Starlight Instruments: Focuser Boss II Motor Install
Electronic Focusing 3-Piece Kit
The Starlight Instrument FeatherTouch knob upgrade we installed last June on our Celestron 6″ OTA was a huge improvement in our ability to precisely dial in the focus of the telescope. The only way we could improve upon it was to find a way to eliminate the vibration caused by having to manually focus the scope. Starlight Instrument has put together the Electronic Control Focuser Boss II Kit which does exactly that!
The remote-controlled focusing kit consists of the following:
- Stepper motor – attaches to the FeatherTouch for focusing
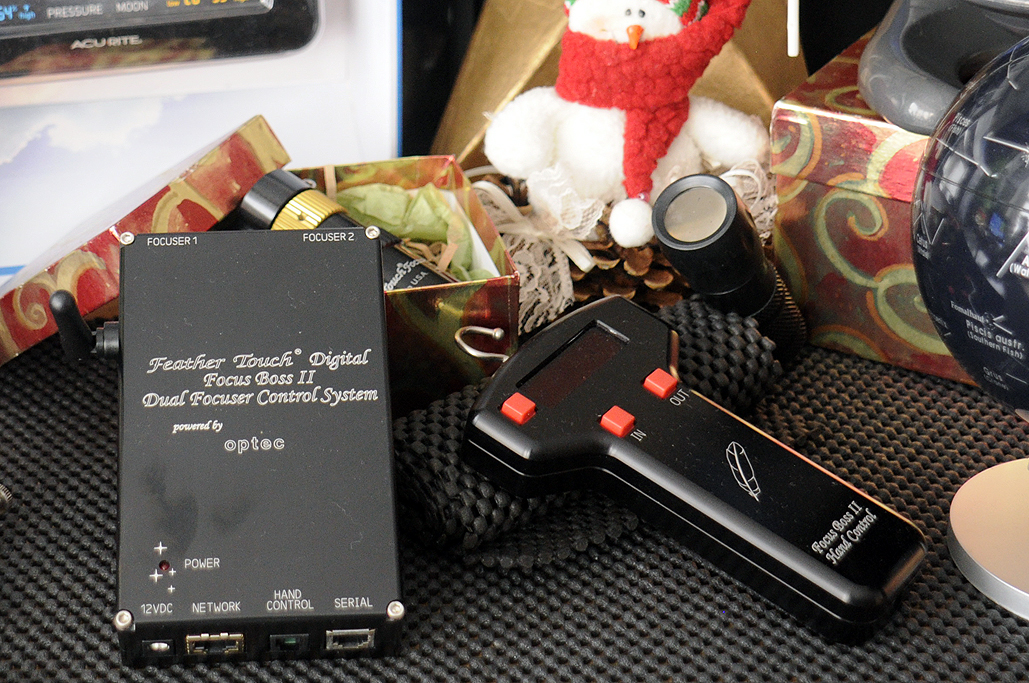
- Focus Boss II Hub – relays commands from the hand controller, computer, etc.
- Hand Controller – sends focusing commands to the stepper motor
The Focuser Boss II digital focuser can be controlled through any ASCOM compliant software, such as Maxim DL, FocusMax, SG Pro, and CCD Soft. The Focus Boss II can be ordered with the WiFi option, which offers remote focus control—from inside the house, say, or with the right internet connection from anywhere in the world. So cool!!!
The first step to installing this upgrade is to add the stepper motor to the FeatherTouch focuser. The “gold/black” knobs are the fine/coarse focus adjusters of the FeatherTouch. The stepper motor will take the place of both the gold and black knobs and clamp onto the stem. A remotely-operated controller will activate the motor, turning the stem, and move the telescope’s mirror.

When completed, the column will extend out by another three inches. Note that this additional length may run into other things you may want to attach to the rear of the scope, so plan accordingly! On our setup, the final length was just short enough to not interfere with anything we are planning to use for taking photos or making observations.

In order to attach the stepper motor, the fine and coarse knobs of the current focuser must be removed. Included with the Focus Boss kit are the hex keys required to loosen the hex nuts and screws. Both knobs came off without any problems.

Before inserting the stepper motor, we had to loosened both the locking screw of the collar and of the knob on the stepper motor. The motor will not slide in deep enough to properly grip the thinner spindle of the focuser assembly on the scope if you don’t do this.

Push the stepper motor in as far as it will go. On ours, a bit of the silver ring was still visible when fully seated. The final step is to tighten both the nut on the black collar and the gold fine focus knob (Blue arrows).

Once the stepper motor was installed, we did a final check to make sure the clearance was sufficient for the Nikon D40. It was just touching, but not so that it will interfere with the operation of the camera or the motor.
Of course, the stepper motor is just one piece of hardware of the kit. There is also the Focus Boss II hub, the Hand Controller, and a few cables so all the pieces can talk to each other….and the computer / iPad / iPhone. We will take a look at all of those pieces this month as we get our Celestron C6 ready for the Spring.


I have the Feathertouch SCT MicroFocuser on my older model C-9.25 SCT. I am using a MallinCam DS10cTEC video camera with USB output for ASCOM control of a focuser through the camera software. I notice from the HSM20 photos that the interface to the focuser is RJ45 or similar. Can the HSM20 be controlled through USB2 and ASCOM?
Thanks for taking the time to do this. It looks great. My setup with the Celestron 1100 Edge HD is not permanent. Transportation with the focuser and motor on the OTA would seem to be problematic. How difficult would it be to at least remove the motor before breaking things down to travel? Or could you suggest some way to protect the focuser/motor combo when travelling with the scope rather than taking the motor off. It does seem to extend a long way from the back of the scope. Thanks.
Once on, it is a pretty sturdy setup…so unless it is more of a space issue, we would suggest not taking it on/off, but rather get a hard case that will accommodate the extra length (with proper foam support).