| Today |
| Carolyn's World |
| Gear & Gadgets |
| Garage |
| Garden |
| Kitchen |
| Unaccompanied Minors |
| Workshops |
| Contact Us |
| Index |

| RainyDayProjects... |
||
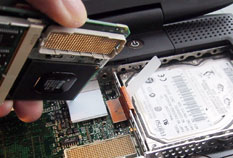
There are 4 screws (Torx #8) holding the drive in the shock mount. We took note of the orientation of the mount, the drive, and how the interface cable threads though the frame.
We removed the interface cable by using a flat-head screw driver and slowly working it free from the drive. You can see the pins exposed under the connector in the photo above.
The Seagate Momentus 7200 RPM 100GB drive was exactly the same size, but a bit thinner than the 12GB Fujitsu unit.
We reattached the interface cable...note that the last four pins on the right were not connected to anything.
The frame for the drive has four rubber shock mounts. Be sure to thread the interface cable through the opening at the bottom and out toward the front before reattaching the drive to the frame. We took care not to overtighten the mounting screws...we just turned them until they were flush with the rubber mounts.
Once the drive has been remounted, the entire assembly can be inserted back into the opening and dropped into place.
With the drive in place, we reattached the interface cable connector to the motherboard. The next piece to go back on was the memory and processor module.
This module was a little tricky to get back into position. Note the large connector (left red arrow). We needed to push down a little harder than we thought to get it to "snap" into place. If the machine does not boot...this is the first thing you should check.
The heat sink was next to be reattached (3 screws). The last piece to be replaced was the heat shield.
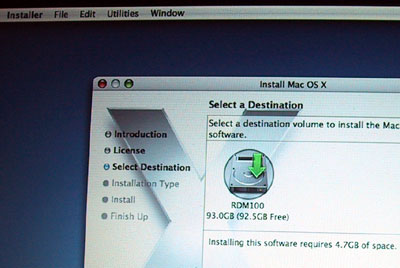
Once everything had been put back in place (keyboard, batteries, external power plug), the moment of truth was upon us: we pushed the "on" button to see if the unit would boot. We heard the boot sound and in a few seconds saw the "No Systems" icon...so far so good! The next step is to install a system! However, when we ran the OSX installer, we did not see a destination volume. We needed to format the drive before we could install a system.
We used Disk Utility to format the drive. Once the drive had been properly erased and partitioned, it showed up on the list.
Now we were ready to install OSX! |
Apple G3 Upgrade Install a New Hard Drive |
|
Why do we here at RainyDay Magazine keep trying to make our old discontinued gear work with the new technologies? Well, we can think of plenty of reasons (too much time on our hands, not enough money, too cheap to upgrade, etc...) However, sometimes we do it just for the fun of it :-) Take the G3. Because upgradability was part of the G3's design, user access to it was engineered in. In this series we'll walk through the steps on how to do some upgrades (memory, hard drive, G4 processor) to an old Apple G3 laptop so it can run OS-X, edit iMovies, and god knows what else :-)
In this article, we'll take a look at the G3 laptop, its removable pieces, and how to get at the upgradable components inside it. Accessing the inside : Drive Upgrade : Seagate Drive Specs: 1. General Info Software Upgrade : 12 GB External Drive: Memory Upgrade: 1. RamJet 512 MB module install G4 Processor Upgrade:
|
||