EXO Labs camera: FirstUse
After the FirstLook posts, comments and questions from RainyDayScience readers were expected, but we were somewhat surprised by the number of inquiries from our general audience. The most-asked question regarding the Exo Labs Focus was about its stand-alone capabilities. Apparently, there is a sizable population interested in using the camera for low-magnification/inspection tasks, enough that we decided to change our FirstLook write-up to address those inquiries.

The Focus camera is made of two parts: CMOS sensor, interchangeable glass lens. The Focus has the following specs:
- 3.1MP CMOS color camera (2048×1536 active array)
- 36dB dynamic range
- Automatic white balance
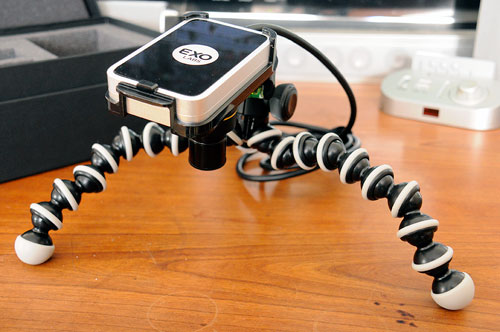
While the Focus Camera kit is designed to work with a microscope, it can also work as a stand-alone device. For stand-alone use, a variable-focus lens and some means to hold the camera (stand, tripod, etc) is required. Exo Labs offers two kits for this purpose, both include a variable lens: the Discovery Kit, the Bench Top Kit. The Discovery Kit has a rigid plexiglas stand with an integrated LED light. The Bench Top Kit has a JOBY GorillaPod flexible tripod. For users who already have a stand or tripod and want just the lens, it is available as a separate purchase.
We got the Bench Top kit: variable lens, camera cradle, JOBY GorillaPod. The flexible legs and the ball-head of the GorillaPod made it simple to set up and position the camera. Note that the best way to set up the camera is to have it positioned between the legs as this allows unobstructed access to the item under the lens. Setting the camera up in that way shifts the balance from the center to the side. The flexible legs of the GorillaPod made balancing the rig quick and easy…something which may not be as easily accomplished with rigid table-top tripods, which are more “comfortable” with the center of mass strictly in the middle of the tripod.

This Exo Labs Bench Top setup is perfect for inspection tasks. The setup is made even better when paired with the free Exo Labs Focus camera app. The app allows the user to take photos/videos, make annotations, do measurements, and share in ways not possible until now. In the photos, we tried to show how things appear on both the iPad screen and as images captured with the Focus camera…very WYSIWYG:
- Watch face: On iPad screen, saved image
- Disk drive: On iPad screen, saved image
- Spider: On iPad screen, saved image
- Microchip: On iPad screen, saved image


The ability to make measurements directly on the image is one of the power of coupling a computer to the microscope. The Exo Labs Focus iPad app takes it one step further by providing an intuitive touch-interface for those tasks.
Users are able to make precise point-to-point measurements on the area of interest with just their fingers. The image here is a screen-grab of the iPad. Here is the same view as captured by the EXO Labs app. Note that they are exactly the same …WYSIWYG. Need a closer view? Just zoom in using the standard iPad gesture. The app will make the necessary calculation adjustments based on the zoom level (note the legend on the lower right).

There is also an optical zoom built into the variable focus lens (zoom: max, min). However, as the changes are optical, some kind of calibration would be necessary for absolute measurements. Included in the kit is a calibration slide expressly for this purpose. BTW, readers may have noticed that the measurements in the photos were not calibrated. We were going to show the calibration process, but Exo Labs have an excellent series of “Getting started” instructional/walk-through videos on how to set things up using the calibration slide.
The basic idea is for the user to tell the app what is meant by a certain distance by making a mark using a calibrated span at a given OPTICAL zoom. Of course, you can just do what we did and get a mat with 1″ squares already marked out. Regardless of the optical zoom level, the 1″ markers on the will always be available to use for calibration. Another quick and dirty way is to just print out a grid of a specific size (1cm x1cm, 1mm x1mm, etc) and use that as the background.

A low magnification setup is useful for many purposes: model makers, coin and stamp collectors, fine repair work, etc. Being able to see things better is one advantage, but being able to easily share what you see is a game-changer. We will go deeper into this particular feature in a future article. Look for it next month.


Leave a comment