|
|
 |
| |
RainyDayRenovations's content can now be licensed for your print magazine or web site. Please contact us directly here. If you want to see something reviewed, then drop us a note with a link and we'll be happy to take a look.
|
| |
|
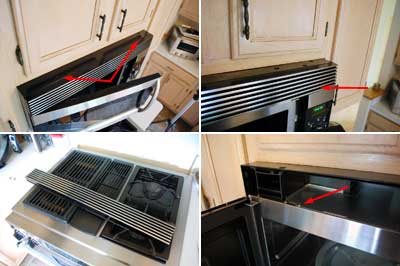
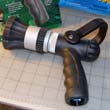
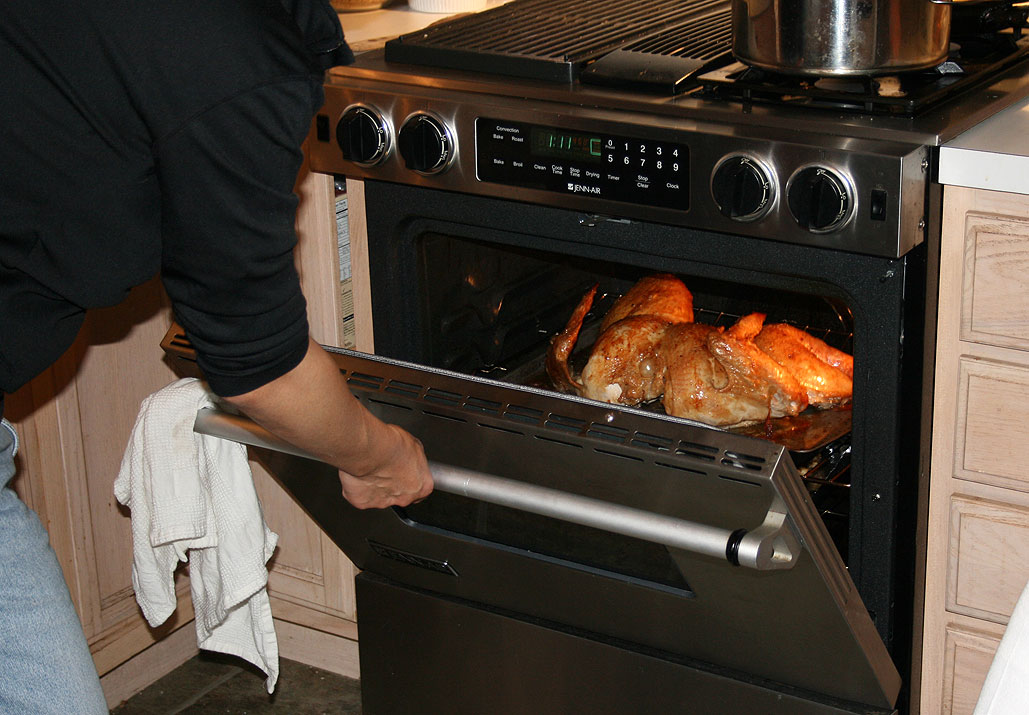
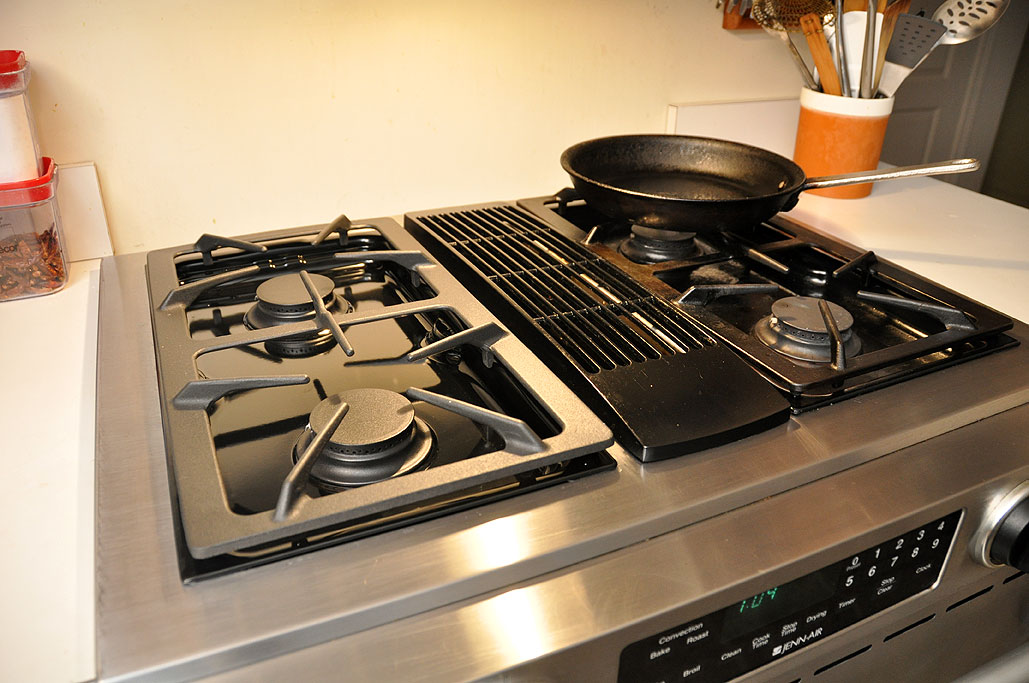
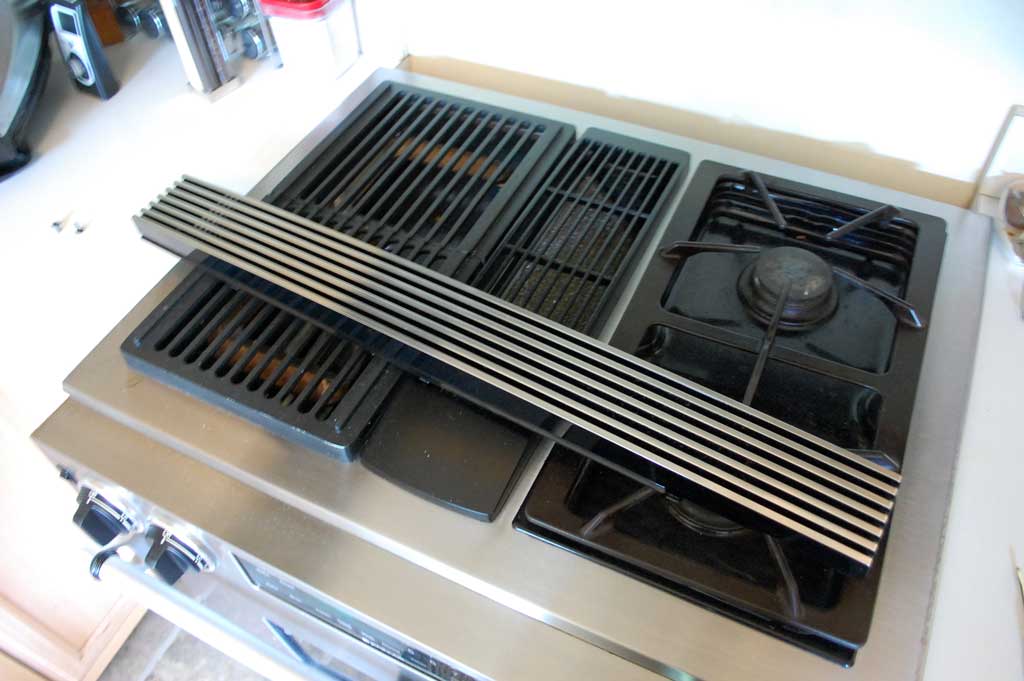
The RainyDayKitchen's new (well, new to us) Jenn Air stove has been getting a constant workout since it was installed over a year ago. However, after using it for more than a year, we realized that we did not use the grill section as much as we thought we would.
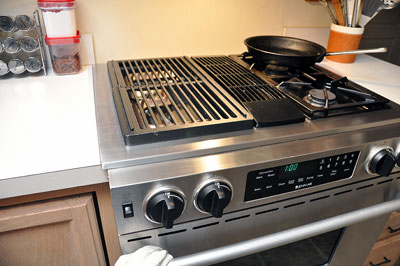
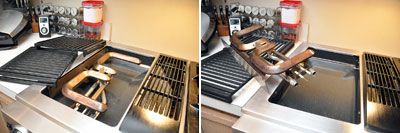
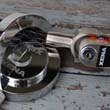
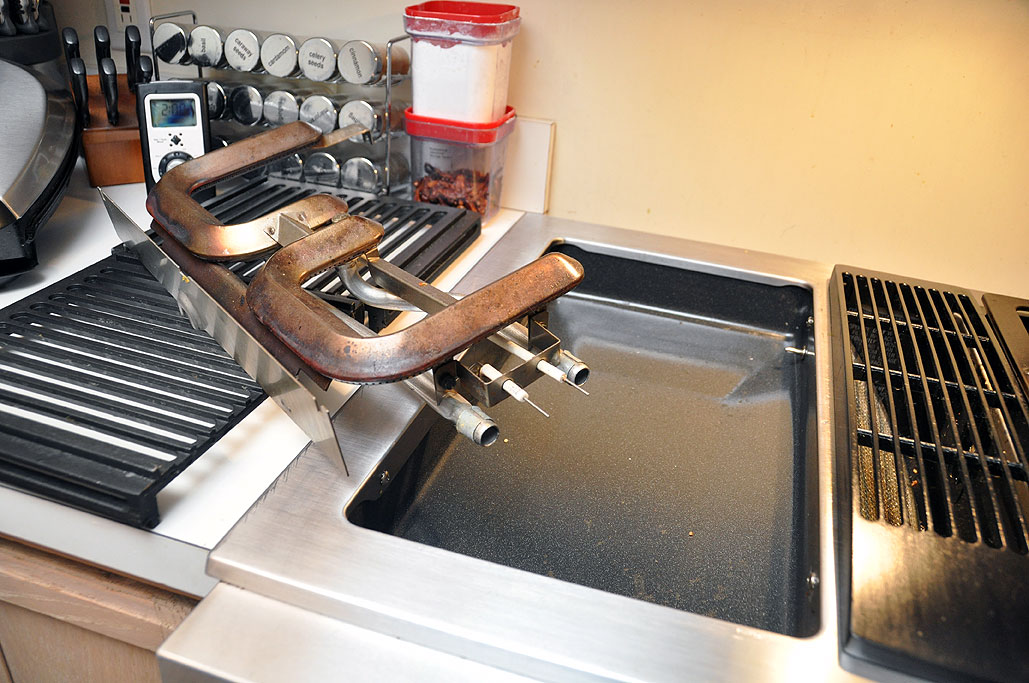
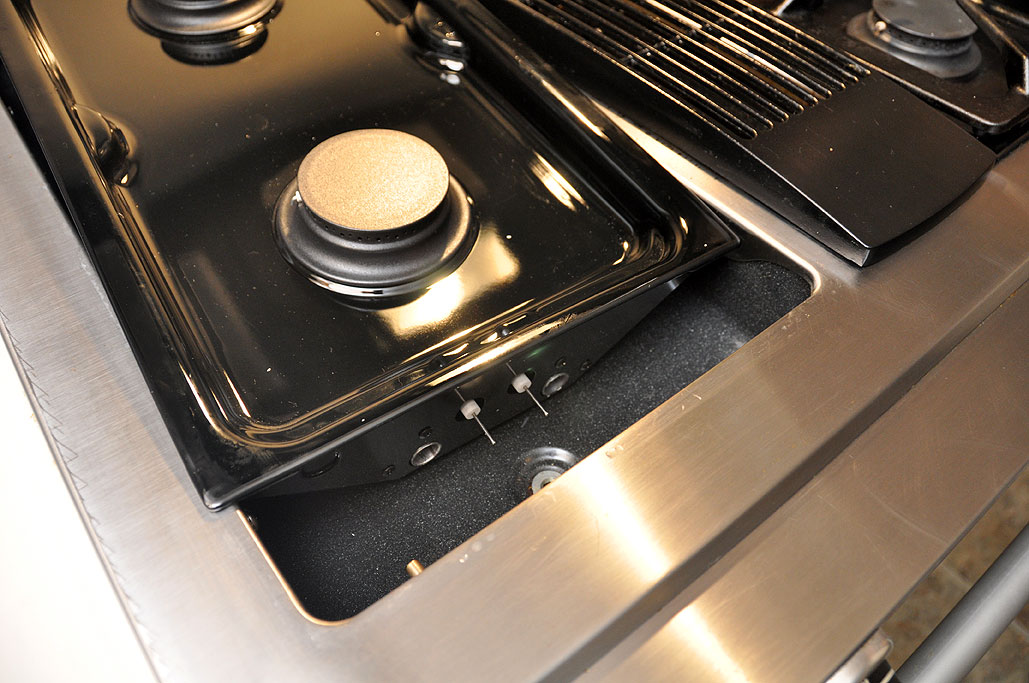
One of the many great things about this Jenn Air range is the easily swapable burner modules. The first step is to remove the grates, the next is to slide out the grill cartridge. No tools are needed to change out one unit and change in another. This design makes it easy to clean the sealed drip burner surface and simple to repair or replace the modules.
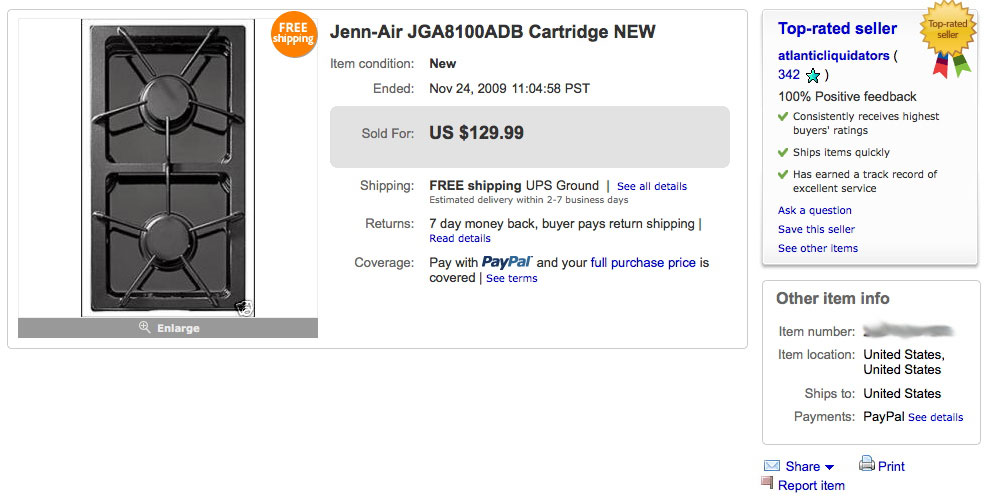
We did some online research for the best prices on a two-burner module. The best price we could find was around $130. This was almost half of the price of many of the other retailers. When an online deal is too good to be true, it sets off our "scam alerts." One way to to a background check is to see if there is a "complaint site" set up about that company. The easiest way to find such a site is to Google it with the phrase " company xyz.com complaints", "xyz.com problems" or some such variant.
We did just that for the online store in question (btw...we are not naming names because we have no direct experience with that seller, so it would not be fair to pass on hearsay) and found that they had a REALLY BAD reputation regarding returns. Normally we would not care as long as the item works. However, it was clear from the posts that this company often immediately charge the credit card, ships out the wrong or defective parts, but refuses to make good via a replacement. Well, no one needs THAT kind of hassles.
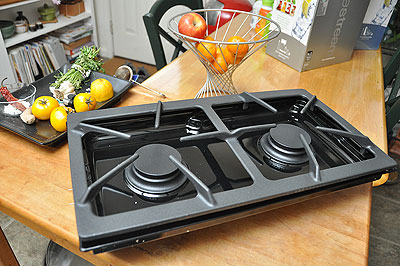
Instead, we went on EBay to see if we could get lucky. There were a few sellers with a two-burner cartridge which would fit our Jenn-Air range. One of them was a Buy-It-Now listing at $129 complete with FREE shipping! This too felt too good to be true. However, THIS seller (AtlanticLiquidators) had a spotless reputation with over 340 sales, so we were pretty confident that they were not some fly-by-night operation. We pulled the trigger on the purchase. Six days later a brand new Jenn-Air cartridge showed up at the office. We have been using EBay for over 10 years and it still amazes us every time we use it.
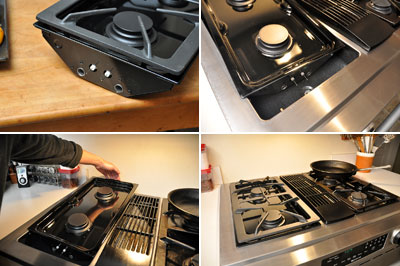
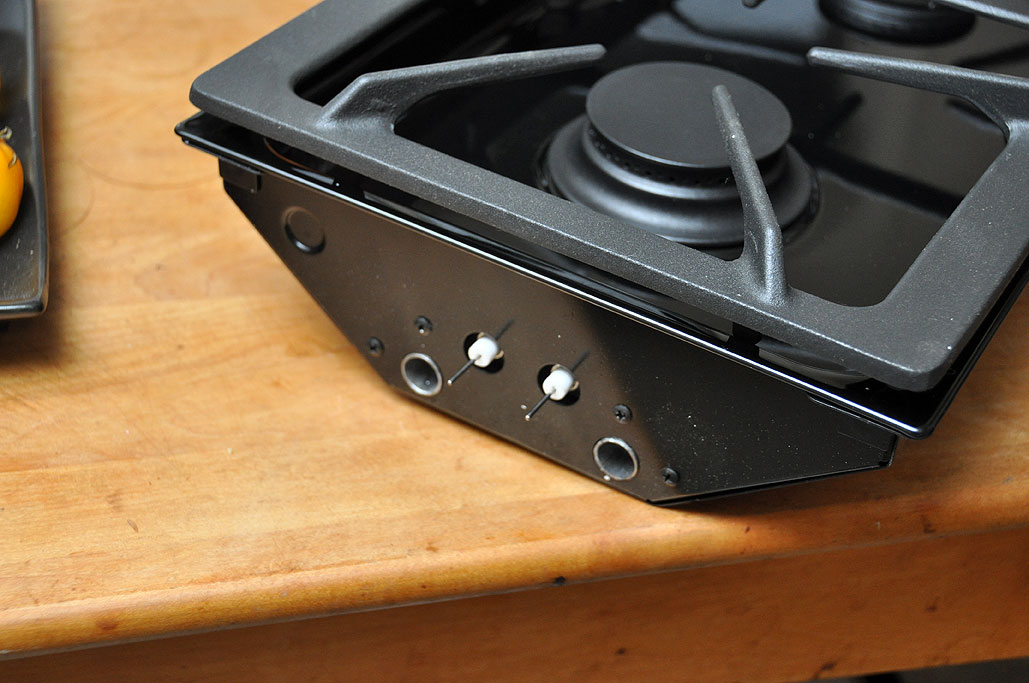
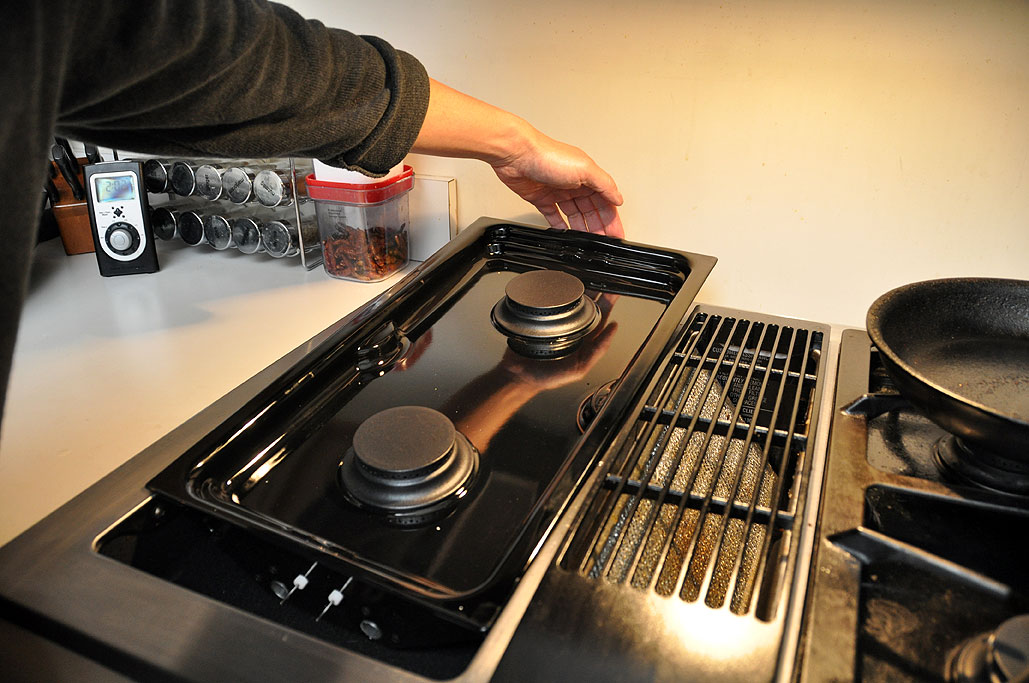
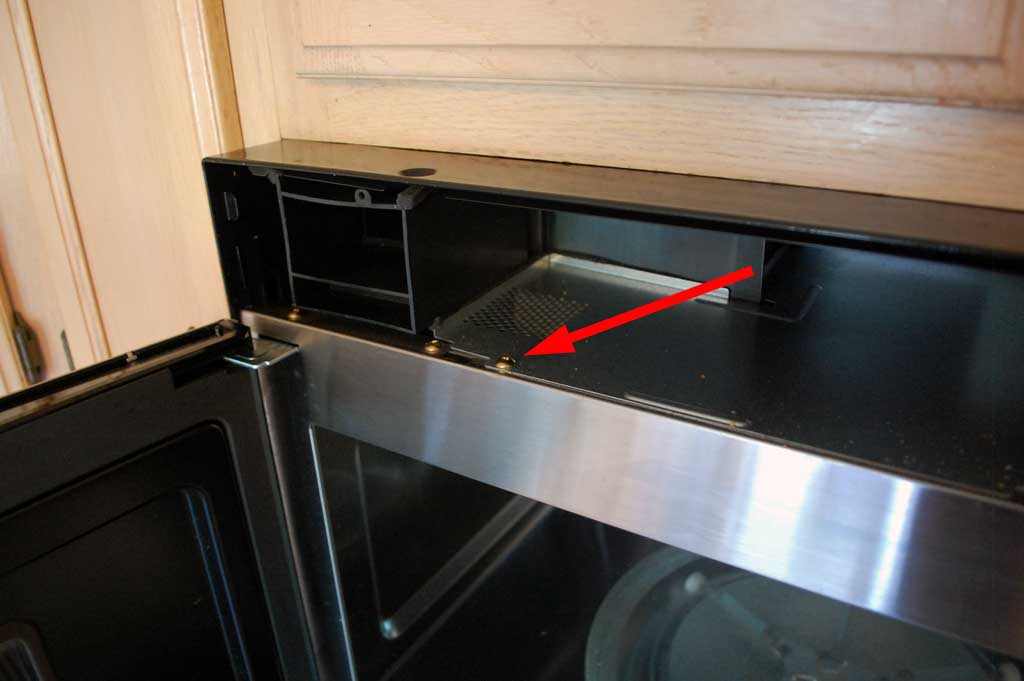
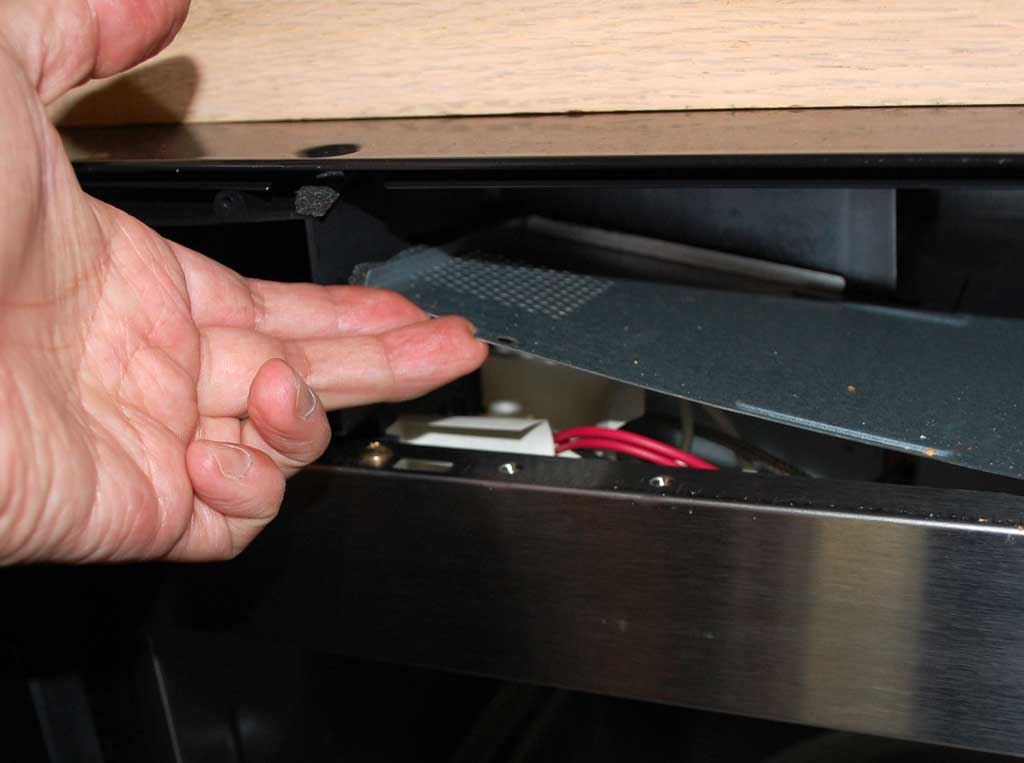
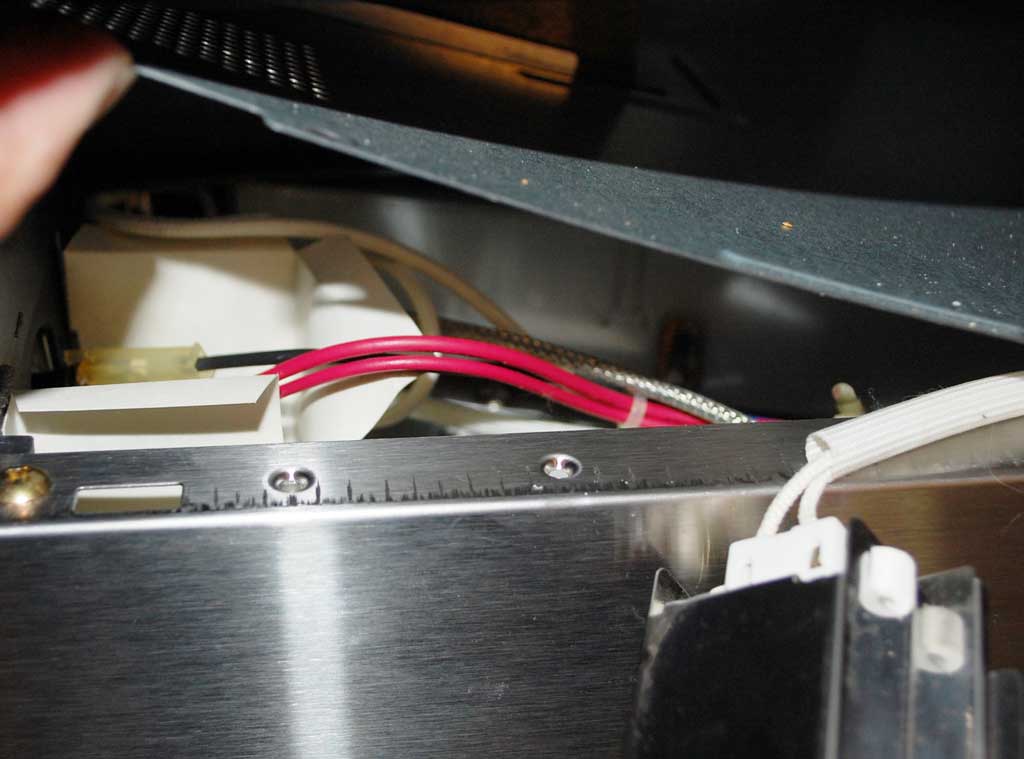
The two-burner cartridge has a set of connections (electric, gas) exactly like the grill module. The replacement steps are: align the connector with the ones on the range, slide the cartridge into place, and place the grate on the burner. Done.

The new burners worked without a hitch. The entire swapping process, from start to finish, took less than five minutes. Check the LED clock on the front of the range if you don't believe us. We now have four burners on the stove, but can switch in a grill unit at a moment's notice. How cool is that? There are other accessories for the stove top (cutting boards, griddles, etc.) that we may take a look at in the future. For now, we are going to enjoy the new "upgraded" 4-burner Jenn-Air range. [Permalink] -Jenn Air Burner Swap
|
|
|
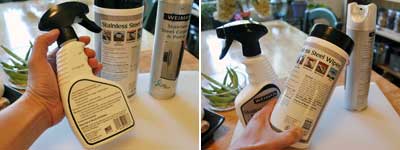
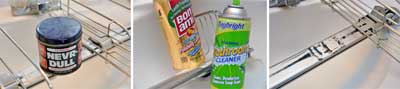
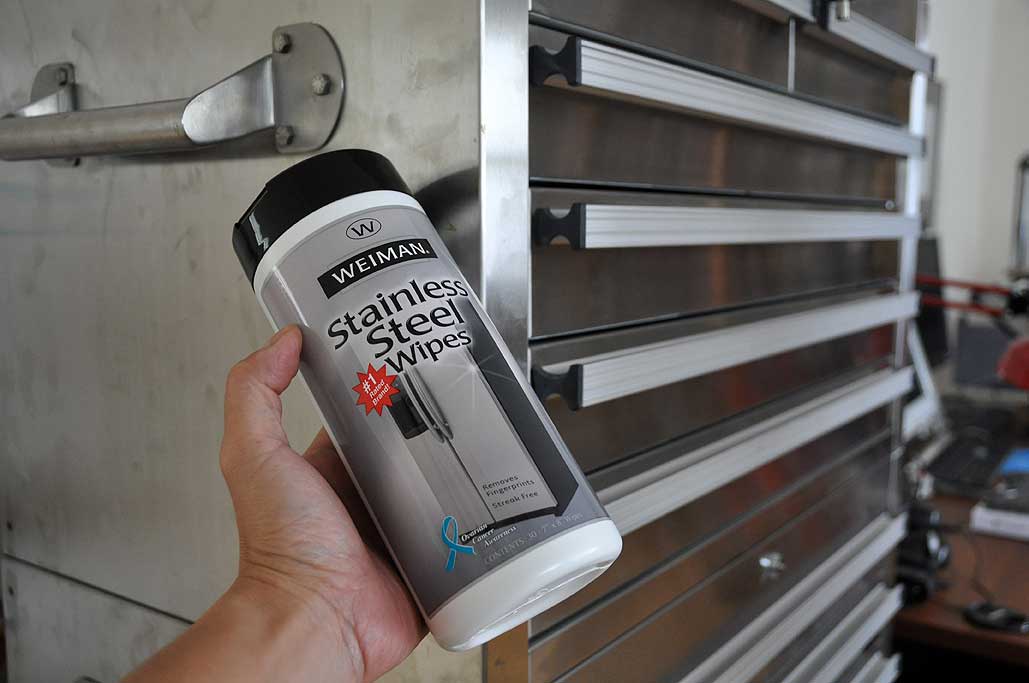
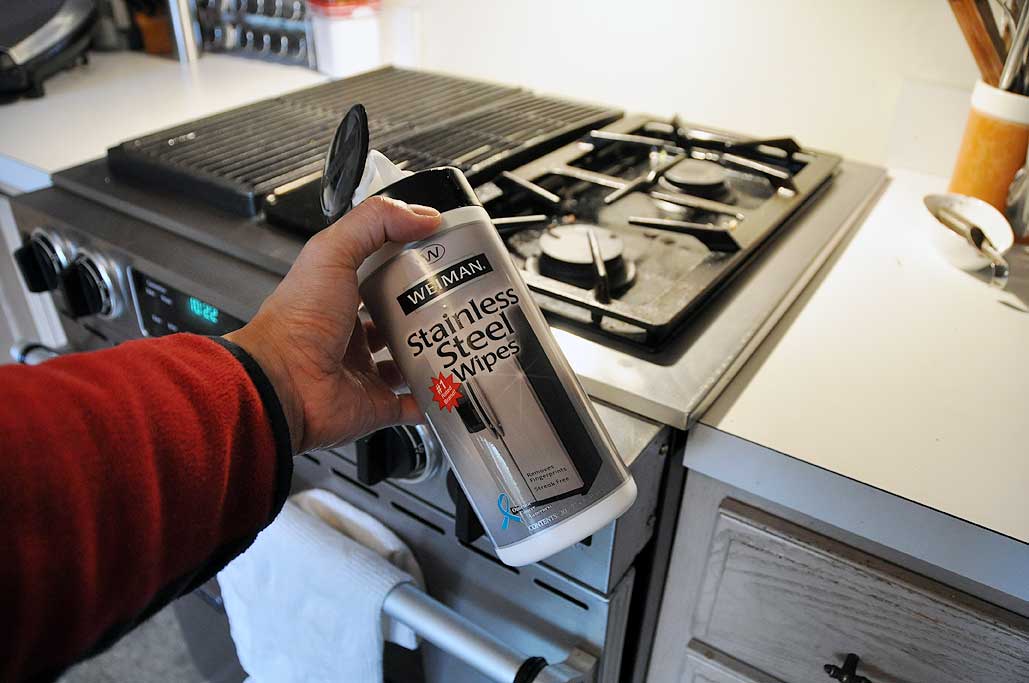
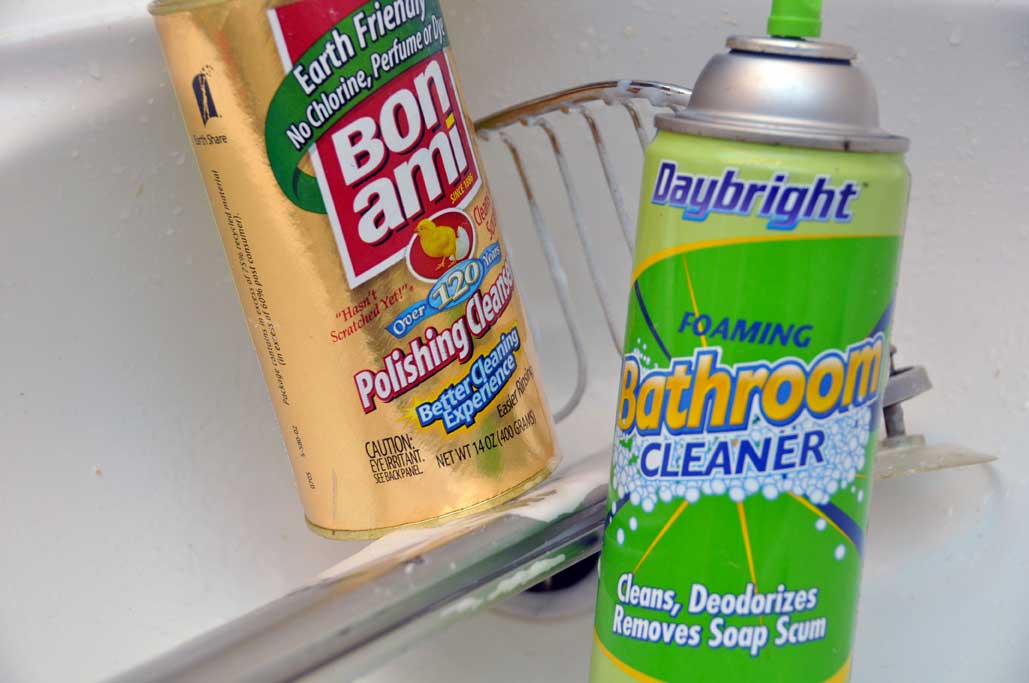
Once in a while, we come across a product that far exceeds our expectations. When we do, we like to show it off :-) The Weiman Stainless Steel Wipes is such a product. It is relatively inexpensive, and it works amazingly well.

While stainless steel surfaces are "stain" resistant, they are actually fingerprint magnets. The oils from the fingers are quite difficult to wipe off and a clean surface will become covered with them quite quickly. No one here can be accused of being a "neat-freak," but we do clean up every once in a while. When we do go on a cleaning bender, we like to get it done with as little work as possible.
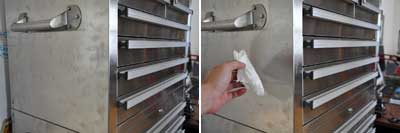
The Weiman wipes definitely made the task of cleaning our stainless steel surfaces a simple wipe-on/wipe-off process...REALLY! The towelettes are pre-moistened with the special cleaning solution. All we had to do was wipe it on in a circular rubbing motion, let it dry, and wipe it off.
The gleam and shine was impressive. The fingerprints completely disappeared. The surface was left clean and smooth. The wipes left a thin layer of protection which is not oily and does not attract dust.
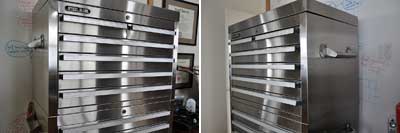

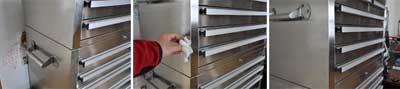
After seeing the results of the Weiman wipes on the tool chest, we went wild and cleaned every stainless steel surface we could find. The results were all equally spectacular: clean, shiny, and gleaming.

Readers know that we like "homebrew" cleaning solutions, but nothing we have tried was as easy or as effective as these Weiman Stainless Steel wipes. If you want to get your stainless steel surfaces shiny and like-new again, give the Weiman wipes a try. We think you will be very impressed. [Permalink] - Weiman Stainless Cleaner FirstUse
|
|
Stainless steel is a fantastic material. Stainless steel is a low-carbon steel containing at least 10% chromium. It is the chromium that gives the steel its unique stain- and corrosion-resisting properties. Stainless steel is 100% recyclable. In fact, over 50% of new stainless steel items come from remelted stainless steel scrap. Most items made with stainless steel have been meant for industrial applications, but many products for home use are now made with this versatile material.
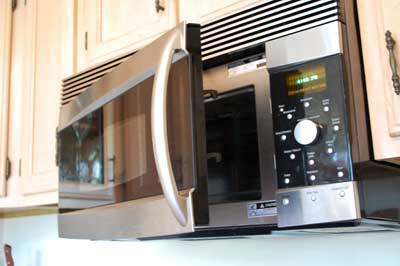
We have slowly been updating the appliances in the RainyDayKitchen. Most of them have a stainless steel finish. They look great and stand up to well to heavy use. The steel may be stain resistant, but they are certainly not fingerprint resistant. Keeping the finish clean is definitely a challenge.

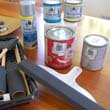
This is where Weiman comes in. They make a line of stainless steel cleaners that take the work out of keeping these surfaces sparkling. The cleaners come in a few different forms: spray, aerosal, and wipes. What they have in common is a formula which will remove fingerprints, smudges, residue and grease from the surface without leaving any streaks.
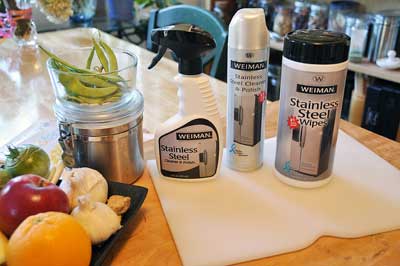
The spray and aerosol are useful for covering large surfaces (oven, stoves, refrigerators, and dishwashers). The wipes are good for smaller appliances (microwaves, toasters and coffeemakers).

To see if the claim is as good as the product, we are planning on testing these Weiman stainless steel cleaners on all of the surfaces in our kitchen. We'll be looking at the cleaners' ability to cut grease, remove water spots, and leave a shine. [Permalink] - Weiman Stainless Steel Cleaner
|
|
|
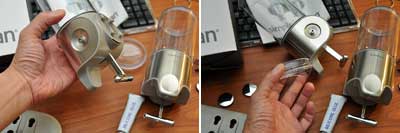
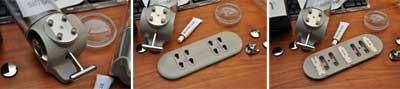
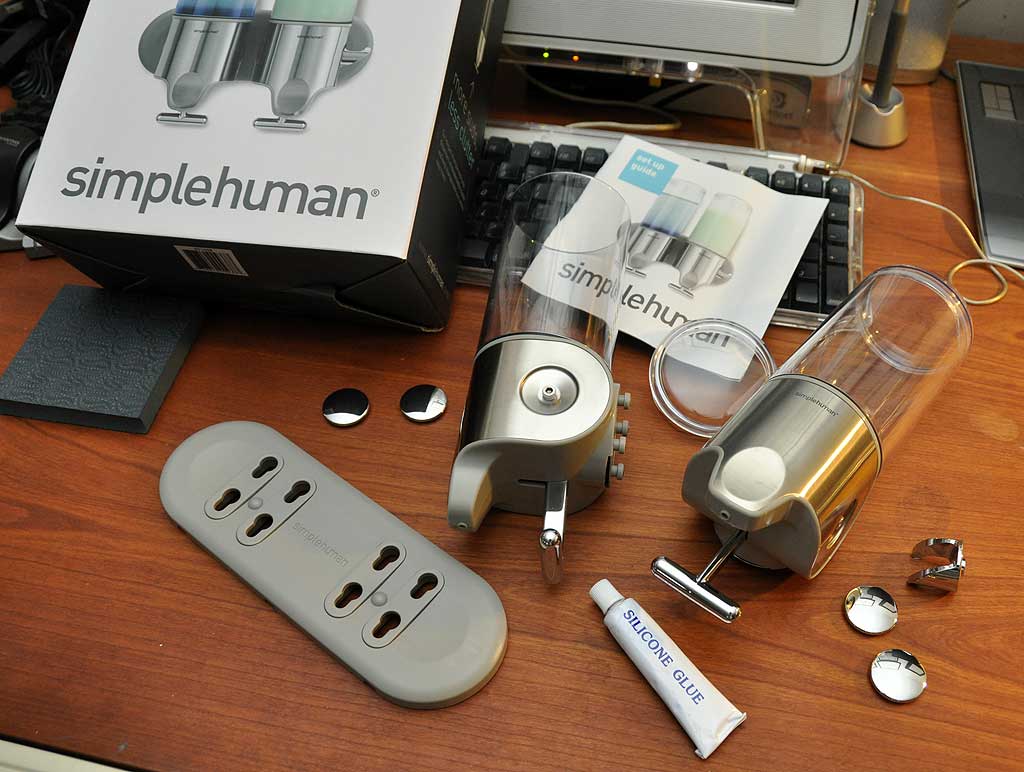
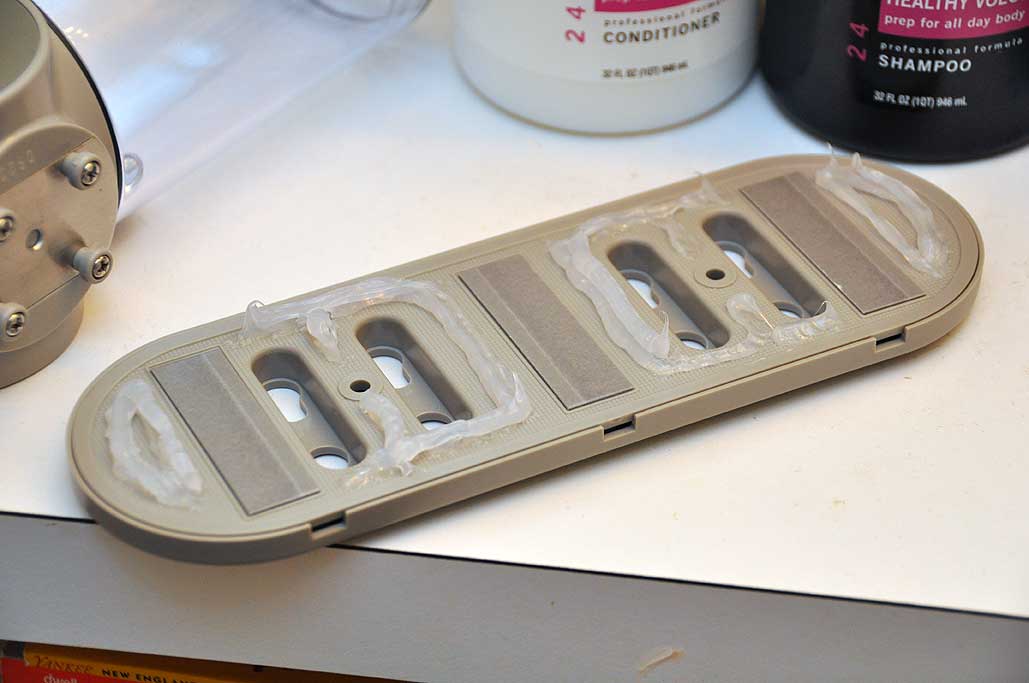
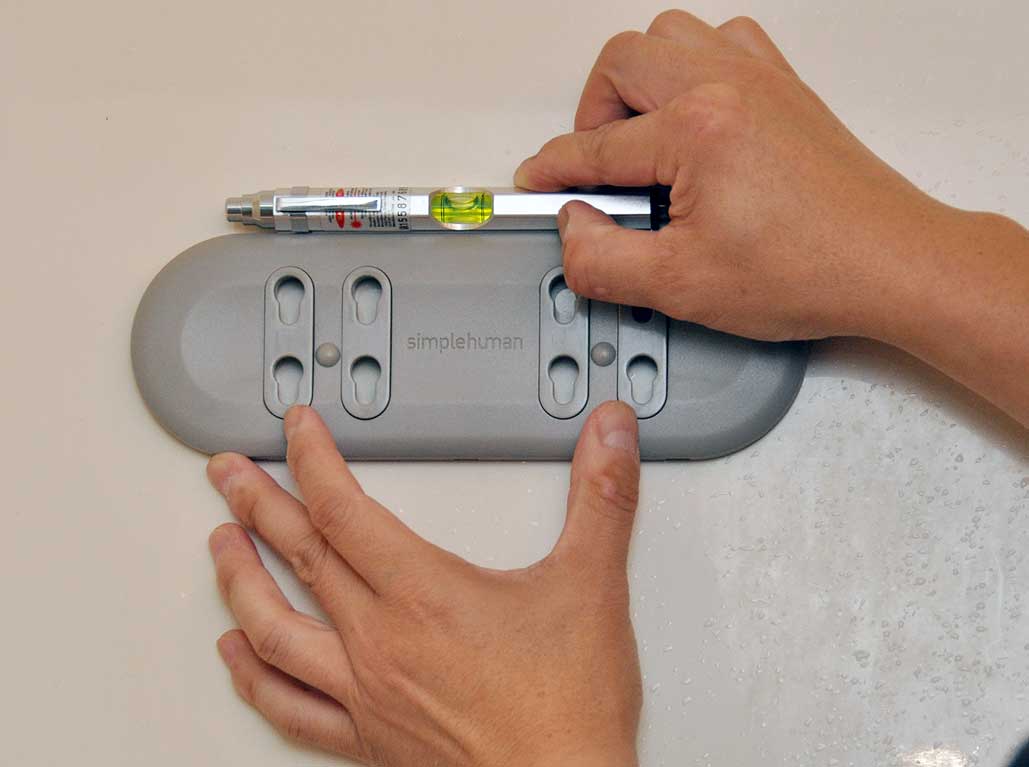
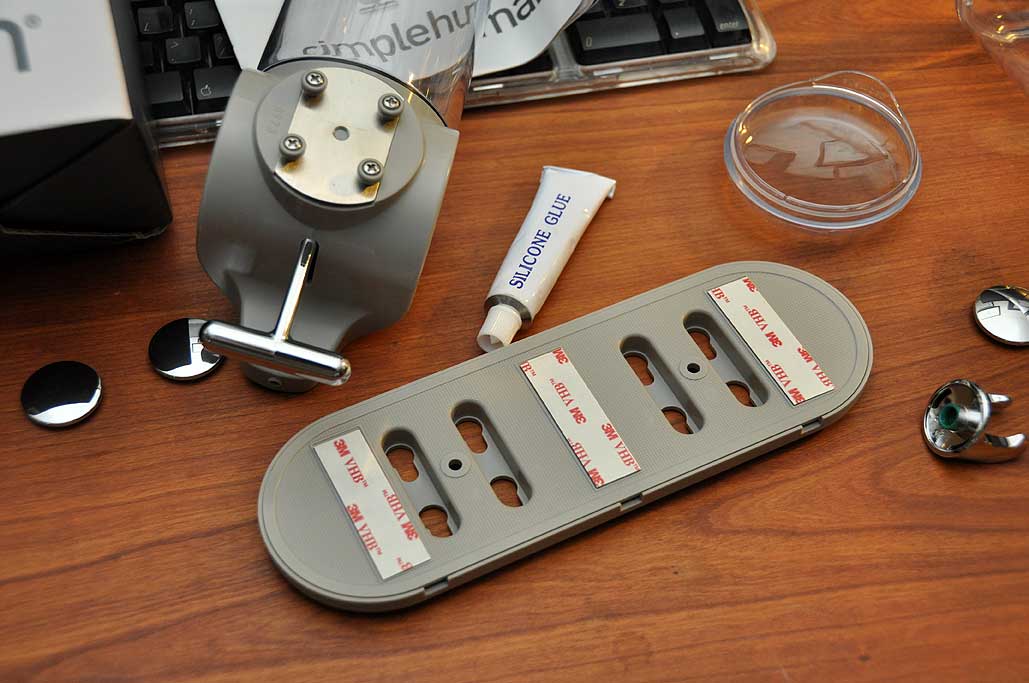
We have been away for the past few weekends, so a few of the smaller projects have been piling up. This included the installation of the SimpleHuman soap dispenser.

The installation steps are very simple: pick a spot, apply the silicone glue to the mount, level on the wall, press and let dry for 24 hours, attach the dispensers.
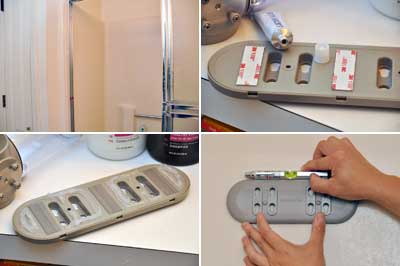
One tip for mounting is to not hold back on the silicone glue. The three strips of adhesive tape will only hold the mount in place until the glue dries. However, do make sure the mount is level before pressing down on the adhesive tape.
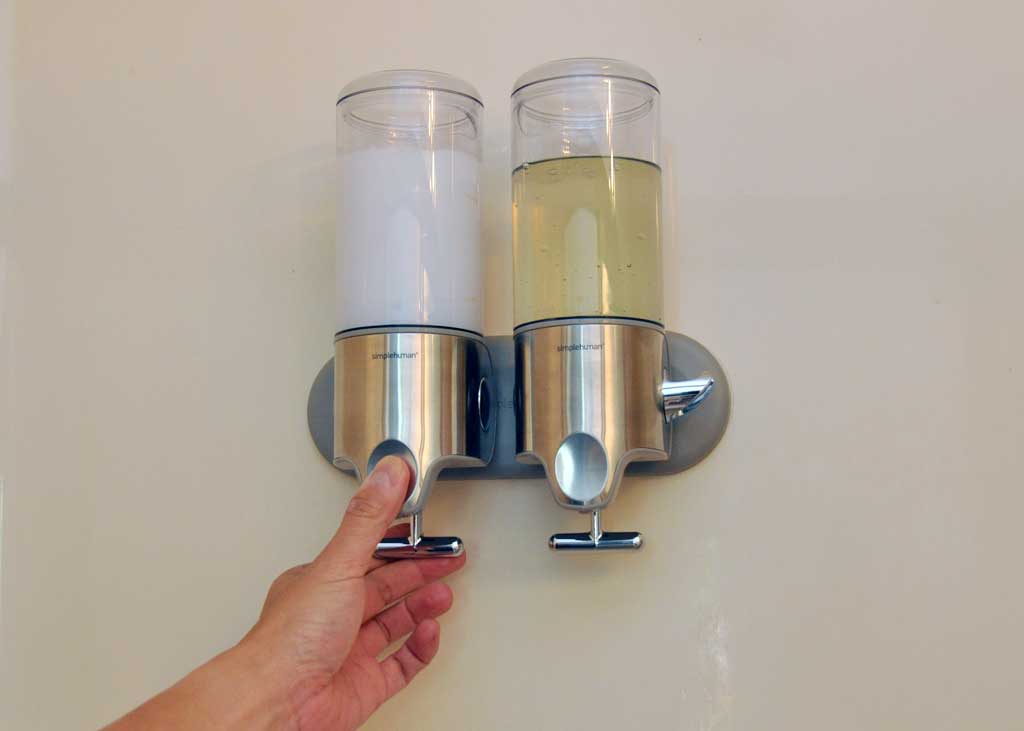
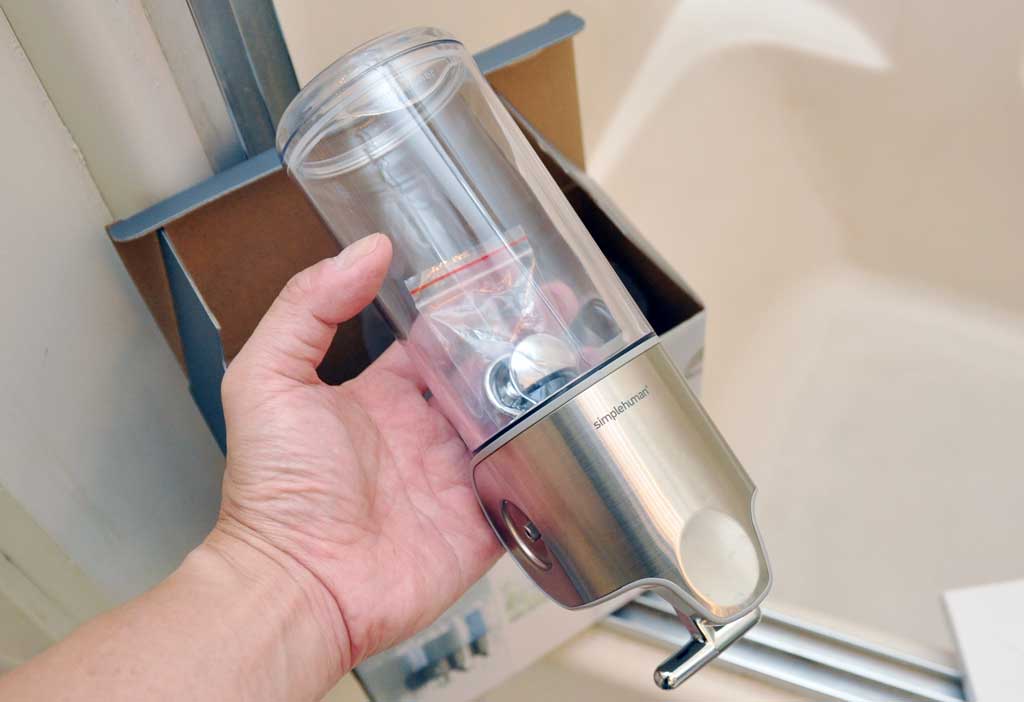
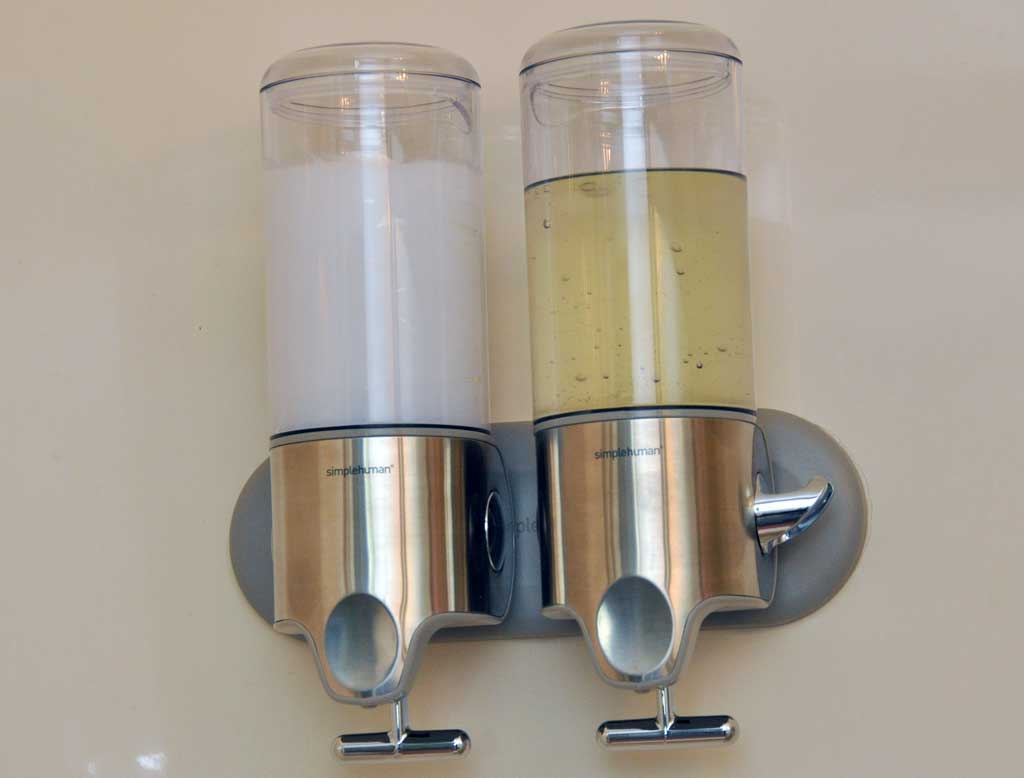
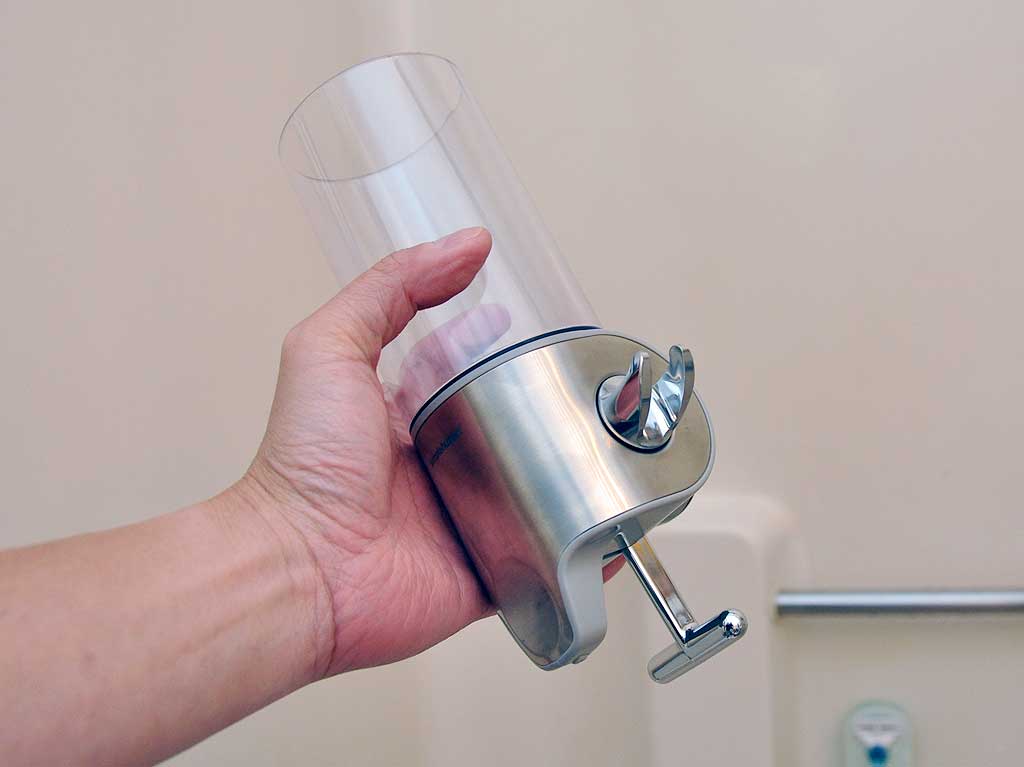
The dispensers just slide into the openings in the mount and lock in place. They are easy to remove for cleaning. There is a choice of end cap or hook for one of the dispensers.

Simple Human designed these dispensers for one-handed operation. This may seem like a small detail, but it is these small touches which make their products such a pleasure to use every time. [Permalink] - Simple Human Soap Dispenser Installation
|
|
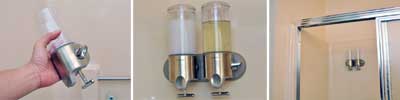
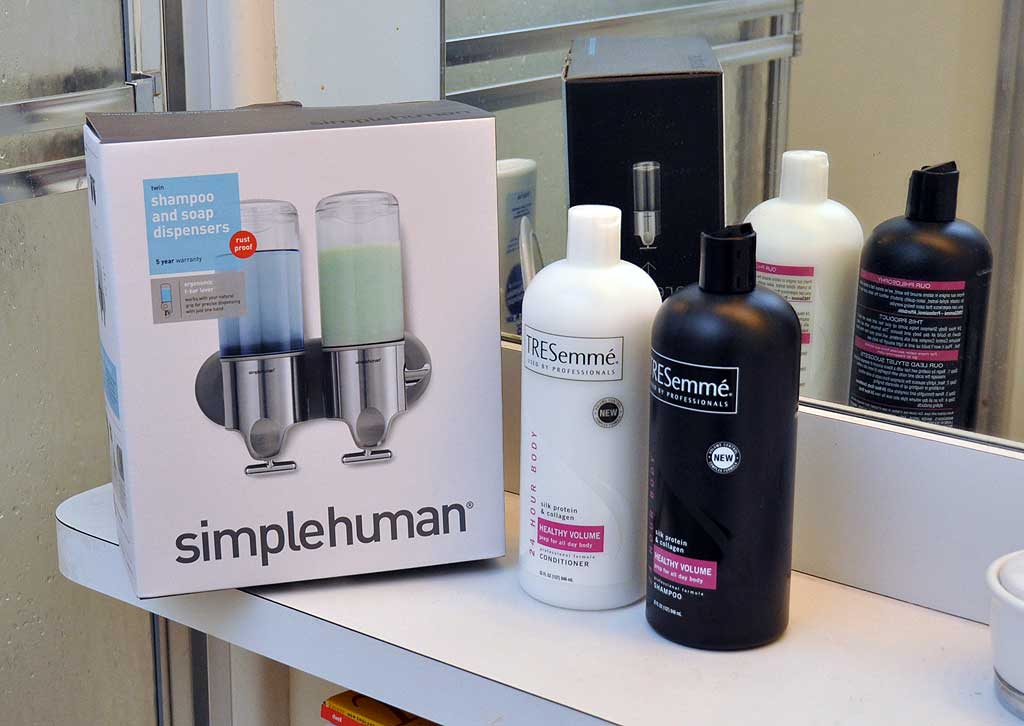
SimpleHuman makes a lot of really well thought out products for the home. We have a few of them around the office (soap dispenser, shower caddy, etc...) and have found them to be well made, functional, and visually appealing. SimpleHuman's latest product is a new line of wall-mounted shampoo and soap dispensers created to bring simplicity and order to the shower.

These shampoo and soap dispensers are designed to hold shampoo, conditioner, body wash or lotion neatly and securely on the wall. The dispensers have a transparent soap chamber and elegant chrome body. A design sure to compliment any décor and make the bathroom feel more like a luxury spa.
Unlike most soap dispensers, which require both hands: one to release the soap and the other to catch it. The simplehuman shampoo and soap dispensers are designed for easy, one-handed use. A wide, twist-off lid makes the dispensers easy to refill and the clear soap chamber shows how much soap or shampoo is left.
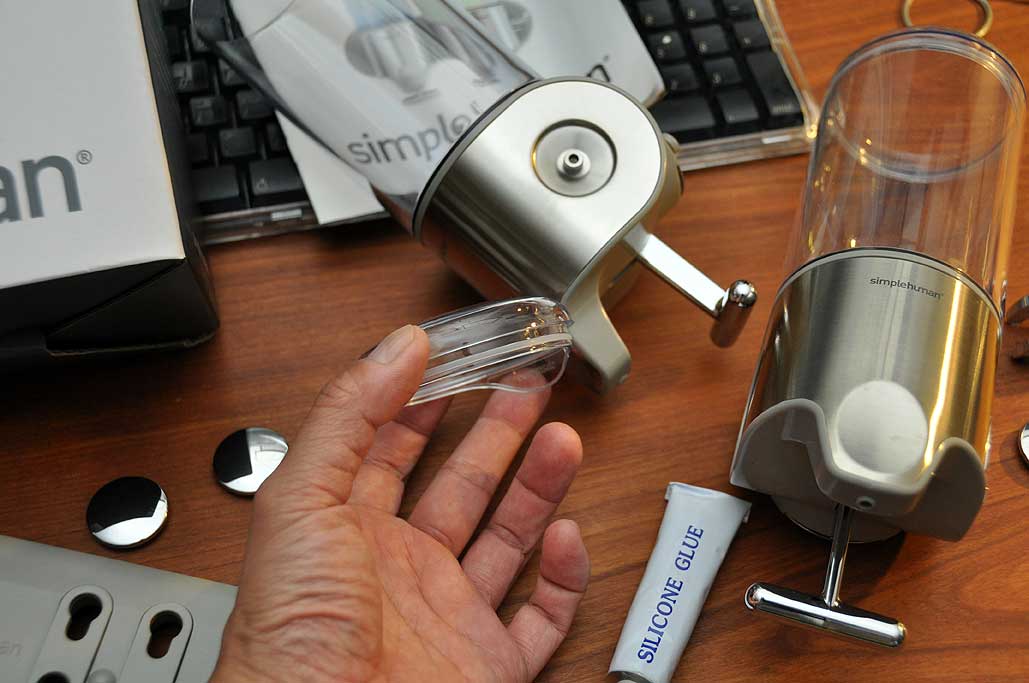
In addition to being easy to use, the dispensers are also easy to install. There’s no need for hardware or tools—they come with specially formulated waterproof silicone glue and double-sided adhesive tape. The tape holds the dispenser in place while the silicon glue is applied. The glue creates a watertight barrier and attaches the unit securely to the wall.
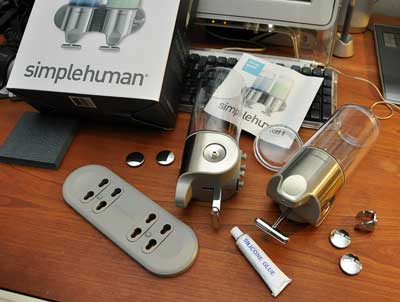
Made from rustproof high-grade stainless steel and durable ABS plastic, the shampoo and soap dispensers won’t rust or discolour over time, and come with a 5 year warranty. We will be installing this soon and should have the installation write-up in a week or two after. The interns will have no more excuses for not following the one shower a week policy...whether they need it or not! [Permalink] - SimpleHuman Soap/Shampoo Dispenser FirstLook
|
|
|
The interns decided to stay late, then worked through the night, and got the office completely back to full operational status by morning. We were treated to a completely refactored workspace with more room, a better layout, and a lot less clutter.
They also took the opportunity to put a few pieces of equipment they found during the clean-up into action. Apparently they found an unused Mirra drive which was reviewed a few years ago, but had never actually been added to our technology setup. This is now part of the automated office backup scheme.
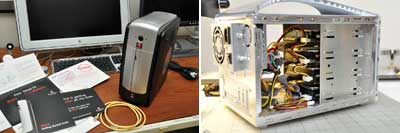
The interns also moved a few drives around, filled up the portable terabyte array, and made a couple of other "tweaks" around the office which they claim we'll "see" eventually.

We have to say that the interns did a fantastic job rearranging the office. Somehow the intern's desk is now facing the window and all of editors desks ended up facing the walls. As the interns did all of the work, none of us could really argue. However, the next time we do this...who are we kidding, we are not going to do this again :-) [Permalink] - Office Reorg Day3
|
|
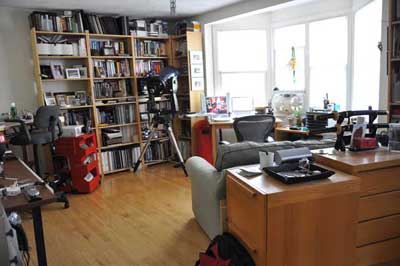
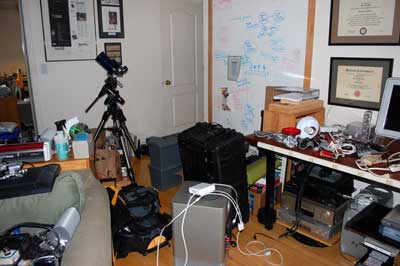
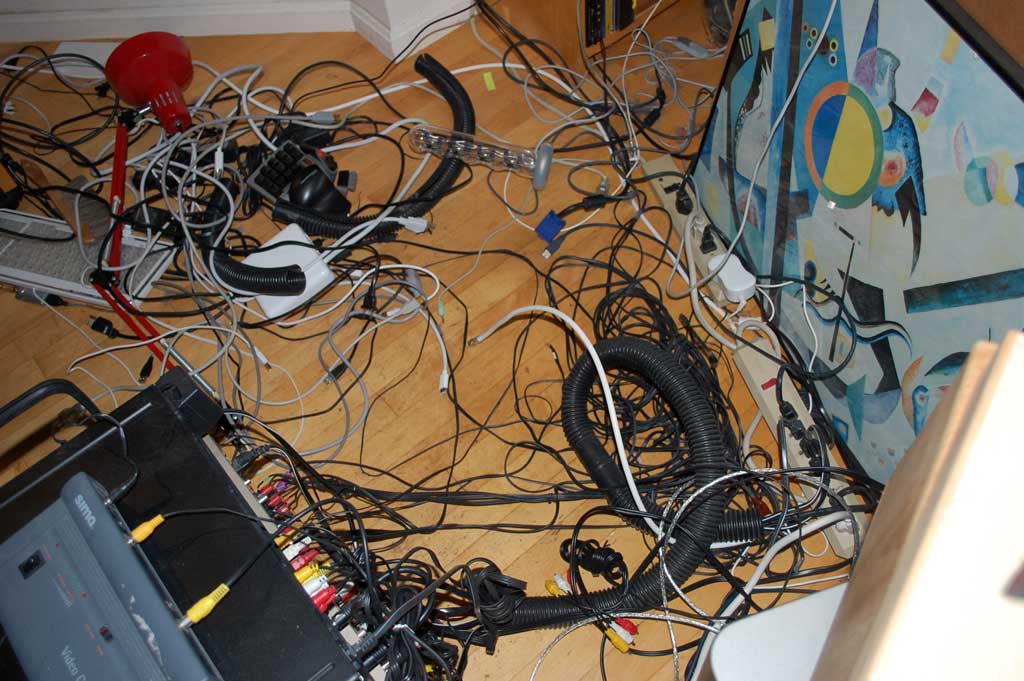
This was Day2 of the RainyDayMagazine Office Reorg. Some pockets of calm have started to emerge from the chaos. However, a well-cropped photo can be deceiving. Moving a bit further back, one gets a fuller picture of the amount of work still awaiting the interns.

Most of the computers, AV gear, and so forth have not been reconnected yet. We do have access on some of the equipment, so we are not totally dark, but our ability to function is still very much compromised. The editors decided it was time for a break and went out for beers, leaving the interns to get on with the business of getting everything squared away.

Tomorrow is trash day, so a lot of unnecessary stuff found its way out to the "recycling" bin. By late afteroon, much of the clutter had been dealt with in some fashion (Craigslist, EBay, trash). By the time upper management returned from their much needed "break", most of the items on the floor had been put away (somewhere). There was also much more space on the "review bench" for incoming items.
While there are still some items on the floor and out in the hallway, the office has returned to some semblance of order. The interns have at least one more day of work left before the office will be fully operational again. The upside is that when we are back, we'll be a lot better laid out and hopefully much more productive! [Permalink] - Office Reorg Day2
|
|
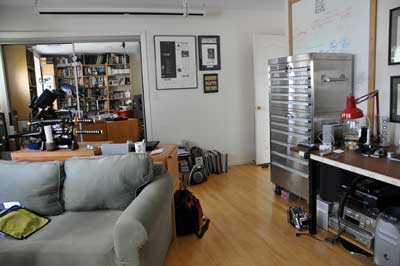
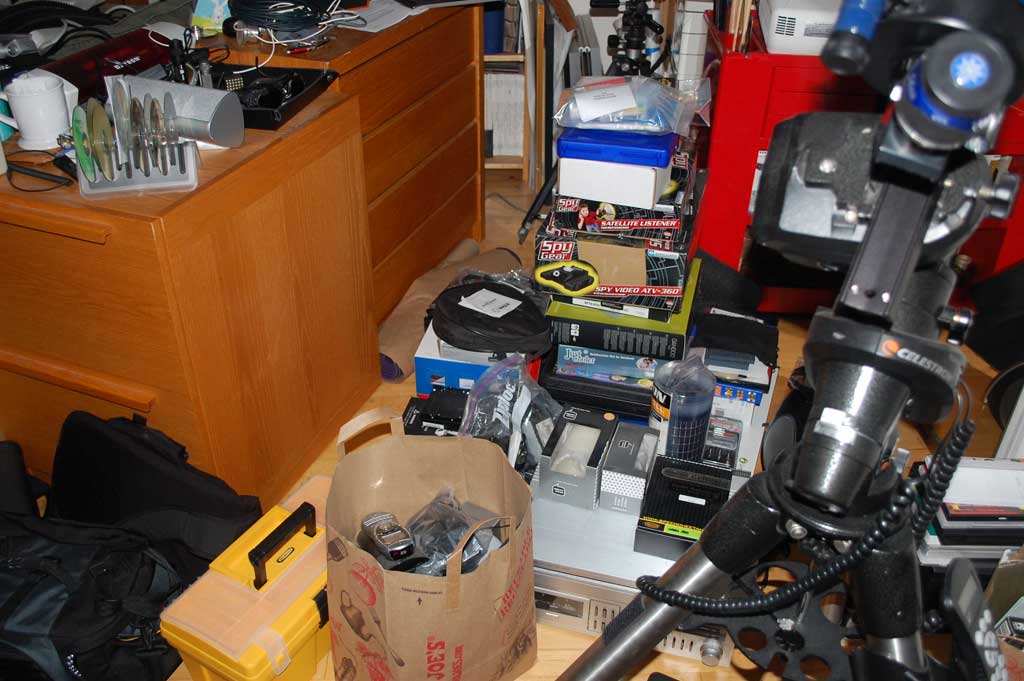
The main office, where everybody congregates (and works), had gotten a bit out of hand. One day, the interns couldn't take it anymore and decided to do a major reorg of all of the computers, AV equipment, and funiture layout while the editors were away on business. They documented the whole effort just to prove that it was as big a job as they had claimed it was.
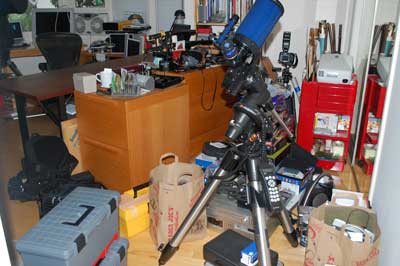
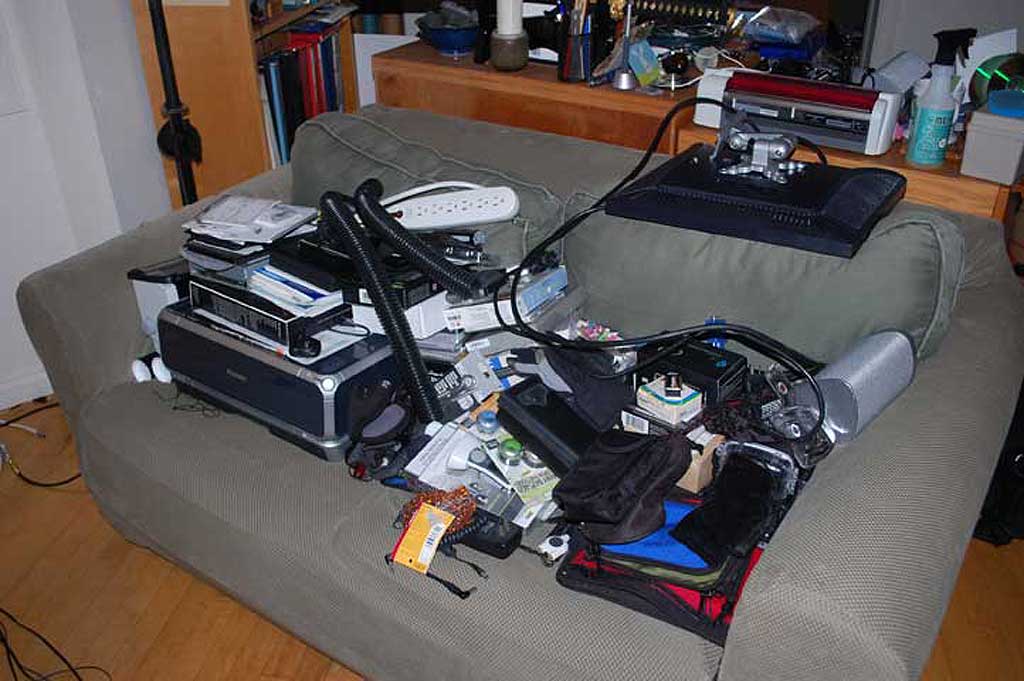
There are always about three weeks of items in the "review pipeline." A lot of them were spread out on various surfaces for testing, photo shoots, and other reasons. In order to move the furniture, all the items had to be moved. The problem was that once the stuff was moved off the desks and onto the floor, there was no room to maneuver. Recognizing the flaw in their strategy, the interns started moving things onto the couch and out into the hallway.
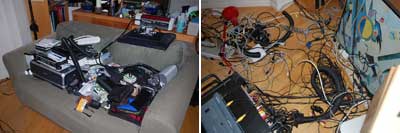
Up until this point, nothing had been disconnected and everything could have been moved back into place. However, seeing that they had the space to move, they started to disconnect the wires. Once that started, they were committed to finishing the reorg :-)
The job was a bit larger than they had anticipated. By the end of the day, the interns did manage to move the furniture around and did manage to settle on an agreeable configuration. However, it appears it will be a few more days before the office will be back to full operational status. [Permalink] - Office Reorg Day1
|
|
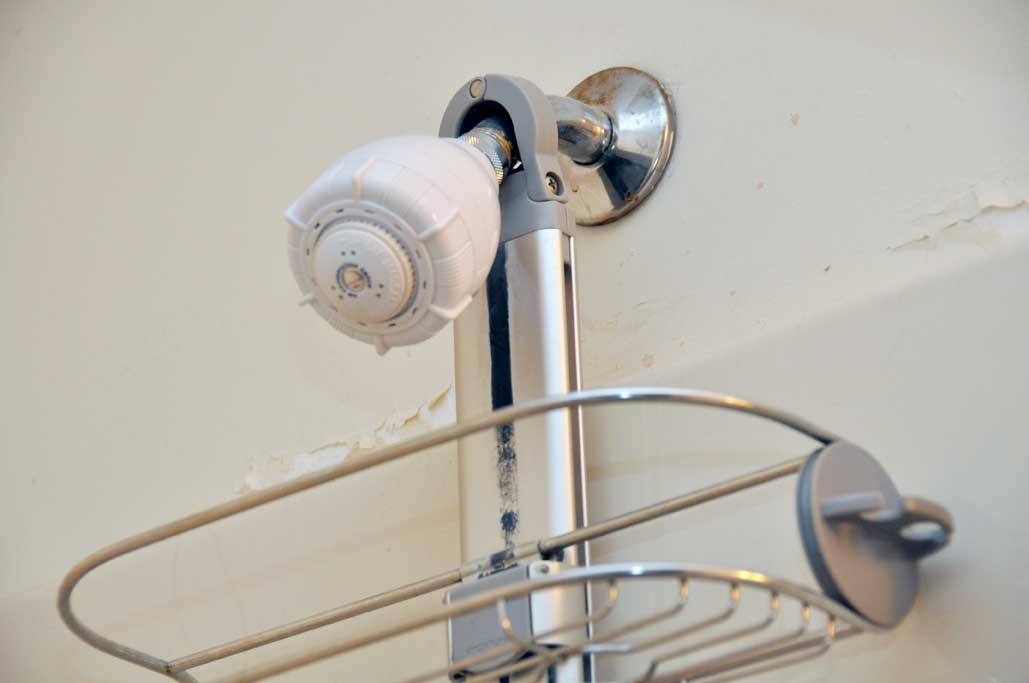
As most readers are aware, we don't just take a quick look at the features for most of the items reviewed on RainyDayMagazine and call it a day. We like to see how they actually perform in the real world over time. This is what makes us different from other "review" sites. Based on the emails we get, you all seem to agree :-) Since we are getting ready to add another SimpleHuman product to the shower in the company bathroom, we thought it would be a good opportunity to take a look at how the last item was faring.
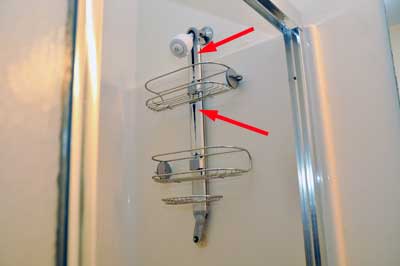
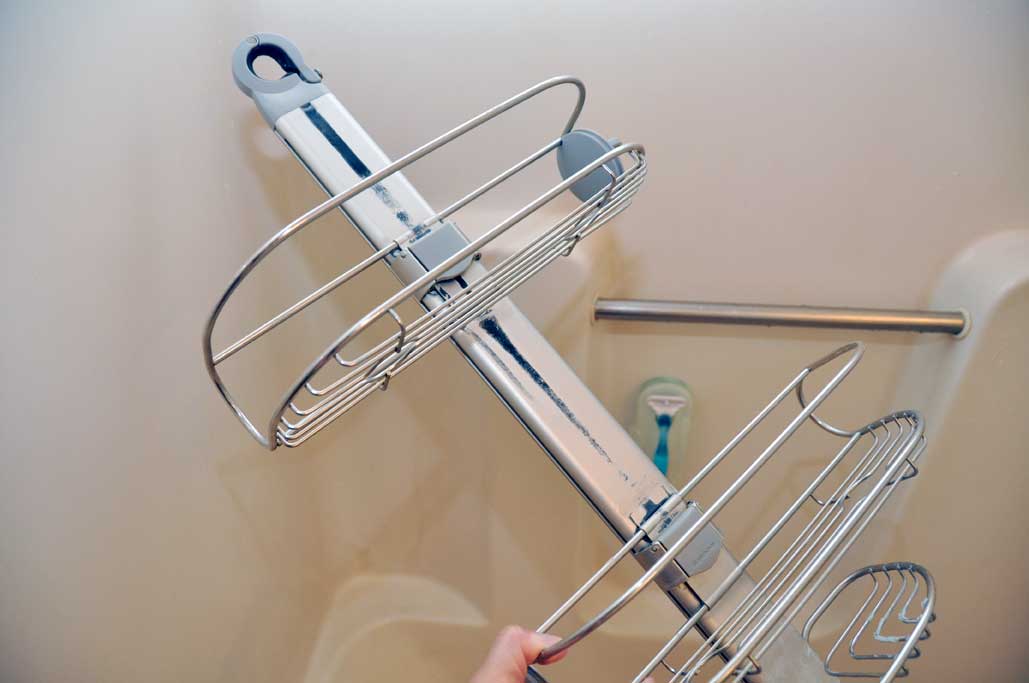
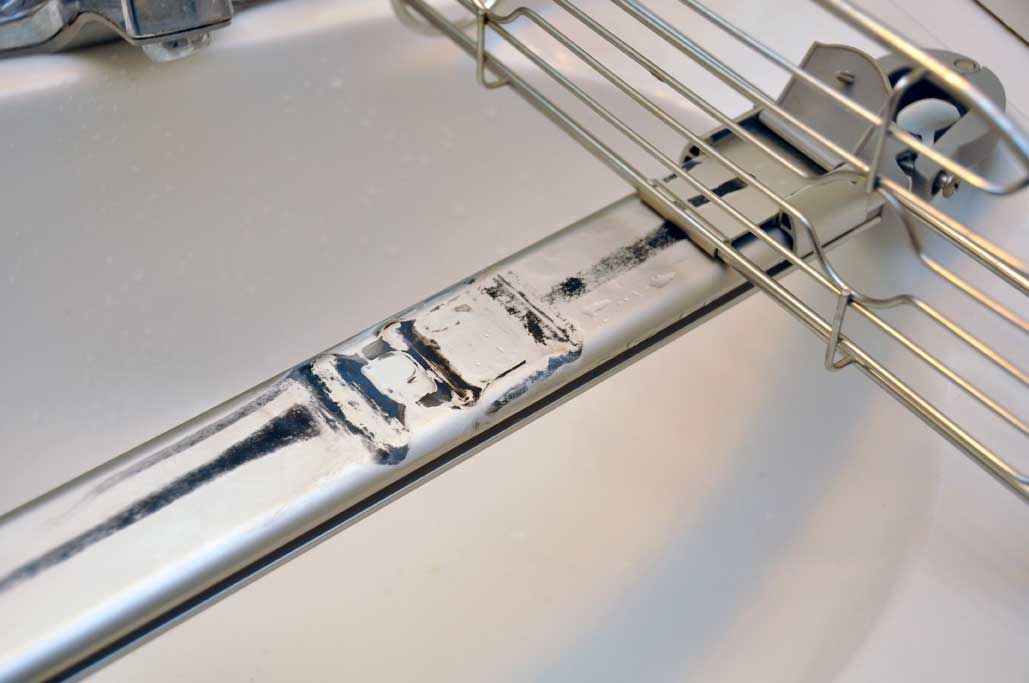
It has been almost two years since we installed the SimpleHuman shower caddy and it has held up amazingly well. Its design is very stable even when heavily loaded. We love the horizontally and vertically adjustable racks. They can be adjusted to accommodate many bottle sizes. After almost two years of daily use, there is no rust on any of chrome parts. The only stain is this odd black streak running down from the shower head. We have been wanting to clean off this gunk for the past 6 months, but like many things we never got around to it...until now.
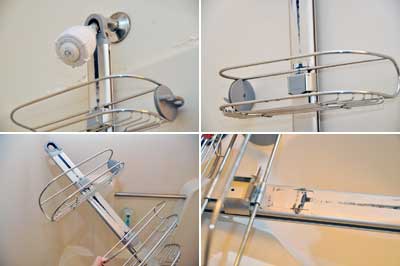
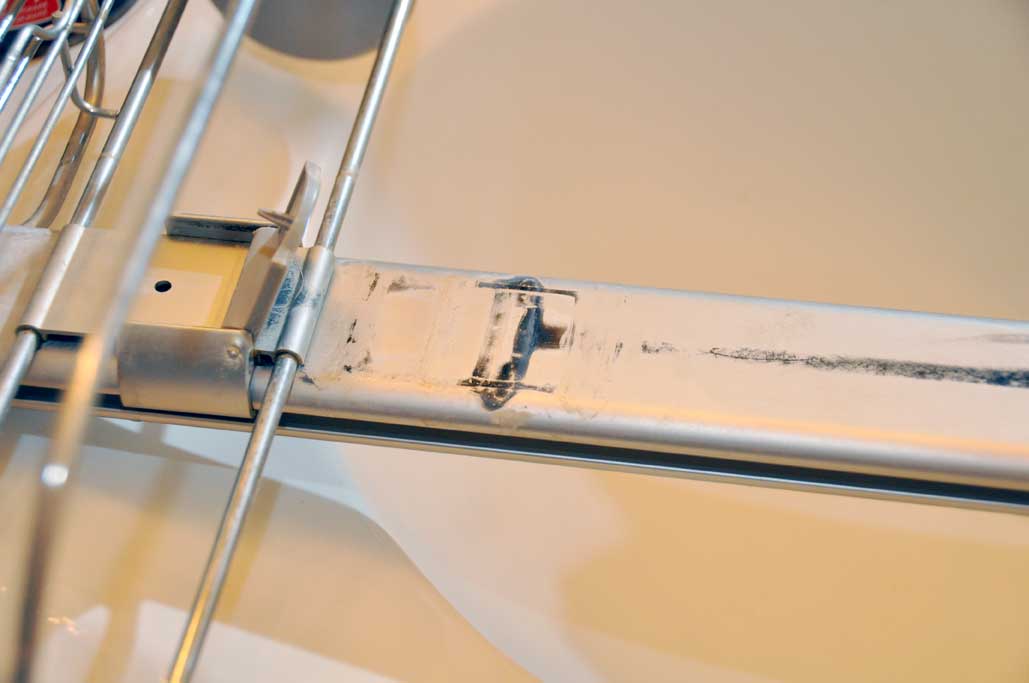
Since it ran from the shower head down, we thought it had to be because of the black rubber ring around the clamp. The stain does not come off when scraped with the fingernail. Whatever it was, it flowed down from the top, around the clamps and was diluted by the time it got to the mid-section. It must have been a bit thick as it left a clean stripe at the start as it moved downward.
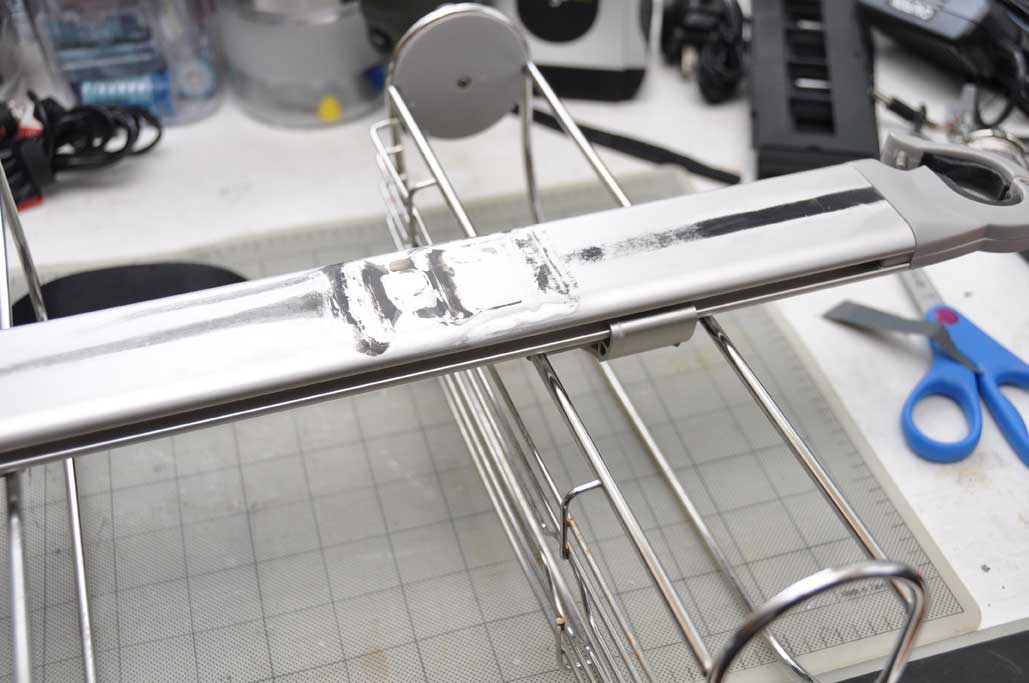
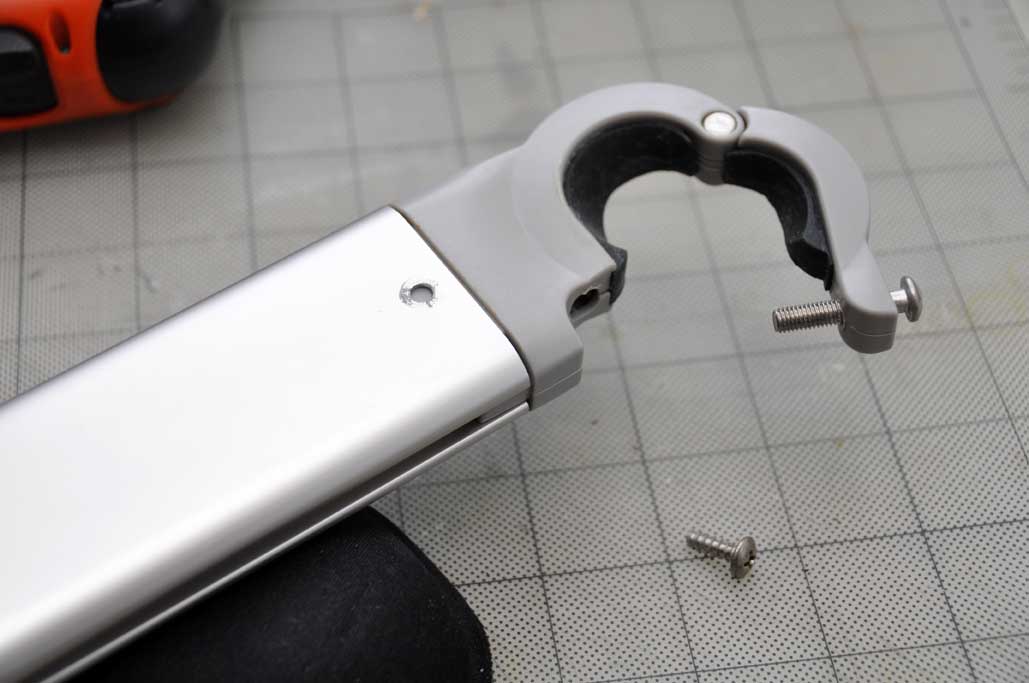
It also did not respond to any of the cleansers we had in house. In fact, the only way we could get it off was to sand it. So, it seems that this stain was the result of a chemical reaction between something and the aluminum spine. We had two options at this point, sand it off or flip the channel. We chose the quicker solution.

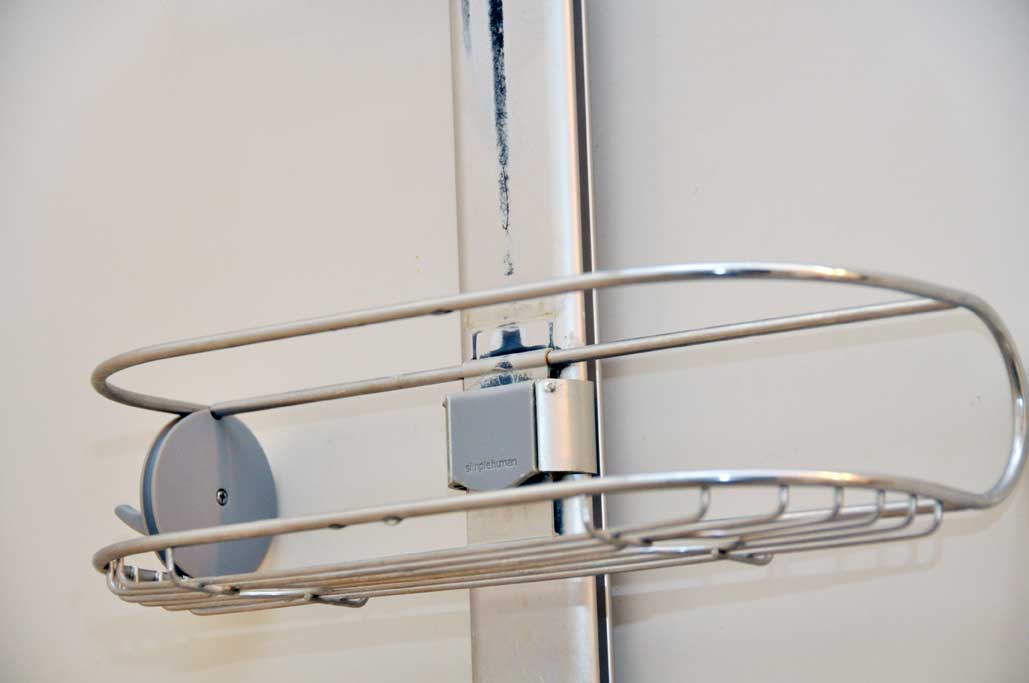
The only downside to flipping the channel was that the two screw holes are now visible in the front of the caddy. This is something we are willing to tolerate as the sanding option would have meant that we would be removing the anodized surface and exposing the raw aluminum...which may not be the best thing for the metal.
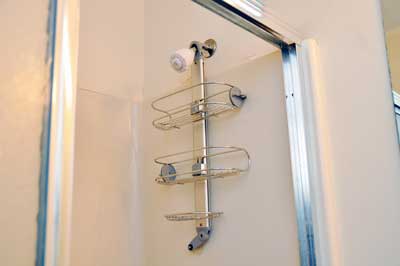
Everything reassembled nicely as the spine is symmetrical. The flipping part of the project took less than 10 minutes and we were happy with the results. Now if we could figure out what actually reacted with the aluminum. Until then, the interns are forbidden to do chemistry experiments while washing their hair in the shower. [Permalink] - SimpleHuman Shower Caddy ITW
|
|
|
Companies that pay special attention to the design of their products (Apple, Sony, etc...) have always enjoyed a loyal following. Their customers are happy to pay extra for products which perform well and look great doing it. We have always tried to do our part in helping to promote companies which have this focus. SimpleHuman is such a company.

We have reviewed many products from SimpleHuman (coffee maker, shower caddy, etc...) over the years. They are great looking products which have stood up to the rigors of daily use around the office. When these shampoo and soap dispenser showed up at the office, we were eager to take a look. Their tagline of "more suds, less clutter" meshed well with the philosophy here at the magazine. God knows we need help in reducing the clutter :-)

As with all SimpleHuman products, this dispenser was designed to help promote a calm and pleasurable living environment. One that is "efficient," not austere.

The FirstLook will be posted in a week or so. The installation write-up will follow shortly. Unfortunately, the "group shower" FirstUse photoshoot proposal did not make it past the review committee (Bostonians...need we say more?). [Permalink] - SimpleHuman Liquid Dispensers
|
|
|
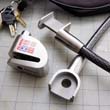
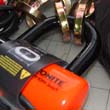
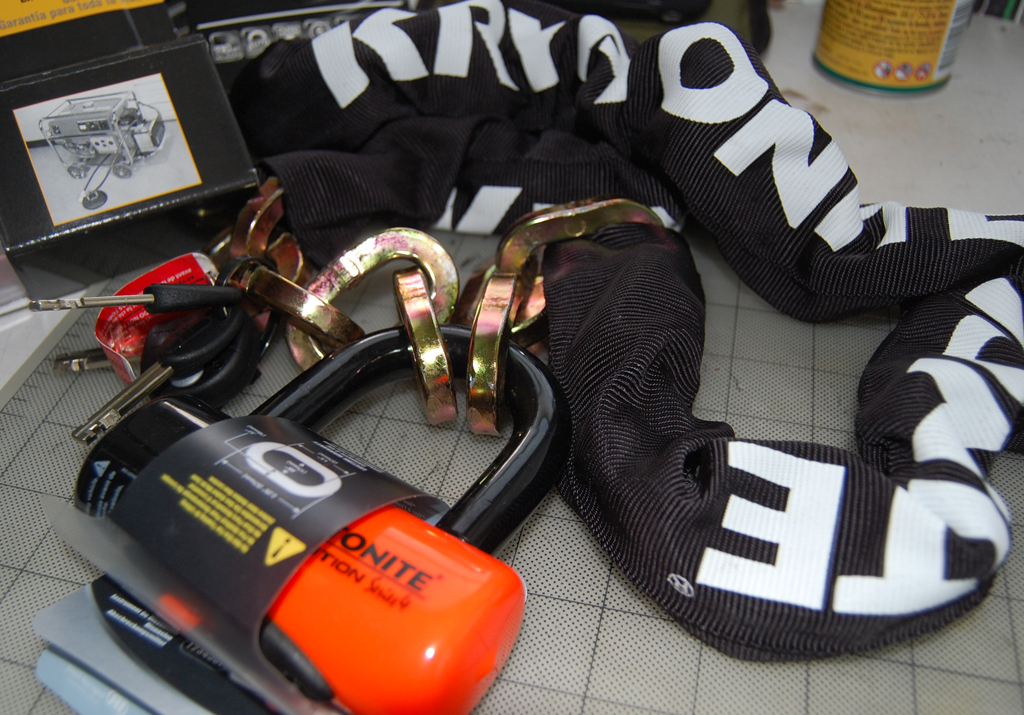
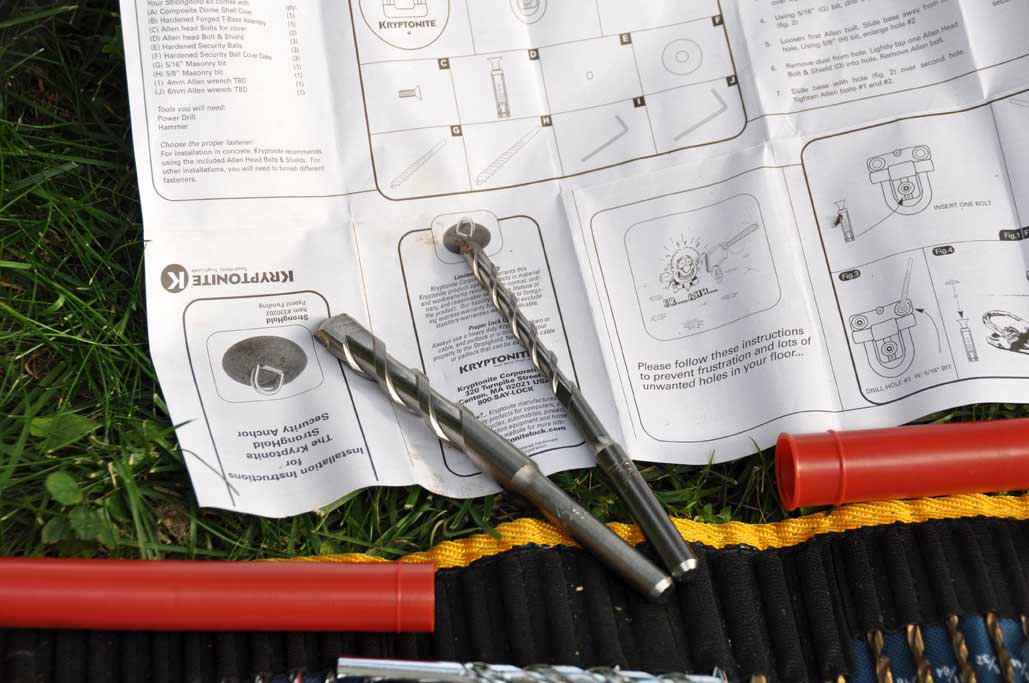
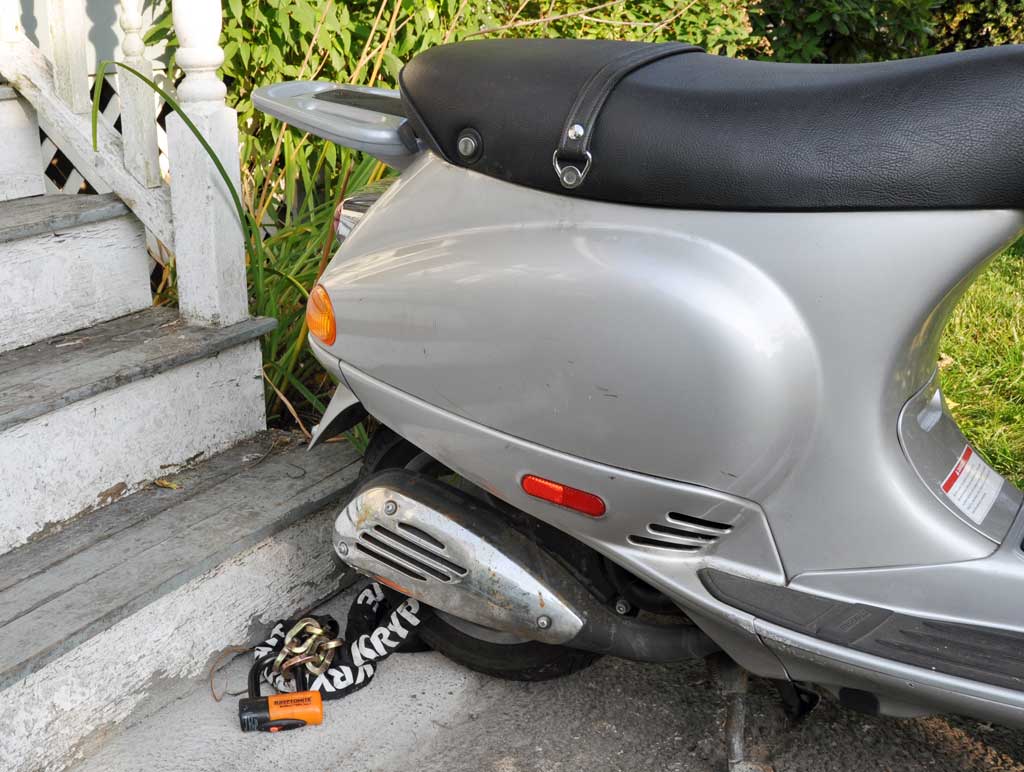
Last September we got the Kryptonite lock and anchor when we got our Vespa. We have been using the Evolution chain and lock daily and it has held up to the New England elements extremely well. Both the lock and chain were outside all winter. Even with the constant exposure to elements (sun, rain, and snow), the lock opens easily every time. One thing we never got around to was installing the anchor. Chaining the Vespa to the railing worked just fine, but it was a bit inconvenient. Since today was such a nice day, we decided to get off our butts and install the Kryptonite Stronghold anchor.
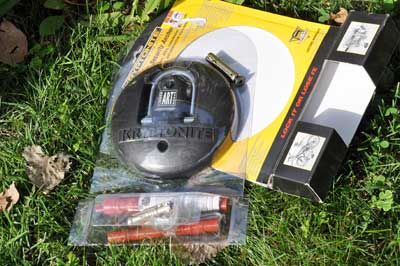
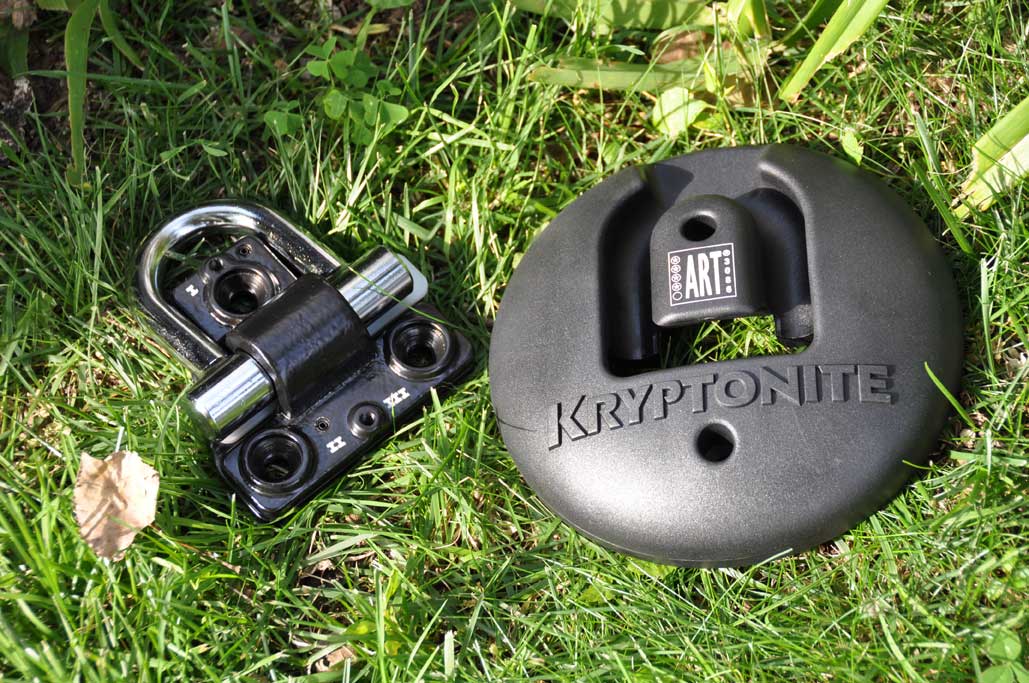
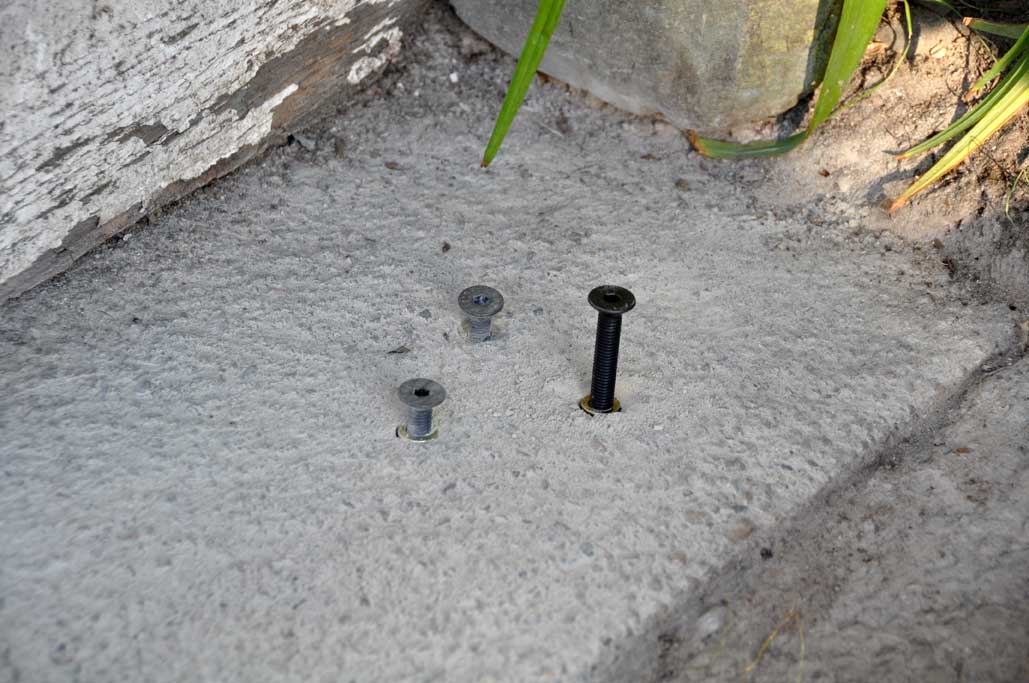
The Stronghold anchor comprised of three pieces: hardened steel base, resin cover, anchor bolts. The anchor is locked down by three expanding bolts. The cover both protects the anchor and acts as additional security to prevent tampering. The StrongHold is suitable for garage or driveway installation because the curved cover can be driven over without damage to it or to the tires.
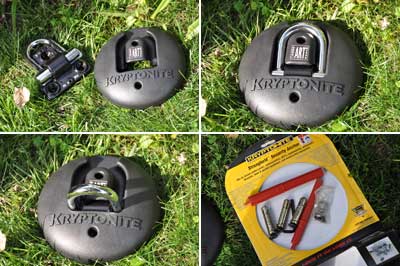
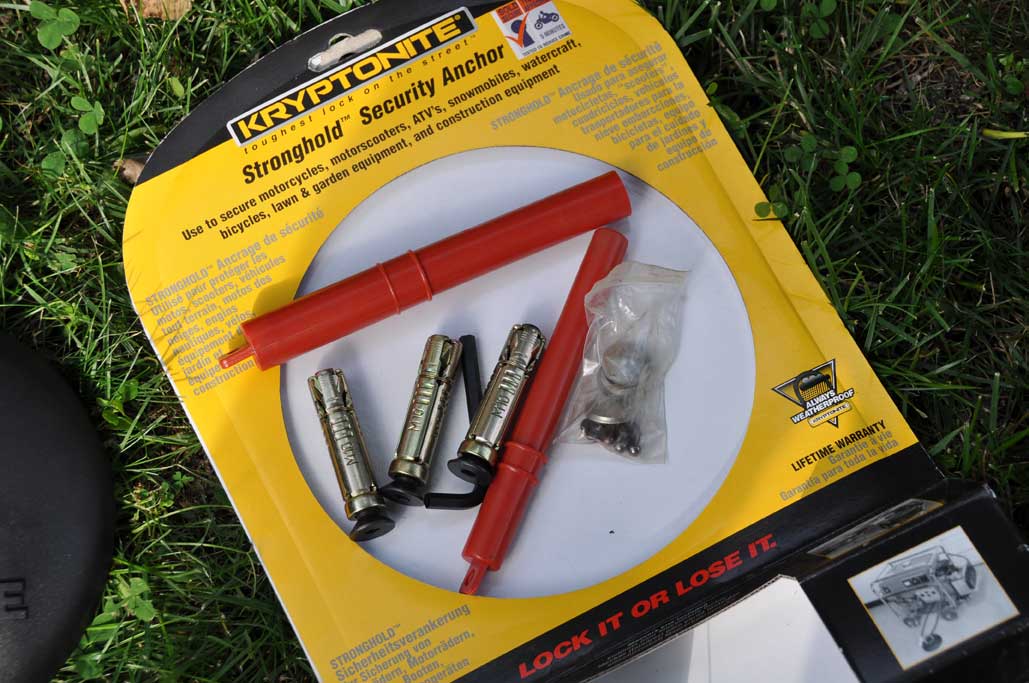
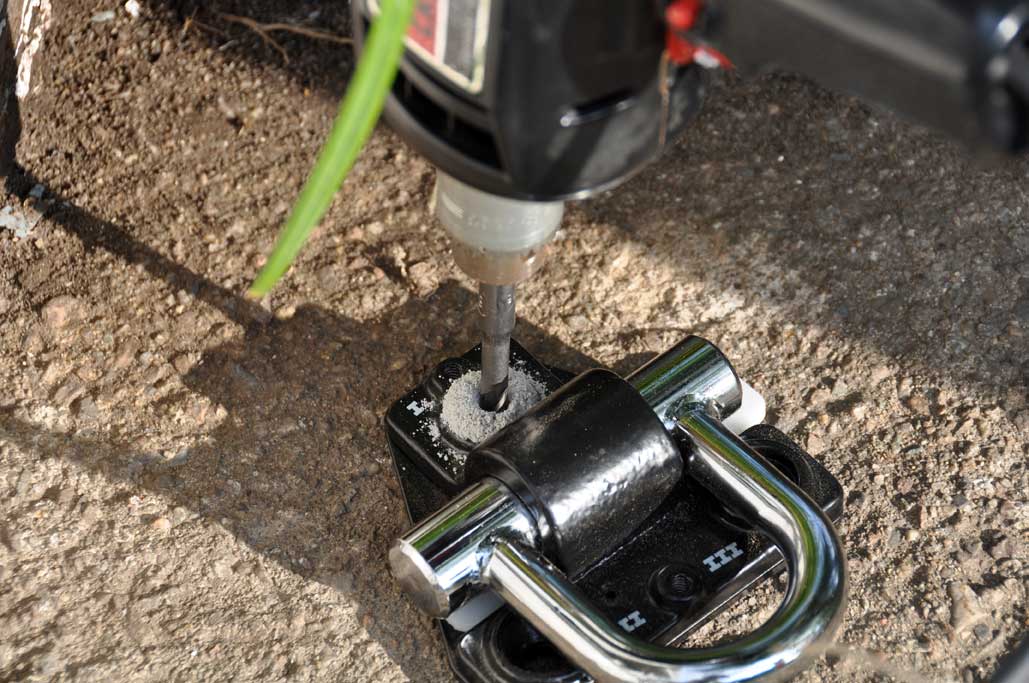
The anchor works best on cement or concrete. Mounting in asphalt is not recommended as it is too soft to allow for a secure fix. We affixed the Stronghold to a concrete slab at the bottom of the front steps to our office.
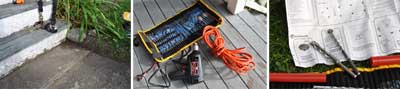
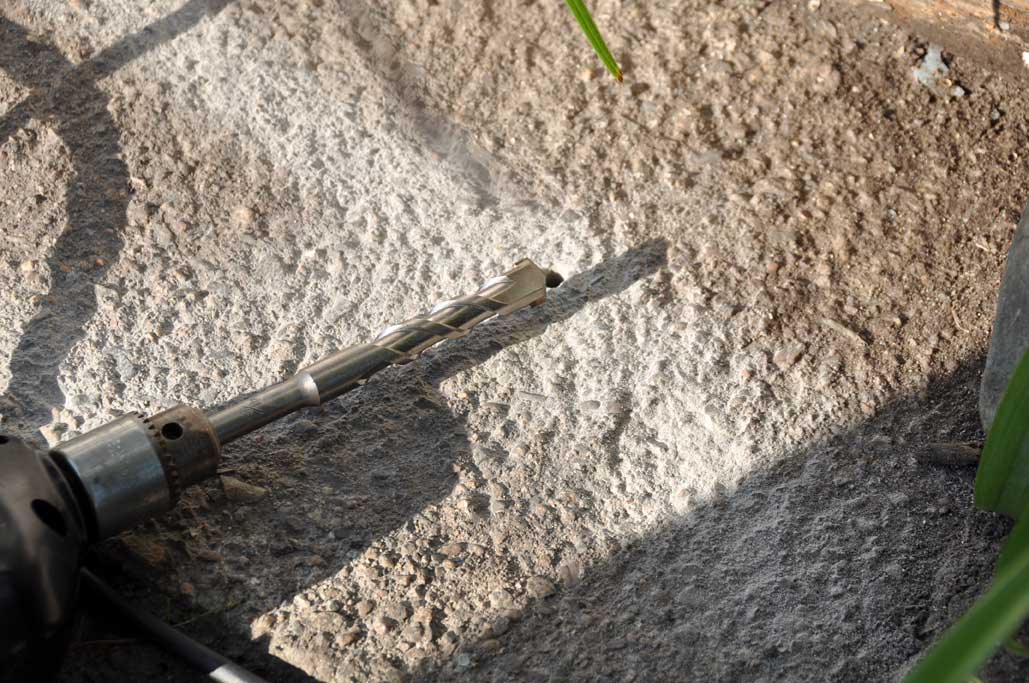
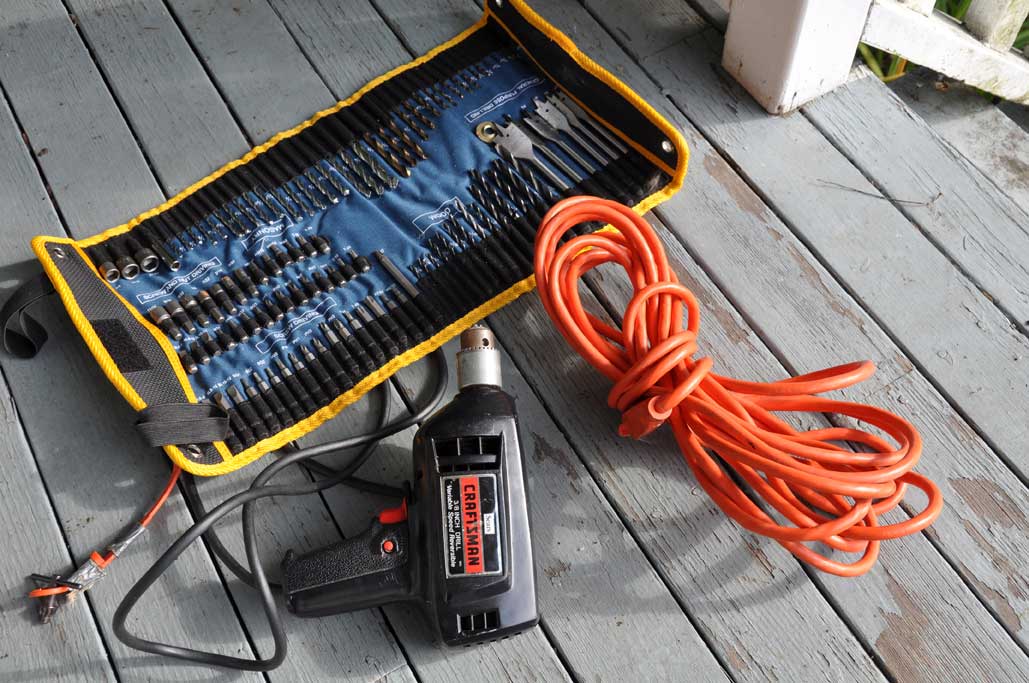
The kit came with the two masonry bits for drilling the holes. The smaller bit was for drilling the pilot hole. The larger bit was for enlarging the hole to accommodate the expanding bolt. The key to making the holes is a good solid drill. Don't try it with any wimpy cordless drills, it won't have enough torque. Even though our Sears 3/8" reversible drill was 20 years old, it was still up to the task. Note that drilling through cement is difficult and care must be taken to not burn out the motor.
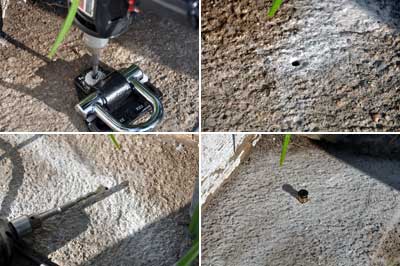
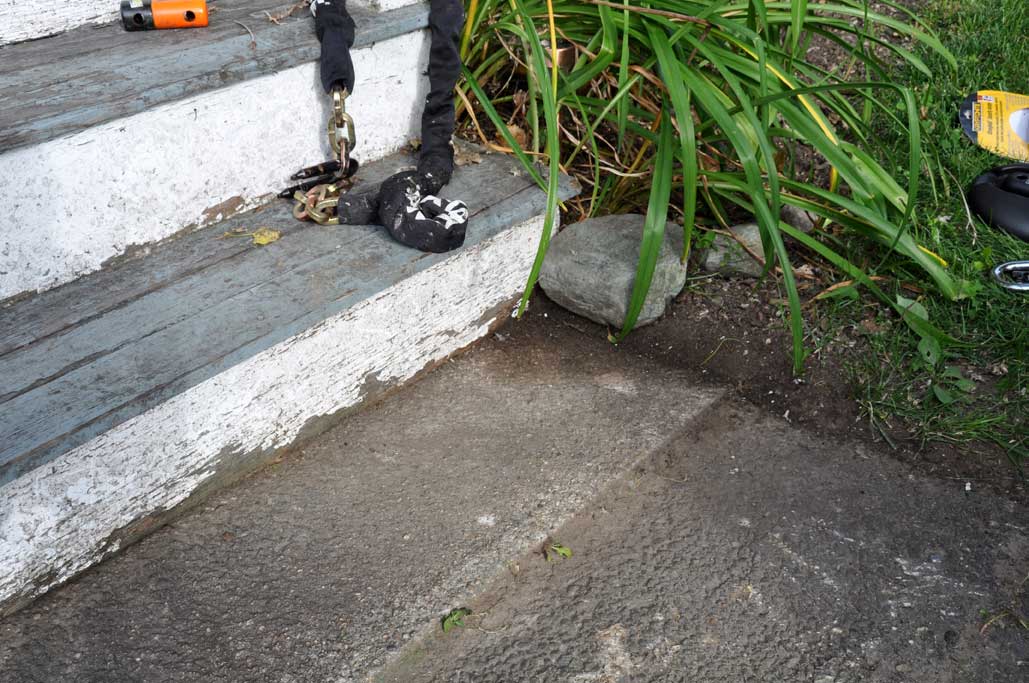
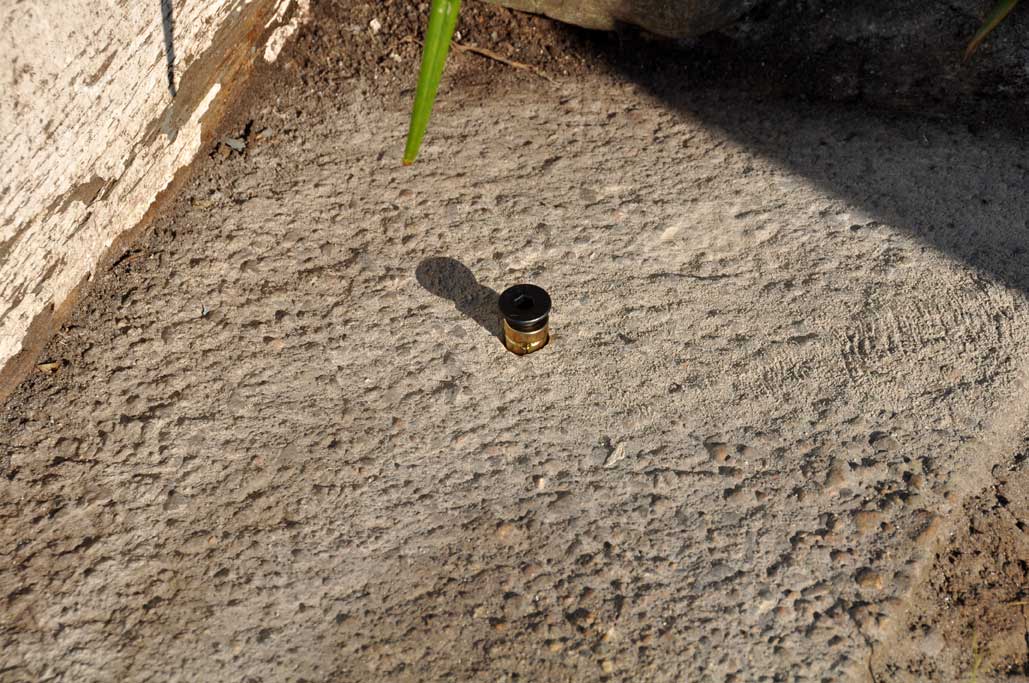
Using the holes in the anchor as a guide, we made three holes in the concrete slab. The drilling was a lot more difficult than we had thought. It took us about 15 minutes to drill the three holes. The drill got fairly hot, as did the drill bit, but they got the job done. Once the bolts are in, tightening the black screw will expand the bolt and lock them in the cement.
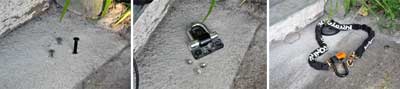
The anchor puts the Vespa further away from the stairs, making it much easier to chain up the scooter. Looping the chain through the anchor is also easier than getting it around the handrail post.

Everyone knows that Kryptonite locks are great for protecting two-wheeled vehicles. It makes sense that they would also have a great product for anchoring them as well. The Stronghold achor is not going anywhere once installed, so be sure it is in a good spot. For readers looking for a low profile option to secure their bikes or Vespa, the Kryptonite Stronghold anchor is a great solution. [Permalink] - Kryptonite Anchor Installation
|
|
|
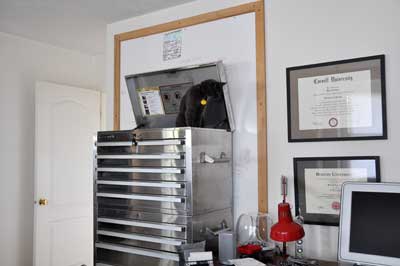
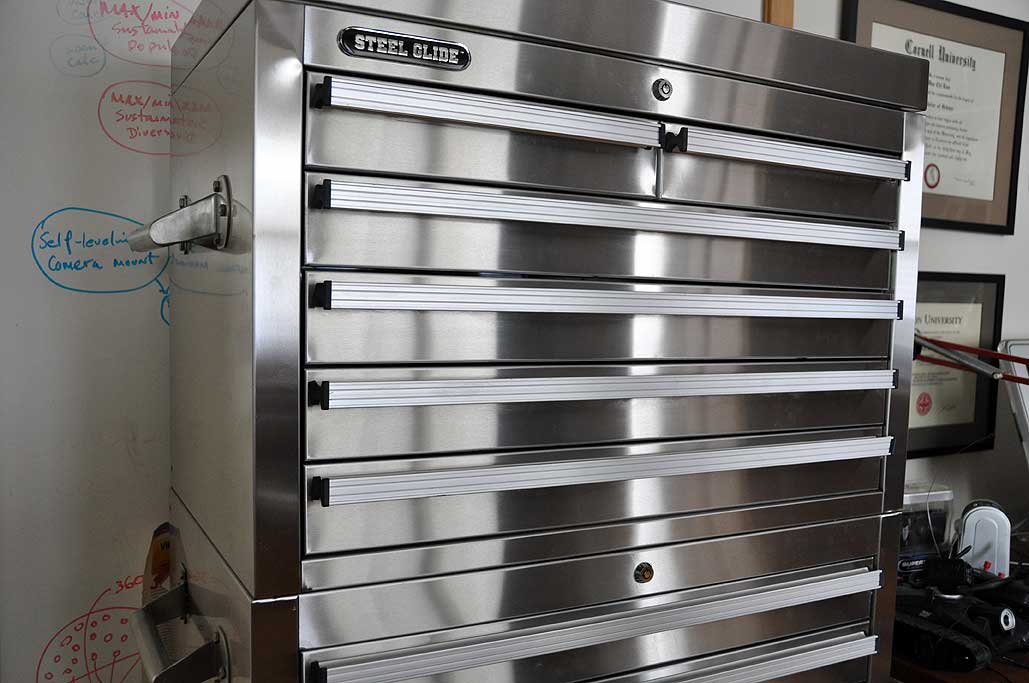
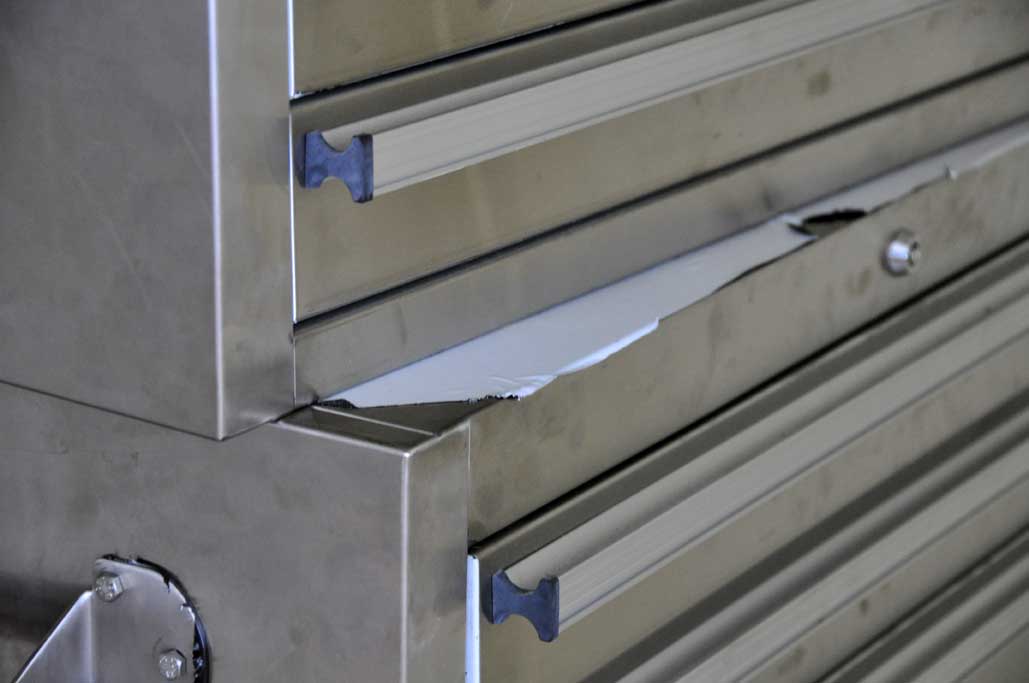
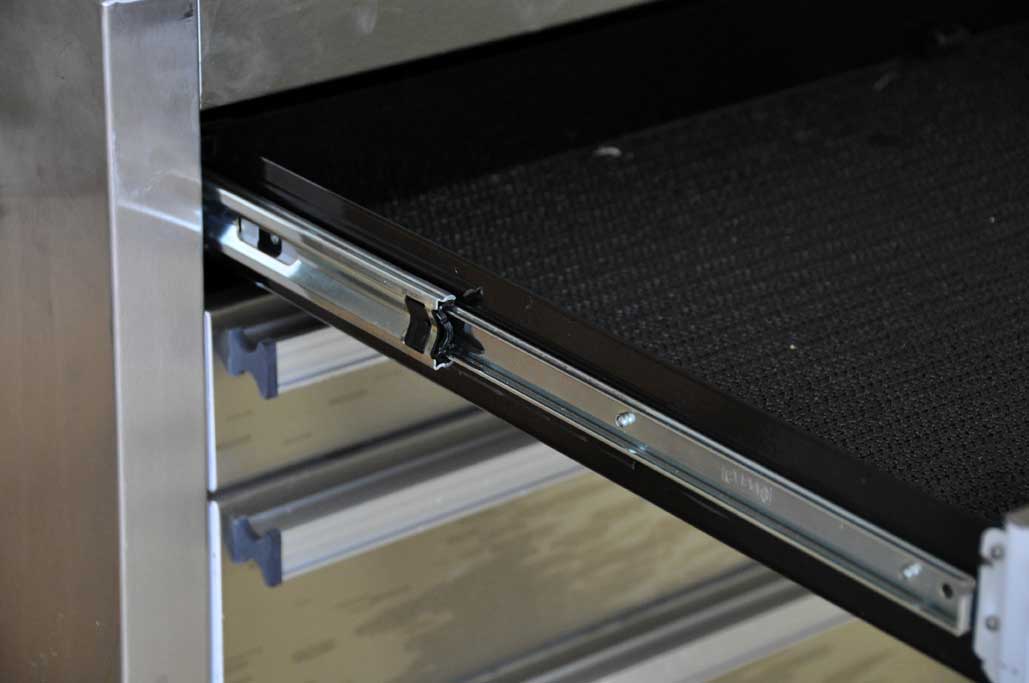
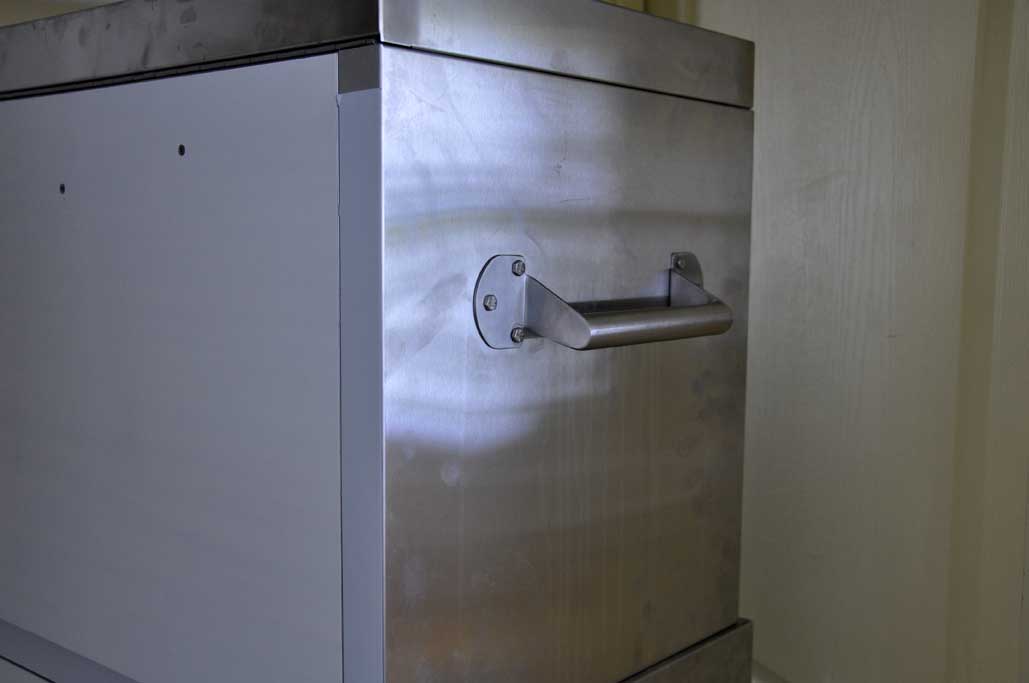
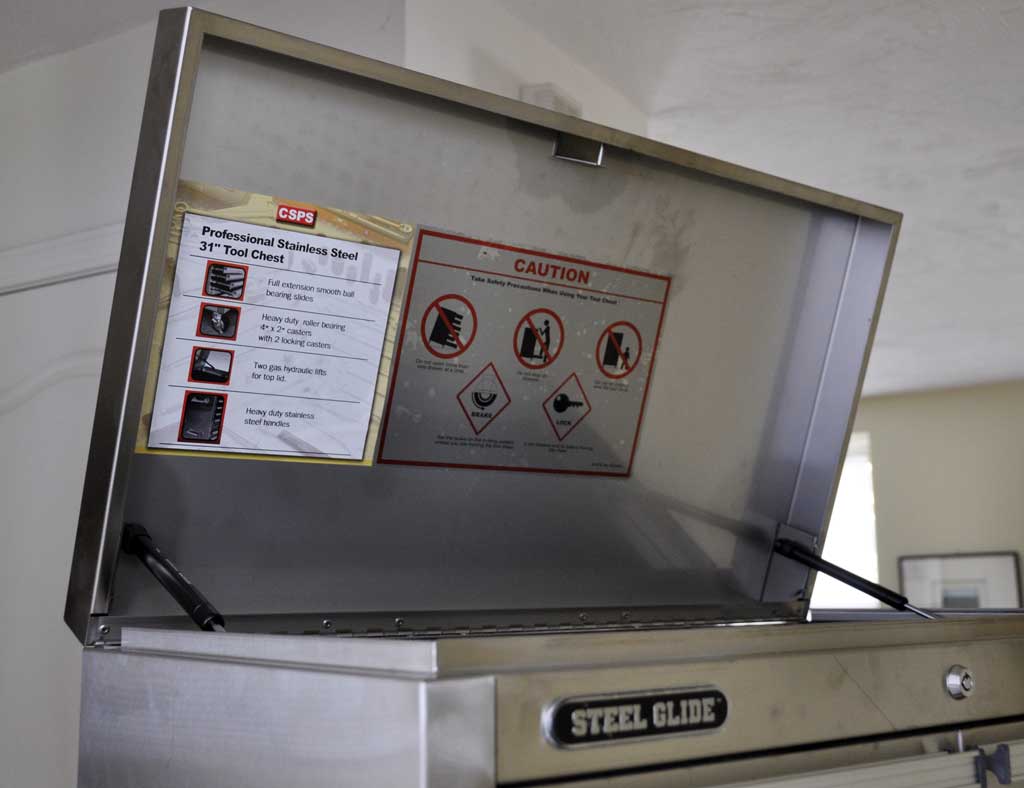
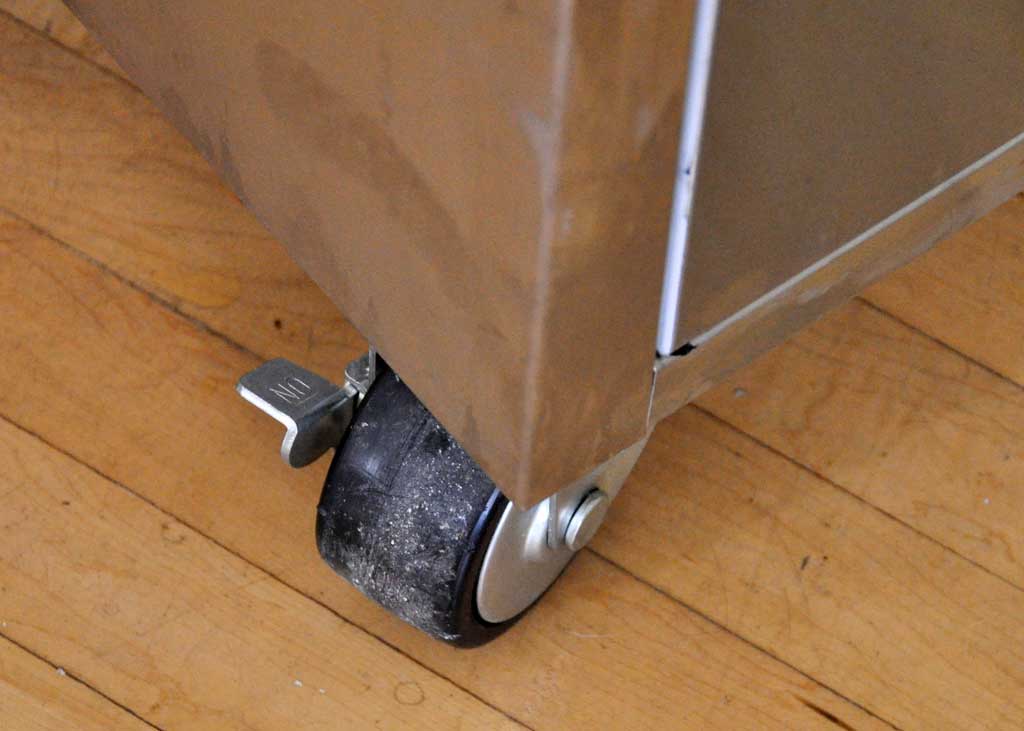
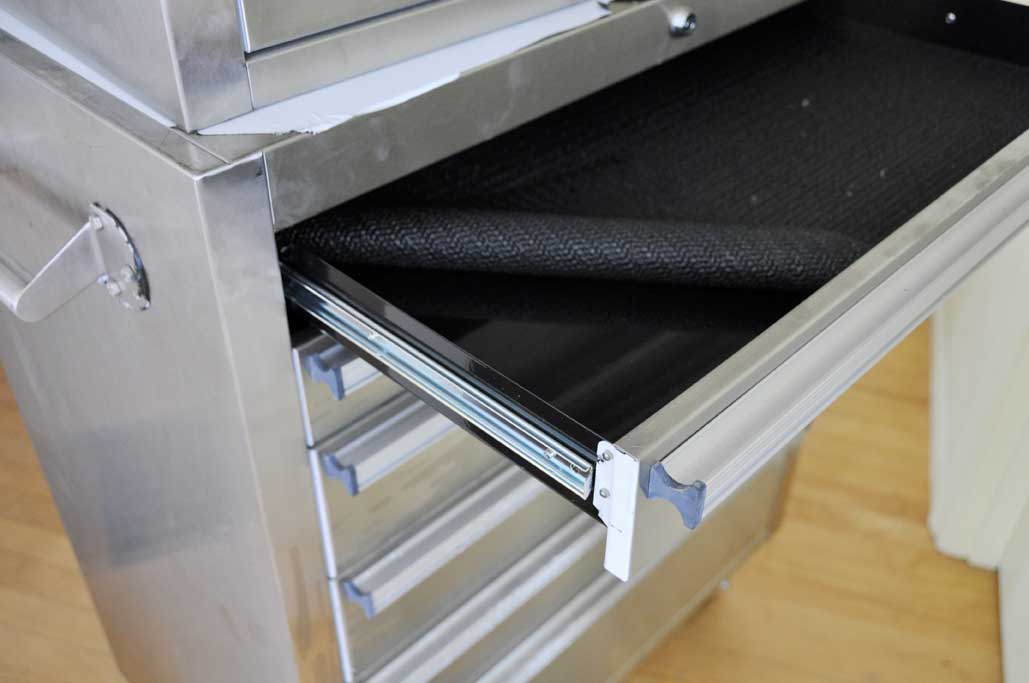
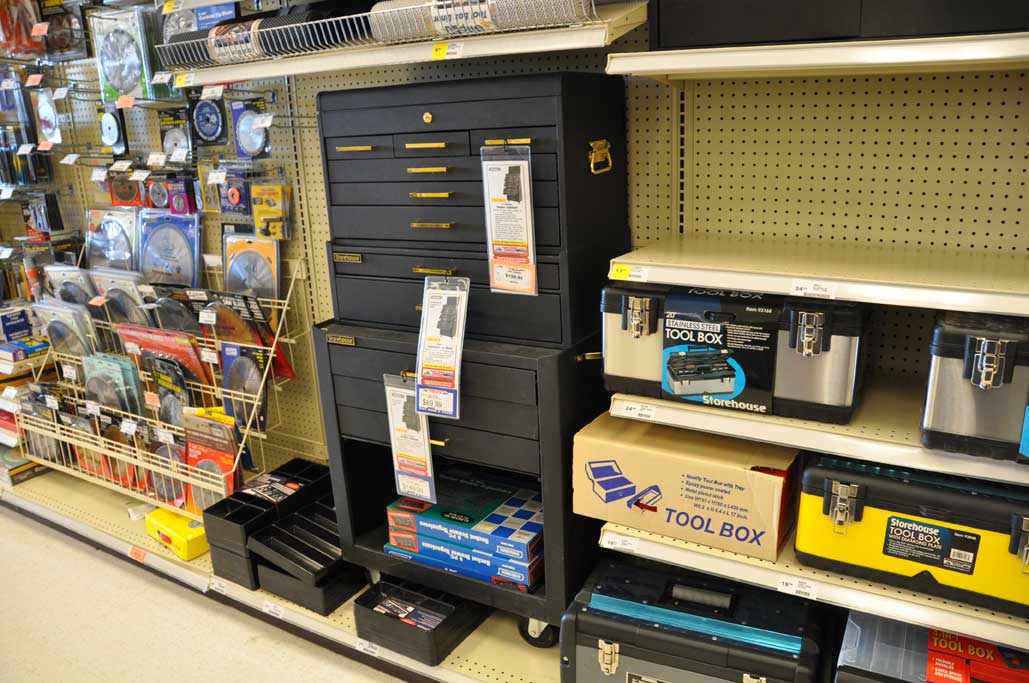
You gotta love Craigslist. We drove for an hour South to Attleboro yesterday to Harbor Freight Tools to check out a tool cabinet. Unfortunately, it did not work out. Today, we drove an hour and a half up North and found exactly what we were looking for and at almost 80% off! Getting it back to the office was an adventure, but that is a story for another time.
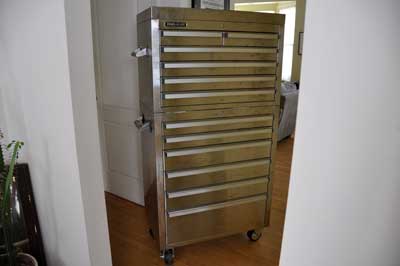
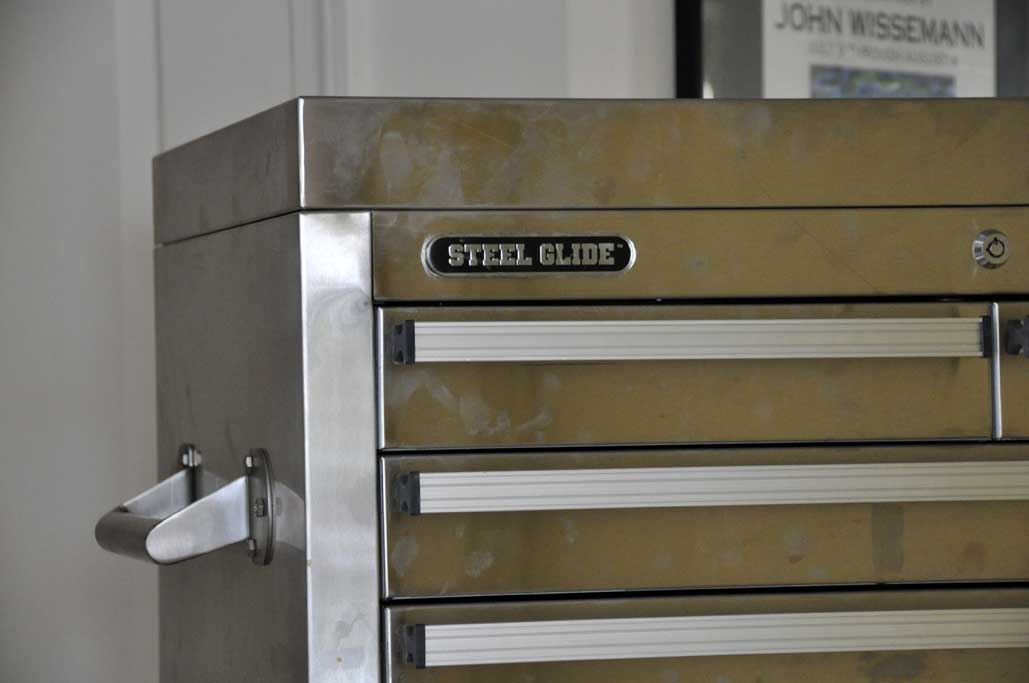
This Steel Glide tool cabinet was purchased new by the seller at Sam's Club. The seller had purchased it, put some tools in it, and never opened it again. He was doing some clean up and realized that he would rather have the room and the extra cash. We saw his ad on Saturday and had the deal completed by Sunday.
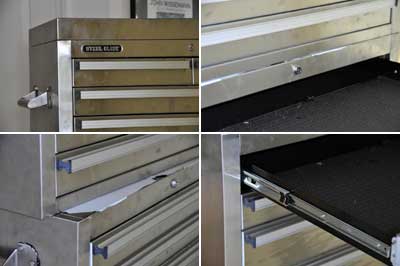
We were not disappointed. The unit was so new that most of the protective plastic wraps were still on unexposed surfaces. The materials used were heavy guage stainless steel. The glides were the extensible kinds which can support the drawers even when fully extended.
This twelve drawer unit came in two separate pieces. There are heavy-duty handles on the side, a gas-shock hinged lid on top, and locking casters on the bottom.
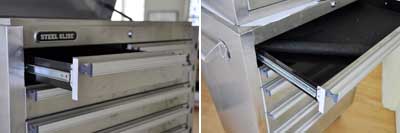
All of the drawers have non-slip tool liners and both units are lockable. This toolchest is a welcomed addition to our workshop. We'll need to do some reorganization before we can find a spot for it. [Permalink] - Steel Glide Tool Cabinet
|
|
|
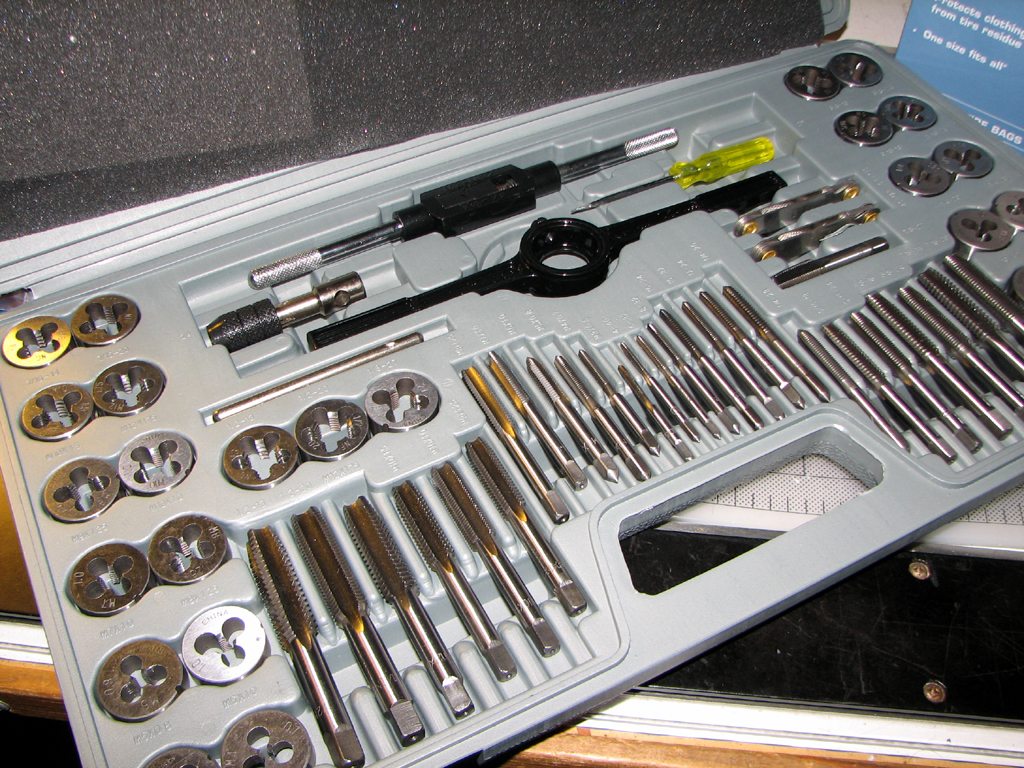
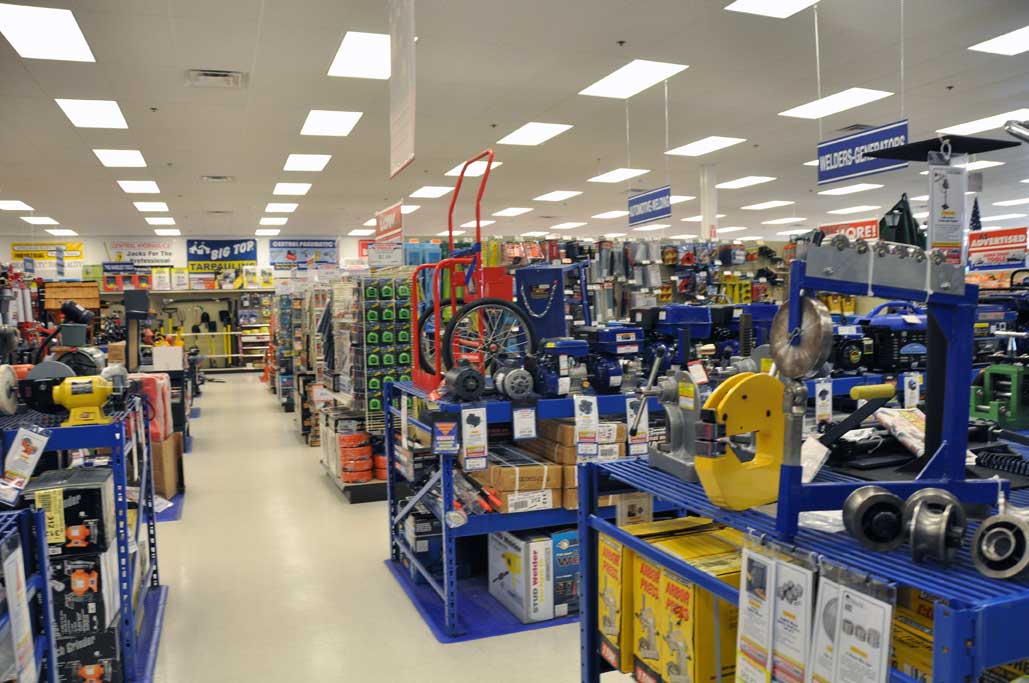
We have purchased many tools (jack, tap&die, caliper) from the folks at Harbor Freight, but all of the transactions were from their website. When we learned they have a store in Attleboro MA, we knew we would have to take a drive and check it out. Attleboro is about an hour outside of Boston, so we needed a good reason to make the drive.
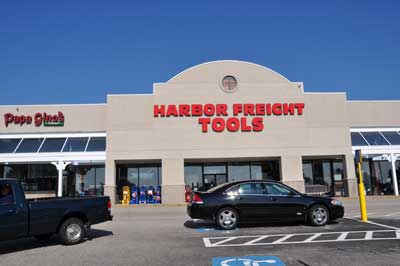
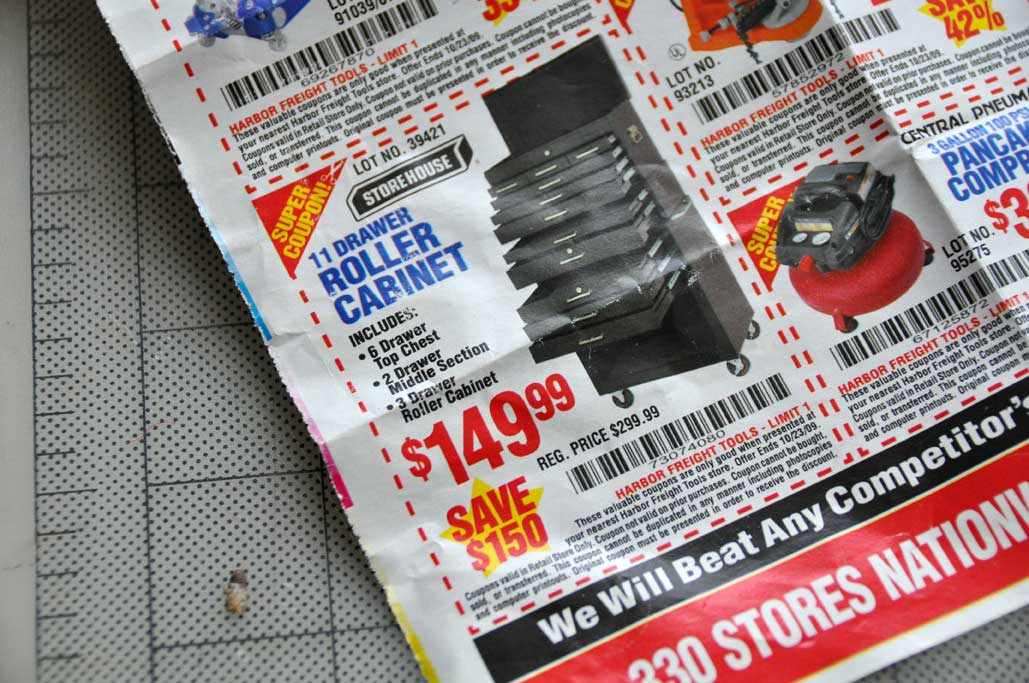
Harbor Freight sends out a lot of fliers and we always see stuff which we "need" for the office. One of the items is this 3-piece rolling tool cabinet. We have been tempted to buy it for a while now. We had purchased one on Craigslist about two years ago, but we can use another one for all of the small precision tools.

When we saw this ad for a 50% off sale (available only at stores), we knew this was our perfect excuse to go for a drive and take a first hand look at the unit. It was a good thing we did. As soon as we pulled out a drawer, we knew this unit did not have the kind of quality we wanted. We decided we may have to pay more if we really wanted a high quality 11- drawer cabinet. The trip was a not a total loss, we did look around.

The store was just like their ads, chocked full of all kinds of cool tools. They certainly had a nice collection of hydralic car jacks. The one we had purchased a few years back was the one in the upper left. We also found a wrench for our "monster truck" project.
We came upon something we have always wanted. It was this "3rd-hand" tool and it only cost us $4.00! While it was a long way to go for such a little item, at least we did not leave empty-handed :-) If you are looking for industrial tools, you can find it at Harbor Freight. Just be aware that some of the "really good" deal may be of questionable quality. Still, we would go back in a heartbeat just to walk around. [Permalink] - Harbor Freight Tools
|
|
|
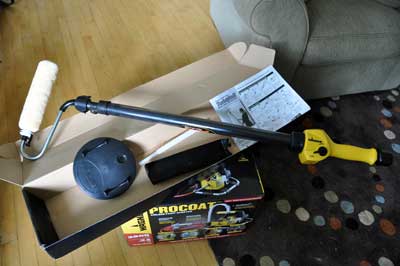
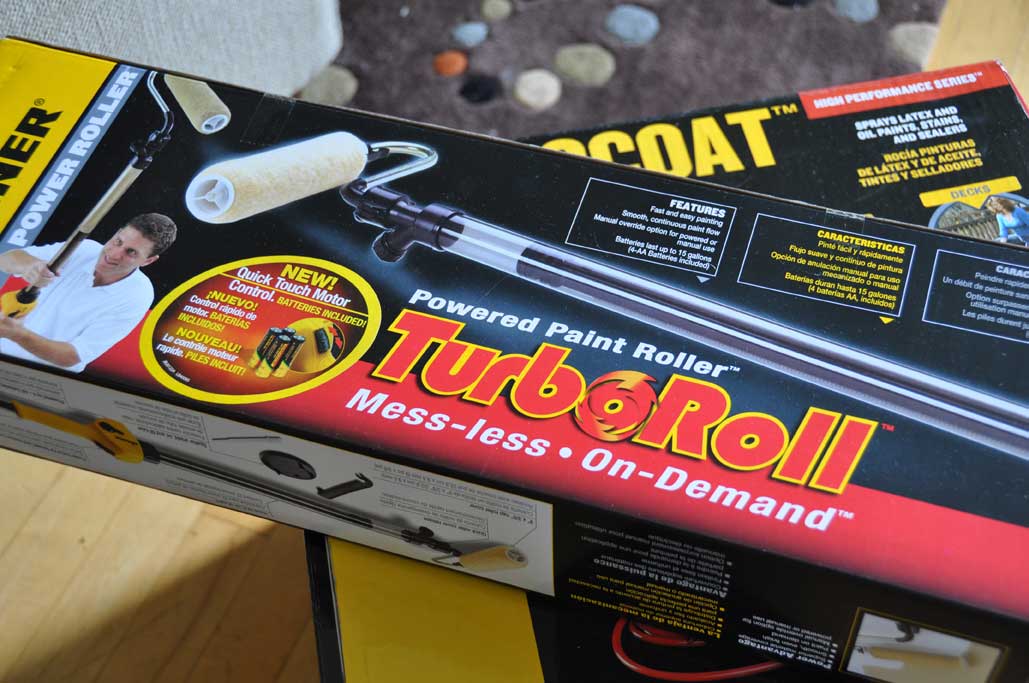
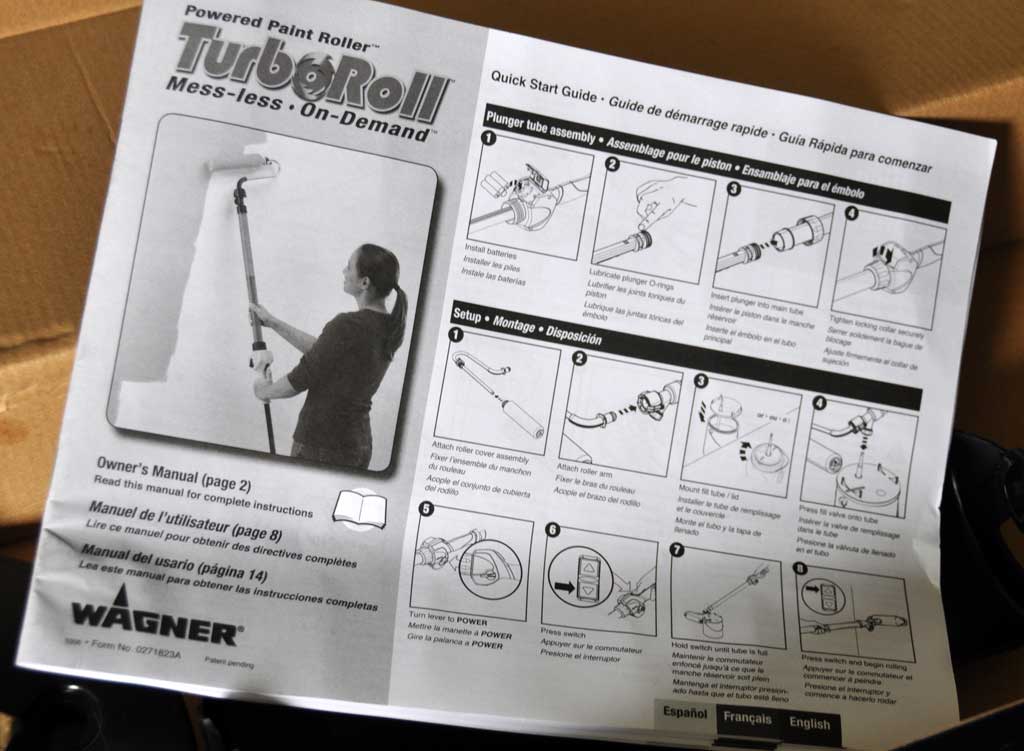
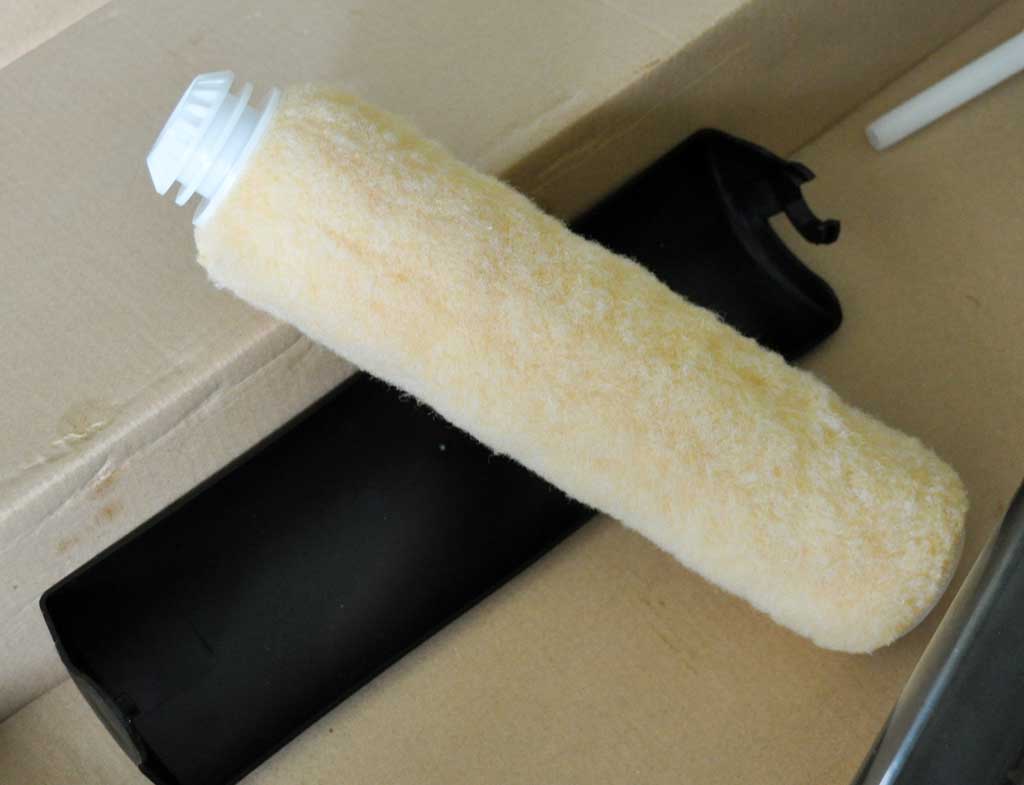
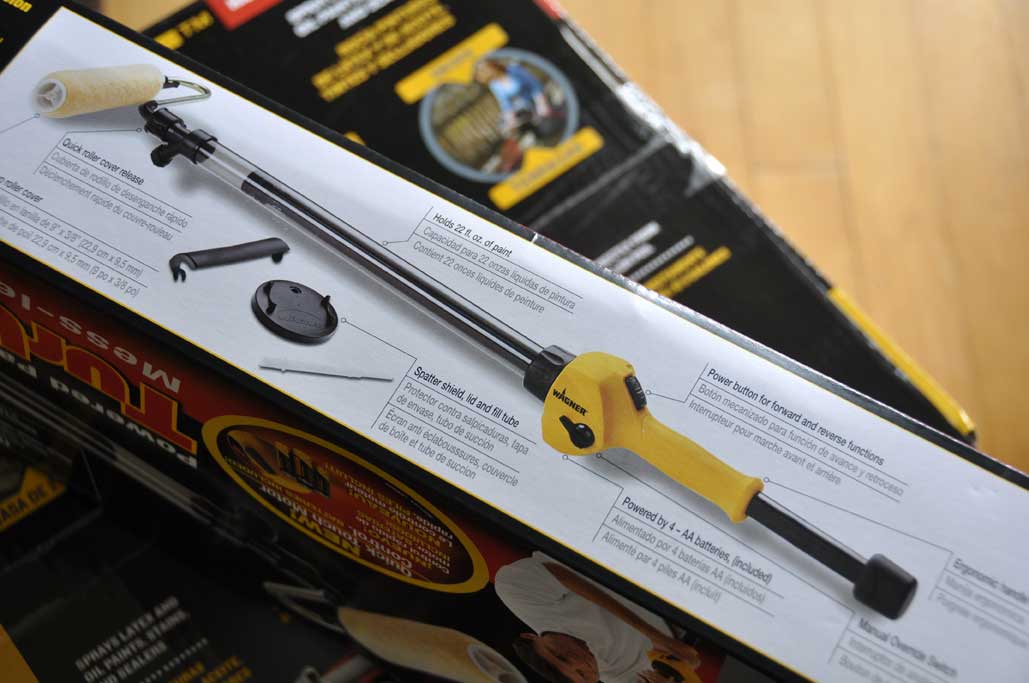
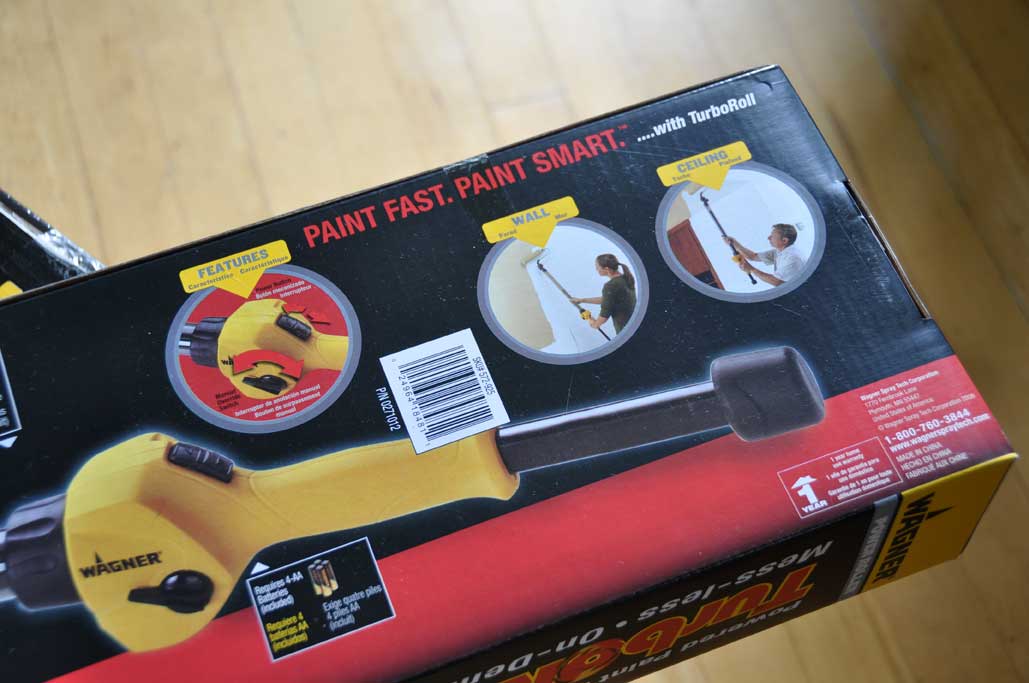
Last week we received the final few pieces of gear we need to tackle our Fall renovation projects. Today we are going to take a closer look at one of them: the Wagner TurboRoll paint roller.
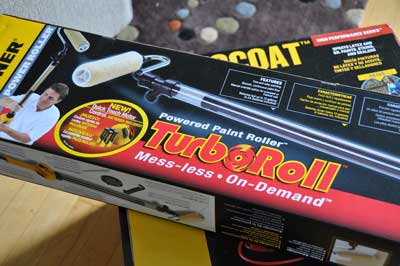
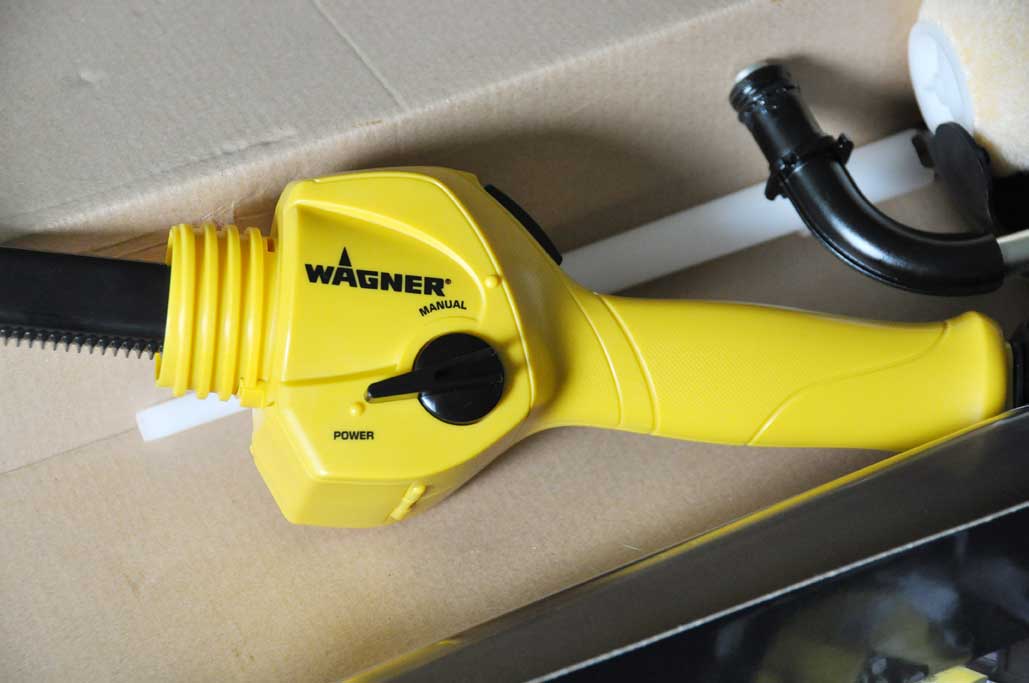
The TurboRoll is a battery-powered paint roller. It makes painting easier by reducing the number of times the user has to refill the roller brush with paint. It will also reduce the drips, the uneven application, and the general hassles of painting with rollers.
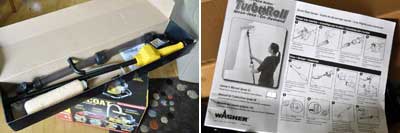
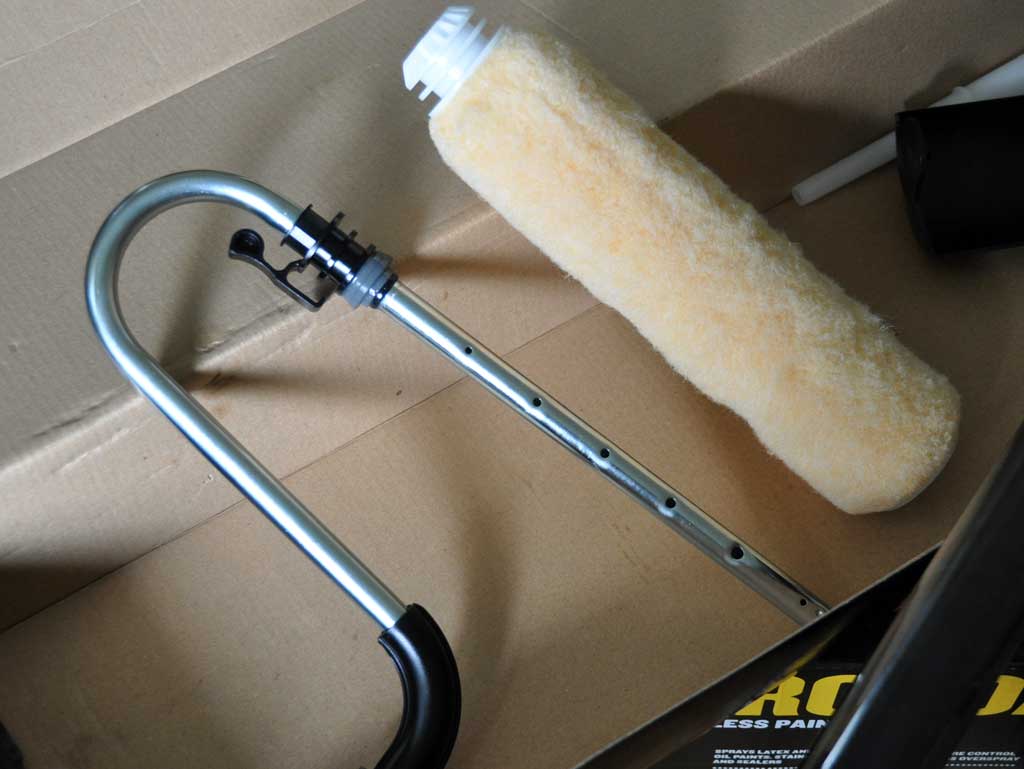
The TurboRoll kit came complete with everything we needed: roller, paint reservoir, plunger/handle, accessories. The directions were easy to follow and the assembly process was quick. It took us less than 5 minutes to put the TurboRoll together...without reading the directions.

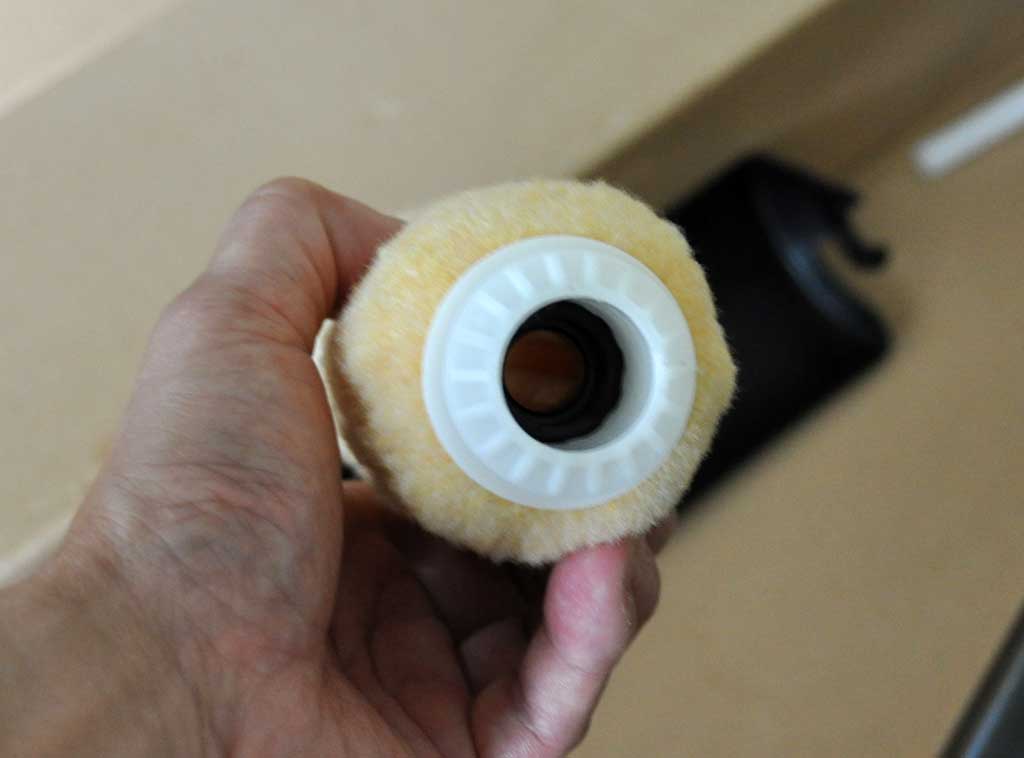
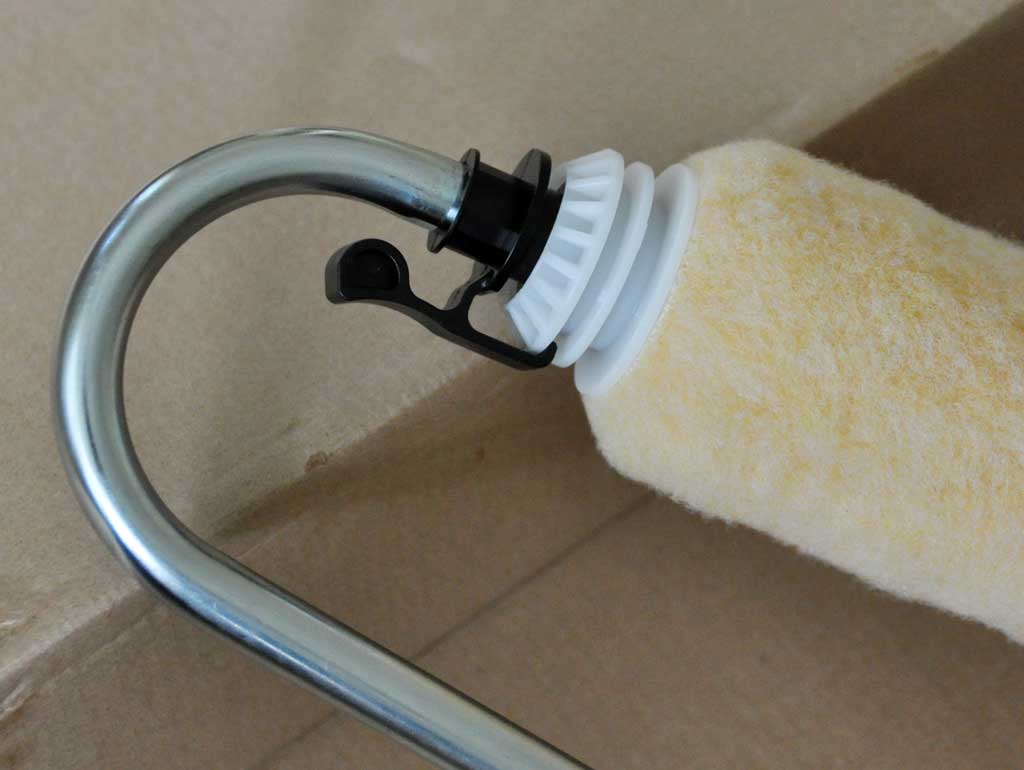
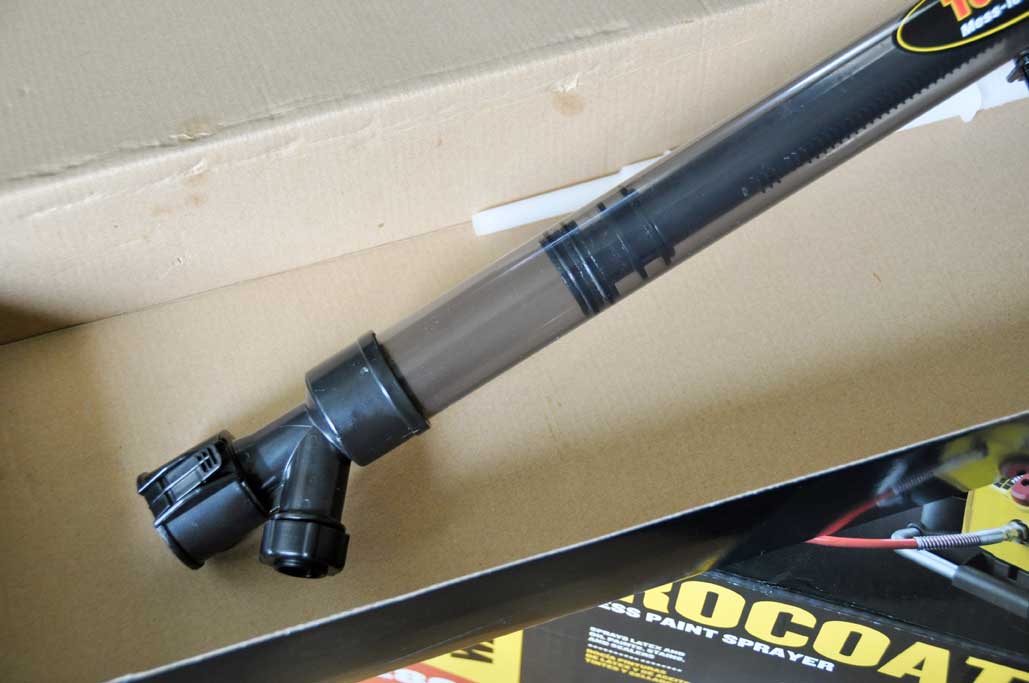
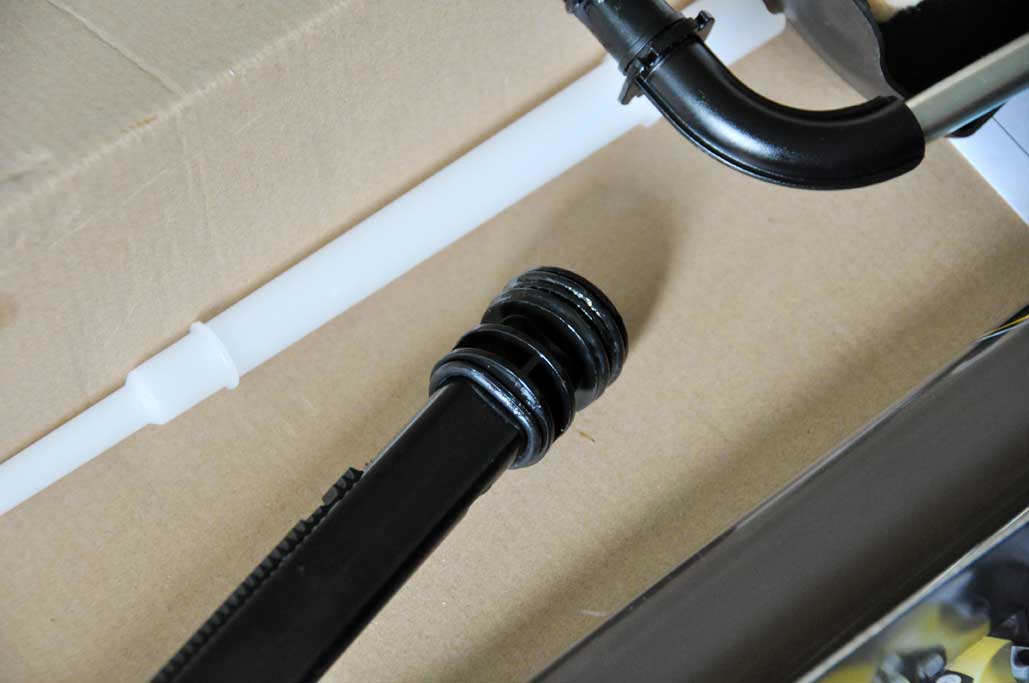
The head of the TurboRoll is a specially designed brush to let paint flow out from the inside. To get paint to the roller, there is a U-shaped feeder tube which is inserted into the hollow of the brush head. Note the holes in the paint feeder. The feeder clicks in and is secured via a spring clip.
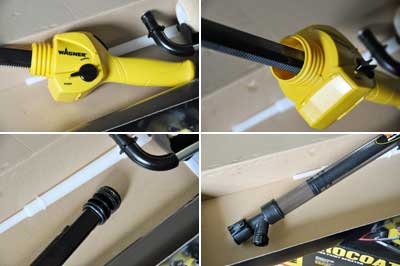
Paint is forced into the roller by a syringe/plunger assembly. The paint is drawn into the tube and pushed out to the roller head. The tip of the plunger is sealed to the paint reservoir by a few o-rings. The plunger may either be manually operated or moved by a small battery-powered motor. All-in-all, a very clever design.
We like to think of the Wagner TurboRoll as a regular paint roller on steroids. We will be using it for a few of the painting projects on the first level. If this works as well as we hope, it should save us a lot of time and effort. We'll let you know how it works out. [Permalink] - Wagner TurboRoll Assembly
|
|
|
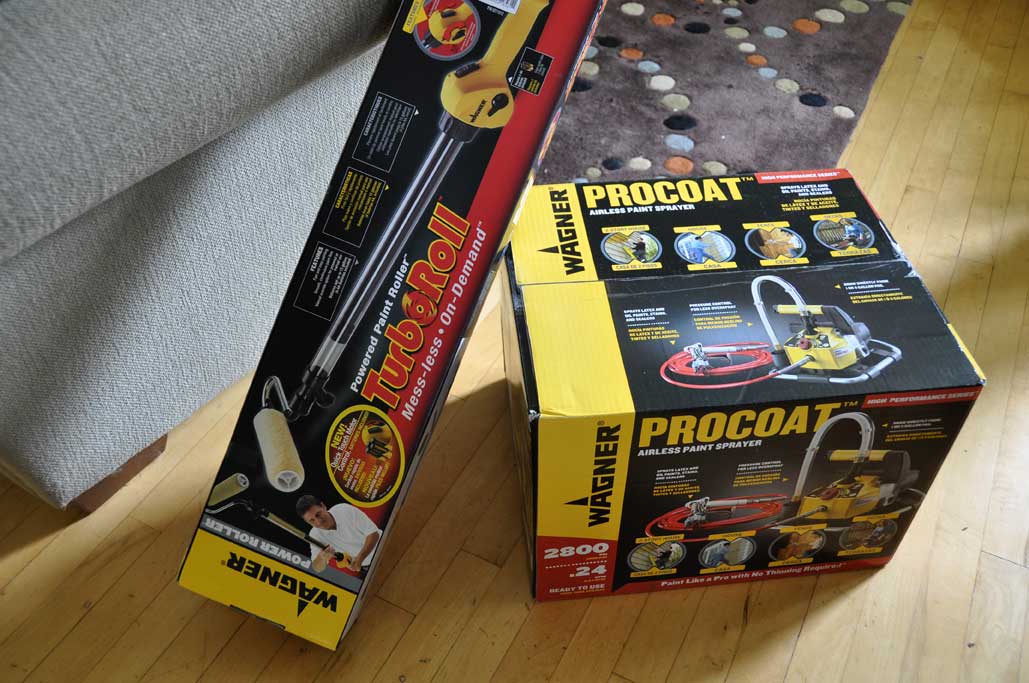
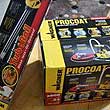
Painting projects can be fun (yes, they can), and a quick way to update the look of your place. Depending on the tools used, painting projects can either be easy or laborious, tidy or messy. This August we are going to paint the outside of our unit. Come the Fall we'll be painting some of our interior spaces. In the past, we did our painting projects with brushes, rollers, and a lot of labor. This time around, we are hoping to save on the labor and the mess by turning to Wagner.
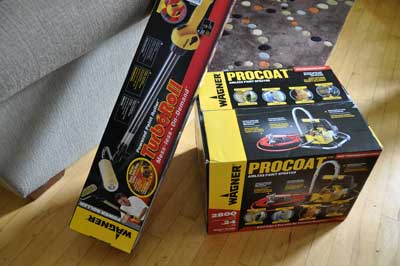
For our interior work, we will still be using brushes for the trim and the details. However, we are hoping the Wagner TurboRoll will make quick work of the walls. The TurboRoll is a battery powered all-in-one roller/paint container. The hollow handle is actually a tube which can hold enough paint to paint an area 7’ x 10’ on one fill. This reduces the number of trips back and forth to the paint tray...less time, fewer drips, easier cleanup.

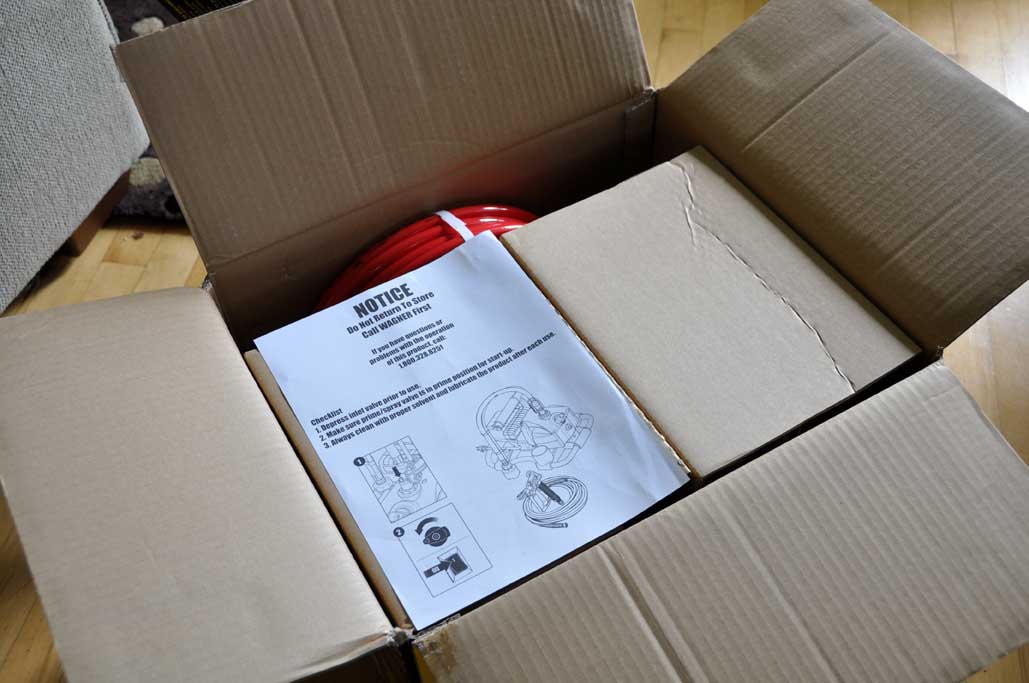
For our outside projects we will be using the Wagner Procoat airless sprayer. We like the idea of painting spindles and rails using a sprayer as they are so tedious to do using brushes. We expect, by using a sprayer, that the job will be faster and more even. Our only concern is the amount of prep work required so the overspray does not accidentally cover everything else (bushes, flowers, automobiles, cats).

We will be unpacking, assembling, and getting to know these two new pieces of Wagner painting gear this week. If the weather cooperates, we will be doing the prep work this coming weekend and painting by next Monday. We are eager to see these Wagner tools in action! [Permalink] - Wagner Painting Gear
|
|
|
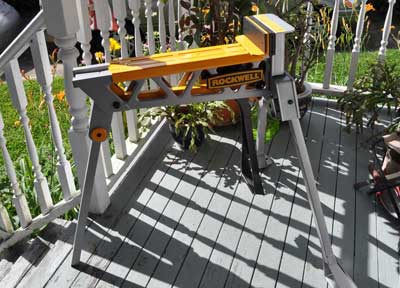
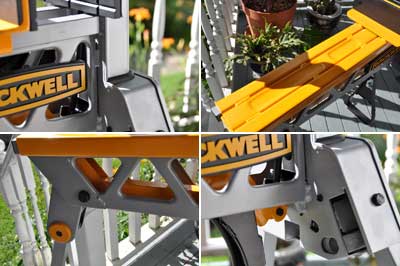
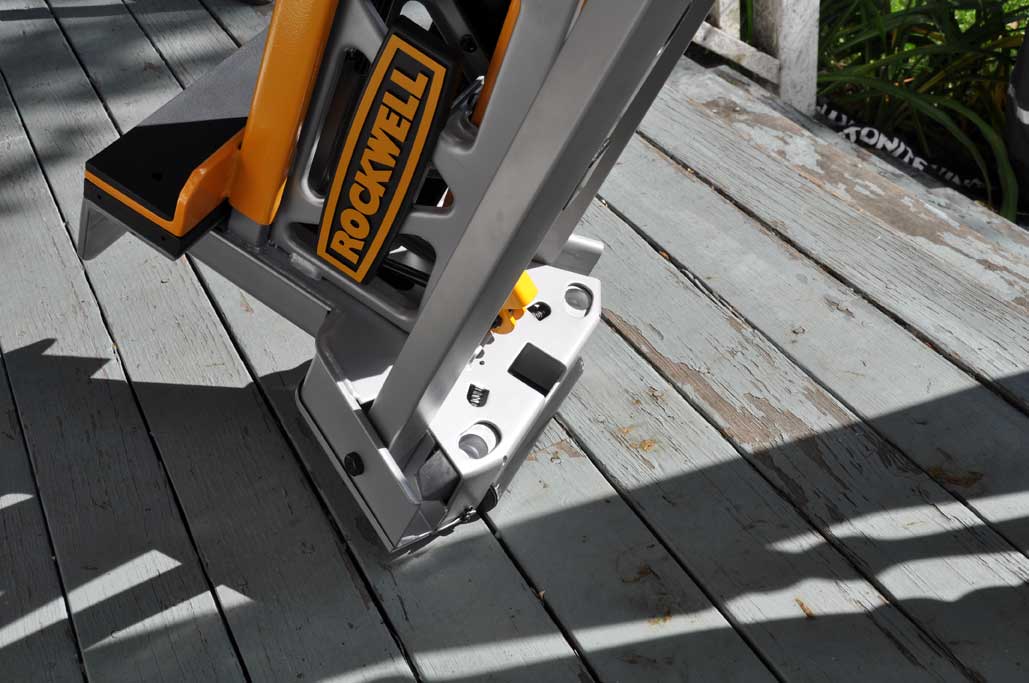
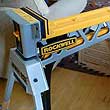
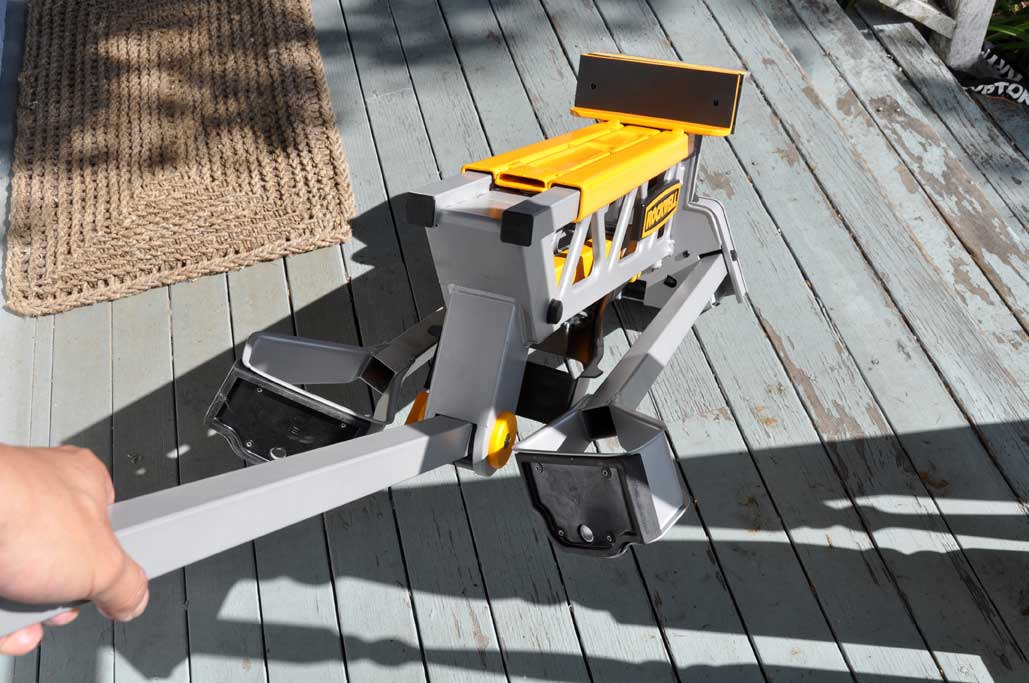
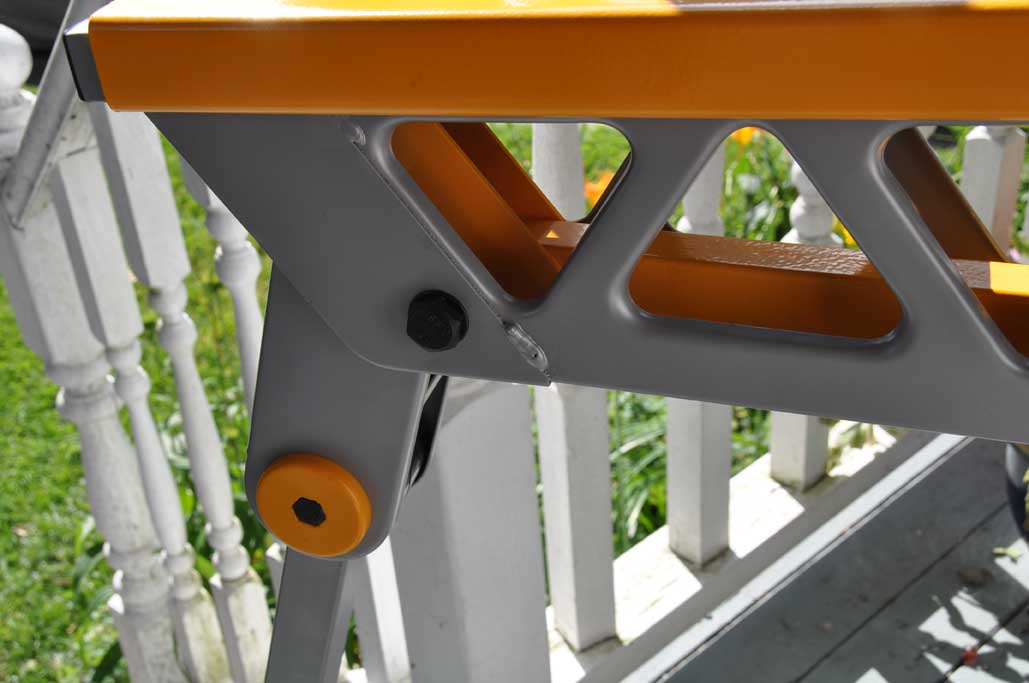
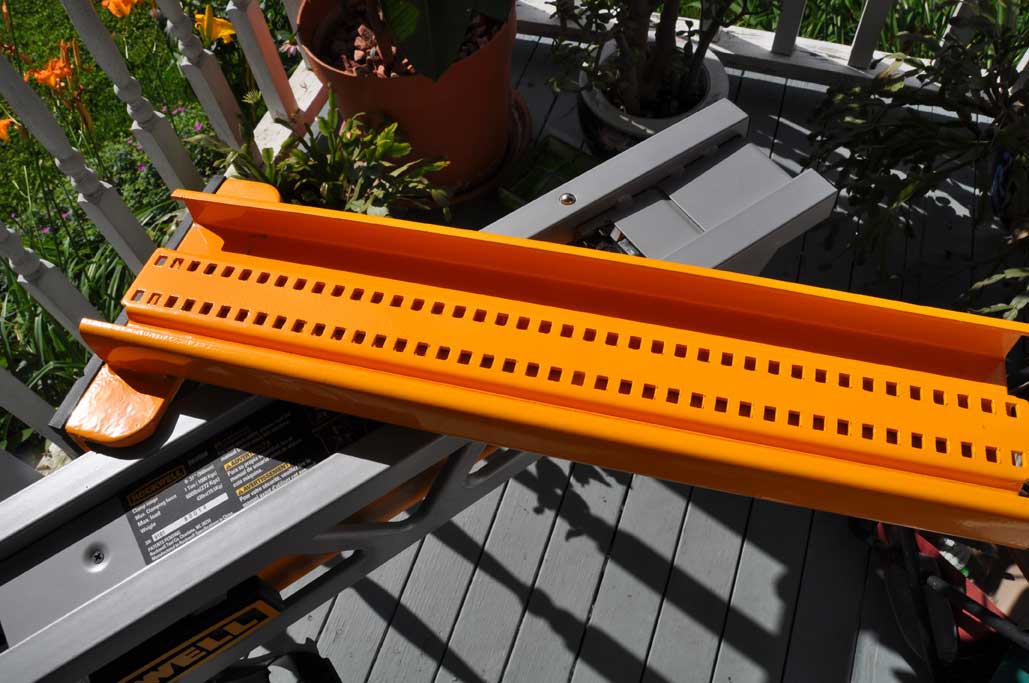
This is the last part of the FirstLook series of the Rockwell Jawhorse. We have already talked about how easy the Jawhorse was to setup, how well it is constructed, and some of the basics of the unit. Today, we will look a little closer look at the details.
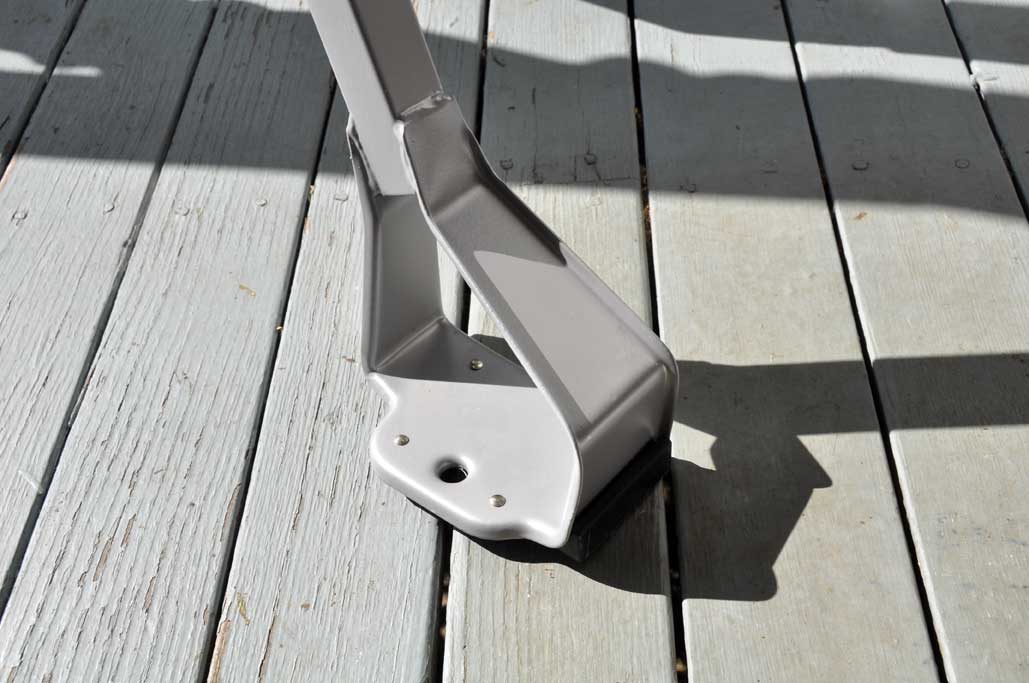
It seem like the folks who engineered this tool really thought about its design and how it needs to work in the field. For better leverage and stability, the feet have stirrups, angled rubber pads, and even holes for stakes.
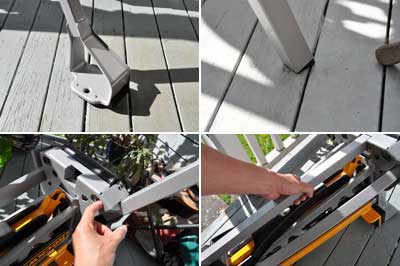
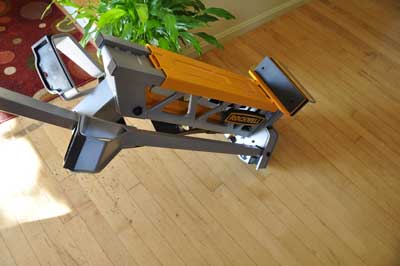
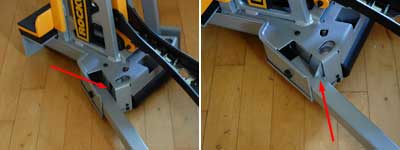
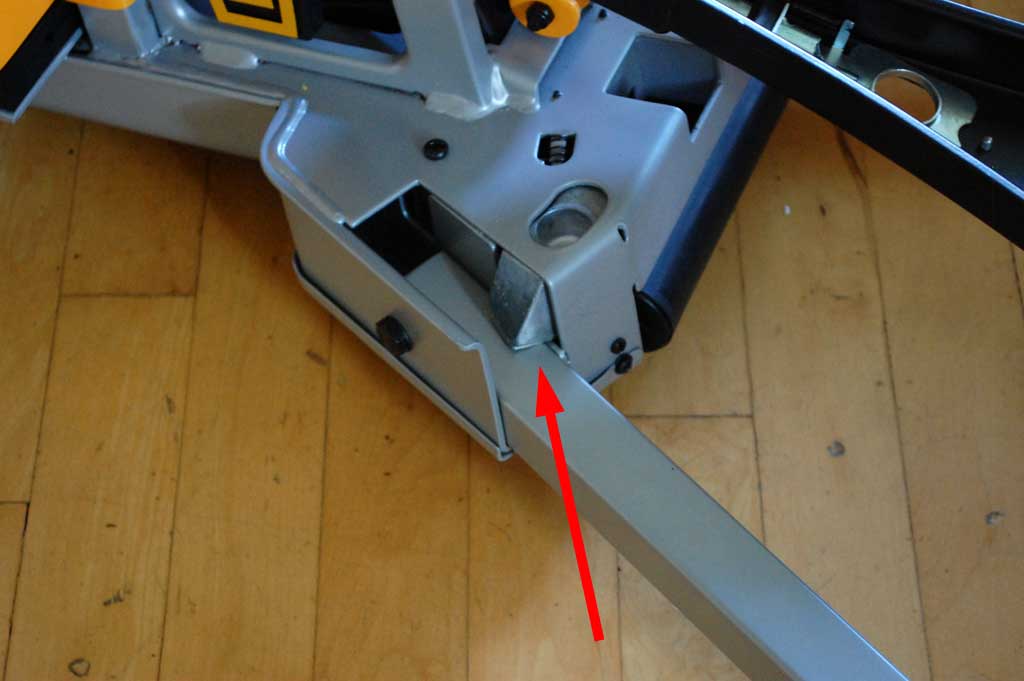
When opened, the unit is stable on its three legs. The Jawhorse weighs about 43 lbs. While it is possible to lift and carry the unit, it is easier to move when folded. The legs interlock to form a handle.
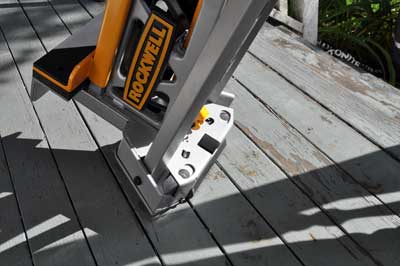
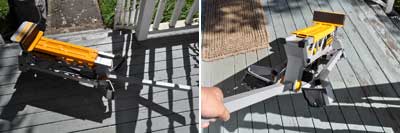
The designers added a roller so it can be wheeled around. The front leg extends flat so it can be used as a handle. The observant will notice the legs in this photo are not quite locked in place.

The legs, if not folded in the right sequence, can come loose if the Jawhorse is rolled on a bumpy surface. When folded properly, the wings from the black handle will prevent the legs from moving.
The Jawhorse is tough enough to handle the outside world, and gentle enough to be used inside the house, which makes it incredibly useful. We'll have more about it in our FirstUse report. [Permalink] - Jawhorse FirstLook Part2
|
|
|
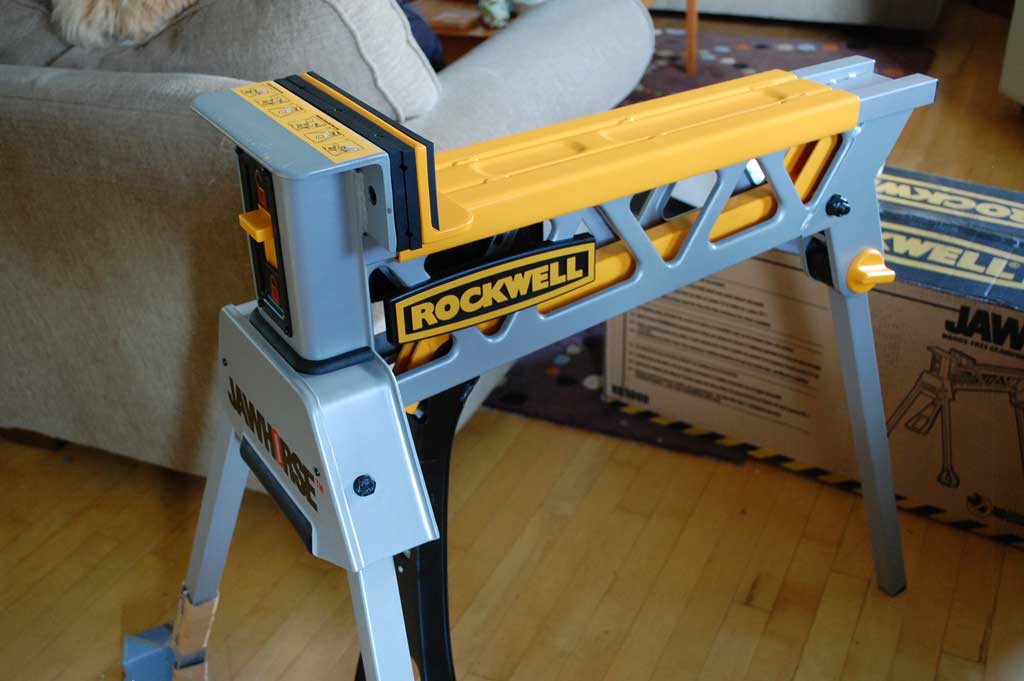
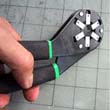
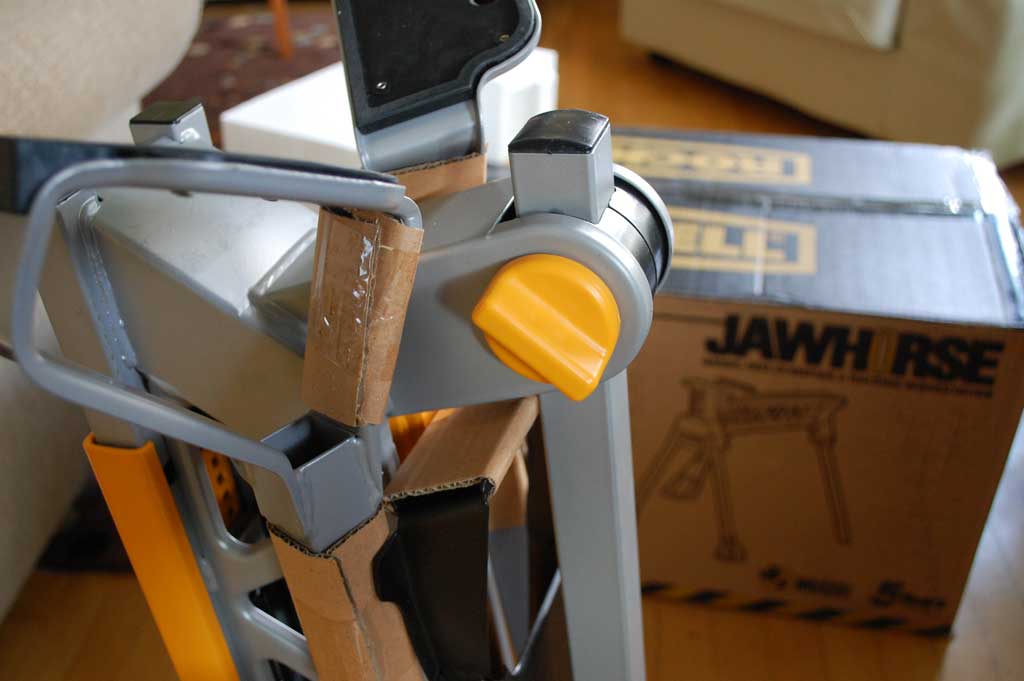
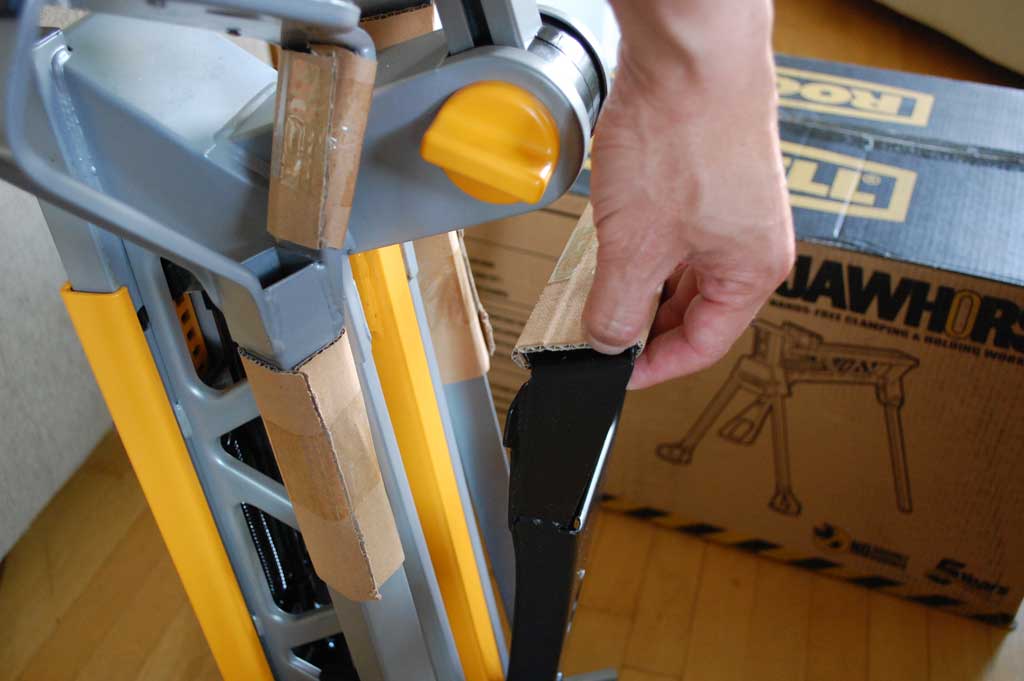
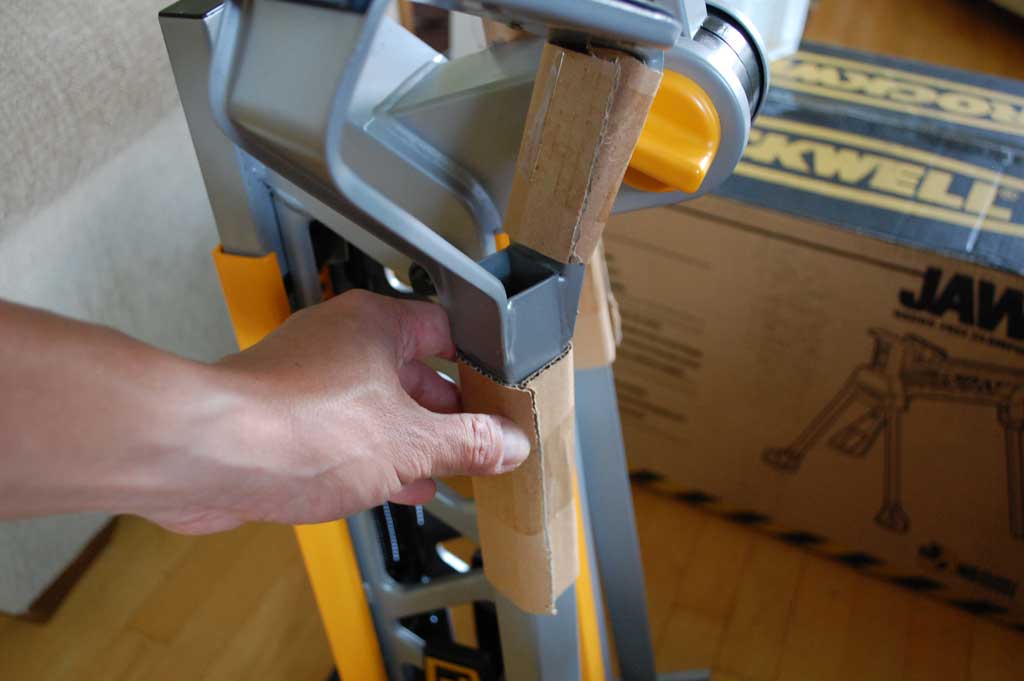
We had been writing about the unpacking and setup of our Rockwell Jawhorse. The more we examine this piece of equipment, the more we came to realize that the Jawhorse is one of those "I wish I had one when..." type of tools.
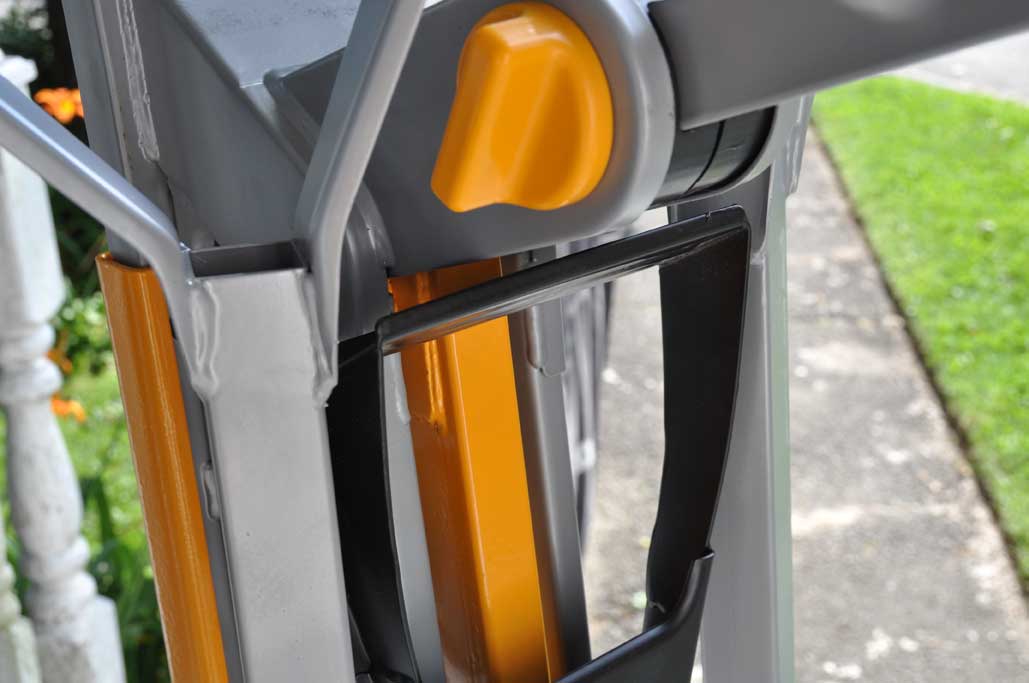
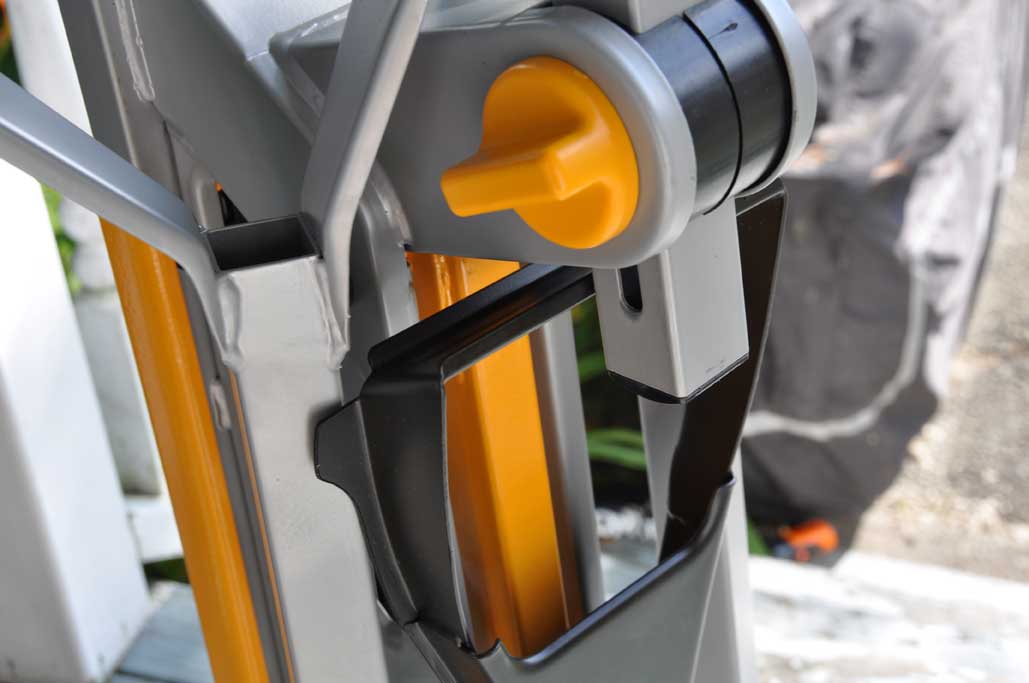
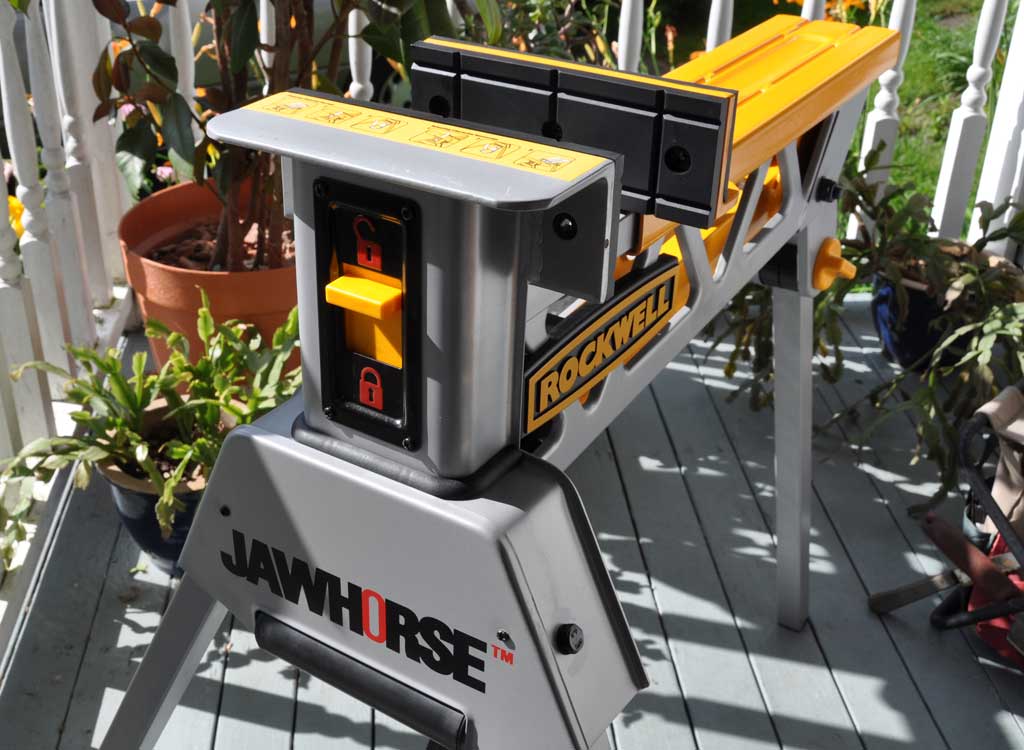
The Jawhorse is cleverly designed, ruggedly built, and easy to operate. Of the various emails we have received about this unit, the most asked question was about the quality of the construction. In this FirstLook segment, we'll take a closer examination of the just that question.
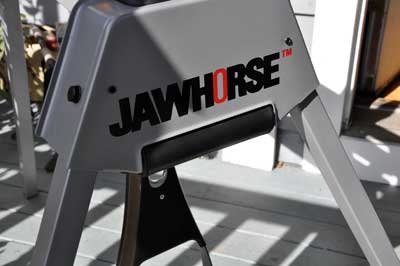
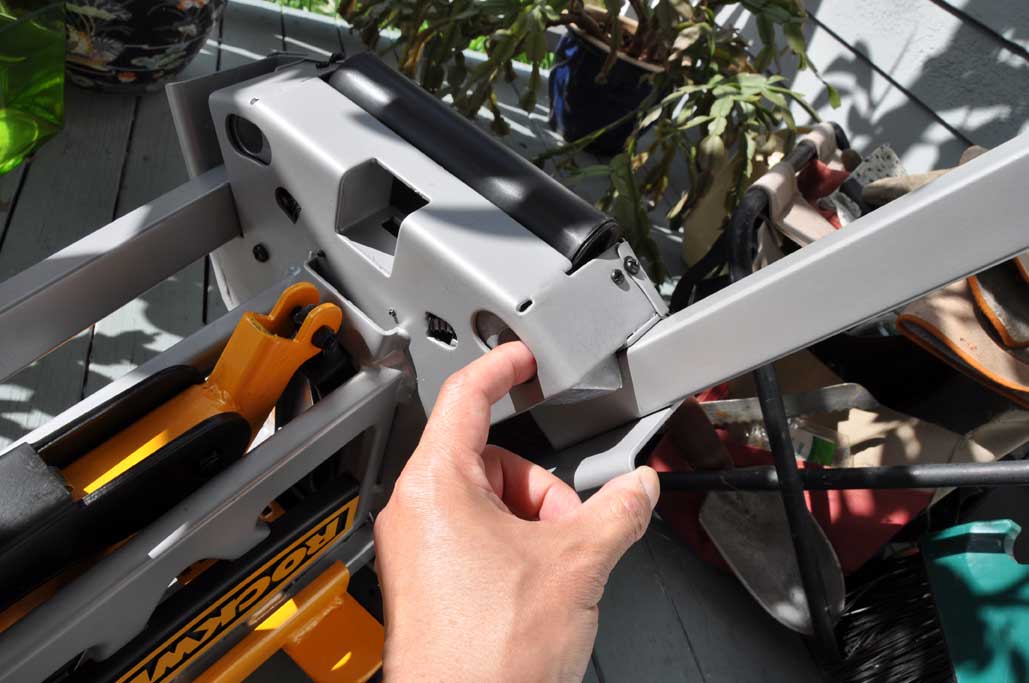
We took a few pics of the joints (frame, rail, supports) throughout the unit. Note the beefy welds at all of the potential stress points. We would be extremely surprised if this unit fails under normal or even heavy use.

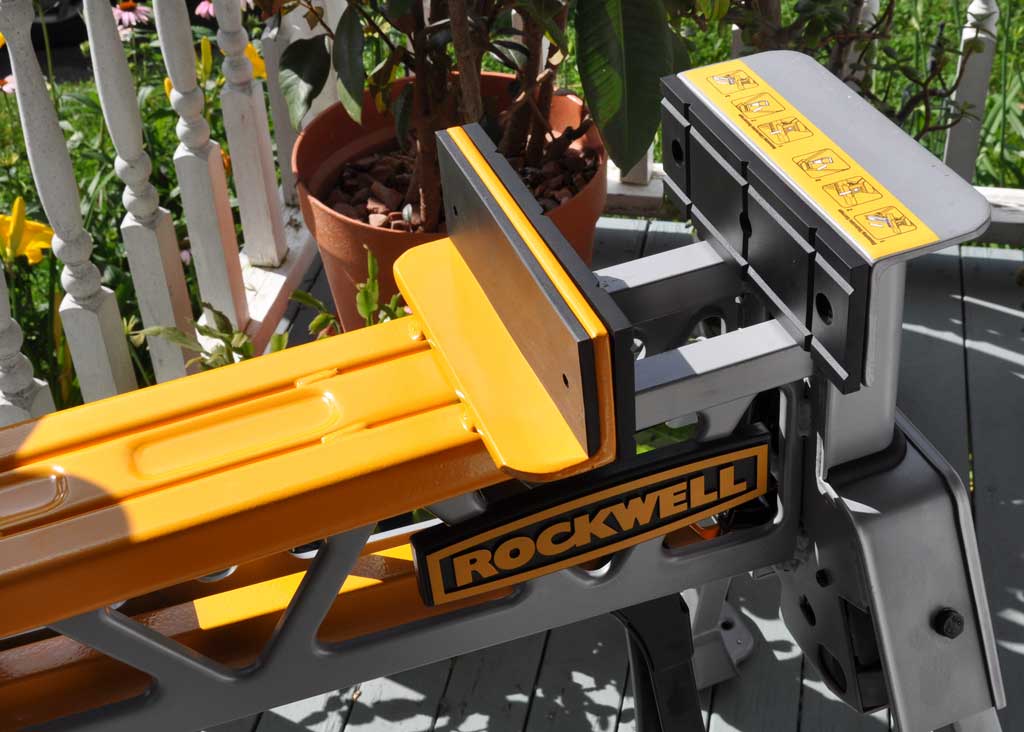
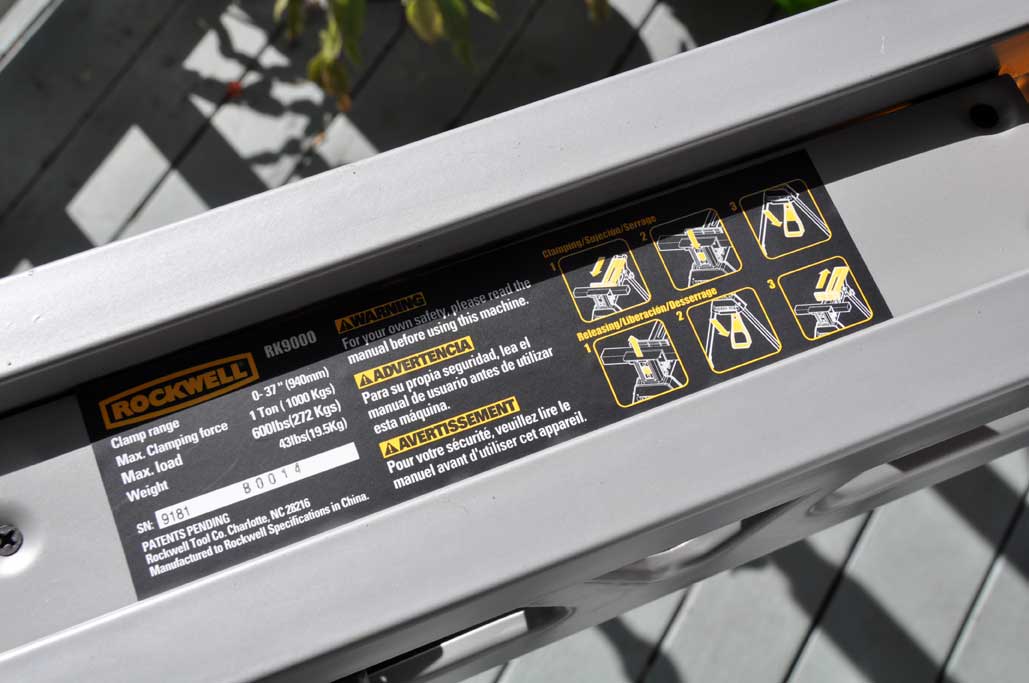
The adjustable jaws are obviously the main feature of this piece of equipment. It is this capability which enable the Jawhorse to take on its variety of tasks (workbench, sawhorse, one-ton vise, machine press). The jaws are padded with a rubber-grip to prevent marring of the workpiece. They can open as wide as 37" and clamp with the force of over a metric ton of pressure.
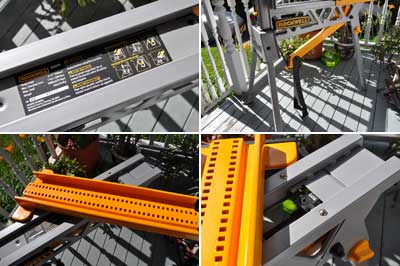
All that force is generated by a cleverly-designed easy-to-use ratchet mechanism. The movable clamp sits on a rail. The clamp has holes on the bottom which may be moved by a foot-operated lever. The pressure from the leveraged can be substantial.
There is more to this Jawhorse. The next installment of this FirstLook series will be the last. The FirstUse series, where we put this tool into use, will start in August. [Permalink] - Jawhorse FirstLook
|
|
|
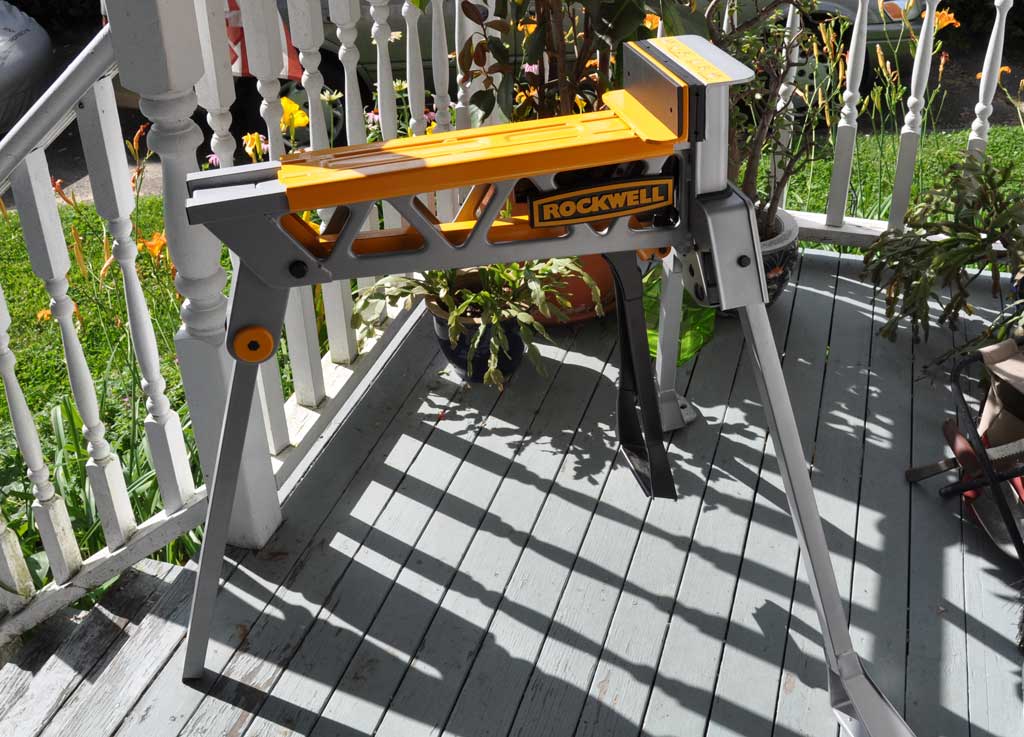
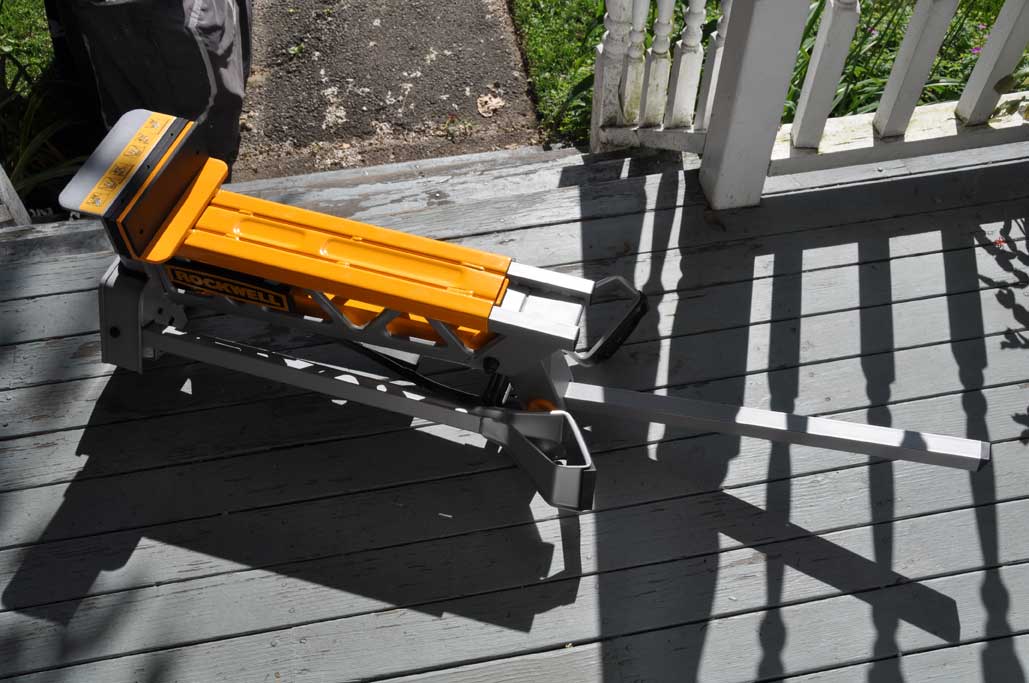
A typical sawhorse is used for tasks such as painting or cutting. It usually comes in two pieces, is made of wood or plastic, and is used for support. Rockwell Tools looked at the sawhorse's A-frame construction and decided to improve its basic design and make it more useful and versatile. The result is the 3-legged steel JawHorse clamp.
The interns unpacked the Rockwell JawHorse yesterday, but were temporarily stymied as to how to unfold and set up the tool. Yes, they could have read the directions, but what fun would that have been? We did look over the directions just to make sure they would not accidentally do something "bad" or hurt themselves. In any case, the process they went through to understand how to unfold the legs gave them a greater appreciation of the clever interlocking design of the JawHorse.
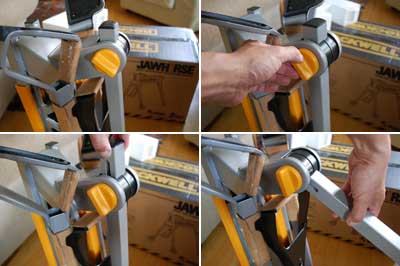
The side legs of the JawHorse are held in place by the single end leg. This end leg is locked down by slot and a friction knob. To set up the unit, first loosen the large yellow friction knob and slide the leg up and out of the retaining slot.
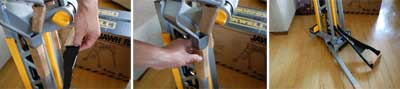
Next, move the large black lever slightly forward so the side legs can be set into the retaining tabs on the black lever. The side legs must be moved until they click-lock into place. If you can see the spring-loaded tab, then it is locked open. When all three legs are locked in to position, the JawHorse will stand upright in a very stable fashion.

When we bring a new tool into our shop, we like to fully understand its features and limitations before we use it on a job site. We will have a more detailed look at the overall construction of the JawHorse and review some of the features of the unit in our next installment of this FirstLook series. In August, we have quite a few RainyDayRenovation projects and we'll be able to give this JawHorse a thorough workout. [Permalink] - Rockwell JawHorse Setup
|
|
|
Everyone gets excited when the UPS man drops off large boxes in the front office, no one more so than the interns. We have asked them not to start tearing into things in the front entry way as it is a high traffic area. They don't always heed our requests. I suppose if we were actually paying them, our "suggestions" would have a lot more leverage :-) In any case, we like their enthusiasm.
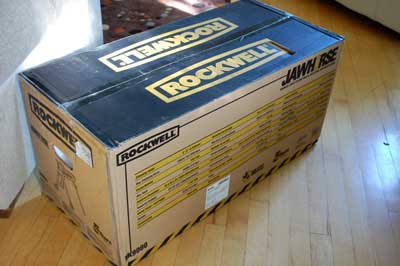
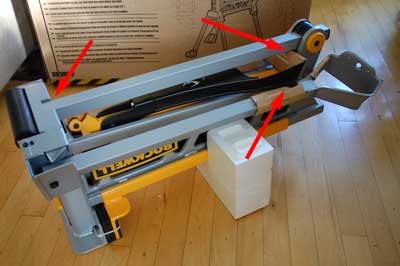
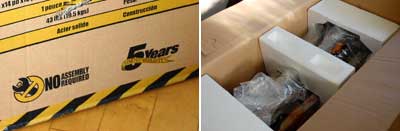
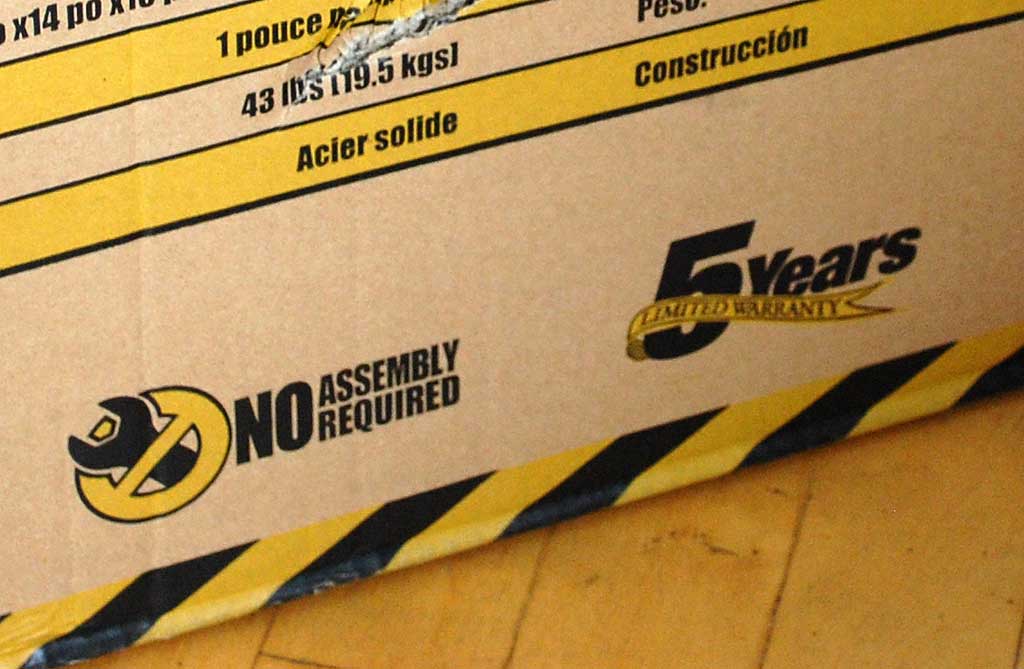
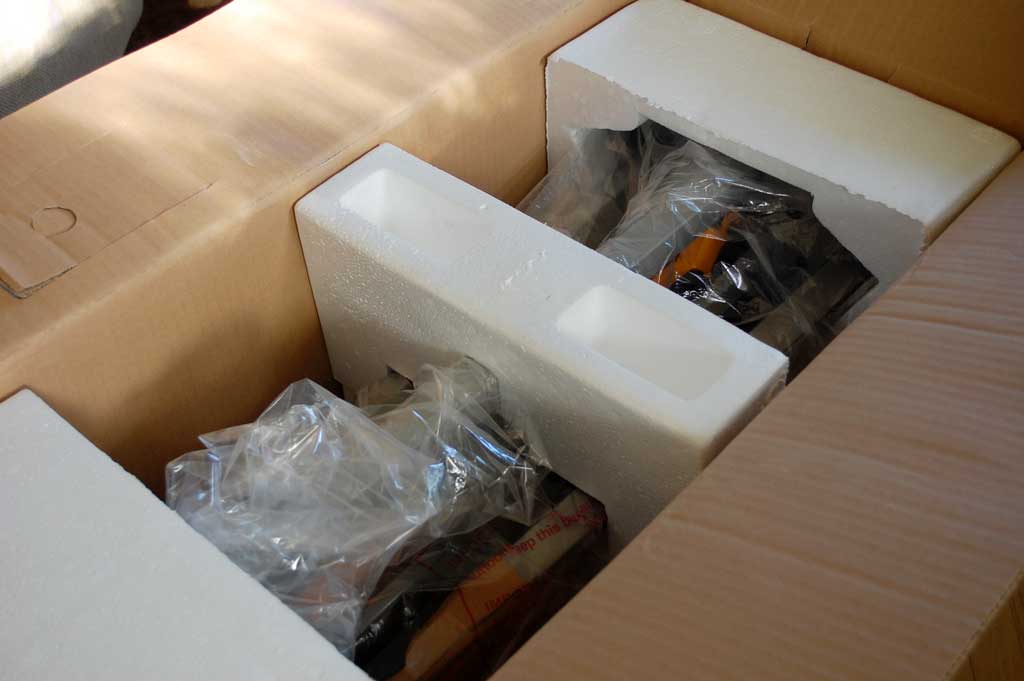
Today's delivery was a fairly large box from Rockwell containing a piece of equipment called the JawHorse. True to the claim on the outside of the box, the unit came fully assembled. There were no loose pieces or accessories. All that was required was for us to take it out of the box. The JawHorse looks to be a well-constructed piece of gear. It felt solid when we lifted it out from the box. The parts are all made of heavy guage metal.
It was not immediately obvious how to unfold the legs. We could let the interns read the directions, but we wanted to see if they could figure out how to do it without them. We'll let you know how thye did in the FirstLook write-up.
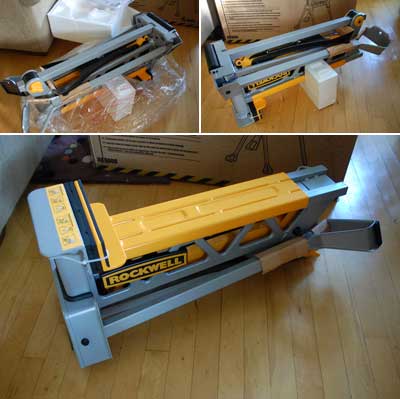
All the rain in July has made us move the renovation schedule around some. The interns are eager to put the Rockwell JawHorse to the test in the upcoming RainyDayRenovation projects. August will be definitely be a busy month! [Permalink] - Rockwell JawHorse Unpacking
|
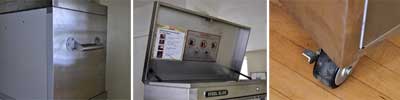
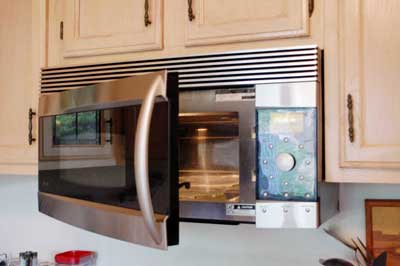
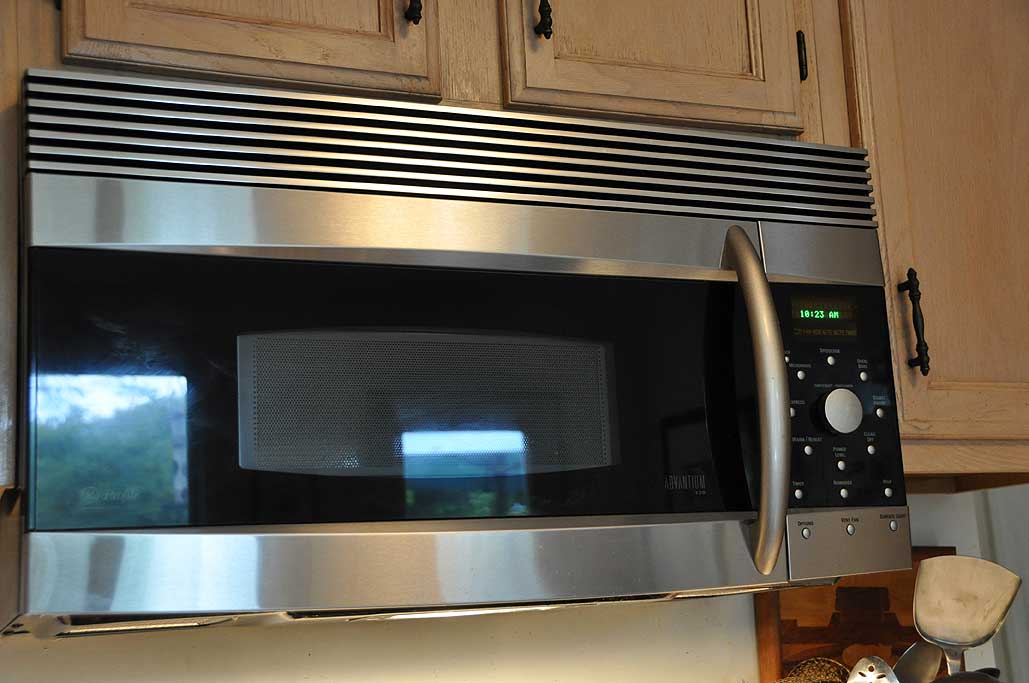
|
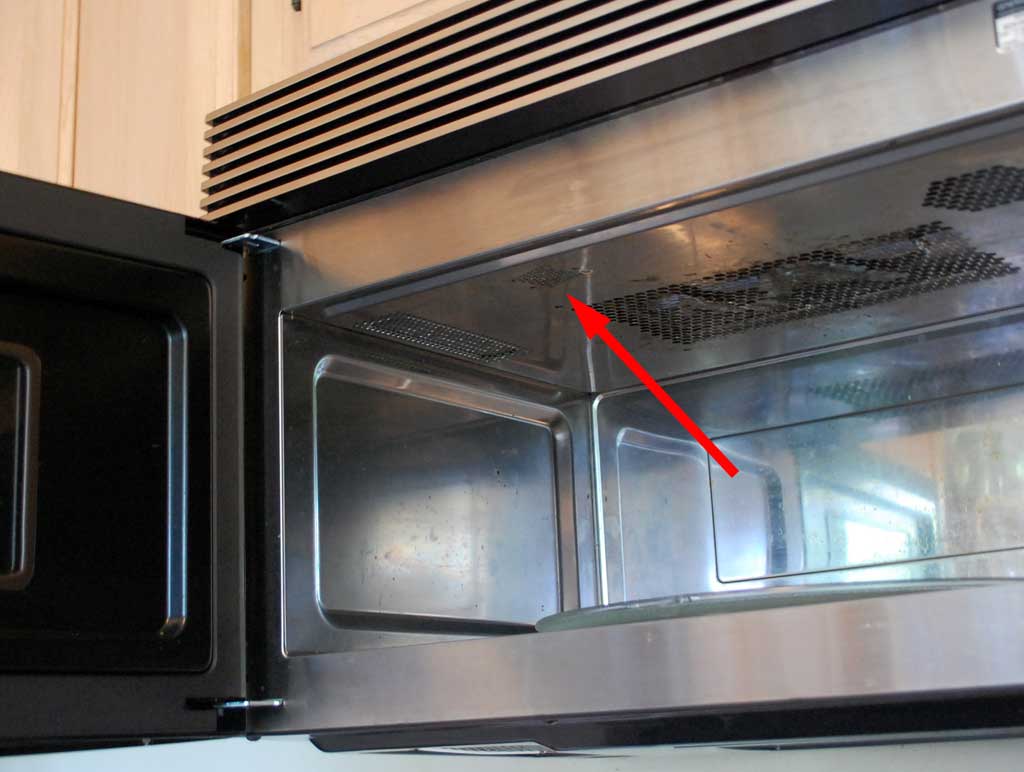
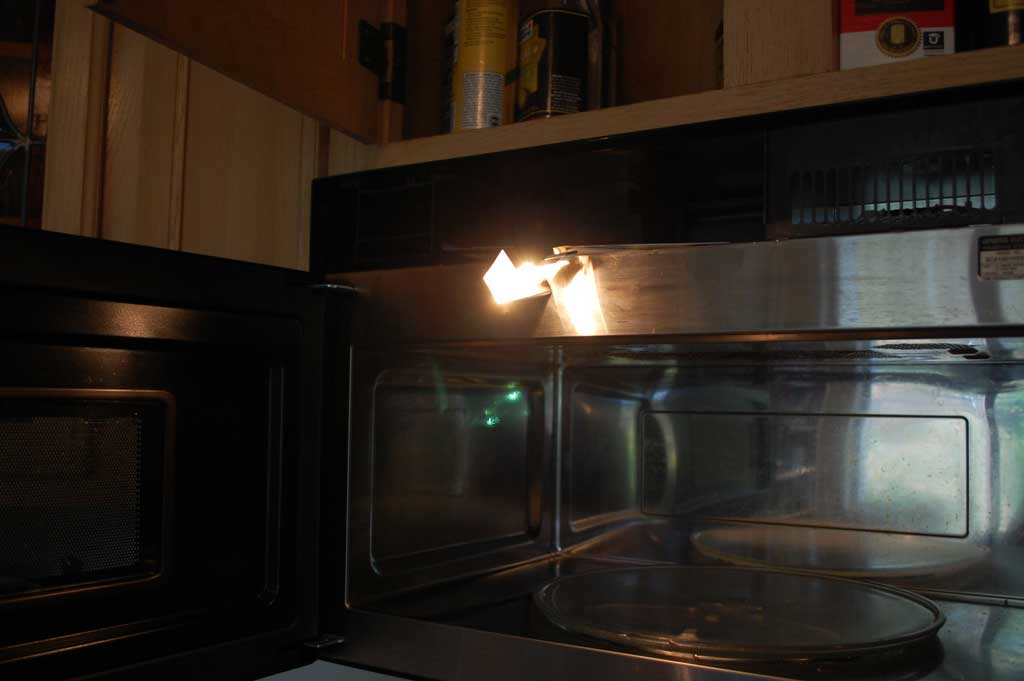
The internal light of our GE Advantium oven went out a few weeks ago. It seem like is should be a simple enough task to replace a bulb. However, upon closer inspection, there did not appeared to be a way to get at the burnt out bulb from the inside of the oven. We figured we would give GE tech support a call to see if we were missing something obvious. The person at the GE service desk was very nice, but they got confused and thought we were asking about the lights under the unit. Once we made it clear that we were inquiring about the light which should come on when the door opens, they "explained" that it was not a "user-serviceable" part. If we would like to schedule an appointment, they would be happy to send a techician out to change the bulb ...for $200.
The obvious question to ask was..."just how many GE technicians does it take to change a light bulb?" They apparently did not see the humor in that question and the conversation soon ended. We thought there was no way we were going to pay someone to come and change a light bulb even if it was free, let alone for $200! If a technician can do it "in the field", then there must be an easy way to get at the bulb.
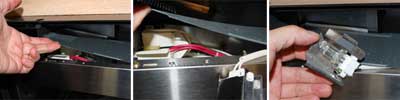
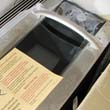
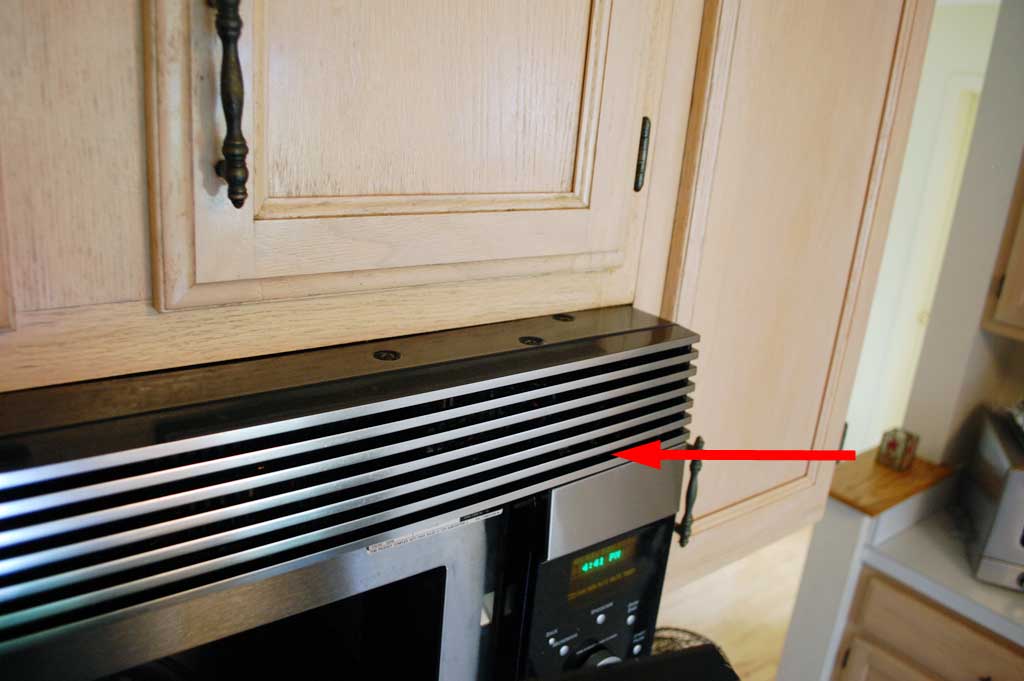
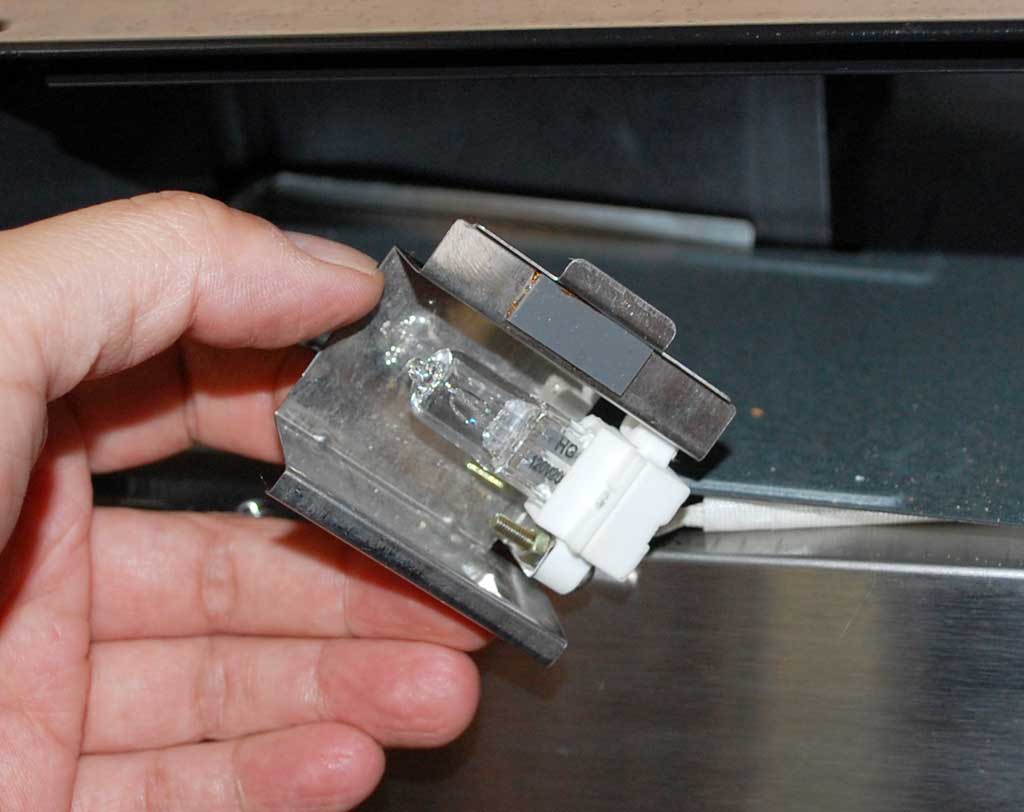
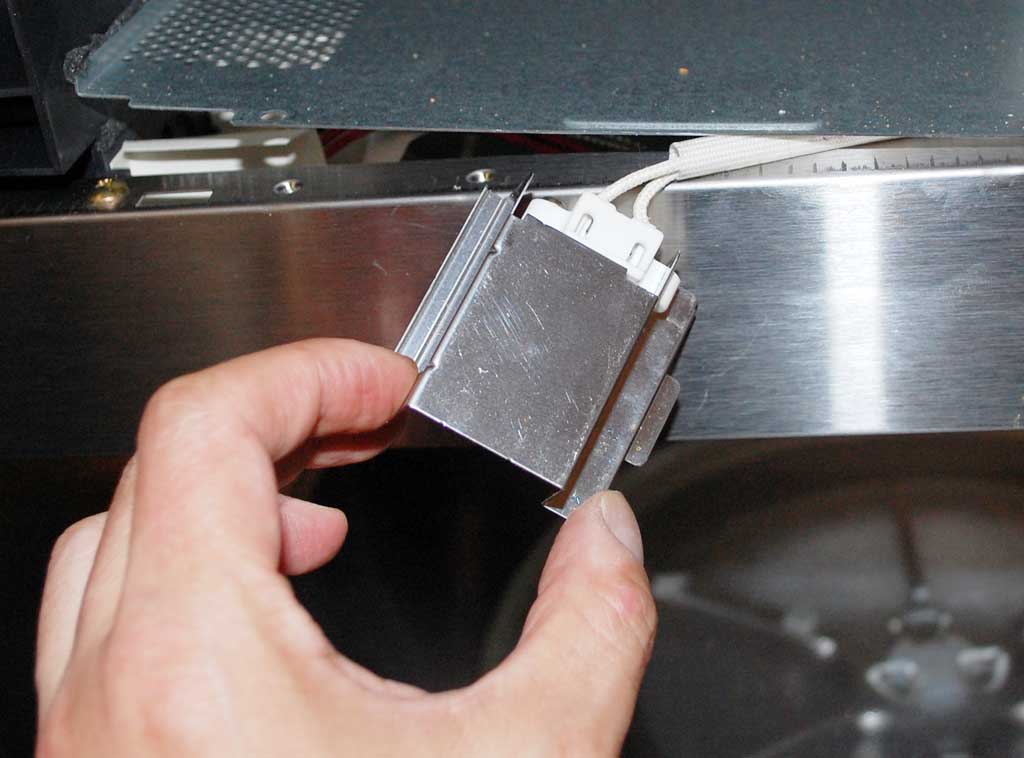
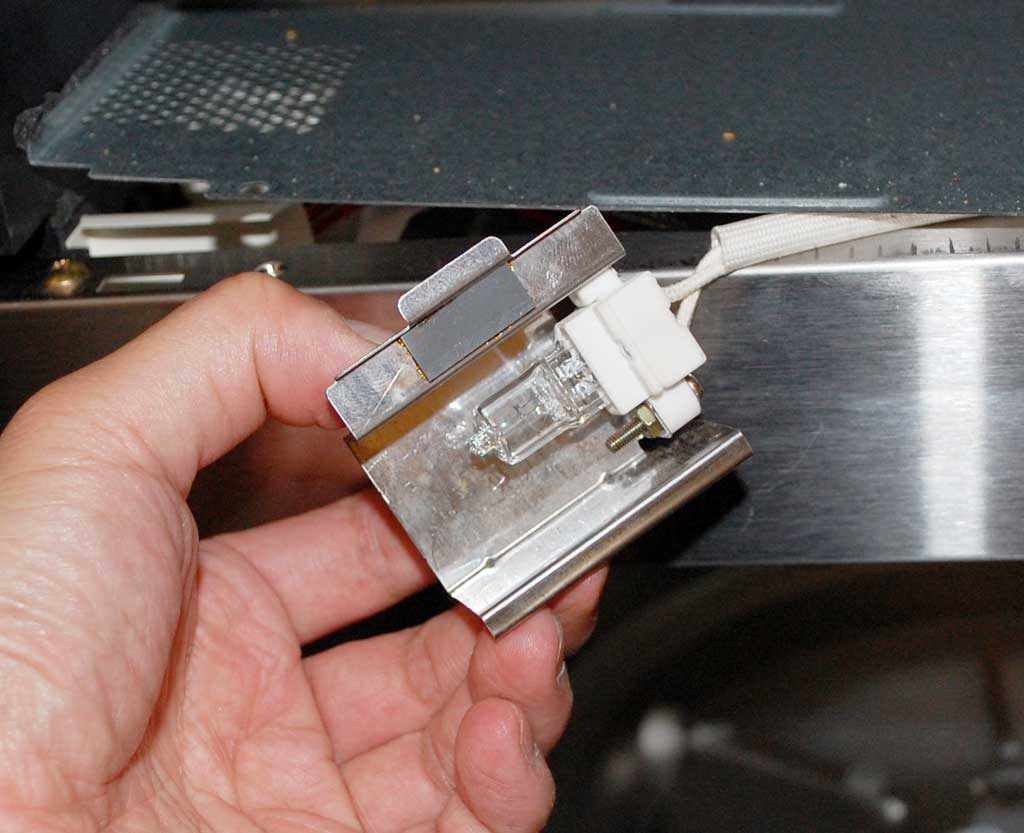
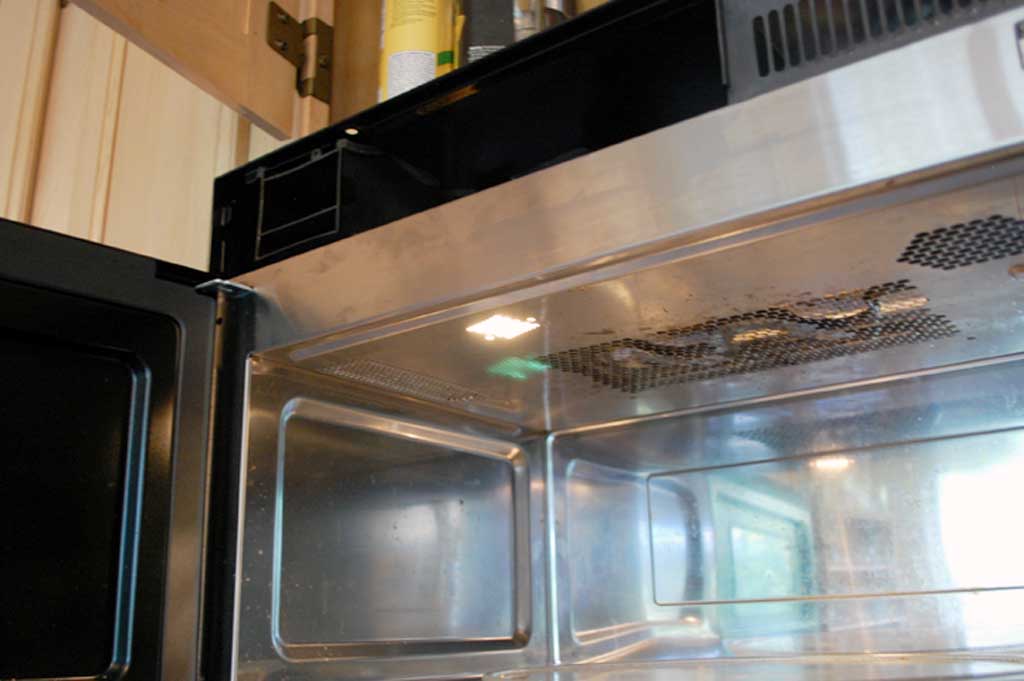
With the AC plug disconnected and the power to the unit verified "off", we went to work. As the bulb was located at the upper part of the inside of the oven, taking the grill off seem to be a sensible first step.
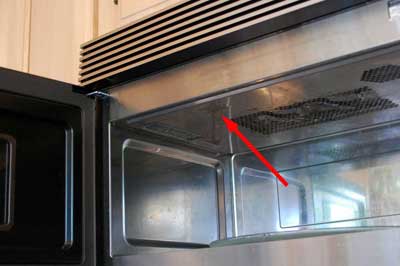
There were a few machine screws accessible from the top of the unit. The two front ones anchored the grill in place. Removing them loosened the grill, but for some reason it would not lift free. There was one more screw in the right front of the grill which was somehow holding on to the grill. When we loosened the screw, we heard a "pop." The screw would not come out, but we were able to free the grill.
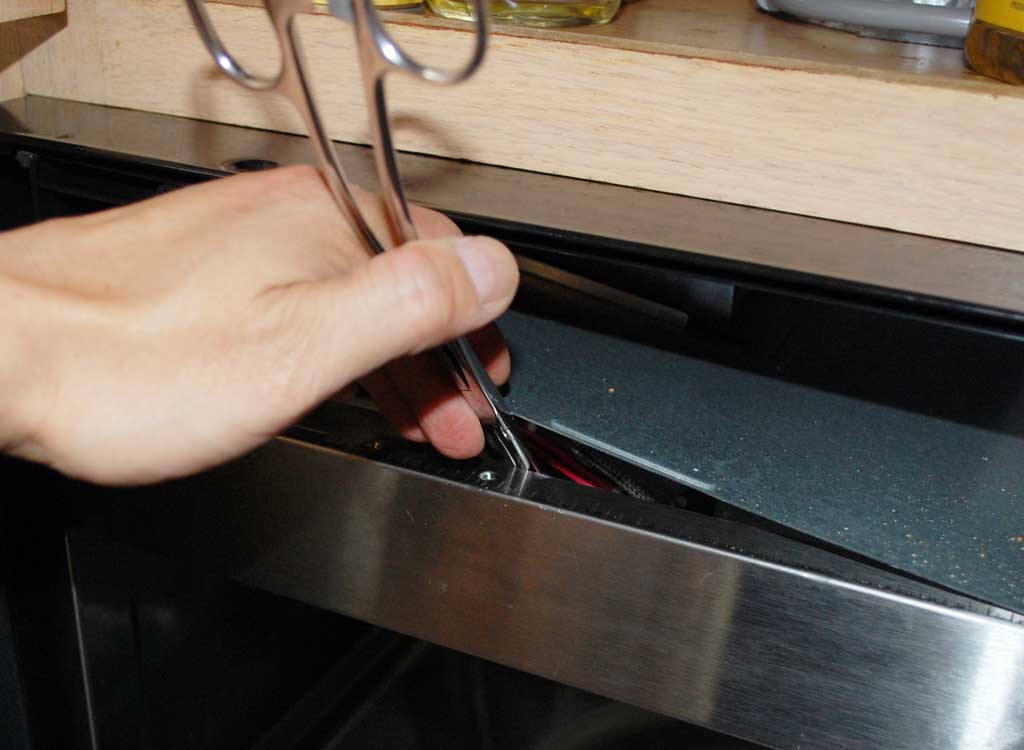
Looking inside the uncovered compartment, we saw a large screw holding a metal panel in place. The panel did not appeared to be removeable, but we were able to lift it sufficiently to see the bulb socket. The assembly did not look like it was screwed down and with a little bit of fiddling we were able to extracted it. Readers with large fingers may have difficulty fishing out the socket assembly, but our interns have small hands so it was not a problem.
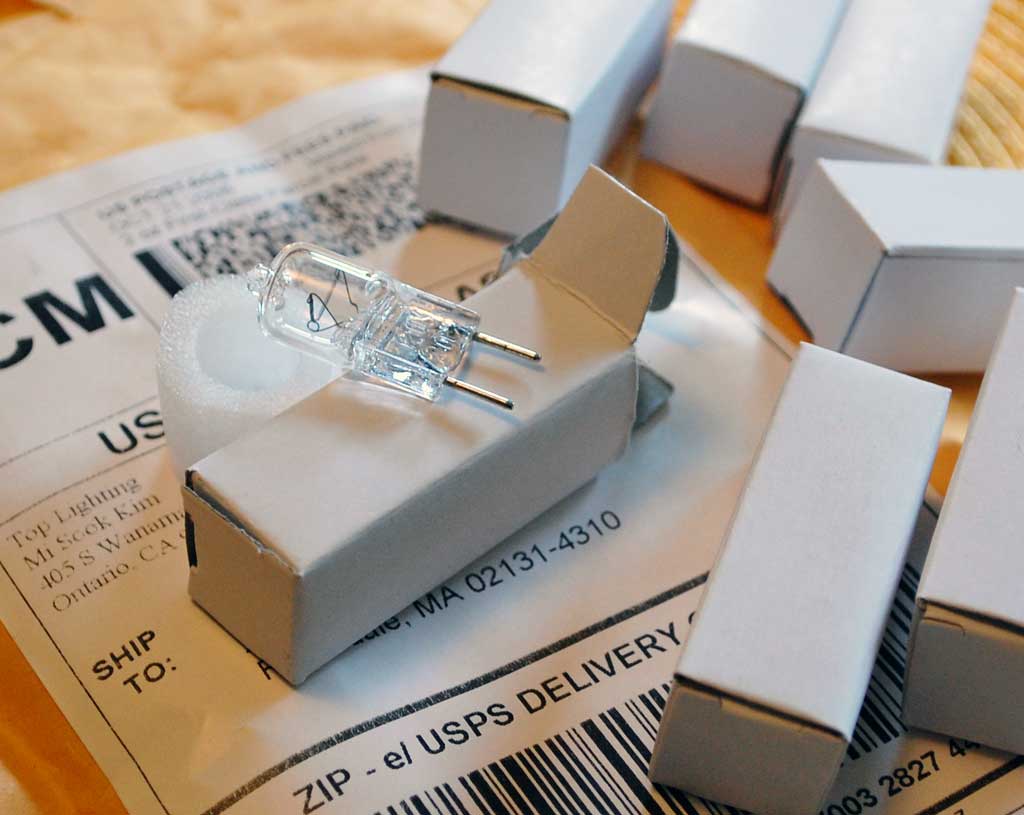
The bulb was a standard 120V/20W G8 JCD-type halogen. Prices of these bulb varies greatly ($20 @GE parts store, $5.99 @Home Depot, $1 @EBay). We had purchased a bunch of them on EBay ($1.15 each + shipping) a while back as they are commonly used in many of the lighting applications around our office.

Upon closer inspection of the light socket, we realized it was held in place by the spring-like cover. This realization made it easier to get the the assembly back into position. All we needed to do was to slide one side in place and use a long thin tool to lightly push the other side until the tab went into the slot.
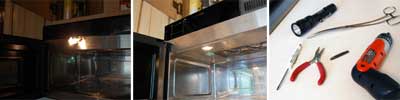
We did do a quick test of the bulb before putting the assembly back into place. One thing to remember is that halogen bulb get VERY hot very quickly. Definitely let everything cool down before touching any part of the socket. Unlike the removal, the reattachement of the grill went without any problems. We didn't even have to mess with that screw in the front. This project only required simple tools, but as we had stated...small hands will make it easier to fish out the light socket.
We can understand that some readers may be uncertain about sticking their hand into a bunch of wires and fishing around. For the few brave souls who are comfortable doing DIY projects around the house, this is certainly a manageable repair task...especially at a savings of $200! [Permalink] - Advantium Bulb Replacement
|
|
|
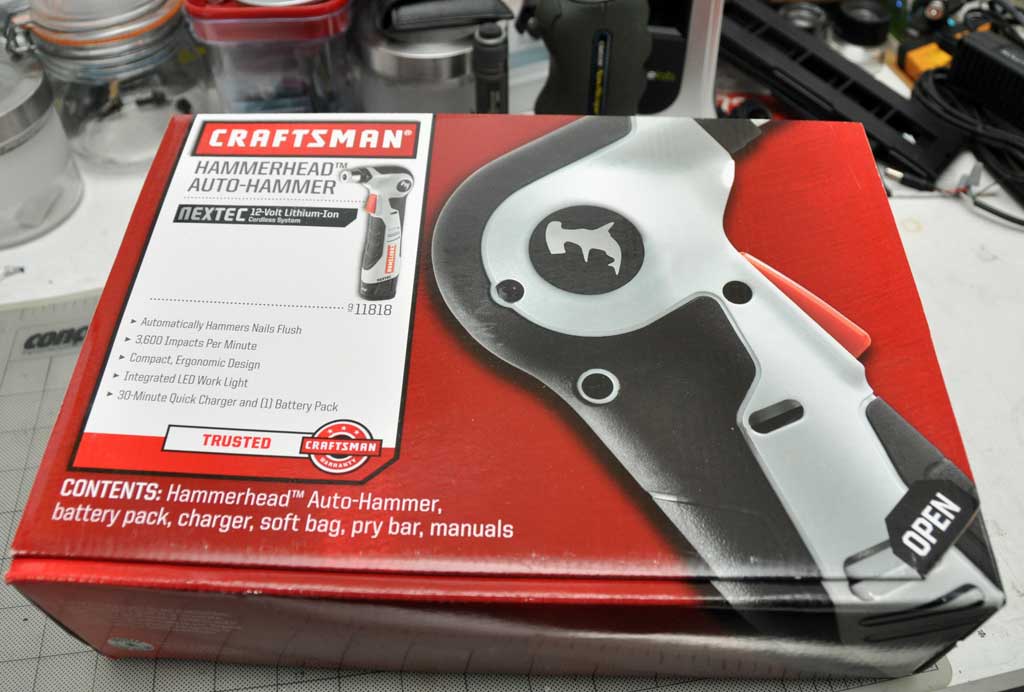
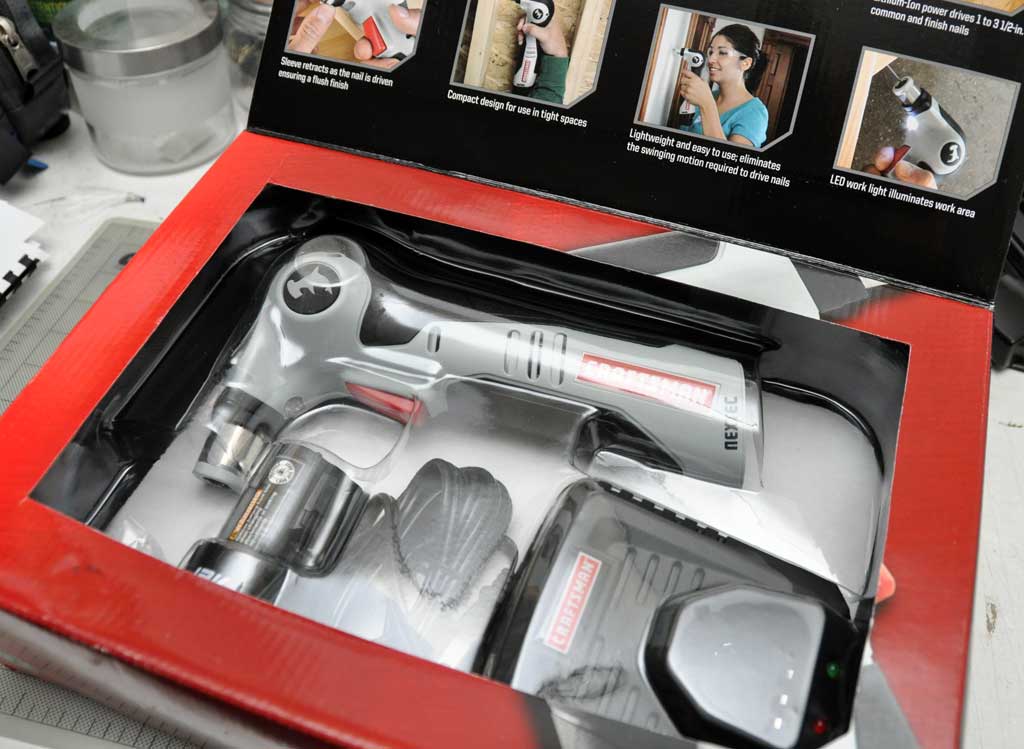
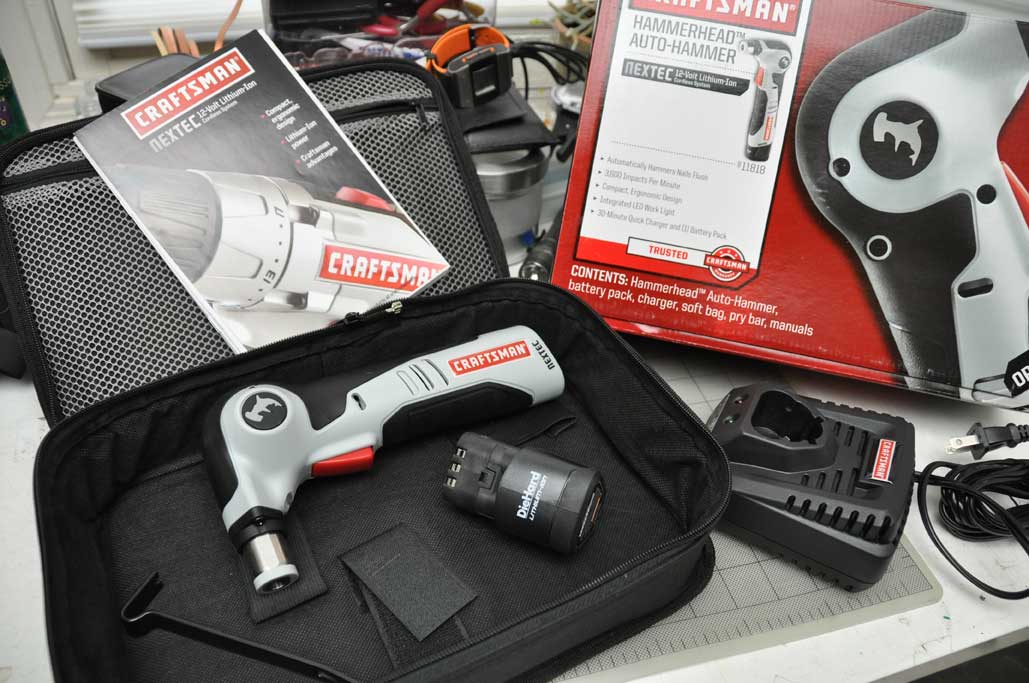
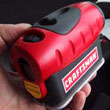
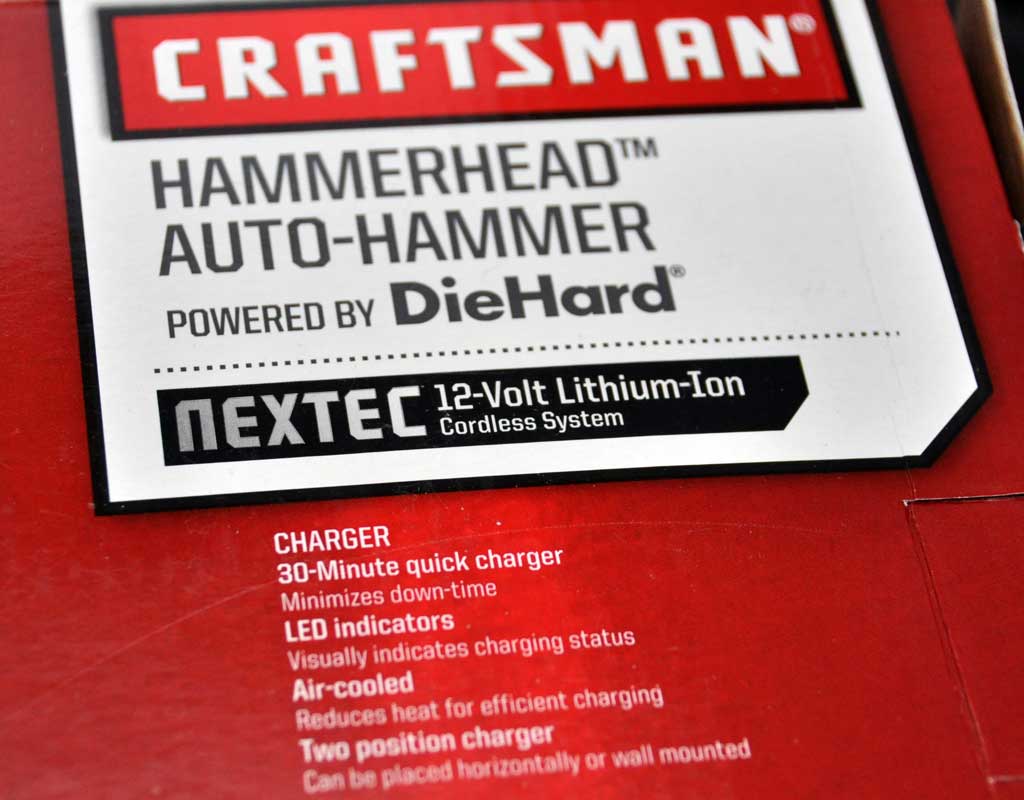
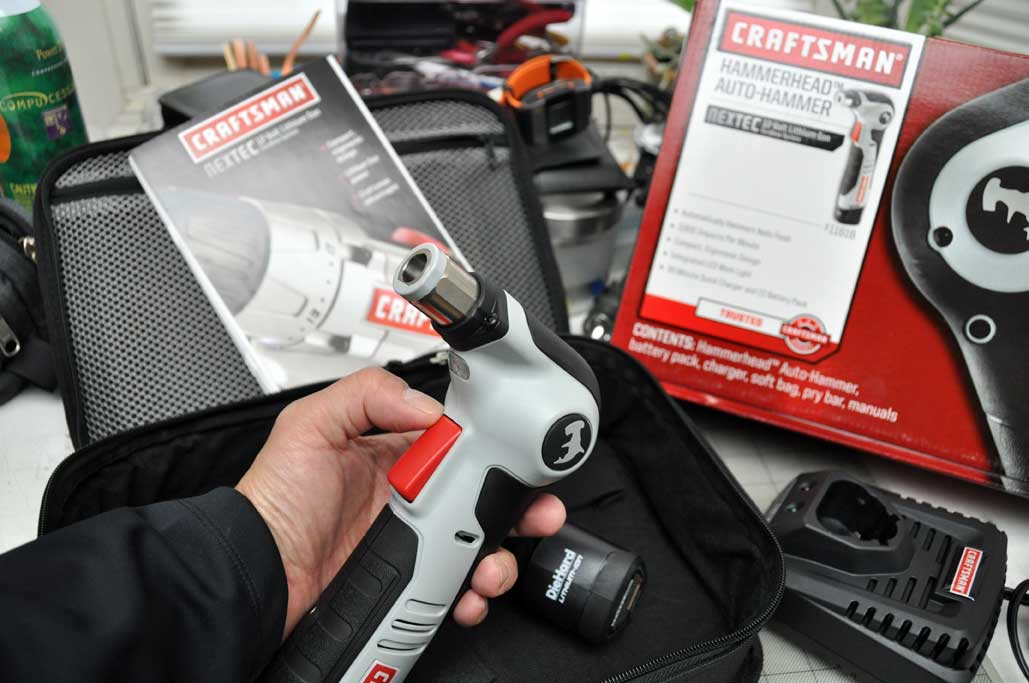
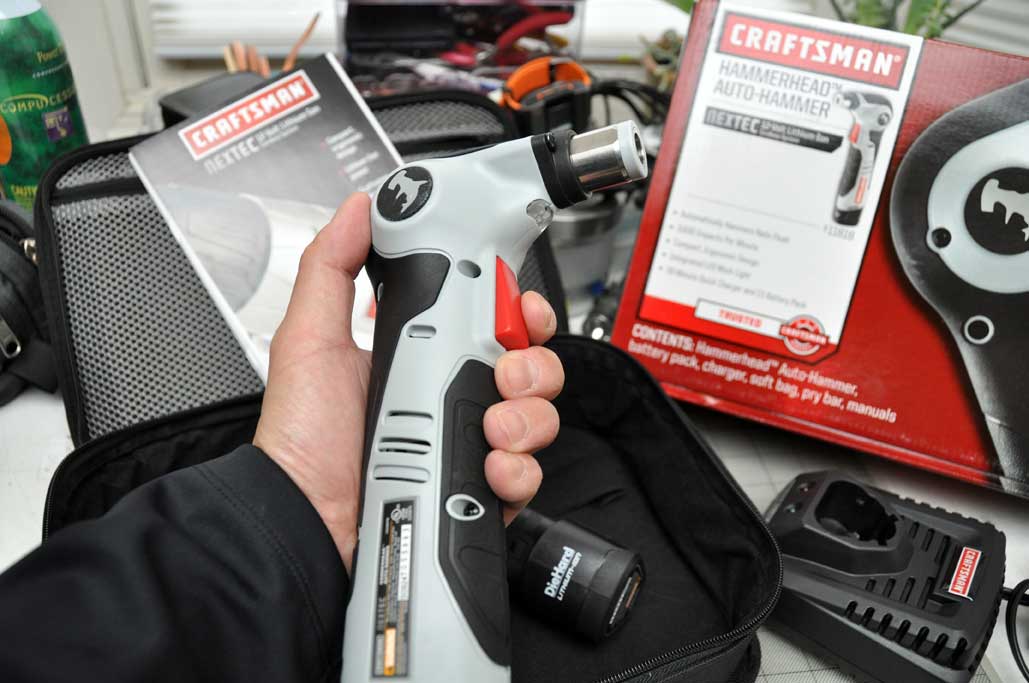
A hammer is a very ancient tool. We would guess that it would be right up there with the knife as one of the first tools invented. There have been updates to the basic hammer design in the past (offset heads, angled handle,etc...), but Craftsman has now taken it to the next level with the introduction of the Hammerhead auto-hammer.
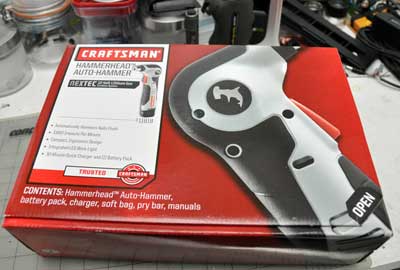
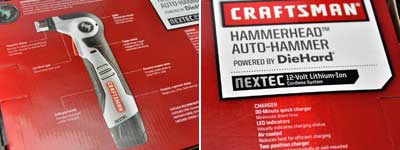
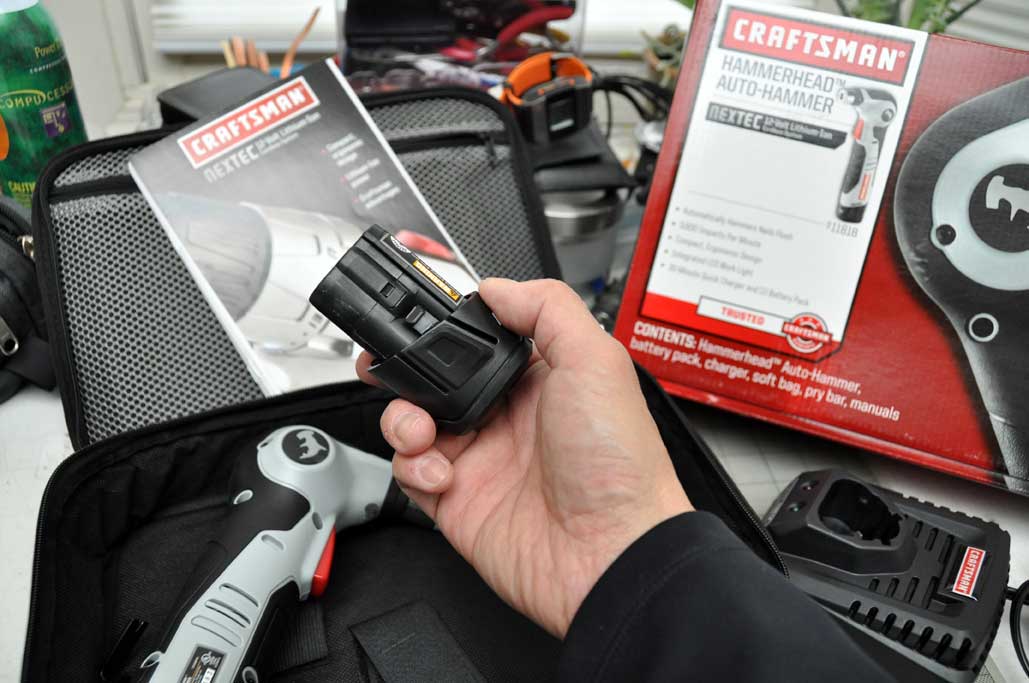
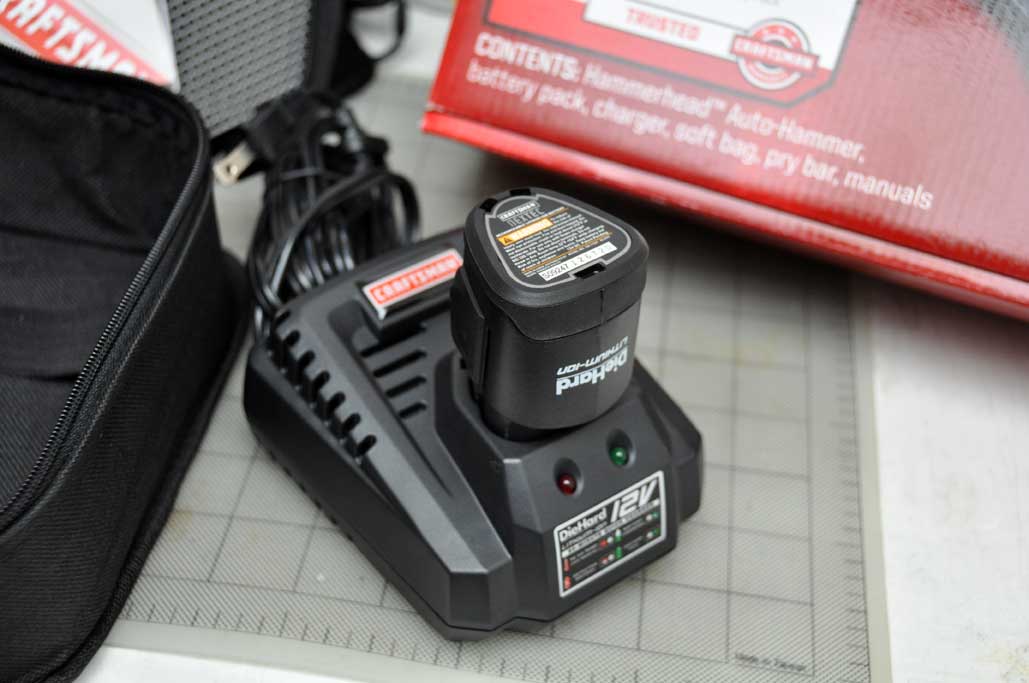
The Hammerhead is a portable, electrically operated, nail pounder that is designed for the novice but suitable for the pros. Unlike most professional nailers, there is no need for a compressor, hose, fuel cell or oil. The Hammerhead's smaller profile was achieved by using a compact, quick-charging, 12V Lithium-ion battery system.
The Craftsman Hammerhead kit consists of the Hammerhead auto-hammer, a 12V Li-ion compact battery pack, AC charger, pry bar, manuals, and a heavy-duty carrying case.
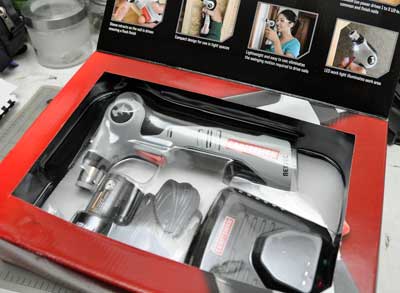
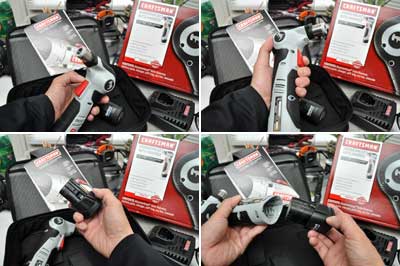
The big problem with traditional hammers for some is the accidental whacking of the thumb while trying to hit a nail. The Hammerhead's magnetic nail holder takes care of that. The ergonomically shaped handle is slightly padded and easy to grip. The balance is neutral and the finger naturally rests at the large trigger.
The 12V Lithium-ion battery is the same technology used in most laptops. It is lighter, has better shelf-life, and recharges without the memory effects of NiCd batteries. Thirty minutes is all that is needed to get a full charge. The charger works either horizontally or wall-mounted. Quite convenient if bench space is at a premium.

Like many of the electrical tools today, the Hammerhead has a well-positioned LED to light up the work area. Being able to see what you are doing is always a good idea. LEDs are great for these applications as they consume very little power.

We will be tackling our planned Summer projects in August and this Craftsman Hammerhead auto-hammer will get a full workout. We will put it to the test on a few of the repair projects both inside and outside of the office. A full report on its performance will be available at the end of next month. [Permalink] - Craftsman Hammerhead FirstLook
|
|
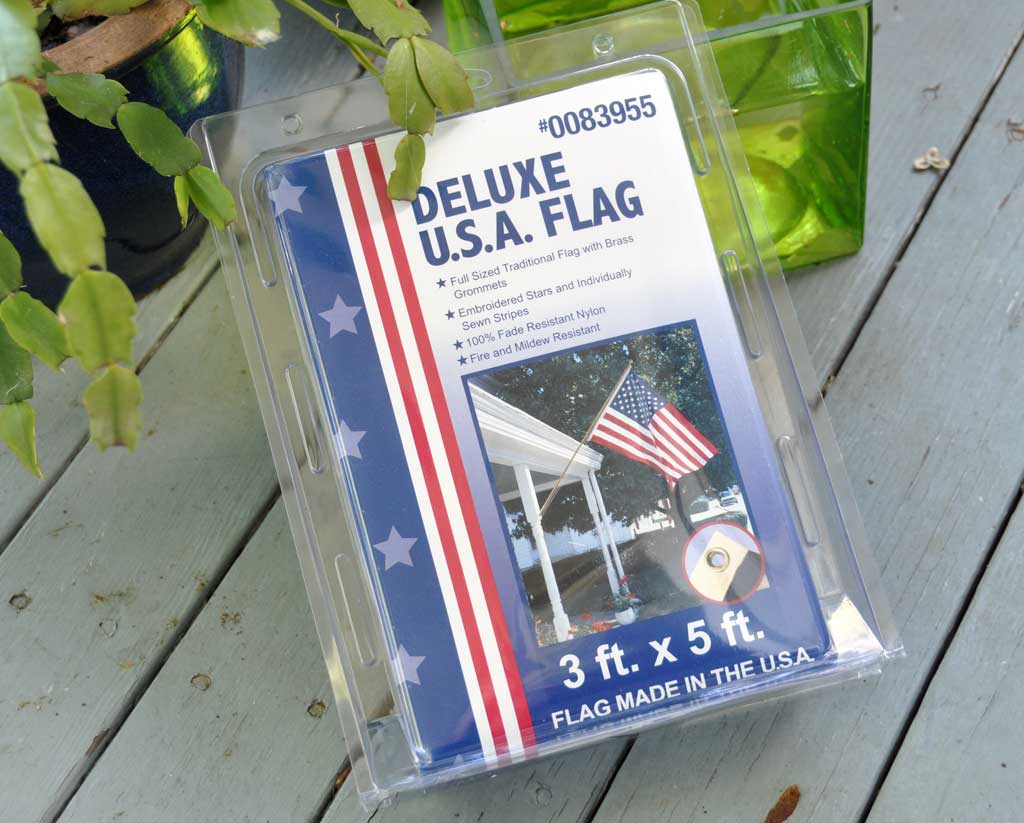
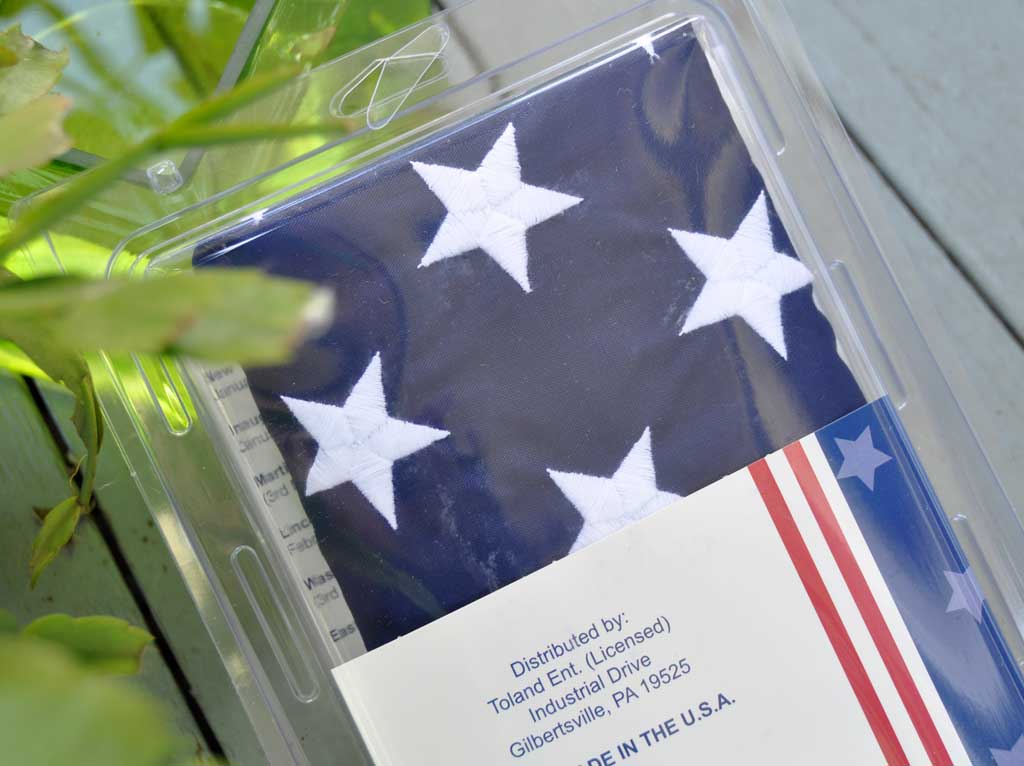
We fly the US Flag at the entrance to the office every chance we get. Due to the constant sun exposure (even in Boston), every few years we have to replace the flag due to fading.

We found a really nice one at Home Depot a few weeks ago. Home Depot had a pretty large selection. The prices ranged from a few dollars for nylon ones to quite a bit more for the higher quality version. We liked the one we got for several reasons. The material was much heavier. The stars were made of stitching instead of just being printed. The flag was also made in the USA. It might be a small thing as we certainly don't look for the "Made in USA" label on other items, but it just seem appropriate that if we were to buy a US flag that we should buy one which was made here in the USA.
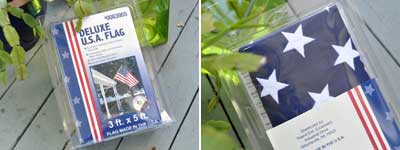
We have not gotten rid of any of our previously retired flags. There is a formal way (burning) to dispose of a retired flag, but we were wondering if there were any other acceptible uses for a retired US flag. Any suggestions? [Permalink] - US Flag
|
|
|
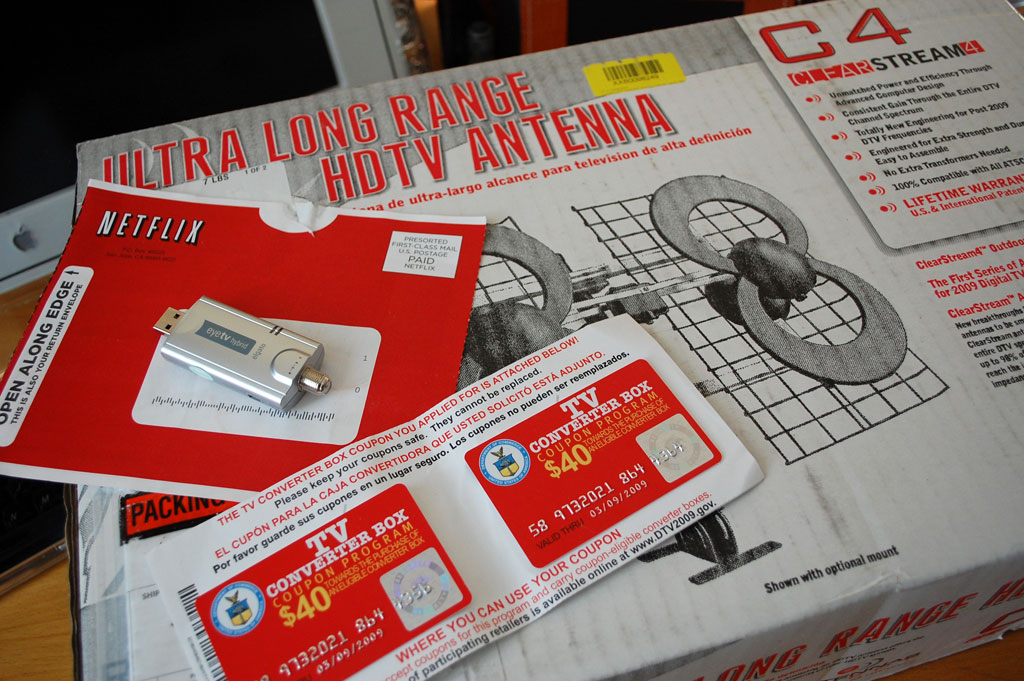
The conversion to digital TV went live last Friday. Many with perfectly good TV sets went and got the converter box and upgrade without any issues. Some have reported issues with getting decent receptions using their old antenna. If you are one of those folks, this may be a good time to invest in a better antenna. We are in Boston and have had good experiences with our Clearstream C1 antenna. If you live in a more remote area, you may want to give the larger C4 a look.
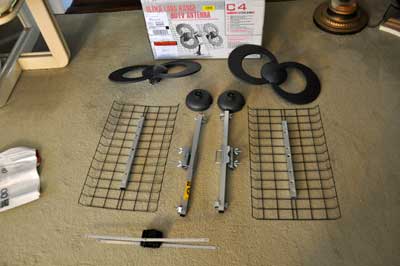
The Clearstream C4 is a lot bigger than the C1, but still quite a bit smaller than a comparable traditional TV antenna. The C4 antenna is also flat. The flat design has the advantage of allowing the antenna to be mounted on the side of the house rather than on the roof.
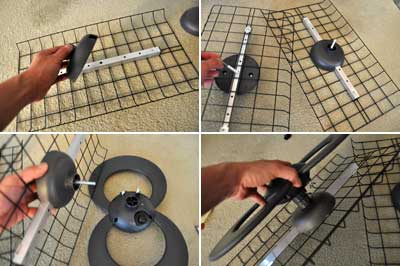
Assembly of the Clearstream C4 was very straightforward. The supplied directions were clear, but not really all that necessary. We will not describe in detail the steps as the photo series is pretty self-explanatory. The only tool required was a Phillips screwdriver.
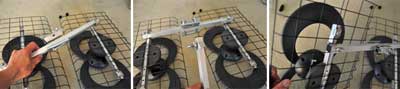

There was only one spot where we ran into a slight snag. We had tightened the black figure-8 to the frame, but in order to attach the cable connector, the wing-nuts (red arrows) must be removed...which you cannot do at this point. So there is no need to tighten the figure-8s.
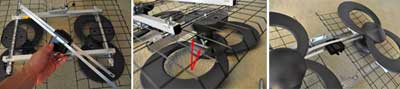
Once assembled, the C4 is very structurally stiff. We would expect it to be able to fare quite well outside. However, we have always mounted our TV antenna in the attic. The wooden frame of the house does cut down a little bit on the receptions, but for folks who are close to the TV stations, this is an easy way to make the antenna last a long time. The big antenna under the C4 is about 40 years old and it is still pretty much brand new.
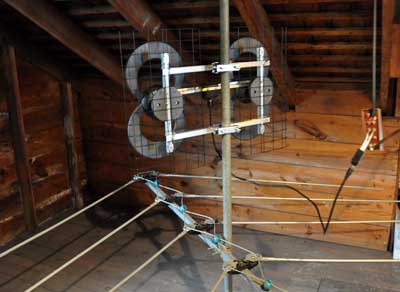
With the Clearstream C4 mounted, we did a side-by-side test of the two antennae. We are happy to report, the C4 did every bit as well as the much larger "cloths-line" antenna.

If you are not getting good reception with your old TV antenna, we would definitely recommend investing in a new one. We like the Clearstream antenna because they are flat, easy to put together, and worked really well...even in the attic :-) [Permalink] - Clearstream C4 Antenna
|
|
|
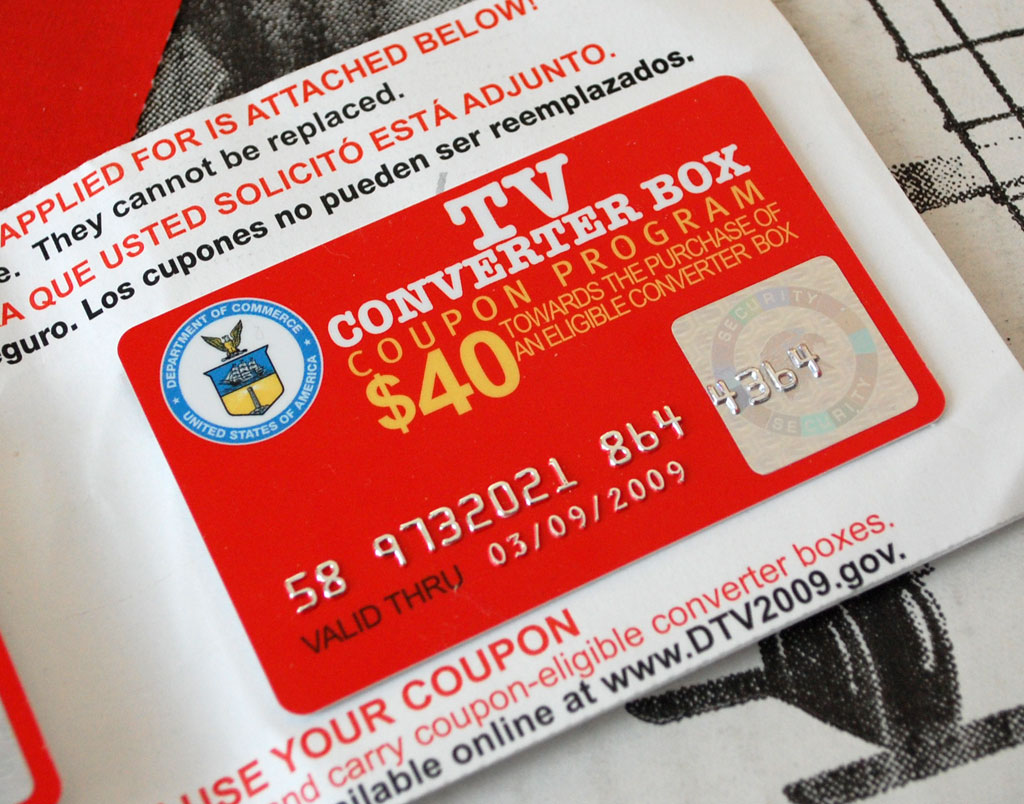
Today is the last day (REALLY) that stations in the US will be broadcasting TV signals in analog form. While we are pretty certain that frequent RainyDayMagazine viewers are aware of this fact, new readers from other planets may not be so aware. The switch to "digital" doesn't really have to affect you all that much. It is likely that many of you get your TV signals via cable or satellite dish, some may watch TV only via their computer, and a small percentage may not even watch any TV at all!
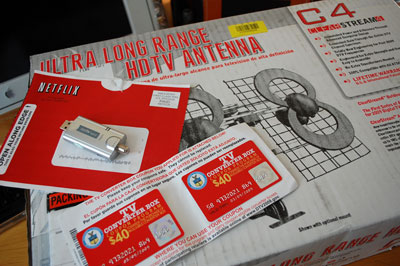
If you want to keep your analog set a little bit longer, a converter box is needed to change the digital signals being broadcast back to analog form for the "old-school" TV tuners. The government has been giving out $40 coupons for about a year now. We never did use ours and they have since expired. We kept them because we thought they would be a good collectors items :-)
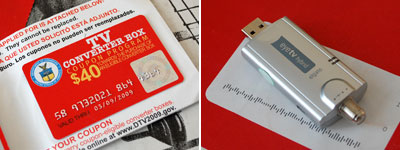
For those who want to watch TV, but don't want invest in a separate LCD TV, a digital tuner such as the eyeTV from Elgato may be the way to go. This little gadget will turn your computer into a digital TV. Attach a good TV antenna to it and you can pull in signals from who knows where.

For readers who don't care about watching "live" TV, Netflix is a great option to stay current on TV shows on their own time. Only the "good" shows make it onto DVDs anyway, so when a TV series is available on Netflix, one can be pretty sure it doesn't suck.
So there you go...analog TV is going away, digital TV is here. There are plenty of options to getting a "new" TV. By doing nothing, it is also an opportunity to break from the "boob-tube's" grasp and reclaim some "you-time". The choice is yours. [Permalink] - Analog's Last Day
|
|
|
We have a nice little bistro set out on the RainyDayGarden deck. The problem is they are exposed to the elements all year long. We would bring them in over the Winter, but we don't really have the space to store any of it. As a consequence, they have started to develop some rust patches after 9 years.
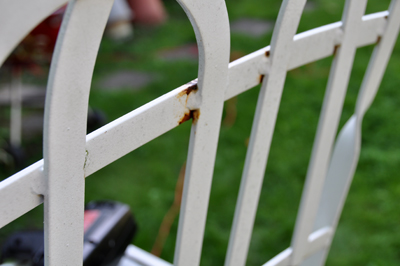
The folding chairs themselves are sound and most of the finish is still quite good. There is some peeling paint and some exposed rusty patches, but nothing a good coat of Rustoleum cannot fix.
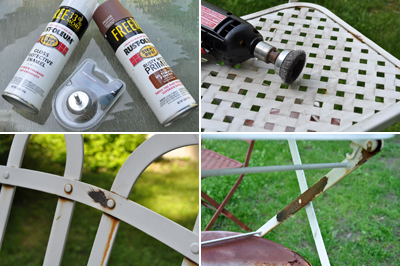
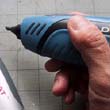
The key to fixing rust spots is to sand and prime. Sanding can be done by hand, but using a wire brush attached to a drill made the job a lot easier. And faster.
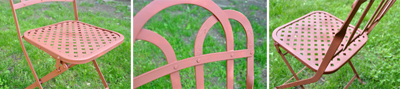
The primer must be applied in a well-ventilated area. We did it outside. There was light breeze which made the spraying a bit challenging, but it worked fine enough. By the time we were done with the priming, we ran out of daylight. We'll let it dry overnight and do the gloss white coating next weekend. [Permalink] - Rustoration
|
|
March 26,2009 (TurnOnTheLightsThursday) |
Some here have been complaining about the flickering light in the RainyDayKitchen. The problem was not serious enough to make it on the RainyDayRenovations Project list, but it was always in the back of our minds.
This past weekend, a few folks went to IKEA for lunch (cheapest place to shop AND eat) and saw a perfect replacement for the annoying, and some would say ugly, overhead light in the kitchen.

Since the lamp they saw was under $30, they didn't bother to get approval from the bean counters. The Finance folks approved the expense even thought they had not pre-approved the purchase. It is unbelievable the amount of paper work we have to do around here.
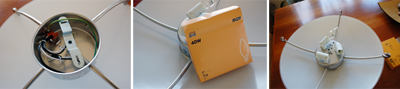
The great thing about IKEA products is they are all designed with DIYers in mind. The construction is simple, their instructions are clear, and the installation usually quick and simple. This overhead lamp was no exception.
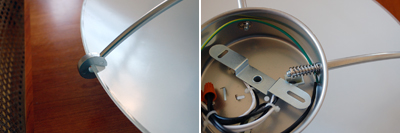
The base holds three 40W bulbs. The glass shade is held in place by four arms. One of the arms is spring-loaded so it can move to secure the shade.
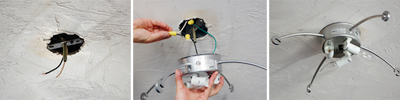
We turned off the main circuit to the kitchen before we started the work...doing the project during the day helps because the lights will be off :-) Attaching the base to the old spot was a simple disconnect/reconnect of the three wires (white, black, ground). The trickiest part was getting the main post to come through the base so we could attach secure it with the nut.
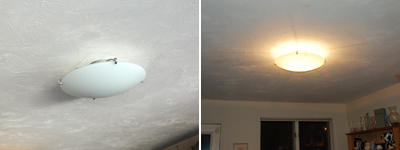
We were done in about 15 minutes. Since we did not have to cut or drill anything, there was nothing to clean up. The light came on when we reset the breaker and hit the power. The flickering has been permanently removed and the kitchen now has a much warmer glow. Thank you IKEA. [Permalink]- Let there be light
|
|
March 25,2009 (WowUsWednesday) |
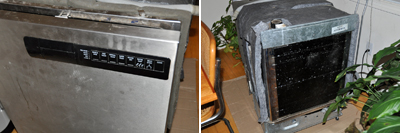
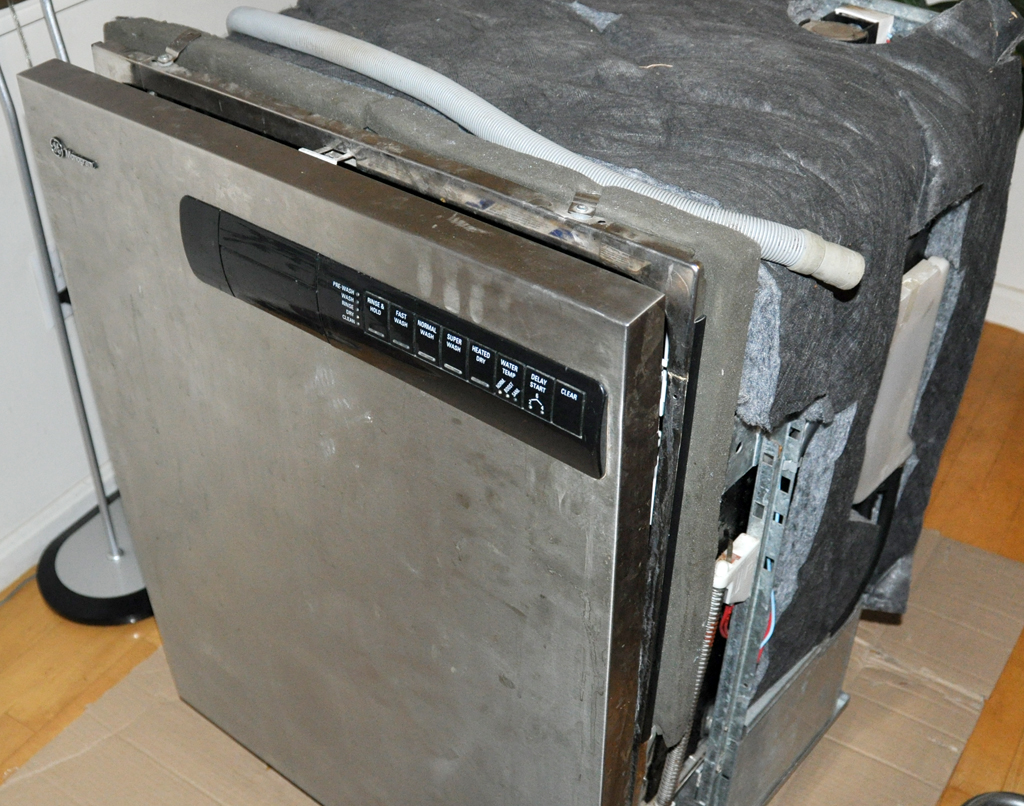
One never knows what gets put out on the sidewalks of Boston on trash day. OK, most of it is trash, but once in a while, you find a $1000 stainless steel dishwasher along with the usual crap.
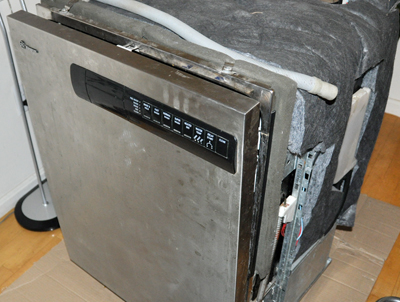
This one was discovered by one of our editors while surfing Craigslist. It was listed as .. "free, first come first served. The only problem is that it leaks...already out on the sidewalk. " Well, nobody here could pass up a deal or challenge such as that!
We were on our way to Rhode Island, but Jay (one of our editors) offered to go pick it up. By the time we got back, it was out on the back deck!

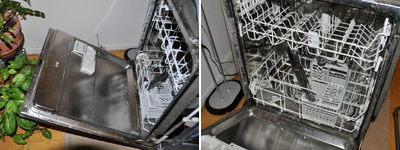
The machine looks to be in pretty good shape. No scratches or dents. It was stainless steel both inside and out. There was no rust anywhere, but it could use a cleaning around the edges.
We have no idea of the mechanical state of this machine, but we now have our Spring RainyDayKitchen/RainyDayRenovation project! How hard could it be to fix a leaky dishwasher anyway? We'll let you know. [Permalink]- Free is Good
|
|
March 7-8,2009 (WeekendEdition) |
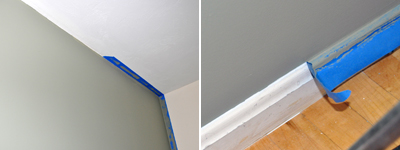
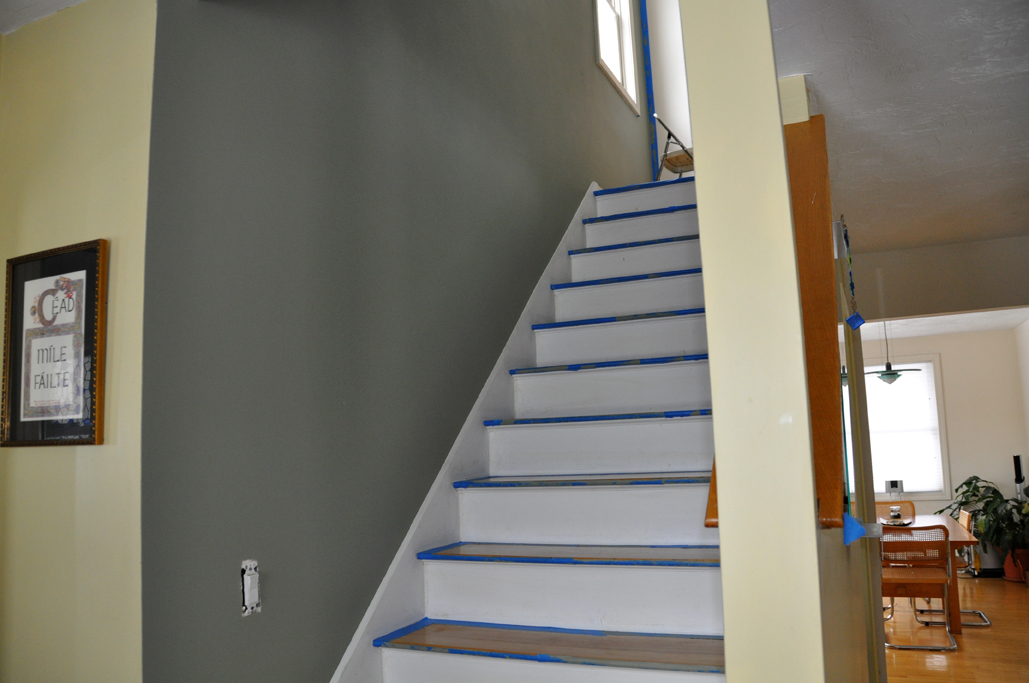
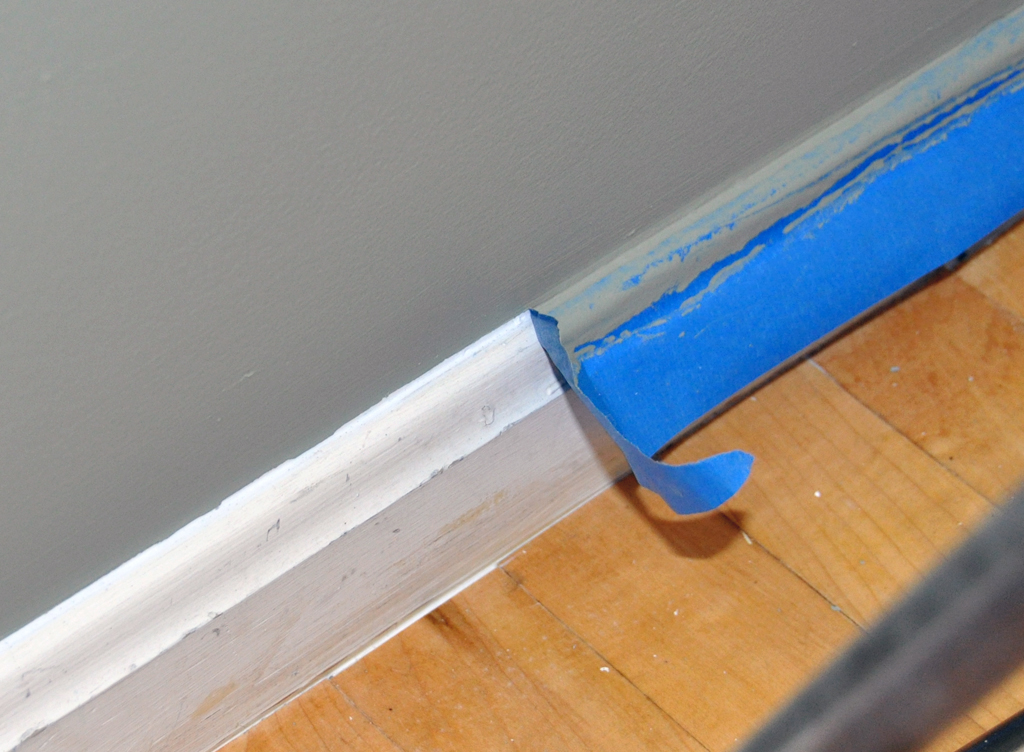
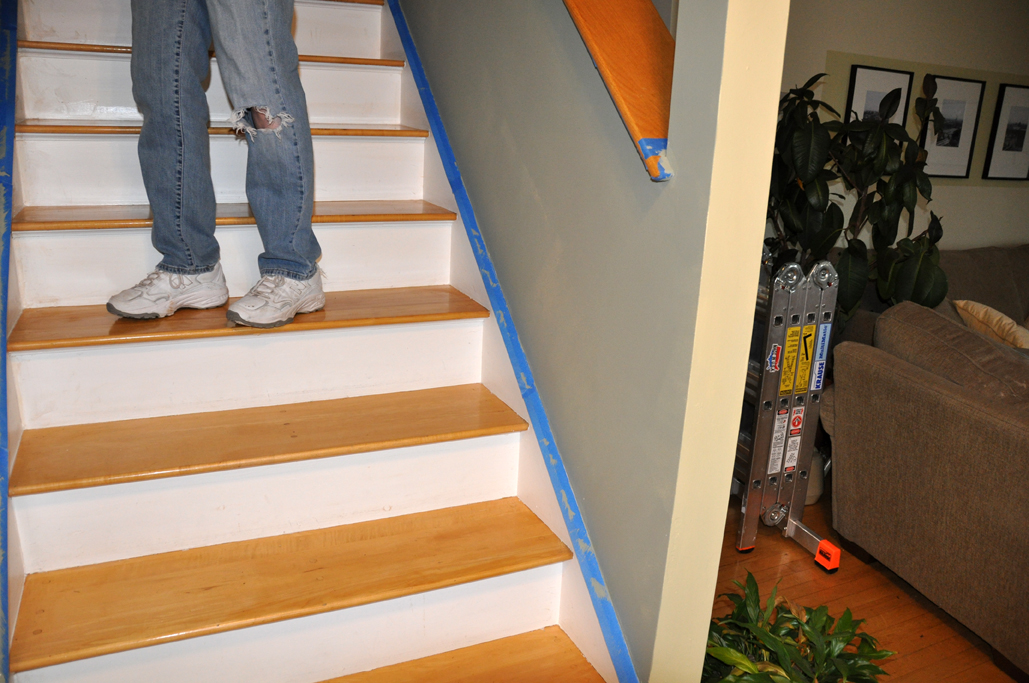
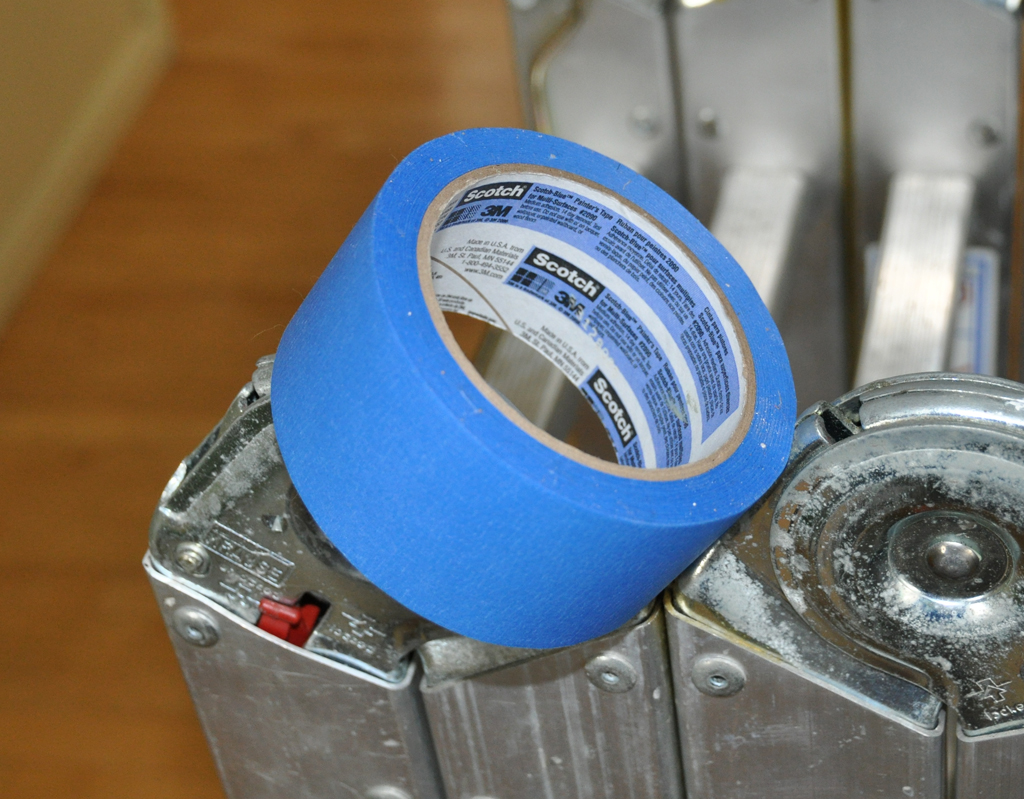
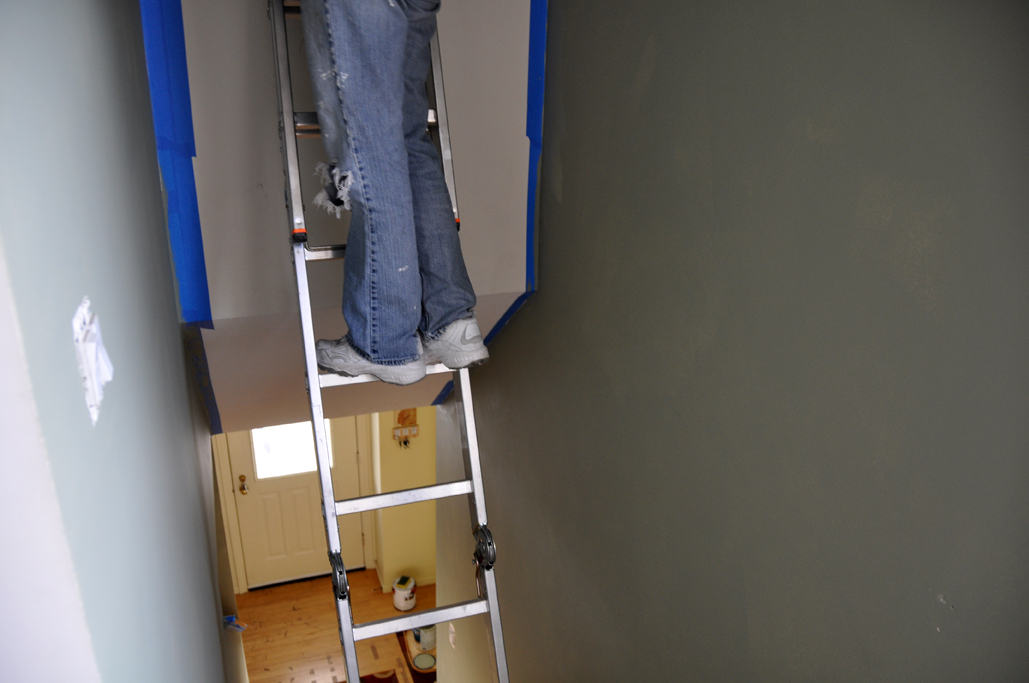
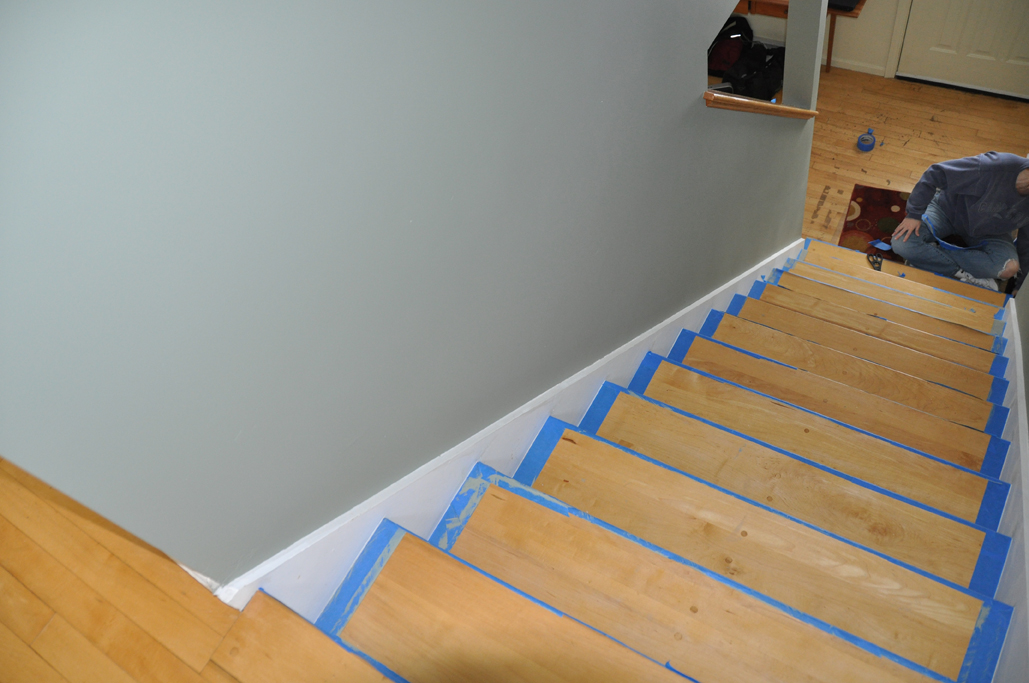
Last weekend we painted the stairwell at the office. We could have hired painters, but the interns offered their services and we took them up on it. The project came out quite well. Taping and masking made the results professional looking, but we did run into a few snags. The main problem was the stair treads. We taped all of them, but the paint managed to seep underneath.
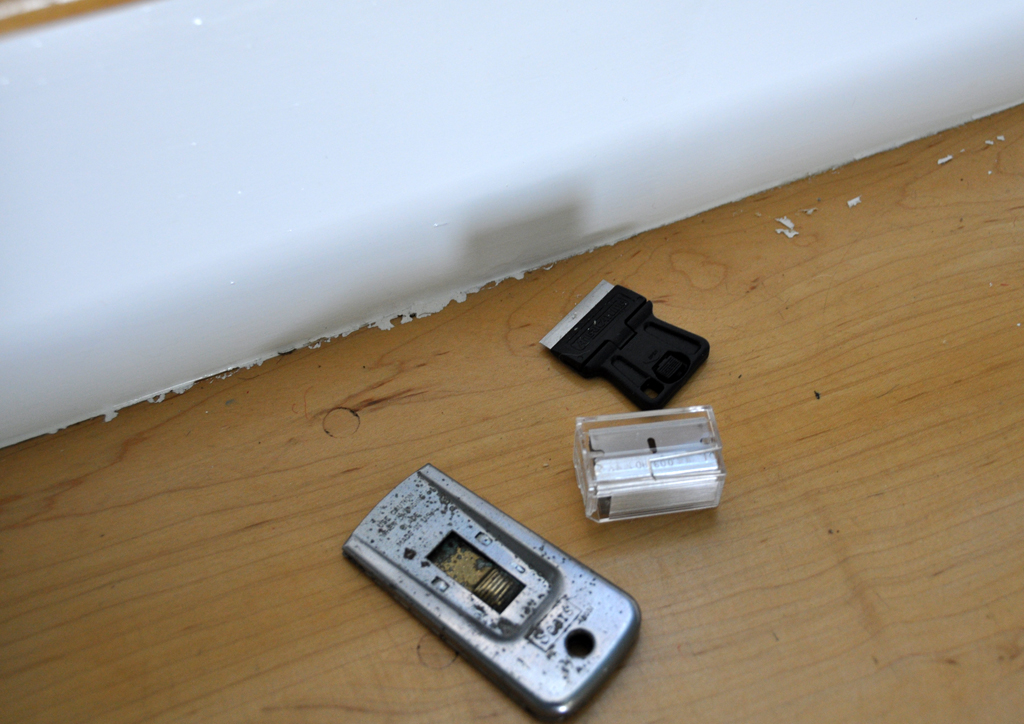
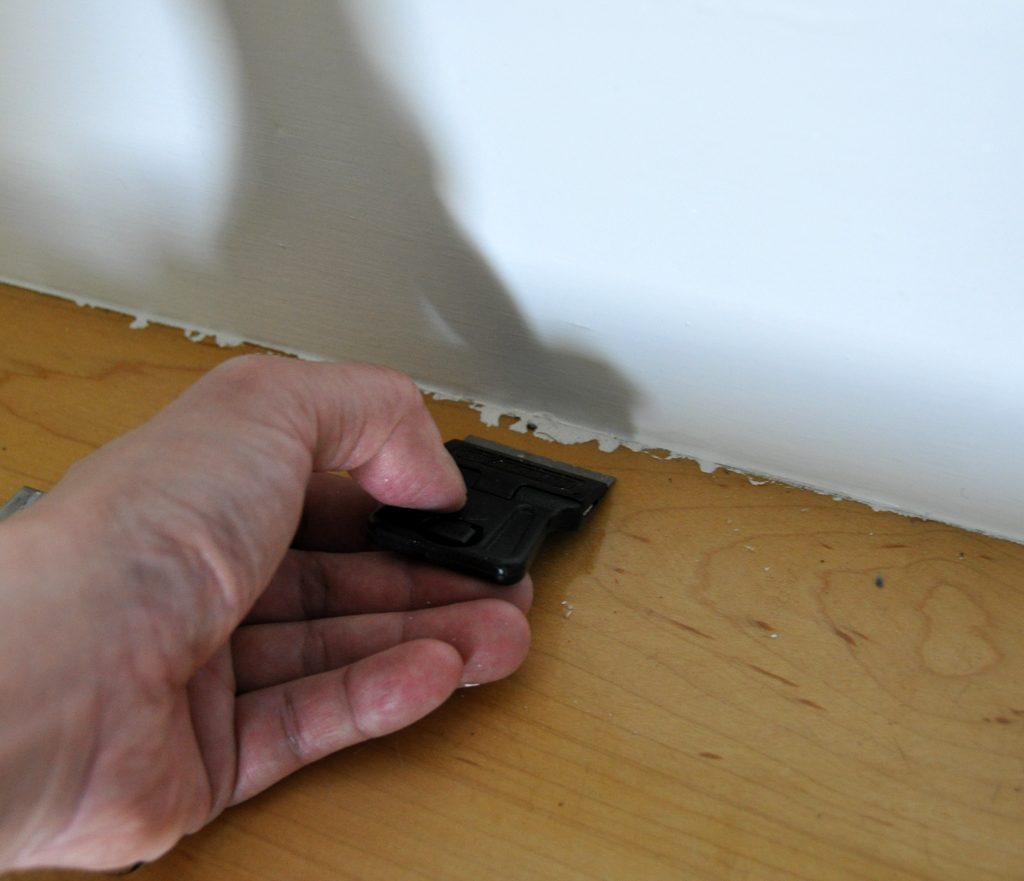
We didn't realize it was a problem until everything had dried and the tape had been pulled off. It was only then that we saw the problem. The only solution was to scrape the paint off. We had an old scraper. It was a retractable one which we used to use for windows.
However, it was not flat enough to scrap well as we needed something which would lay almost parallel to the surface. Home Depot had this little $1.50 tool which was perfect for the job. It held a single straight edge razor blade and was flat enough to get underneath the paint without gouging the wood.
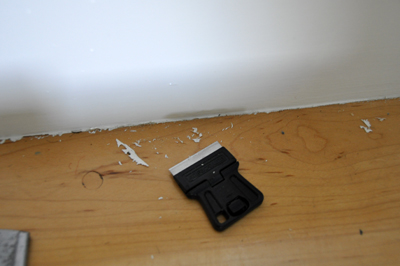
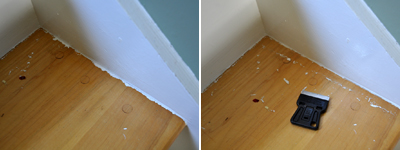
Scraping is a pretty good way to get the excess paint off the stair treads. However, it is both time consuming and works only if the treads have been sealed with urethane.

Our next project is the upstair hallway. There will be a lot of trim work so we are evaluating what we we could do to prevent the paint from getting underneath the tape. We'll pass on any new techniques if we find them to be effective. [Permalink]- Scraping Paint
|
|
|
March 1,2009 (WeekendEdition) |
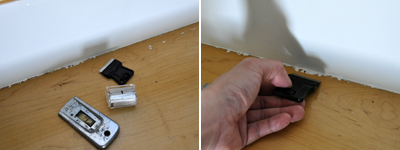
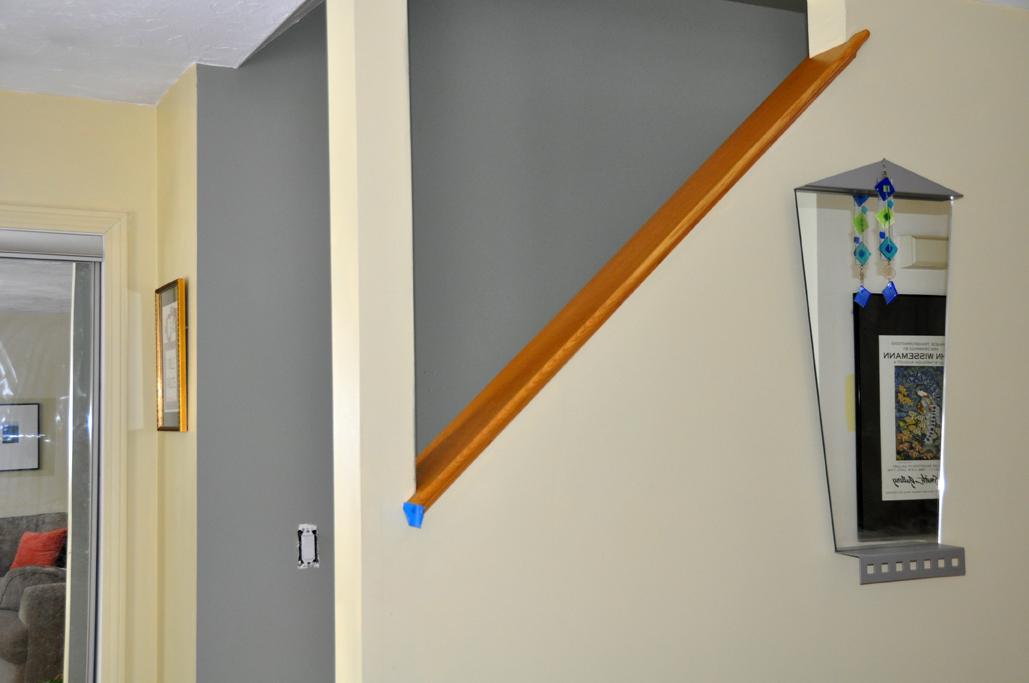
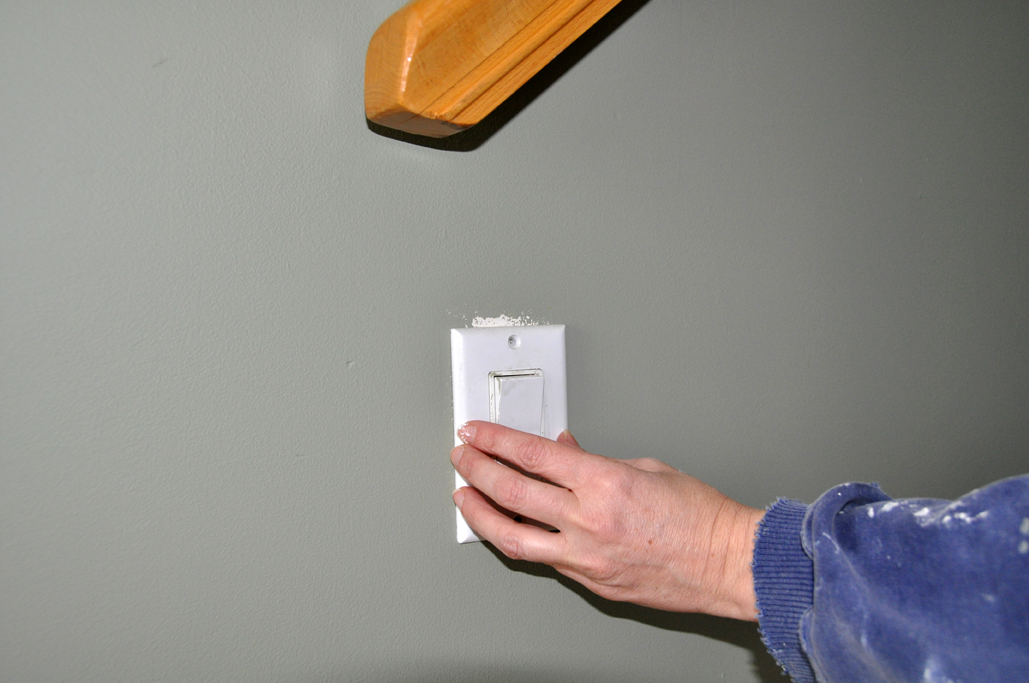
Yesterday we did a quick write-up of the Alden proGrabit because we stripped one of the screws when removing the banister from the wall, which was being removed because we were painting the stairwell.

Plans had been in place to paint the stairwell for about three years. It took us that long because the color decision was left to one of the editors, who we now realize has some "difficulties" with color (she claims its because she's a word person, not a picture person). After painting six different color squares on the walls three years ago and then just leaving them there because she didn't like any of them and had, unbeknownst to her, given up on the choosing of the color, someone else decided to go to the paint store, pick out a color, and start painting. (Although in her defense, most of the visitors to the office thought the six color squares were, um, art, and that we deliberately put them there.)
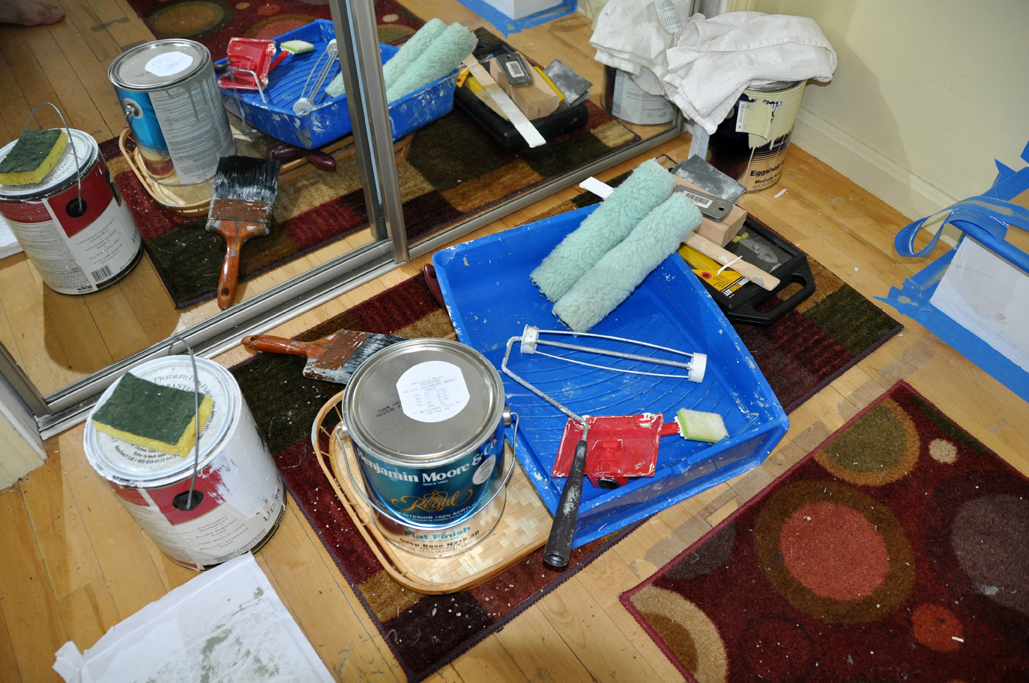
Normally, we would have used this opportunity to try out the latest painting device but after a brief discussion we thought it would be good to do this project using "old school" tools to set a baseline. There are still plenty of walls in the RainyDayMagazine office to "freshen up."

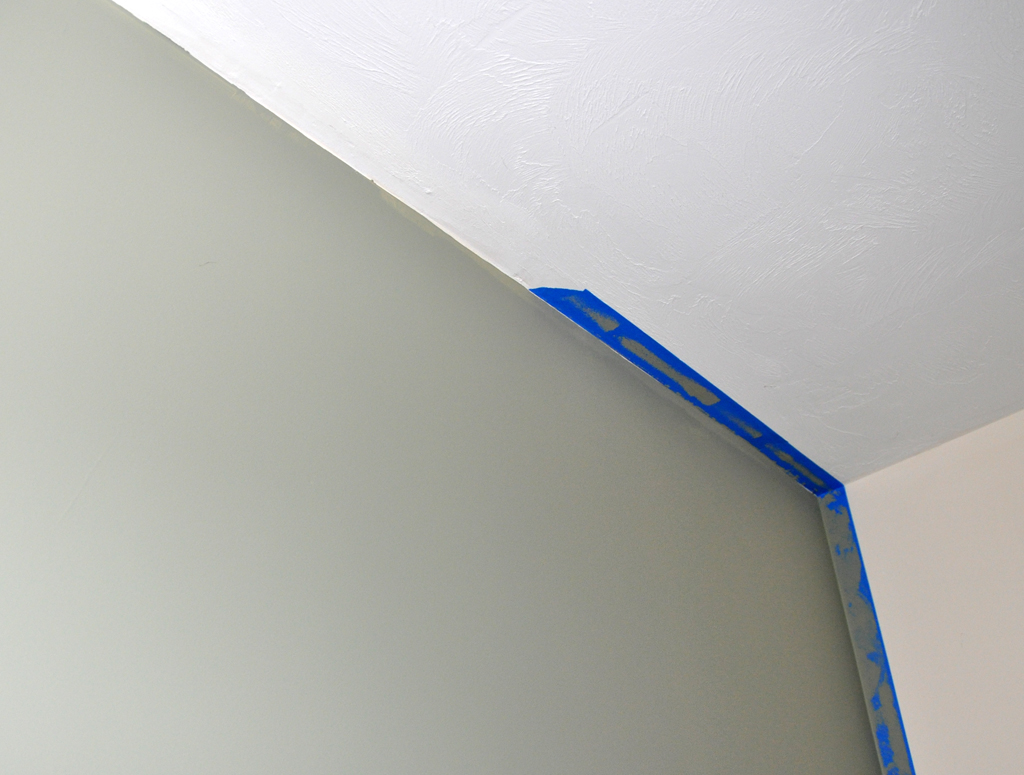
The key to getting good
results has more to do with the amount of prep work than the actual painting. Spackling, sanding, and taping are all critical to the effort. If we had to pick one of the three, taping is definitely the most important step. Some might be tempted to skip and use those plastic painting "guides" and other such tools, but take our word on this... spend the time taping.
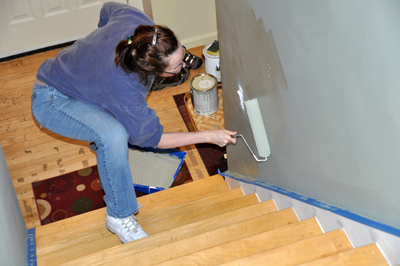
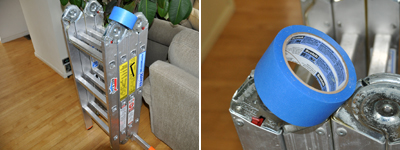
We had both rollers and brushes available for this project, and fter a few minutes, it was clear that rollers were the way to go. The coverage was smoother and faster...about 10x faster. One other tip is to use the 2" wide tape if you use rollers. It will let you run the rollers right up to the ceiling without getting paint on a surface you don't want to.
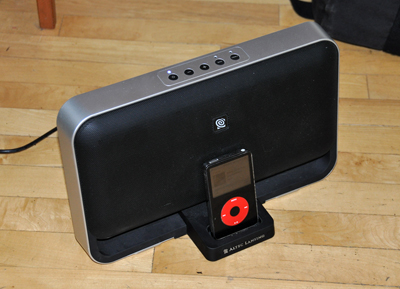
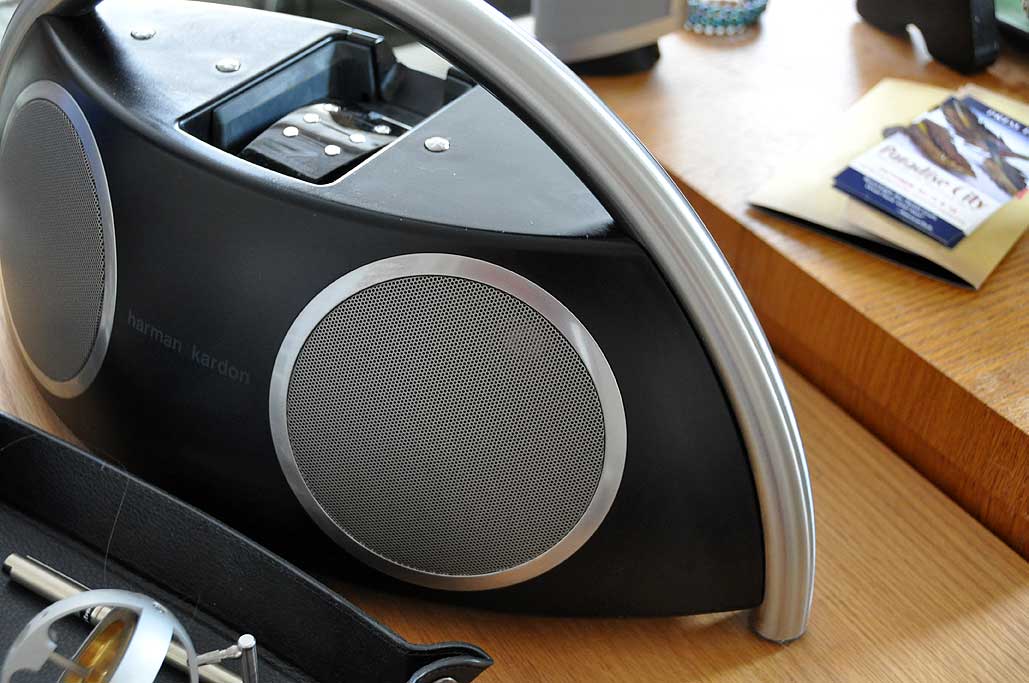
Music is another key ingredient (along with food) which keeps the crew painting and working in harmony. Our setup was this Altec Lansing T612 iPod Speaker system. It is portable, puts out great sound, and easily controlled.
We got most of the job finished over the course of the weekend. Two coats for flat color paint went onto the walls. One coat of glossy white went on to the stair risers and side trim. There is still a day's worth of minor touch-ups and clean up left, but we'll leave that to the interns. [Permalink]- Painting stairwell
|
|
| |
|
|
|


