|
|
 |
| |
RainyDayRenovations's content can now be licensed for your print magazine or web site. Please contact us directly here. If you want to see something reviewed, then drop us a note with a link and we'll be happy to take a look.
|
|
|
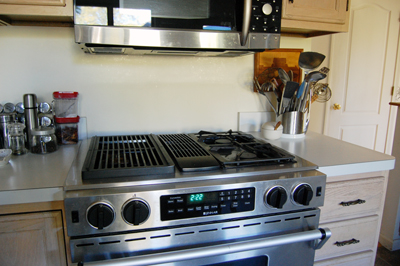
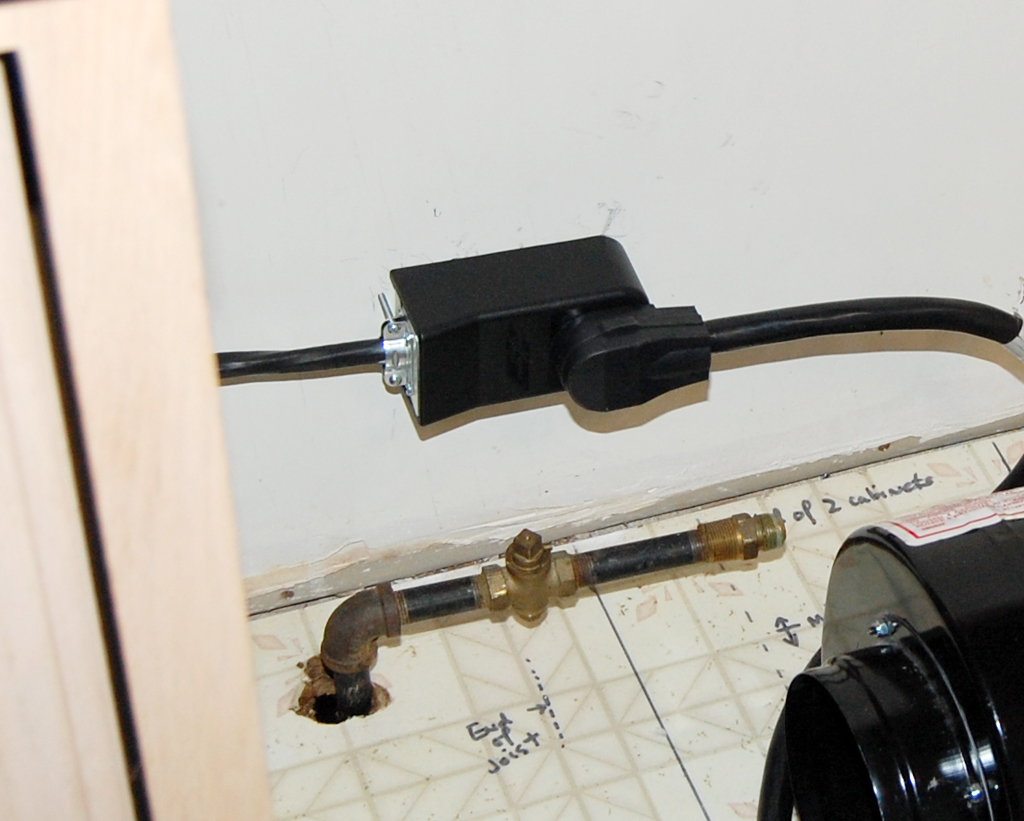
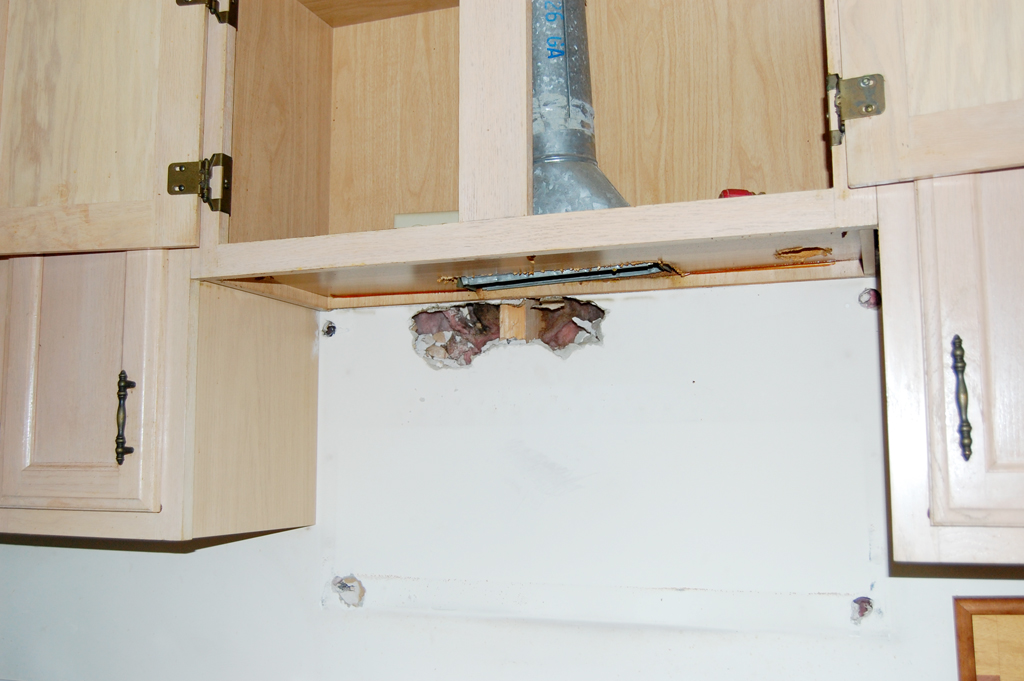
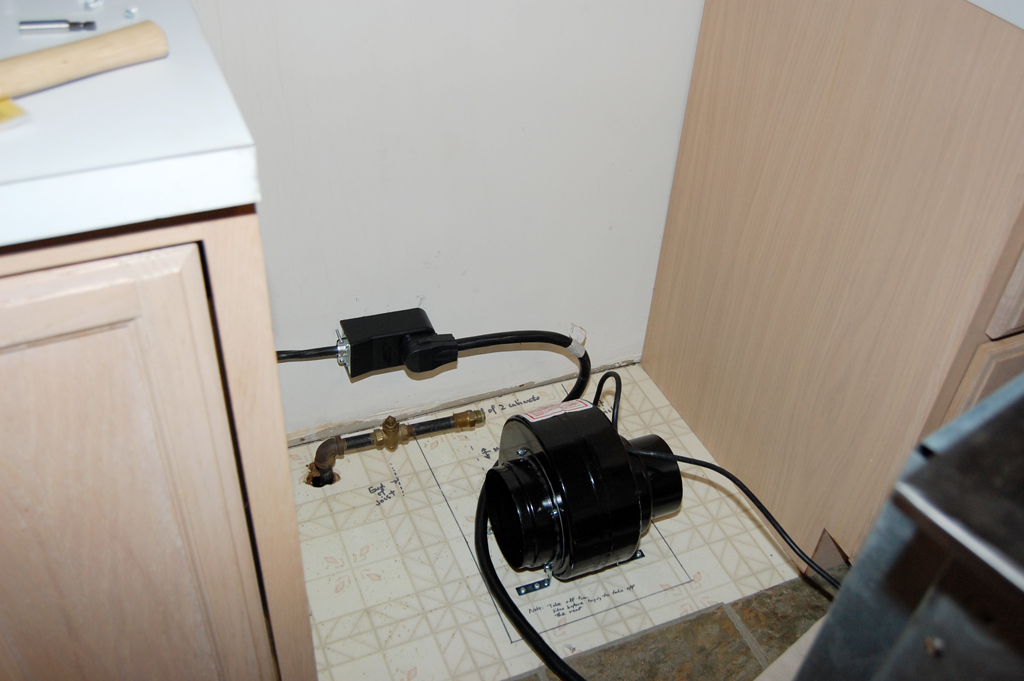
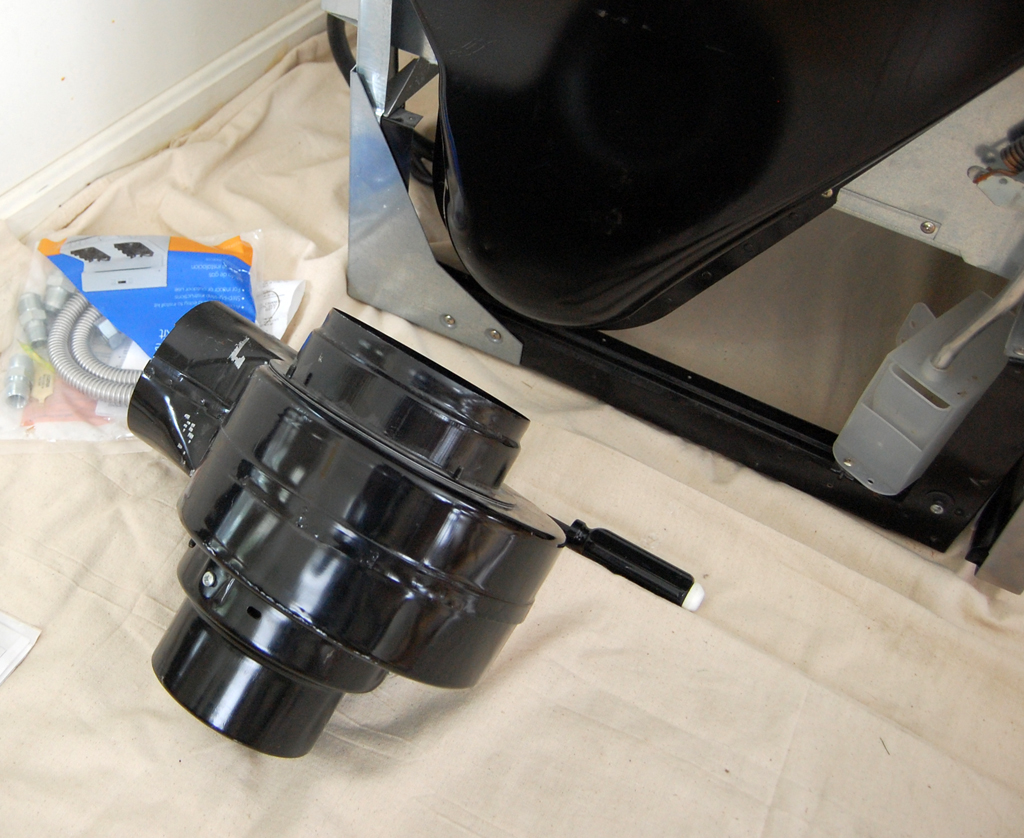
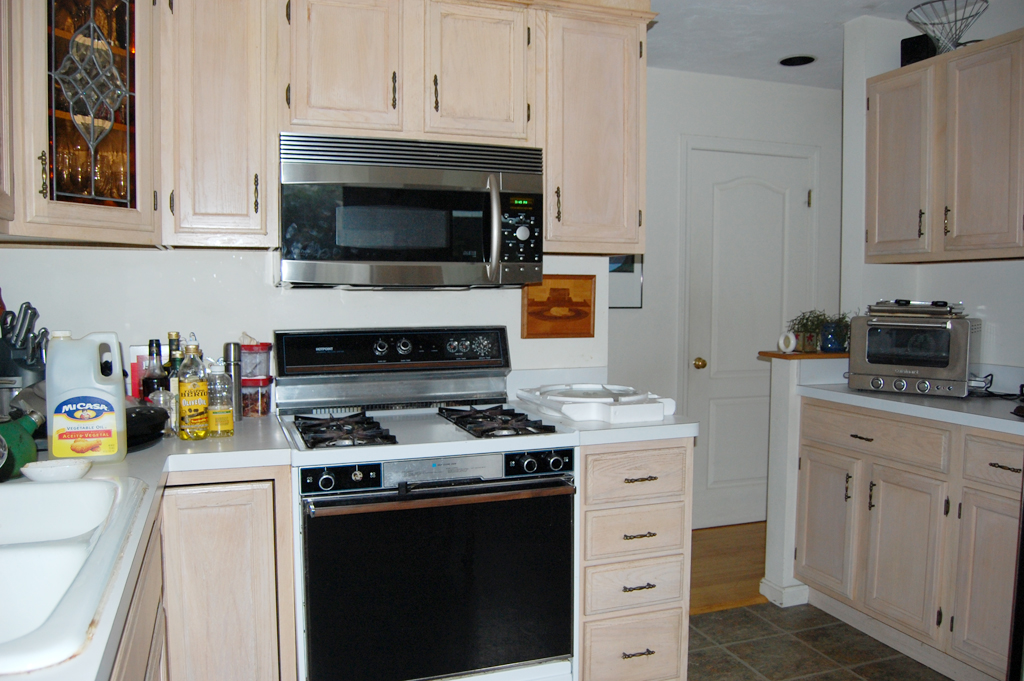
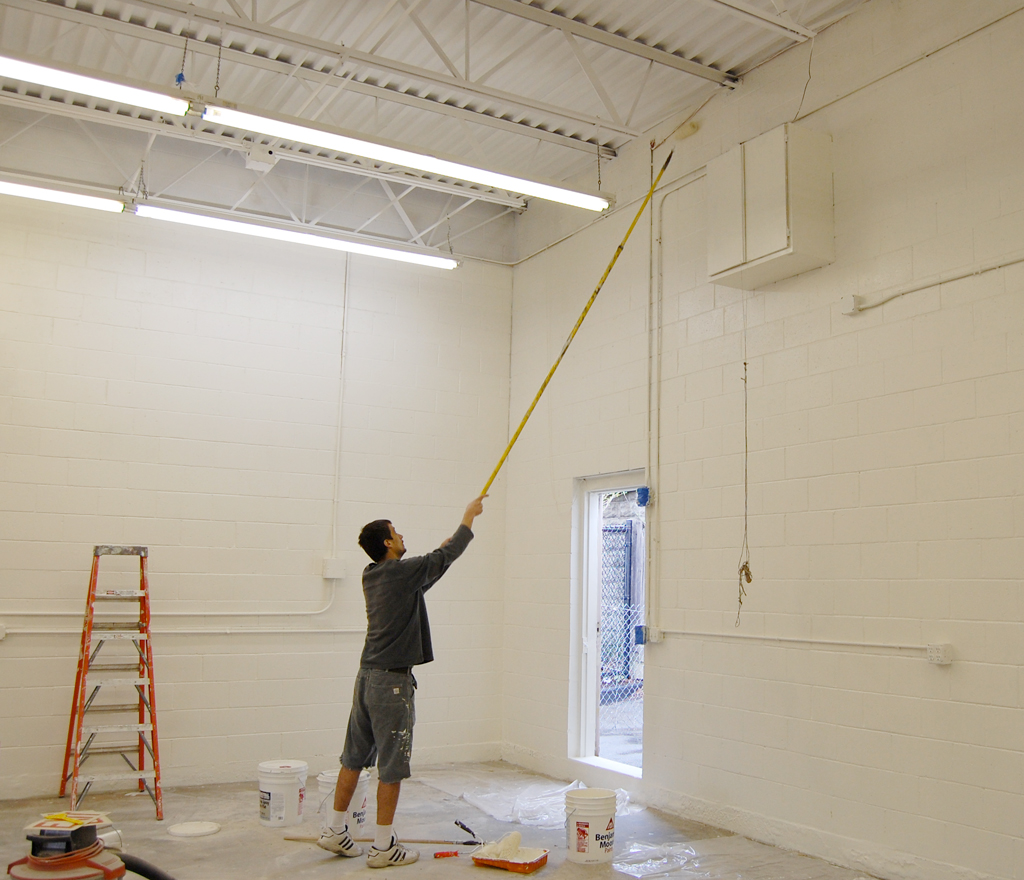
The Jenn-Air range we installed has a grill on the left side. To keep the smoke from the grilling from overwhelming the kitchen, there is a downdraft vent in the middle of the range.
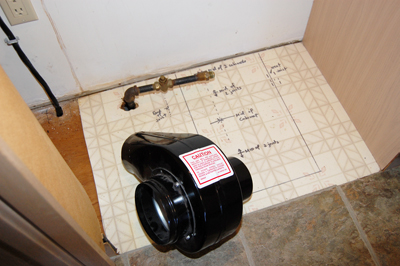
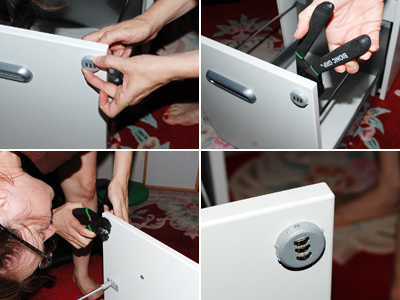
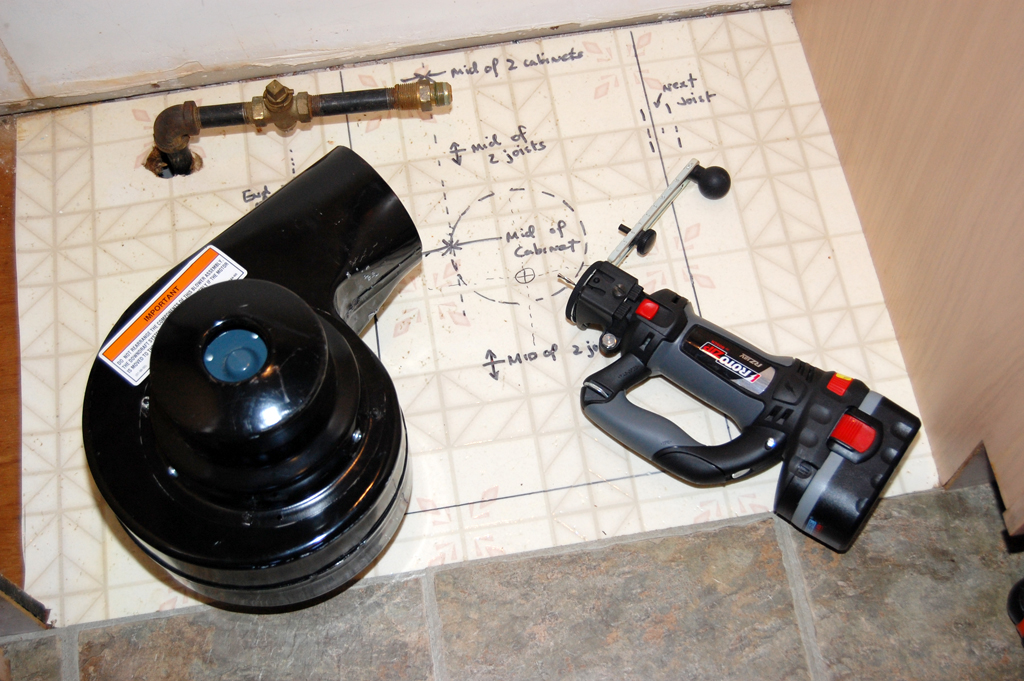
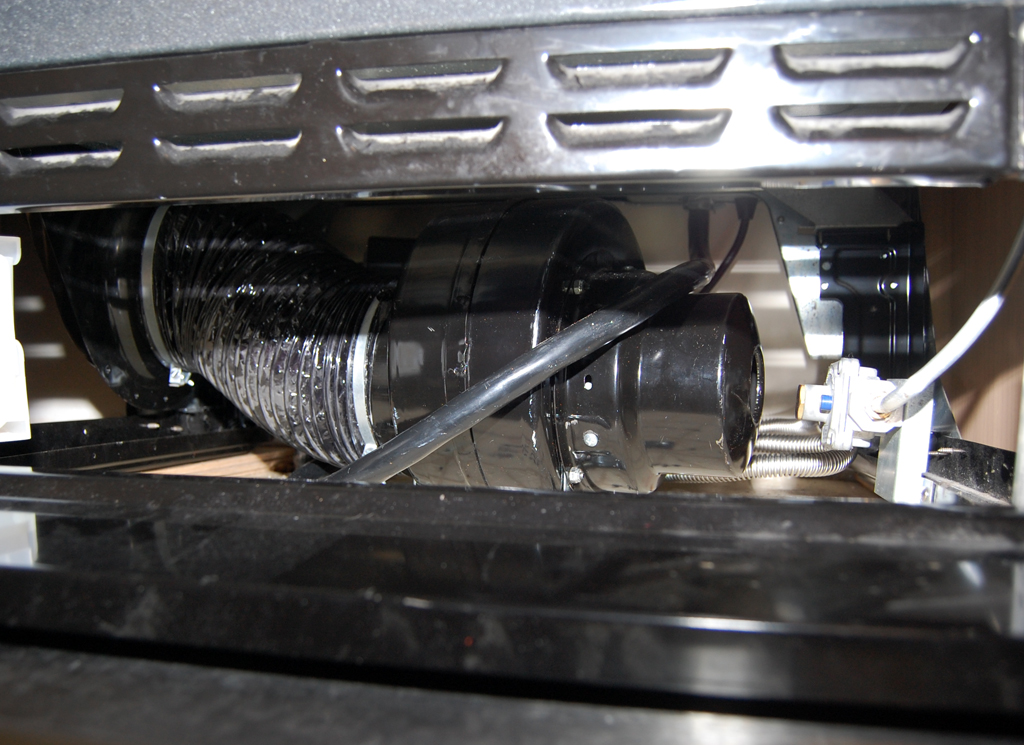
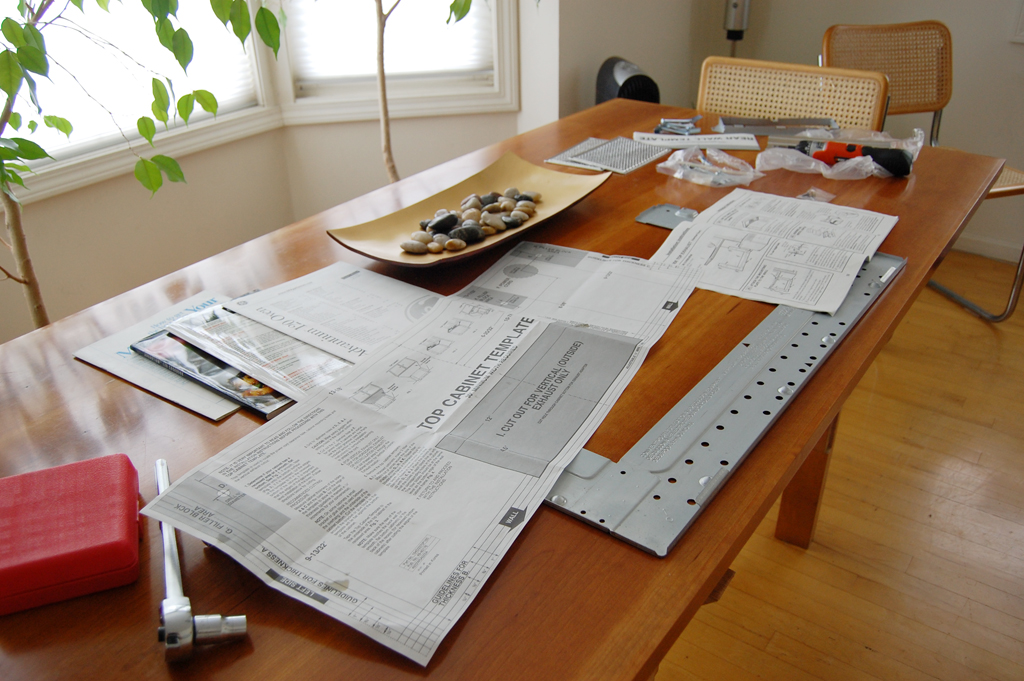
For the vent to work, a blower must be installed to suck the air down and out. This blower may be installed in a variety of ways. We chose to place it on the right side of the stove and vent the air down to the basement.

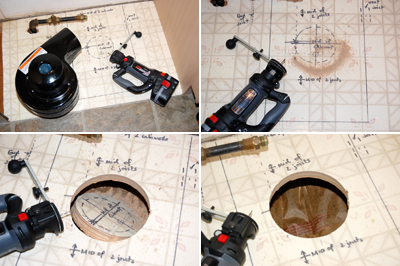
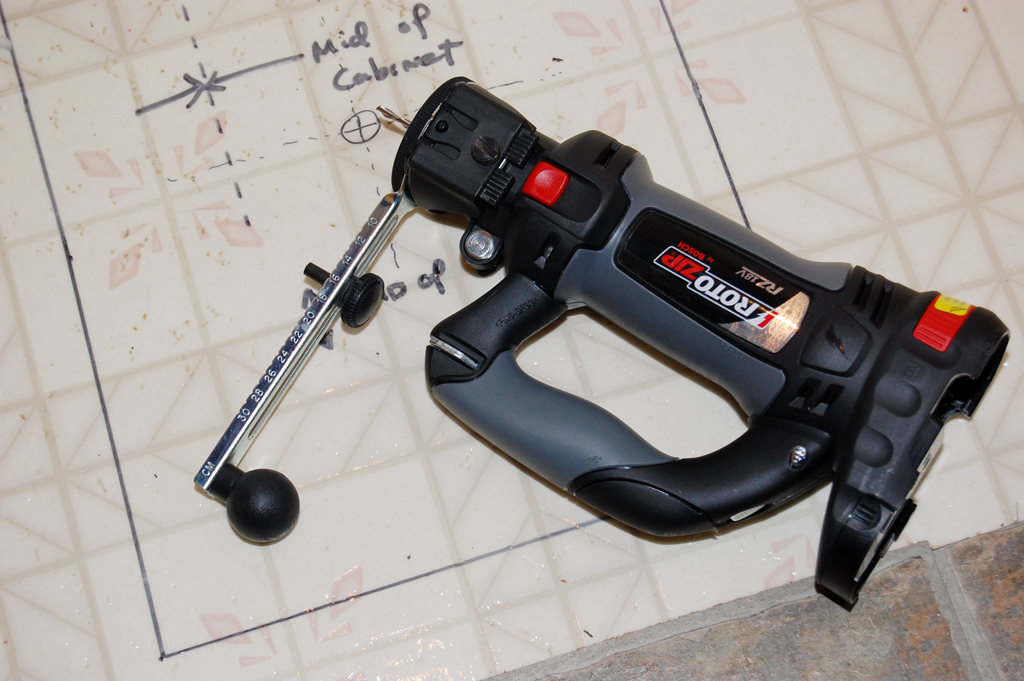
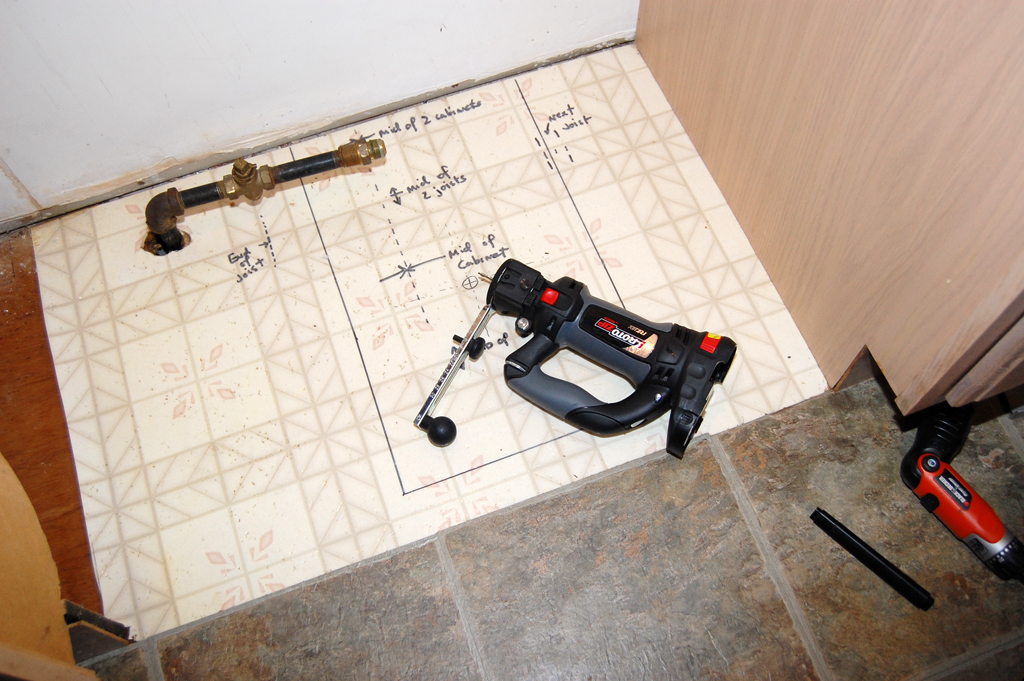
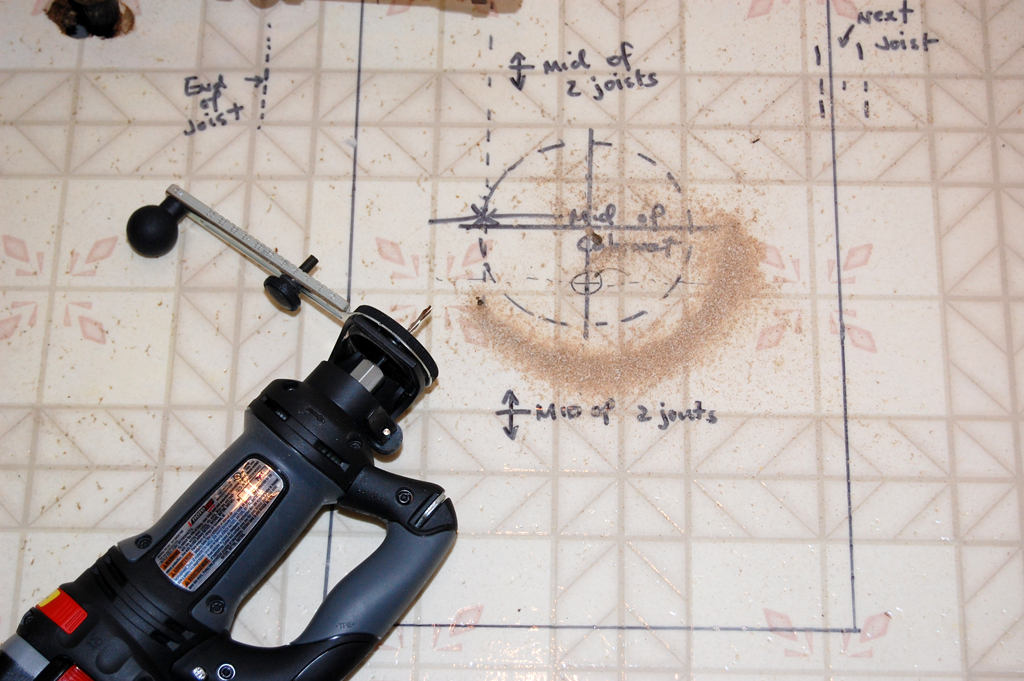
In order to vent the exhaust to the basement, a hole must be cut into the floor. The installation manual gave VERY explicit dimensions for the bounding box of where the blower may be placed.
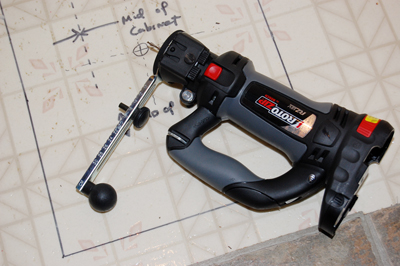
We spent quite a bit of time double checking our measurements before making the first cut. To make the cut, we used a RotoZip with a circle-cutting attachment. It was a LOT easier than using than a jigsaw. The RotoZip is quite an amazing piece of gear. We have had it for a few years and have always meant to do a more detail write-up on it.
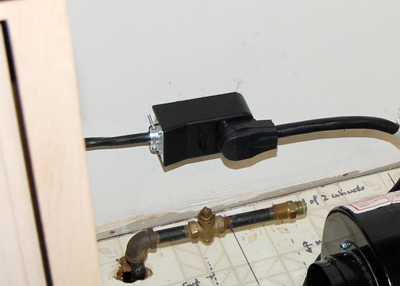
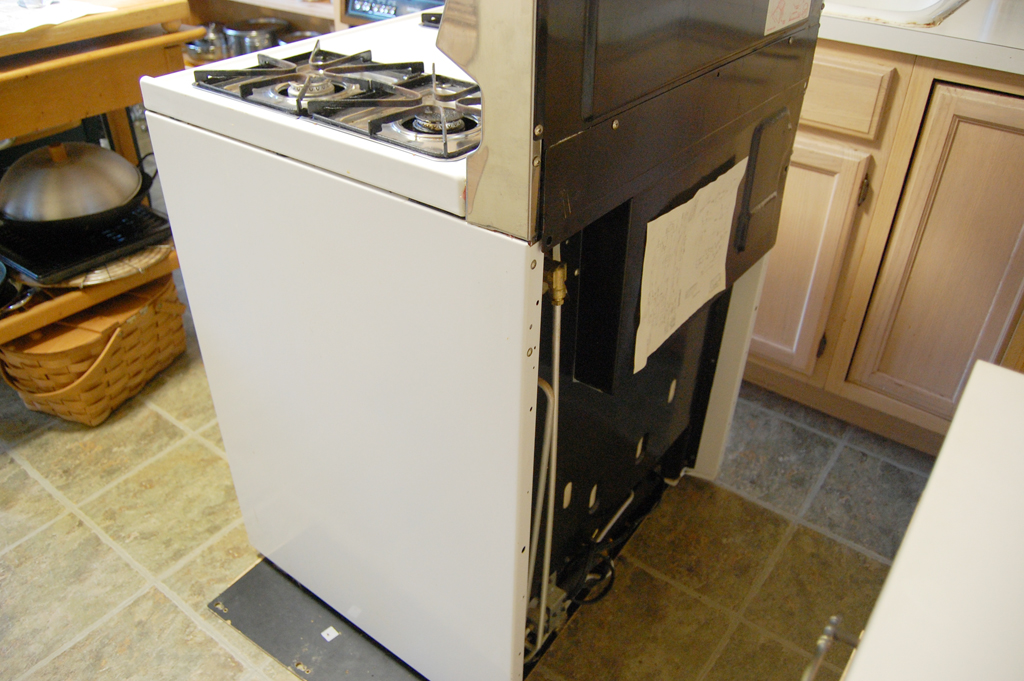
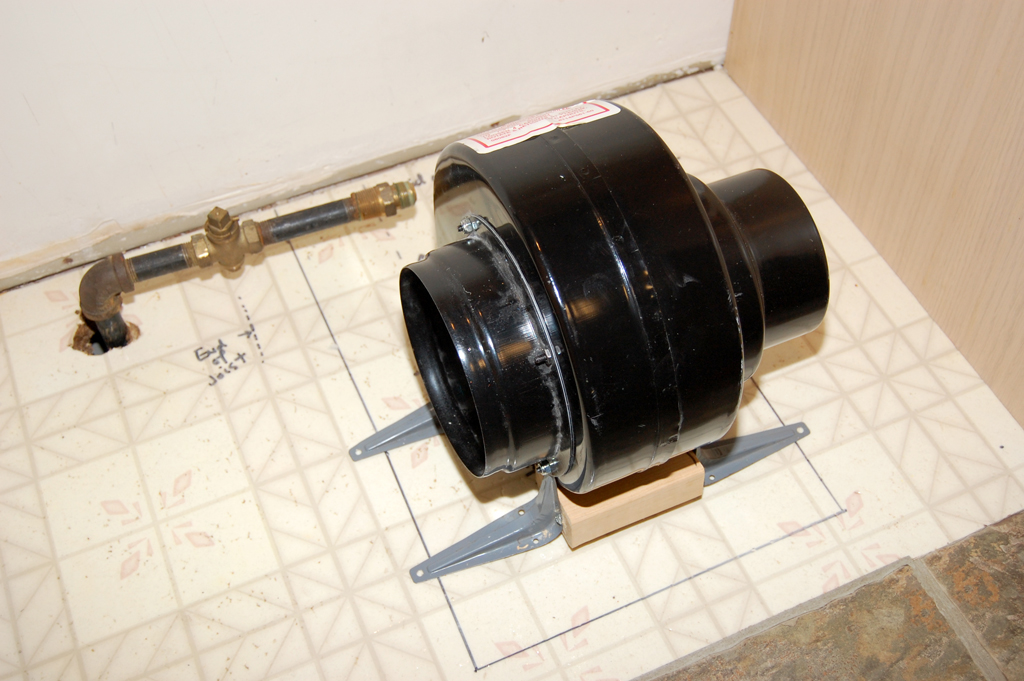
Mounting the blower was more of a challenge, as we realized the mounting brackets were not among the various parts given to us by the seller. No matter, we came up with a pretty sturdy method using some 3" angle brackets. However, when we tried moving the stove in, we realized the blower was about 1/2" too high!
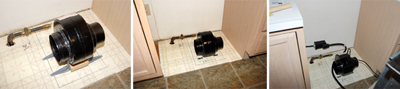
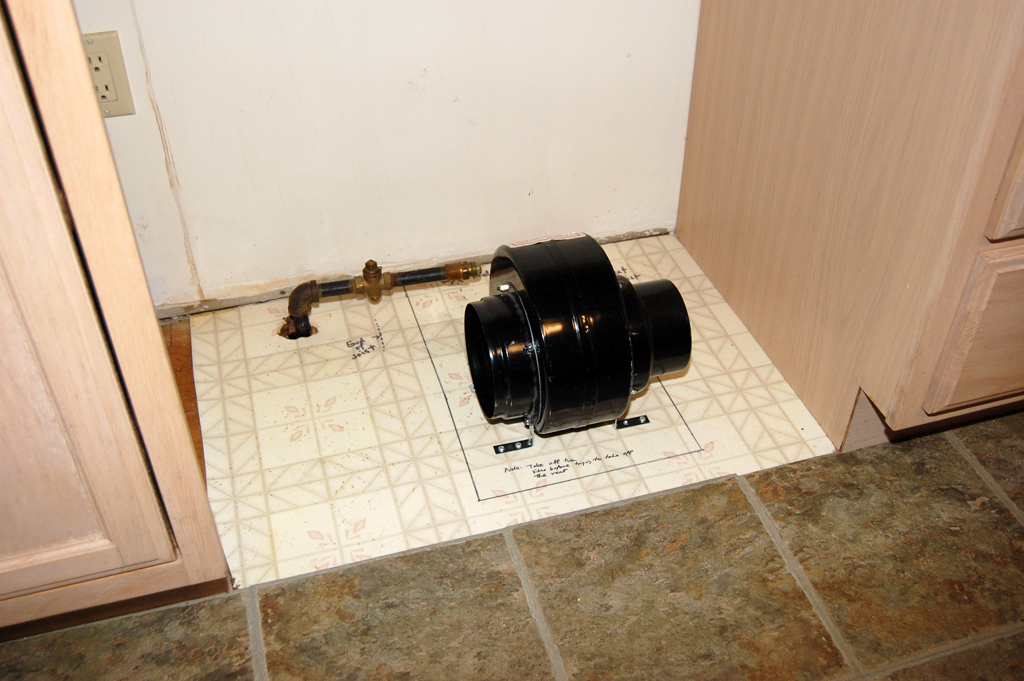
We reworked the mounting using some 2" L brackets and screwed everything down onto the floor. The blower felt very rigid and did not vibrate at all during our power-on test.
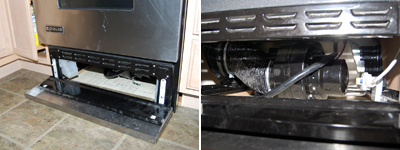
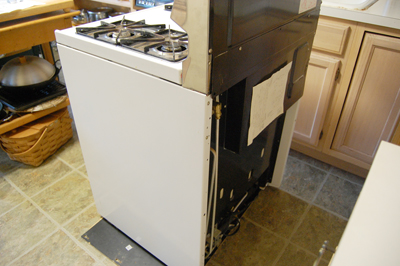
Once the gas line was hooked up and tested for leaks, we moved the stove into place. Everything fitted nicely underneath. The last step in this installation was to connect the vent outlet to the blower using the flexible hose. It took a little bit of crawling around but eventually we got it all attached and working. [Permalink] - Blower Installation
|
|
|
|
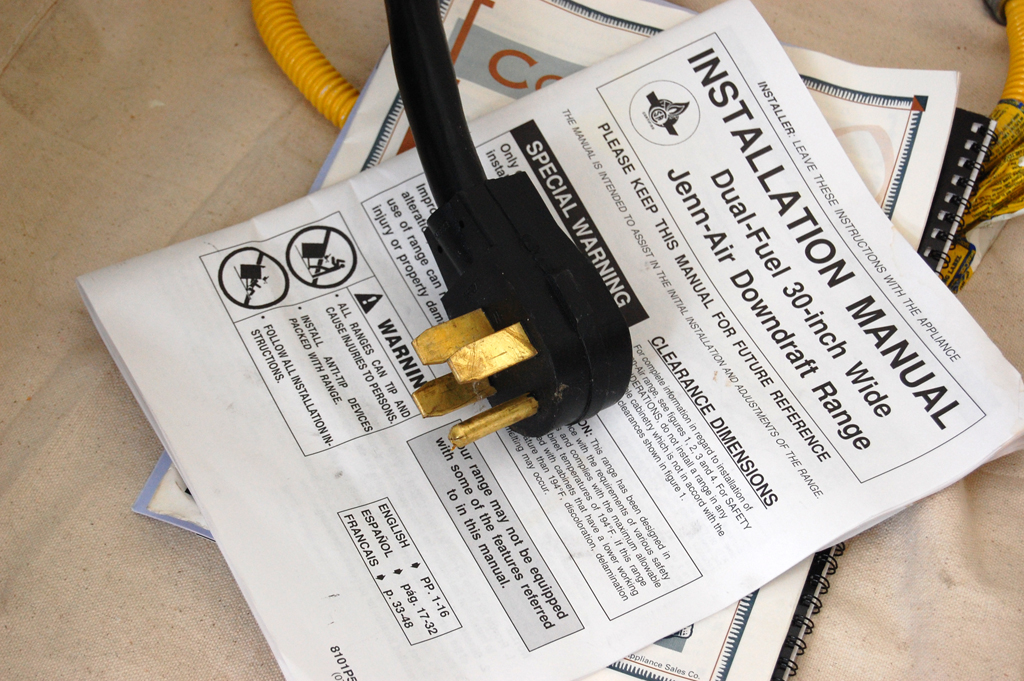
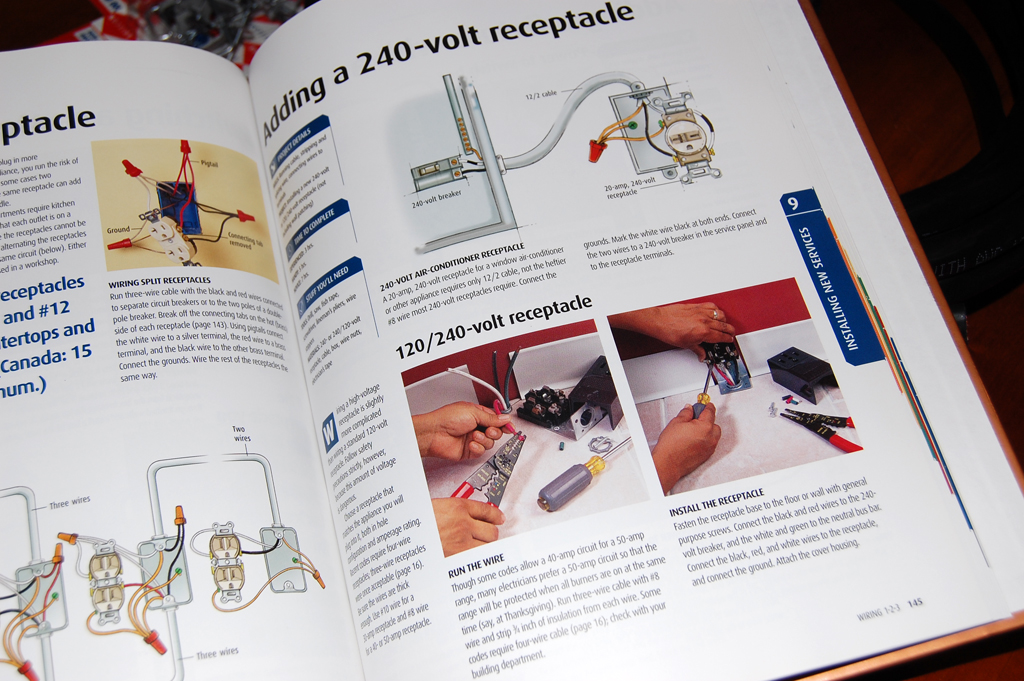
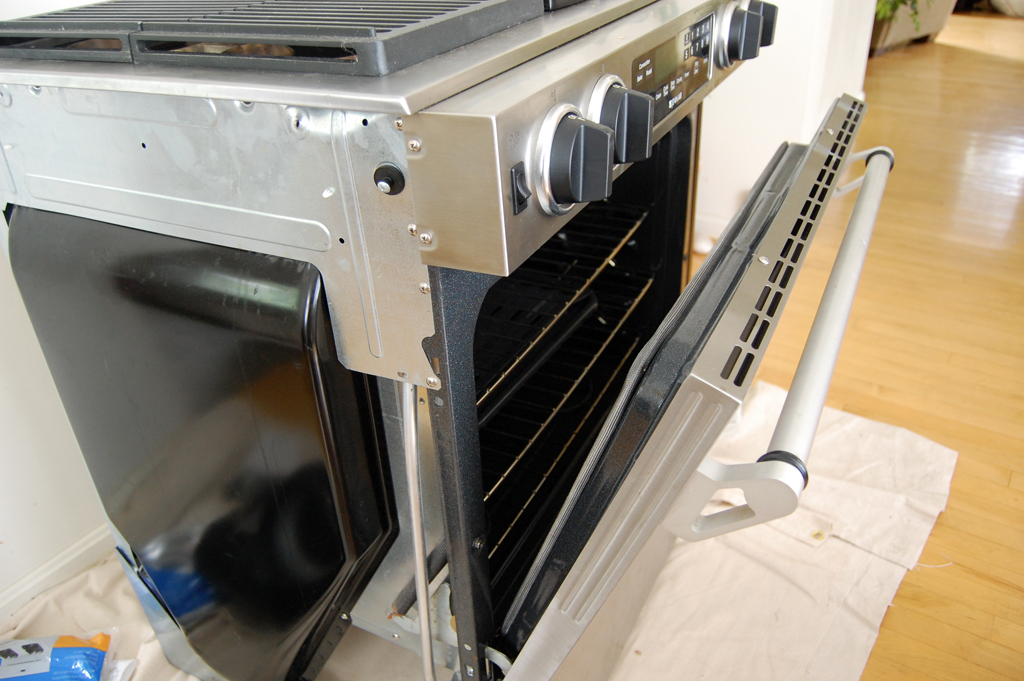
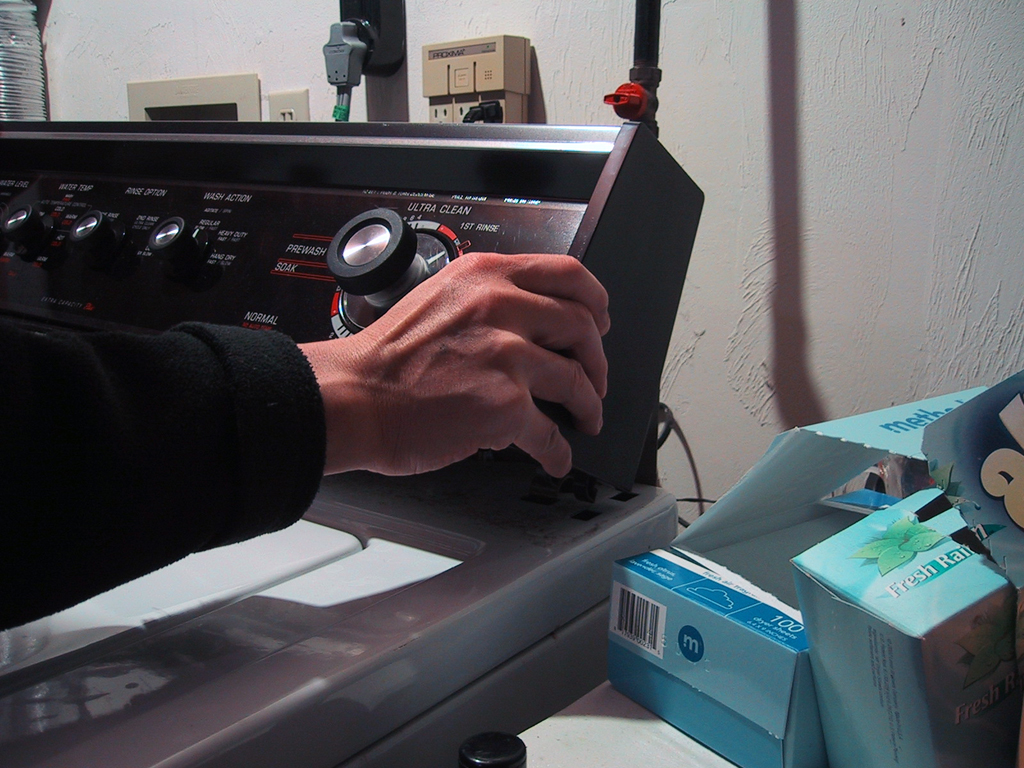
The old stove used gas for the burners and oven. It had a 120v line to power the timer and the oven light. The new JennAir is a dual fuel range - the burners use gas, but the oven is electric and needs a 240v line.
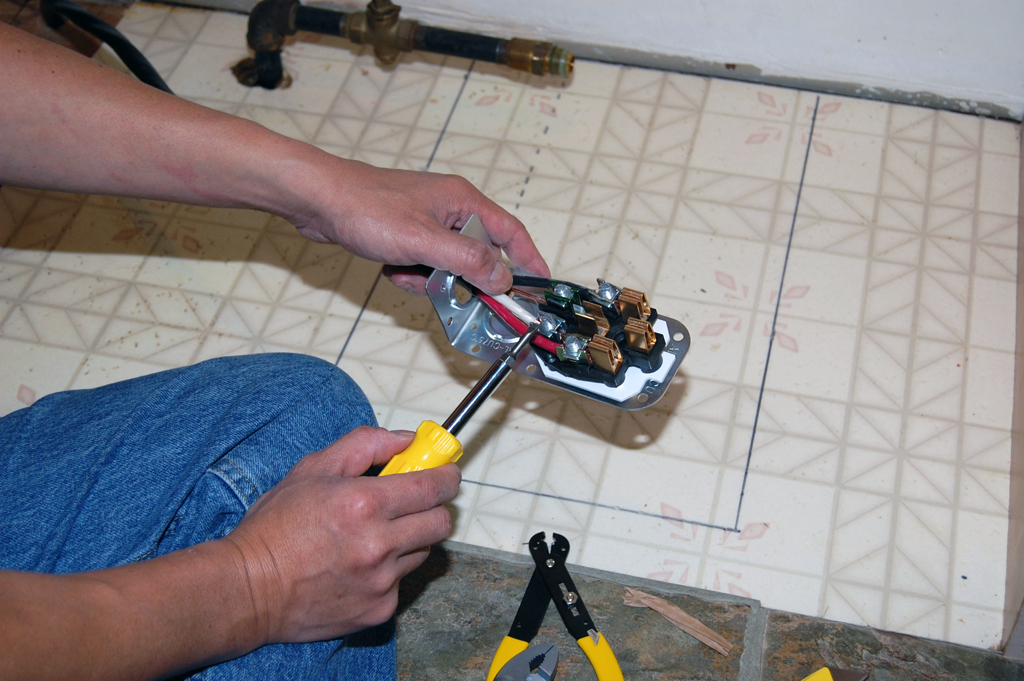
The installation of a 240V line should be done by a professional. However, it is still useful to understand the steps involved. We saved some money by geting all of the parts from Home Depot. First determine where the outlet should be installed. Second, make sure the hole for the cable is not blocked by a floor joist.
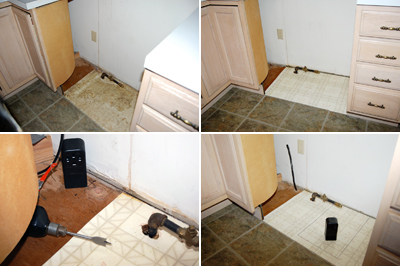
Third, strip the wires and attach them to the 240V outlet. Be sure to note the two hot leads, the neutral wire and the ground wire. One important point is that a 240V cable is VERY stiff. Make sure there is plenty of room for bending the cable should you need to place the outlet in a horizontal position.
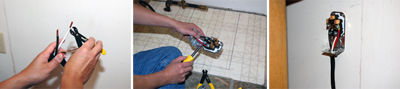
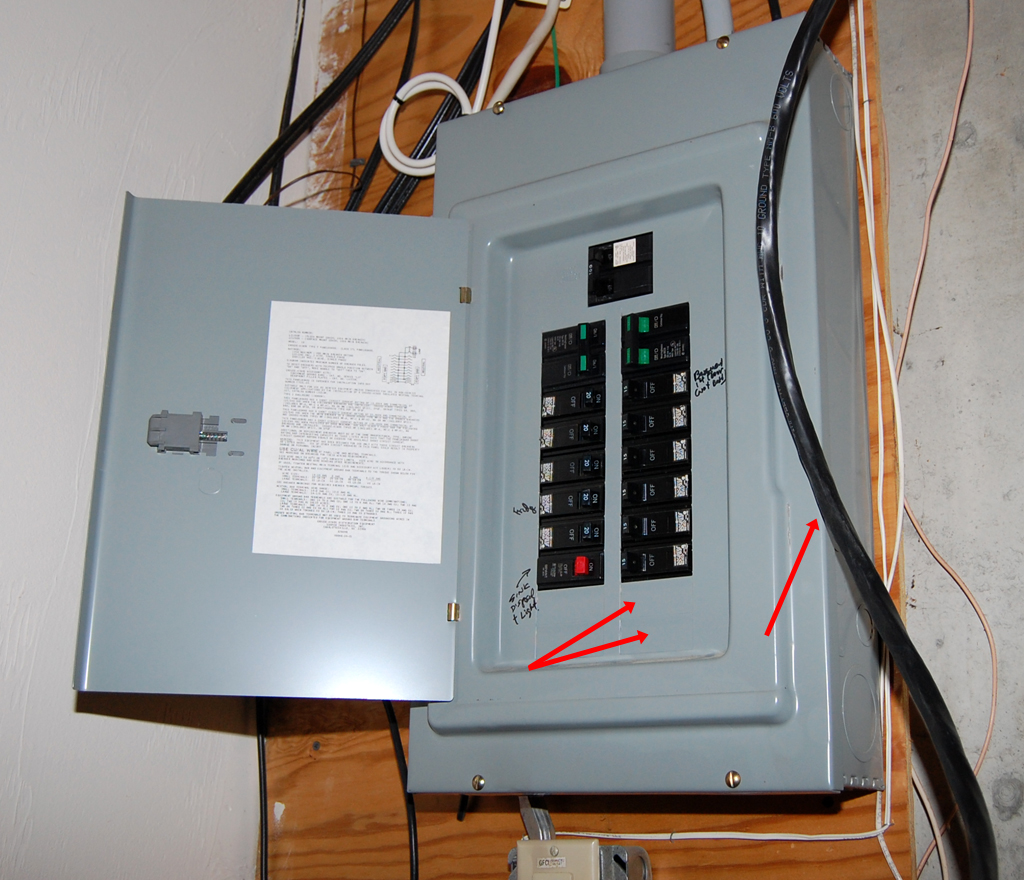
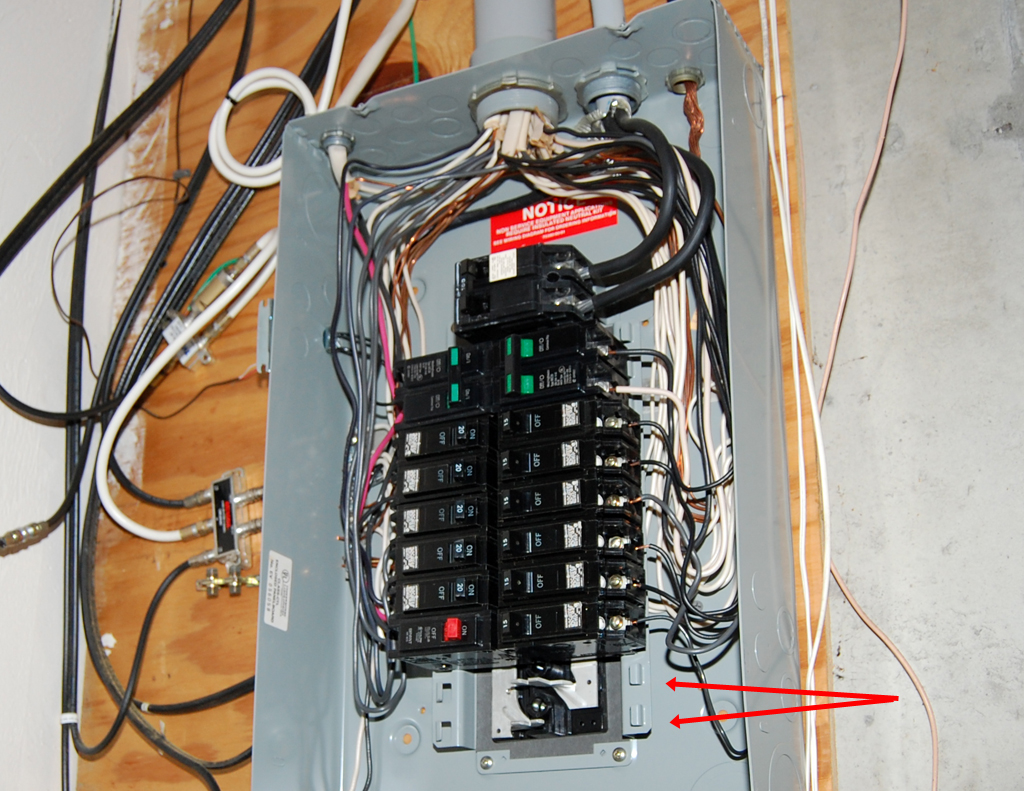
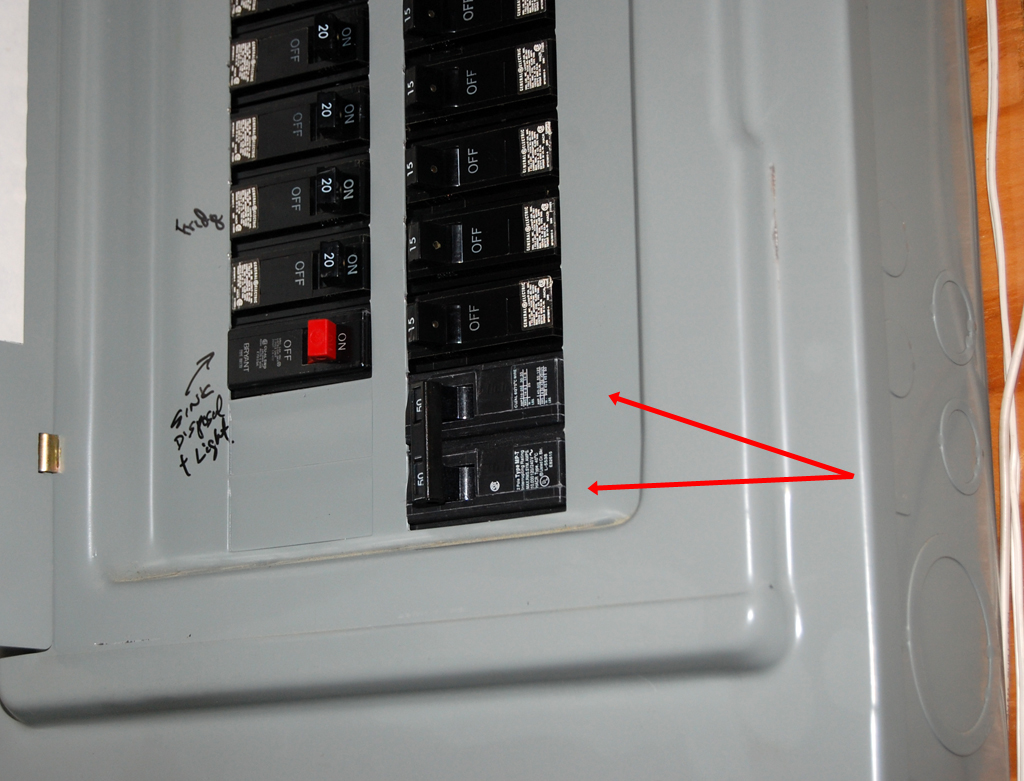
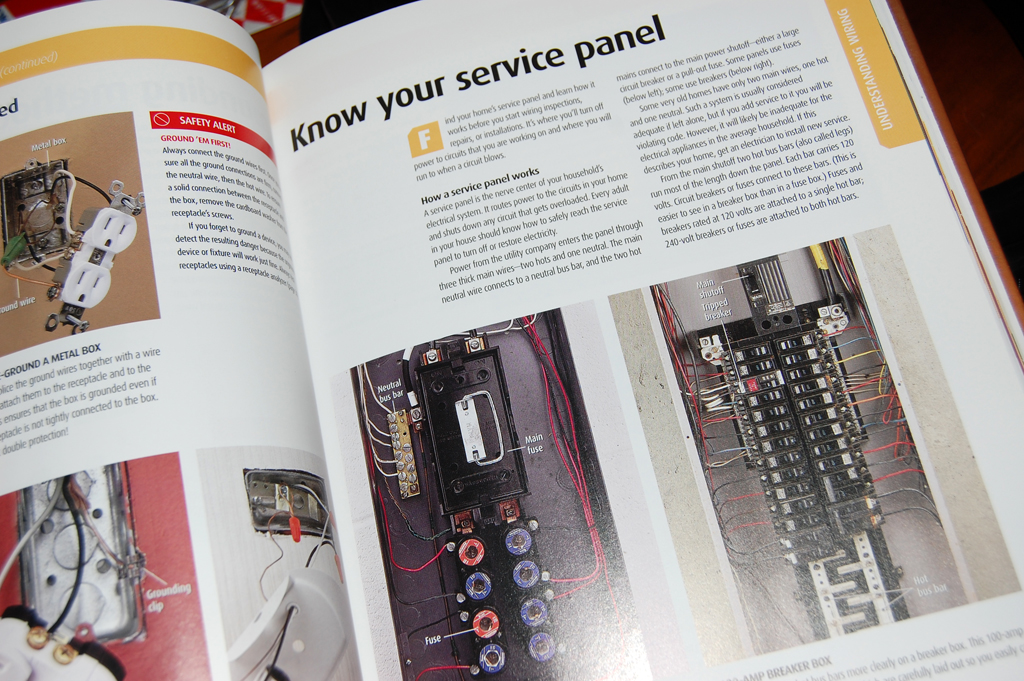
The last step in this installation is to attach the cable to the electrical panel. The panel may look confusing, but it is actually very simple. Two 120V lines from the power company come into the panel and everything taps off these lines.
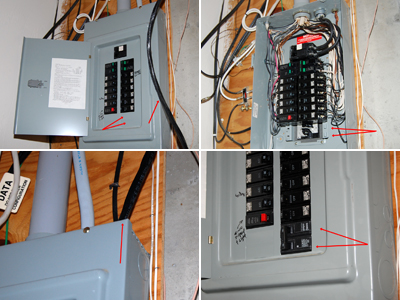
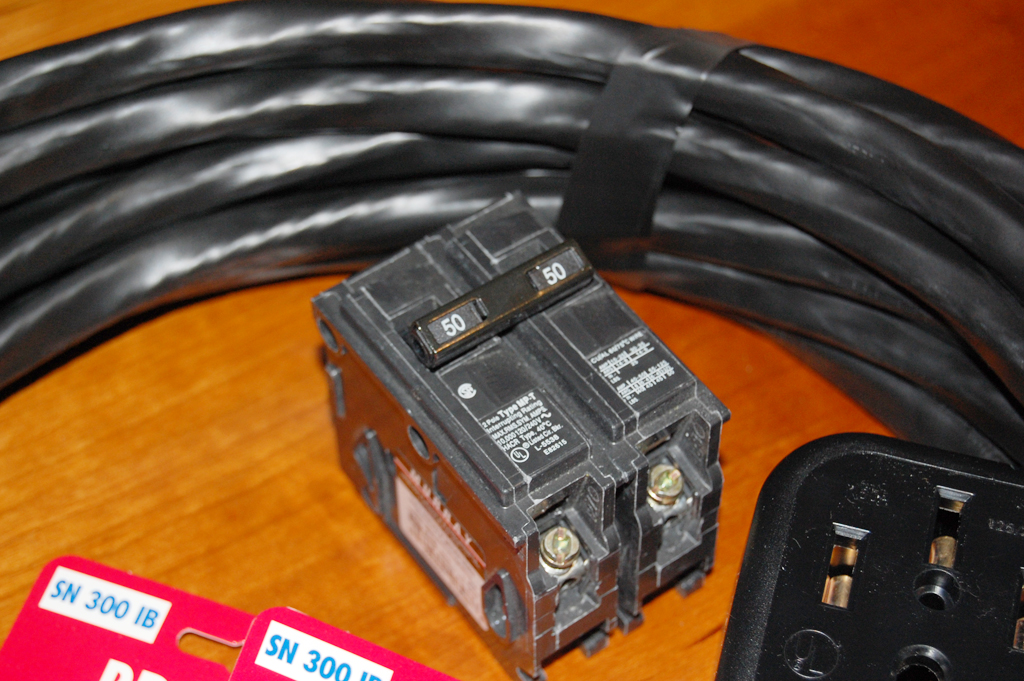
The new 240V 50A line required two new breakers to be added to the panel; each hot lead goes into its own breaker, the white neutral line goes into the neutral bar, and the bare copper ground wire goes into the ground bar.
With the 240V outlet installed and tested, we can now complete blower and the gas line installation. We ran into a few "gotchas" along the way, but nothing our installer could not work around. The installation was not difficult, but it is definitely not something folks should do if they are not sure what they are doing. [Permalink] - 240V Outlet Installation
|
|
|
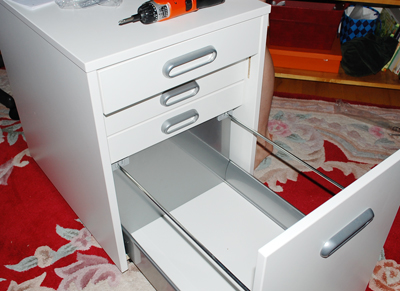
We took advantage of a lull in our schedule this weekend and finished the installation of the Jenn Air range. We'll have a full write-up of the project this week.
The project was a little more involved than we had first anticipated (240v outlet, vent installation, etc...), but it was a great learning experience for everybody.
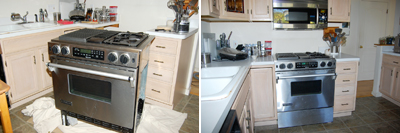
The range has been moved into place. Both the gas and electricity are connected and working. We still have to make the backsplash and complete the venting to the outside. Those side projects will be tackled as time permits.
We are expecting a whole group of LA transplants to be joining us for the Thanksgiving feast. The rumor is the RainyDayKitchen folks will be cooking a turducken (there's another, more insidious, rumor that they are thinking about cooking a Tofukey as well). Whatever happens on Thanksgiving, it will likely be a good test of the Jenn Air's convection feature. [Permalink] - Jenn Air Installation
|
|
|
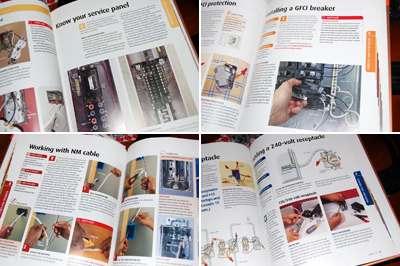
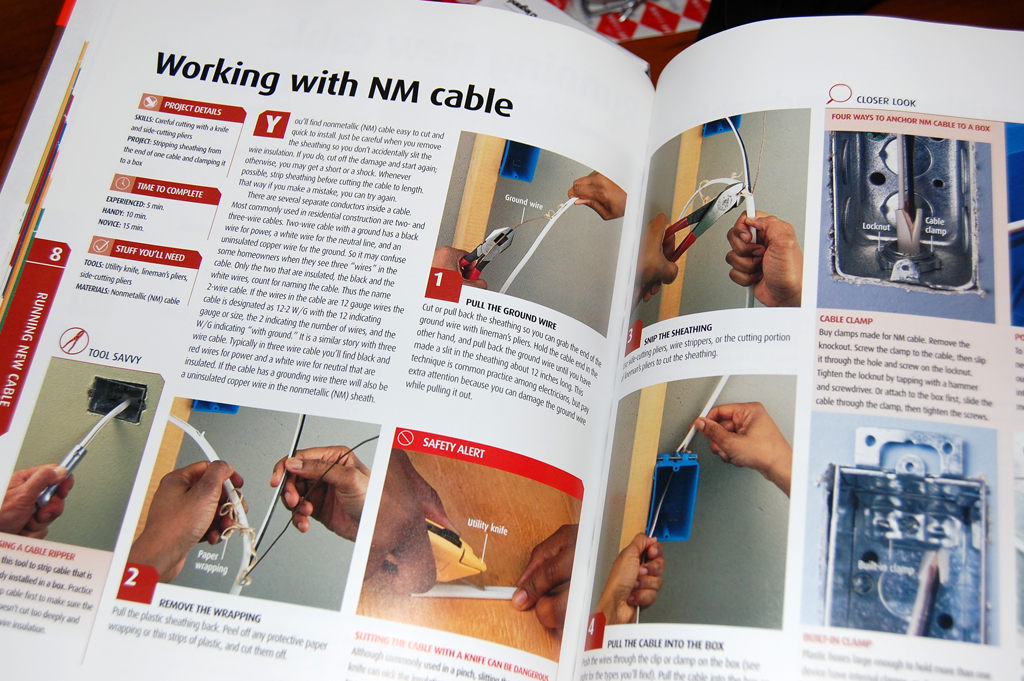
We have been reading up on what we need to do to wire the RainyDayKitchen to accommodate the new Jenn Air range. Once we got things mapped out, the interns took a field trip to Home Depot and gathered the necessary parts (breakers, recepticle, cable, etc...) for the project.
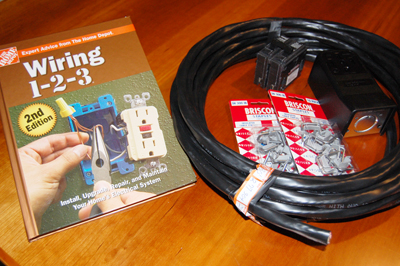
They were gone a long time (no doubt touching everything in the store). One item they did pick up was a book published by Home Depot on wiring. We were amazed at how well written, informative, and useful this book was. It was packed full of project ideas and "how to" articles. It contained everything we needed to know about our project.
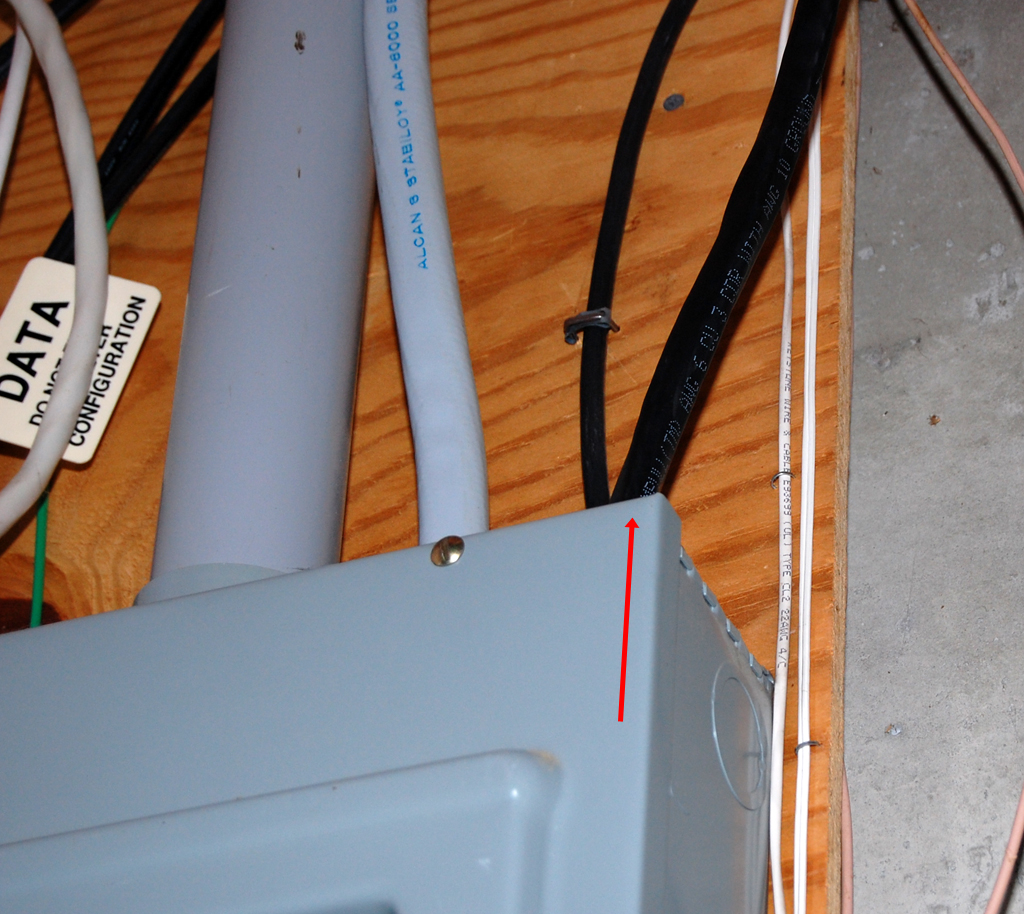
Working with 240V was not something which worried us, it was how to properly handle the 50 Amps. To carry the current, the wires have to be both thick and well insulated. That much current will light us up if we didn't treat it with respect. The code specified NM #6-3 wires for this particular application. At $3/foot, the cost can add up. We needed about 30' of it.
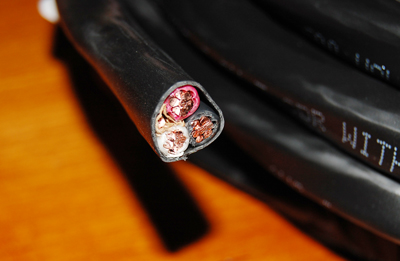

Wires that thick meant all of the parts which must work with it were equally "beefy." The 240v circuit breaker was twice as thick as the 110v version. The 4-prong recepticle looked just as substantial.

We are excited about tackling this electrical work. We will also have a chance to cut a hole in the kitchen floor as we need to run a vent from the range to the outside. No, we didn't ask the landlord for permission. Besides, by the time he finds out, we would be well into the project and there would be no turning back. We are sure everything will work out just fine :-) [Permalink] - Wire It Up
|
|
|
|
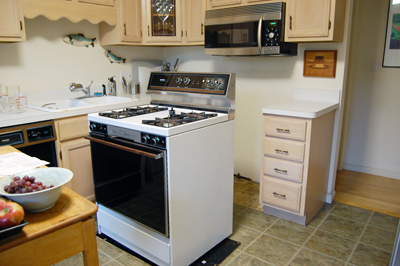
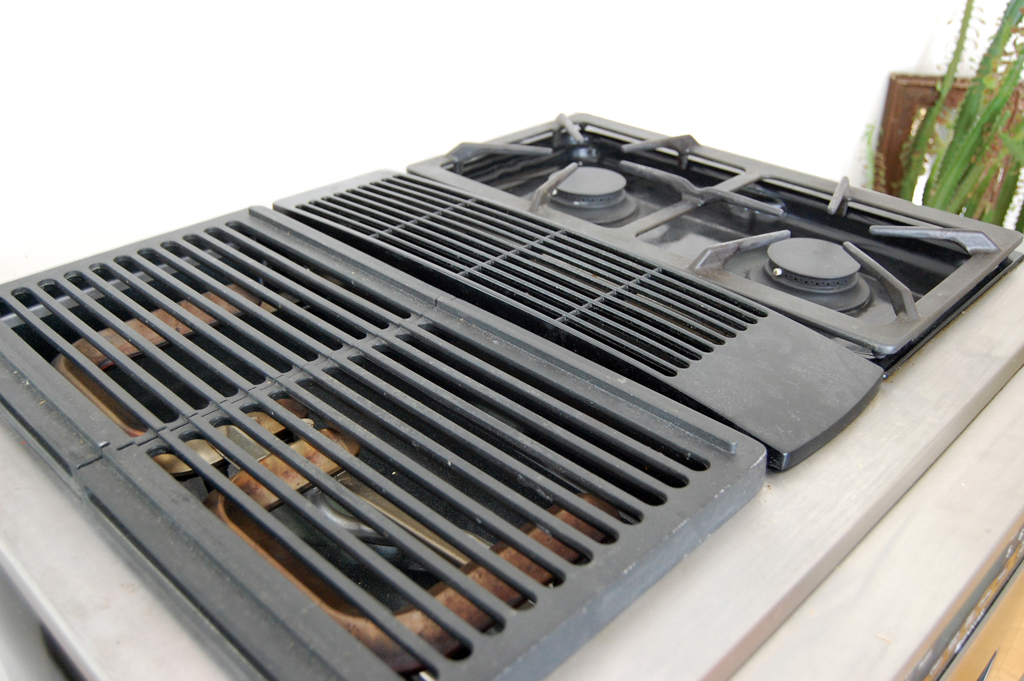
Folks here have been keeping an eye out for a better stove for the RainyDayKitchen for a while now. There are plenty of good ones in the $2500 range, but our budget could not justify such an upgrade. Last week our patience paid off. We found a Jenn-Air dual fuel gas range at about 80% off.
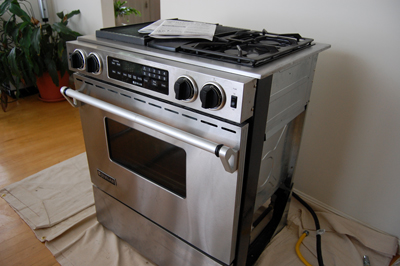
The owner was selling it because they had moved and the new place had no venting option compatible with this stove. It was slightly used, but otherwise exactly what we had been looking for! We rounded up some "muscle," rented a pickup truck from U-Haul, and snapped up the stove before anyone could change their minds.
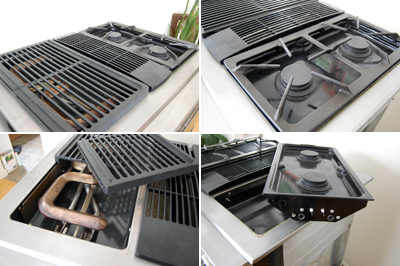
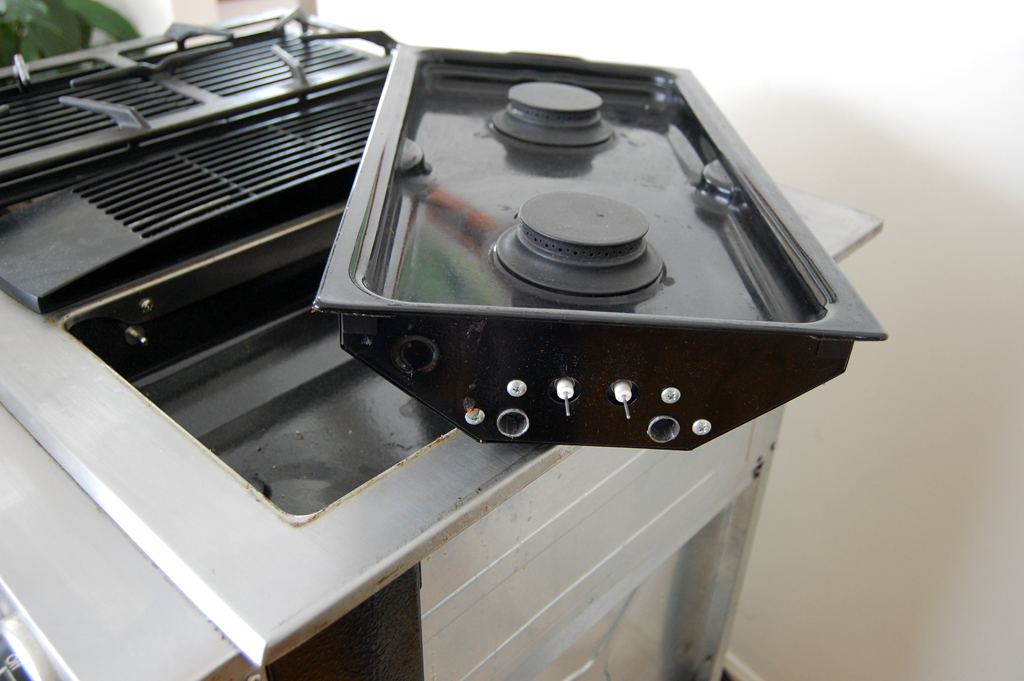
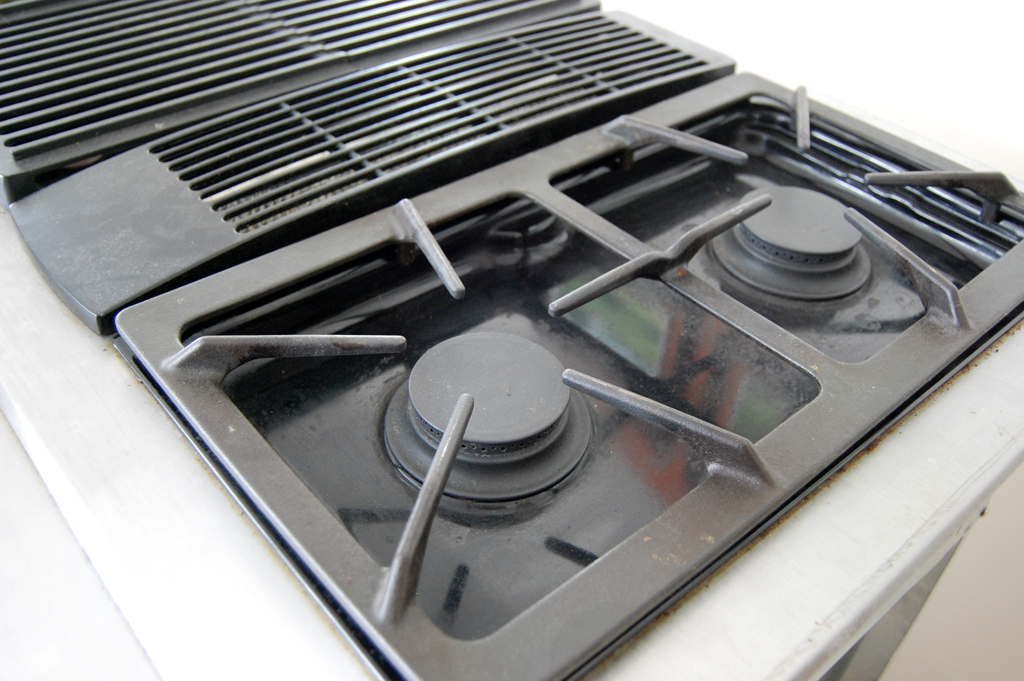
This Jenn-Air stove is designed such that the burners are removable. The one we purchased had the indoor grilling option installed on the left and high capacity sealed burners on the right. The benefit of sealed burners is they are so much easier to clean, since any drippings will be contained in the unit and can be wiped up in a jiff (which make the RainyDayKitchen folks very, very happy).
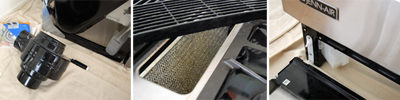
This range has a built-in downdraft vent for removing fumes and smoke from the grills and burners. On the grilling side, grease and oil are collected in a removable plastic trap below. The blower for the vent may be mounted under the range or to the side.
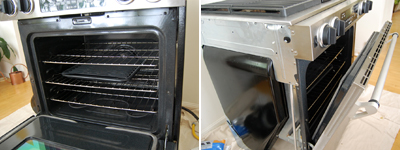
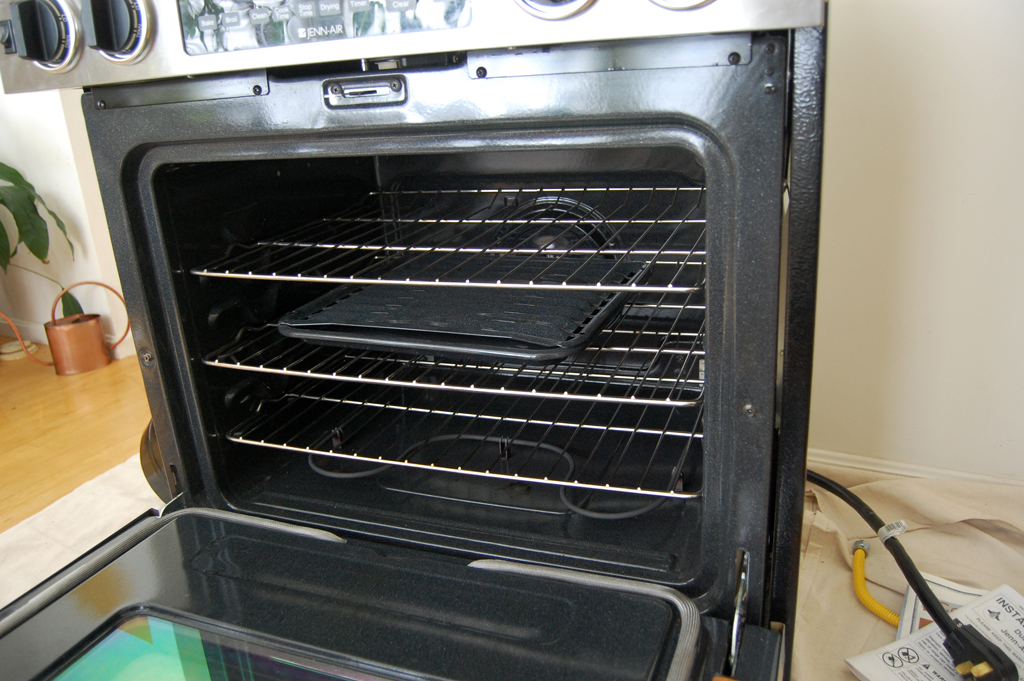
The advantage of an electric oven is the even heating. The convection option makes cooking faster by circulating the heat. This electric convection oven was spotless. In fact, we don't think it has ever been used. If it was, they cleaned it REALLY well.

This Jenn-Air uses both gas (burners) and electric (convection oven). There is already a gas line in place, but we'll have to install a 240V 50A line to the kitchen. We'll also have to install the vent so it can vent to the outside. Readers can look forward to the write-ups of these RainyDayKitchen projects over the course of the next couple of weeks. [Permalink] - Jenn-Air Dual Fuel Stove First Look
|
|
|
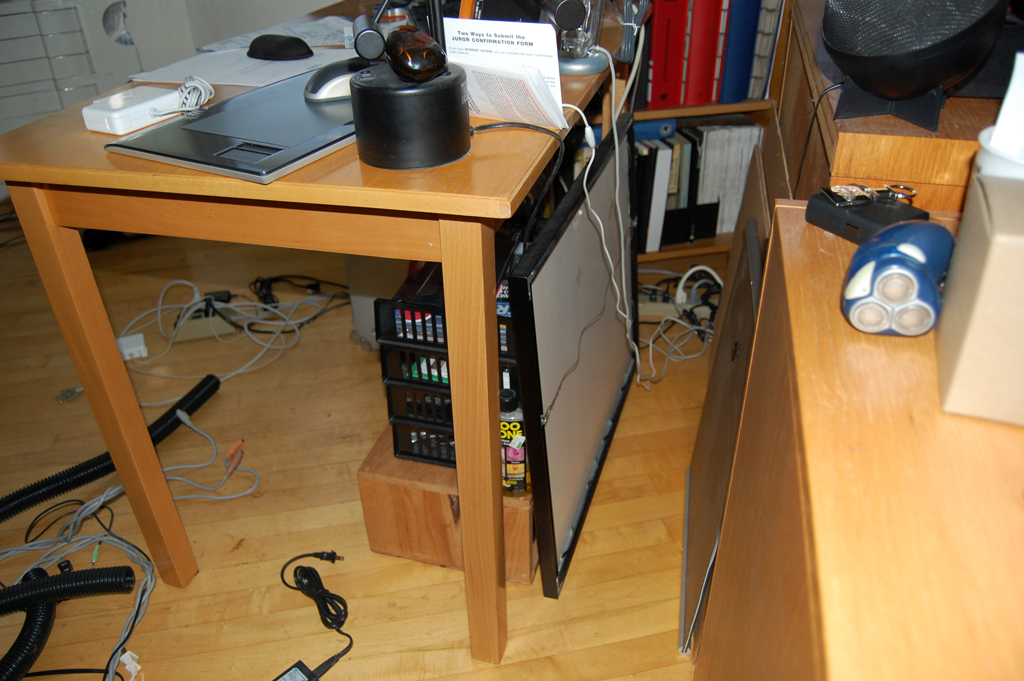
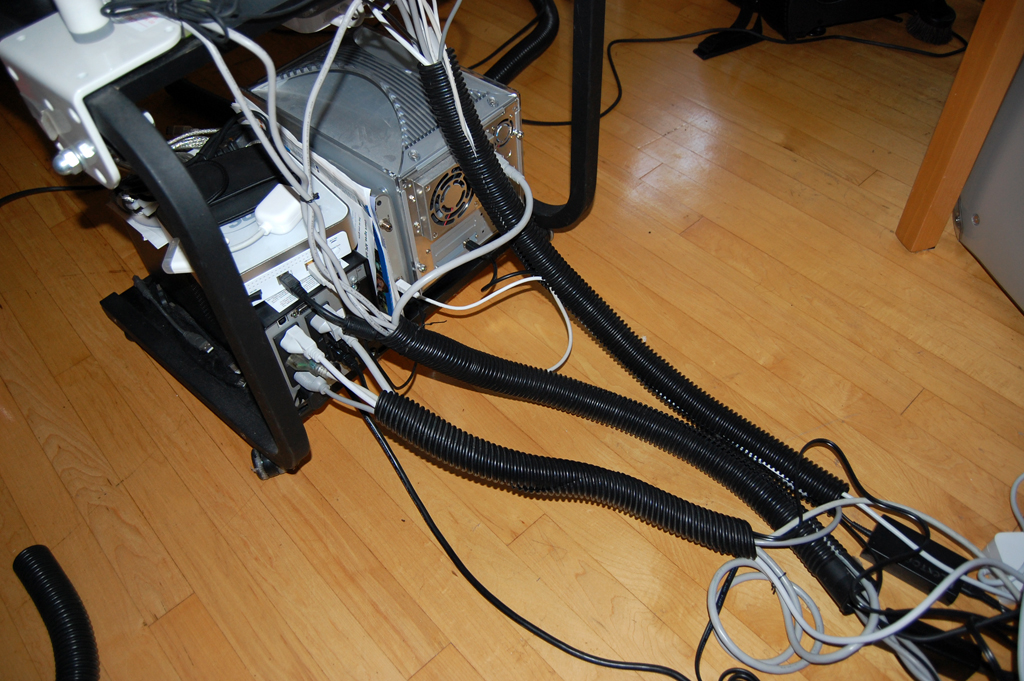
We meant to install an anchor for our Vespa this weekend. Saturday was eaten up wandering the aisles of Walmart on behalf of our former intern. Sunday was spent with us inside, rewiring the Mac mini media center, courtesy of the rain from tropical storm Hanna.
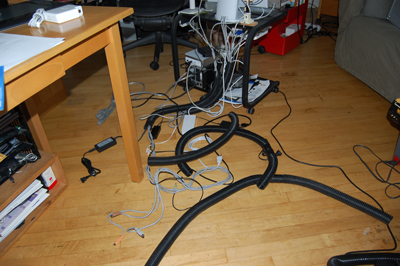
With the large-screen TV disassembled and mostly removed ("partially removed," says our Copy Editor) from the office, it was time to reorganize the gear. The most time-consuming part was deciding where we should put the audio/video gear.
Should we put them closer to the Mac mini media center, or hide them somewhere out of sight? After a bit of pondering, we decided it was best to put it close to the media center and hide it out of sight. The space underneath one of the desks facing the front was the most logical choice.

The biggest tip we have for readers wanting to tidy up the tangle of wires behind the scene is to use some kind of cord wrap. The least expensive way to do it is to get black flexible plastic drainage hoses from Home Depot.
By the time we got the two piles of gear rewired, the surround speakers moved to match the new locations, and tested everything, the sun had came back out. We like the new setup. With the AV gear near the computer, it will be easier to record from all of the video and audio sources without having to run a lot of cable. [Permalink] - Rewiring
|
|
|
|
One of the perks of having our office in a building with a basement is we can have a Kenmore washer and dryer down there to use whenever we want. This also means that we have to deal with any problems when they arise. Recently, one of the editors noted the machine was making a gawd-awful racket, shaking like it was possessed, and leaking water. Since the washer is about 20 years old, we thought maybe it was on its way out.
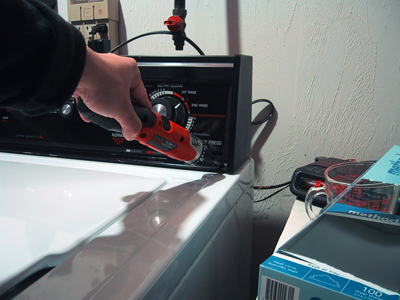
This was, of course, was the perfect opportunity to get out the tools, see what the insides of a washing machine were like, and to see if we could fix the problem. Our first move was to disconnect the power to the washer...water and electricity always make for a shocking combo. So off we went in pursuit of figuring out how to get the control panel off the washer. After careful examination, we realized it was just two screws (hidden by years of lint) which held the panel in place.
After removing the two screws, we were able to lift the control panel free. The panel was designed to rest in an open position due to the support pins on the side. Nice!

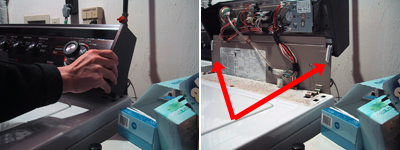
The outside cover of the washer was held in place by two spring clamps. A flat head screwdriver made short work of freeing the clamps. There was also a connector which seemed like it should be unplugged before we started working on the cover to the tub.

Once we got the cover off, it was pretty obvious what the problem was. One of the braces anchoring the tub to the frame had become detached. The brace was part of the spring suspension system. This explained the violent shaking when the unit was in its spin cycle. It also meant the water would slosh around (probably up and over the top of the tub), accounting for the leak.

Re-attaching the brace was straightforward. We first thought the holder was for a bolt, but finally realized it was for a machine screw. The original was no where to be found so we used another machine screw which seemed to fit. We tightened the screw down as much as we could. It should hold, but if it does shake loose, we'll know what to look for in the future.

Well, that repair did not turn out to be a big deal. It took more time to take apart the washer than it did to fix it :-) We ran a wash cycle after putting everything back together. The spin cycle is now working as it should. No more leaks. We REALLY got our money's worth from these machines. Perhaps we'll get another 20 years out of these Kenmores! [Permalink] - Kenmore washer repair
|
|
|
August 18,2008 (LiquidMetalMonday)
|
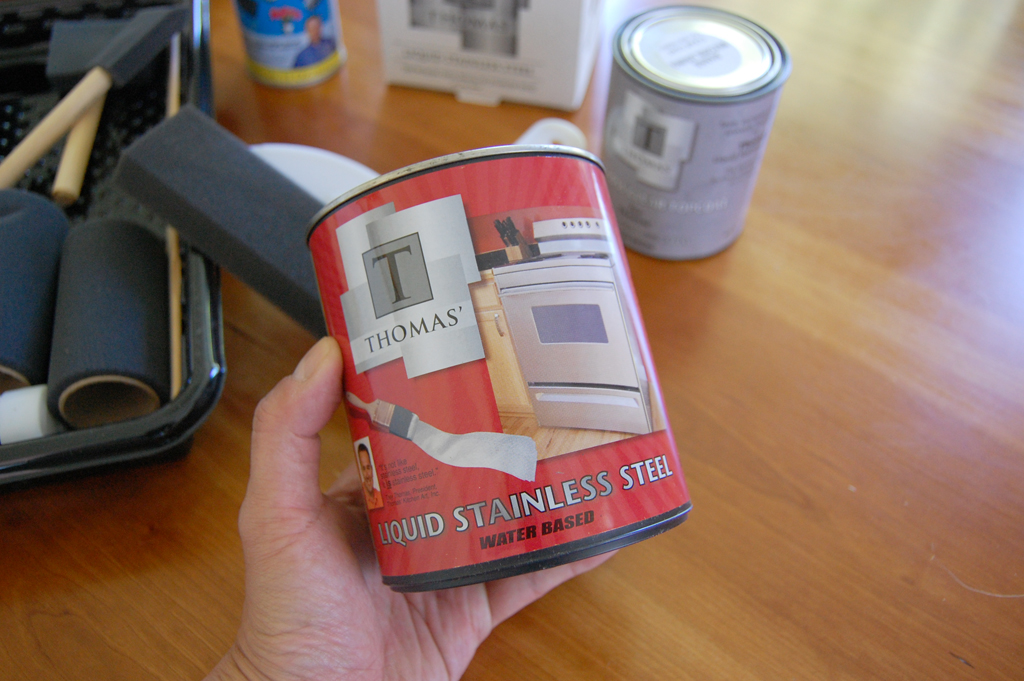
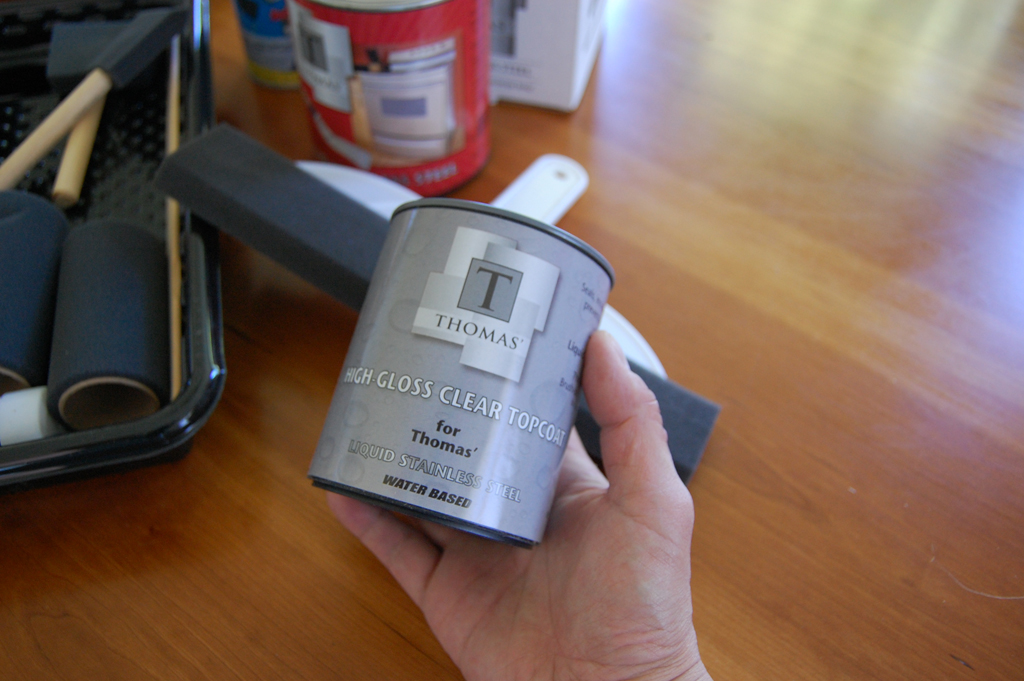
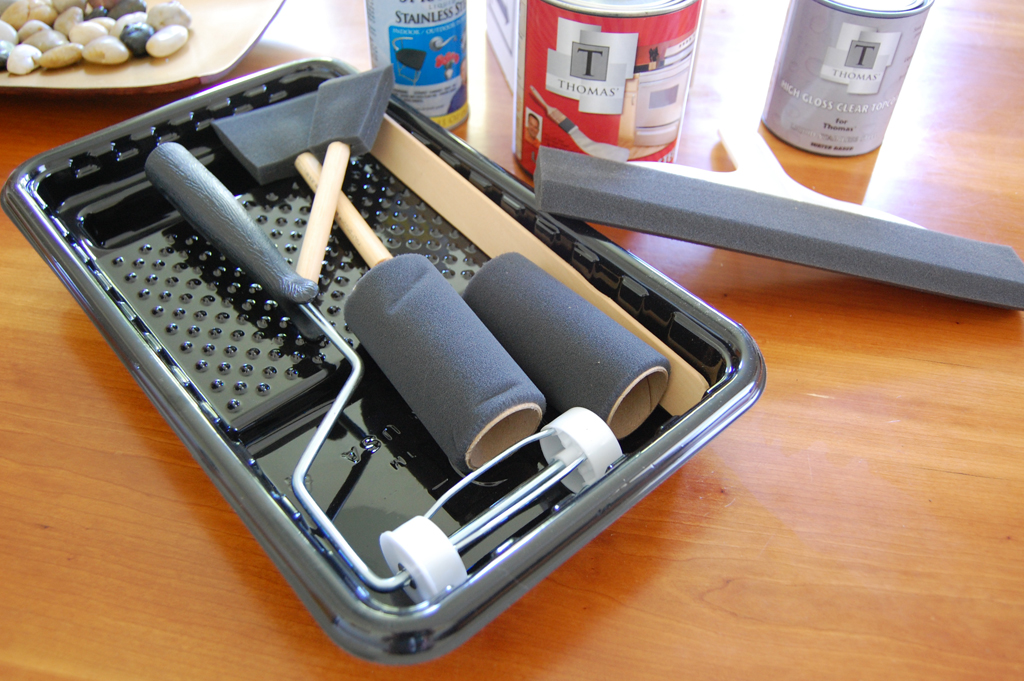
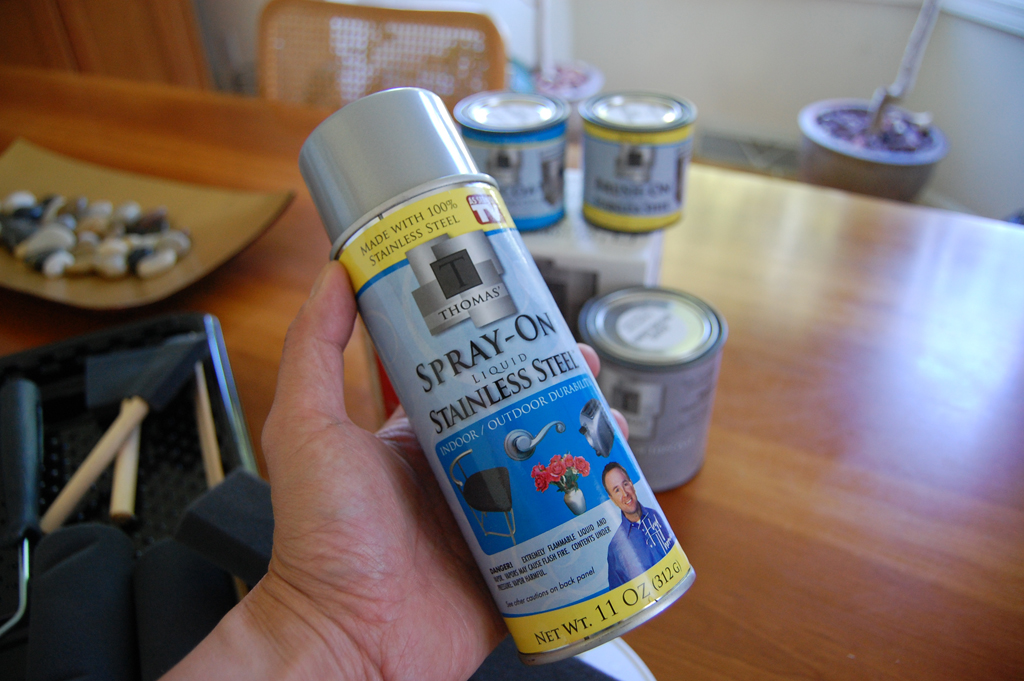
Remember the James Bond movie Goldfinger where one of the Bond girls was painted gold? THAT project was what first popped into our minds when this Liquid Stainless Steel items from Thomas' Kitchen Art showed up at the office. Unfortunately, we were not able to convince any of our editors to let us do that to the interns. JUST KIDDING!!!! This stuff is not designed for use on humans, but for updating the look of kitchen appliances without having to actually update the appliances.
A few readers suggested we check out this stuff after reading about the stainless steel Advantium oven installation project from a few weeks ago. They thought the old stove would look better if it matched the new oven and suggested we paint it using a refinishing product called Liquid Stainless Steel. They did confess that they wanted to try it, but wanted us to check it out first to see if this stuff actually works.
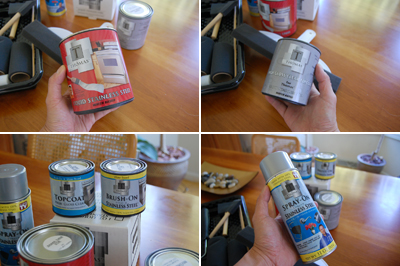
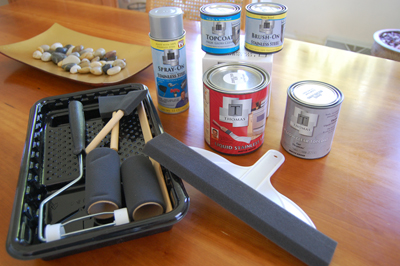
Of course we were intrigued. After checking out the link, we were game. We got enough of the various components (liquid stainless finish, clear top coat, brushes, spray-on) for a few projects. According to the label, this is not silver paint, but an actual finish made with stainless steel.

If this works well, we have a LOT of interesting projects where a brushed stainless steel look would be a perfect accent. We are eager to give this stuff a try. Check back with us at the end of the month to see what we did with this "brush-on" liquid metal and how the projects turned out. We hope this stuff works, as it would be cool to have a stainless steel intern. Oh, right... [Permalink] - Liquid Stainless Steel
|
|
|
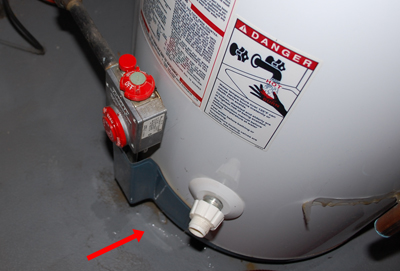
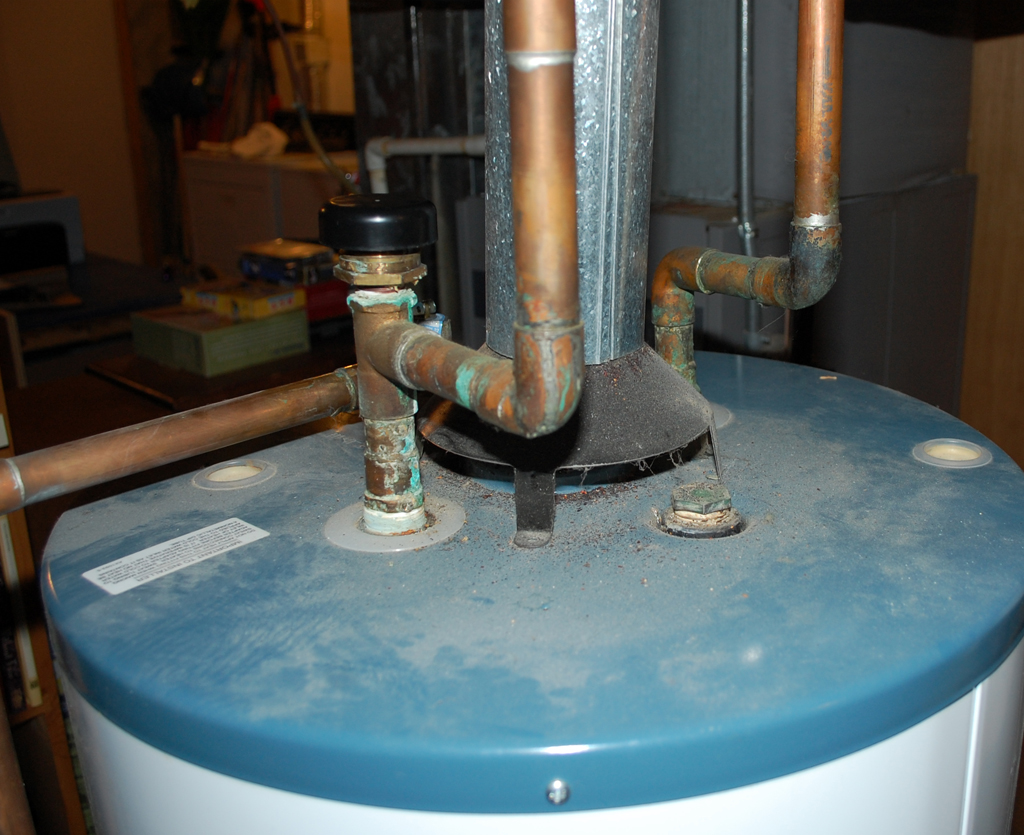
The interns sorted through quite a few responses to yesterday's RainyDayContest. Most readers went with the obvious answer of "lighting the pilot light." However, the correct answer was "connect the exhaust vent." Danny W of Florida was the only one with the correct answer...so Danny, you are the winner! Your prize is the way cool BionicGrip from Loggerhead Tools. It is a handy tool for lots of projects around the home!

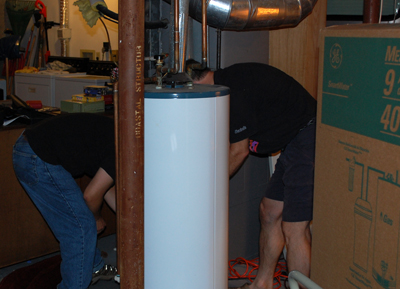
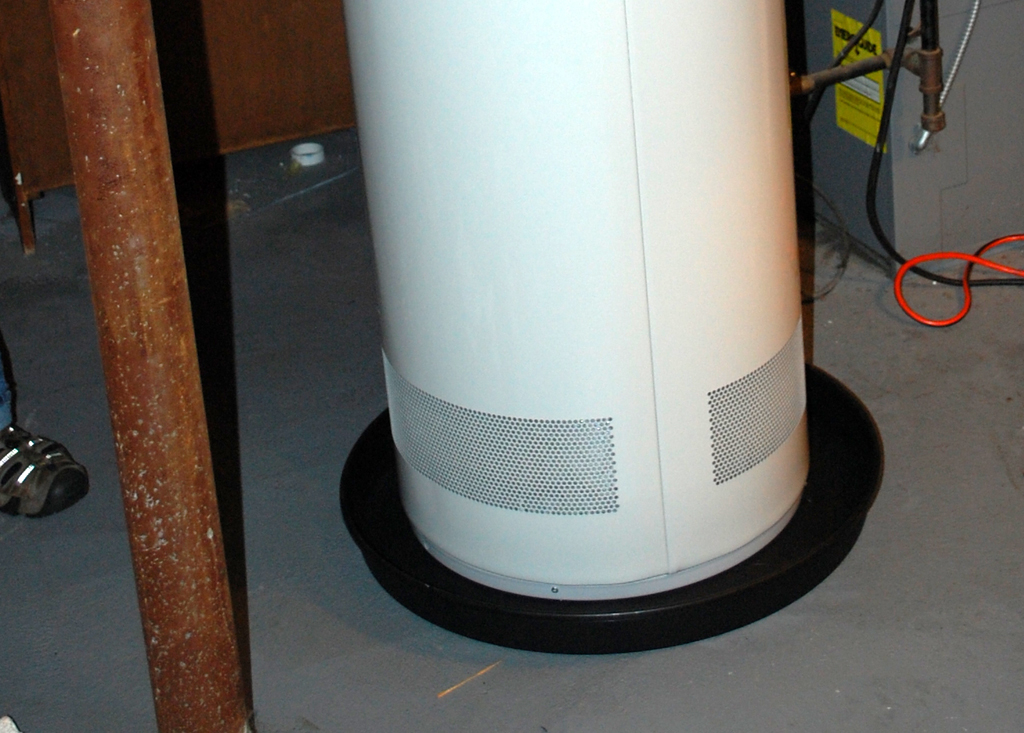
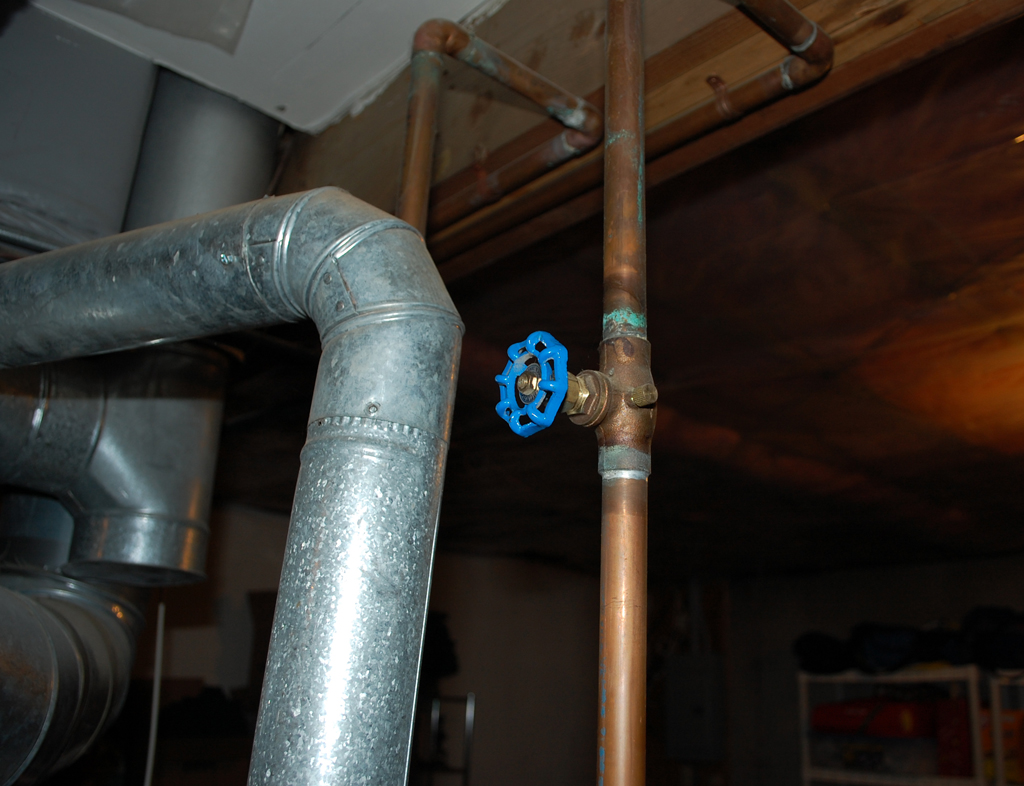
Some of you were wondering which model water heater we had purchased. To tell the truth, we didn't really pay much attention when selecting the unit as all the ones in Home Depot were from GE. The one we chose was a 40 gallon unit with a 9 year warranty. It also came with a one year in-home service warranty.
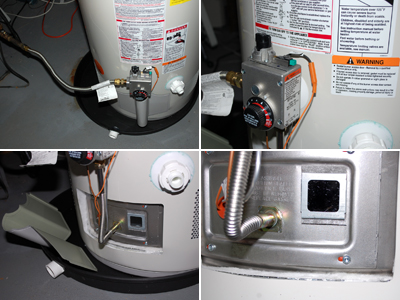
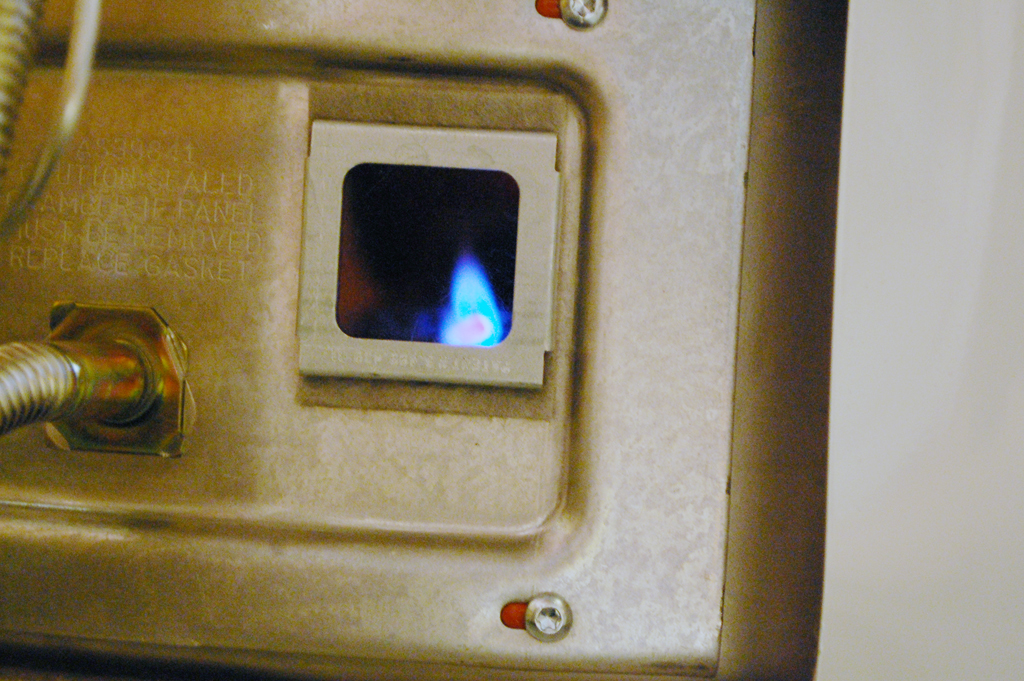
The new GE unit has one feature which was not on our ten-year old unit, a piezo-electric lighter. No longer would we have to stick a match under the tank to light the pilot light. In fact, the entire burner assembly is not even accessible.

To fire up the pilot light, all we had to do was turn on the gas, put the dial on "Pilot", and push the green lighter button a few times. The pilot flame came on and we were good to go! It took about an hour to heat up the 40 gallon tank and we all got our well deserved showers. Ah...clean is good! [Permalink] - Firing up the water heater
|
|
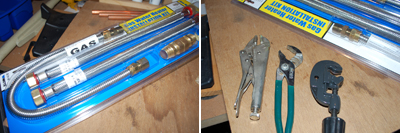
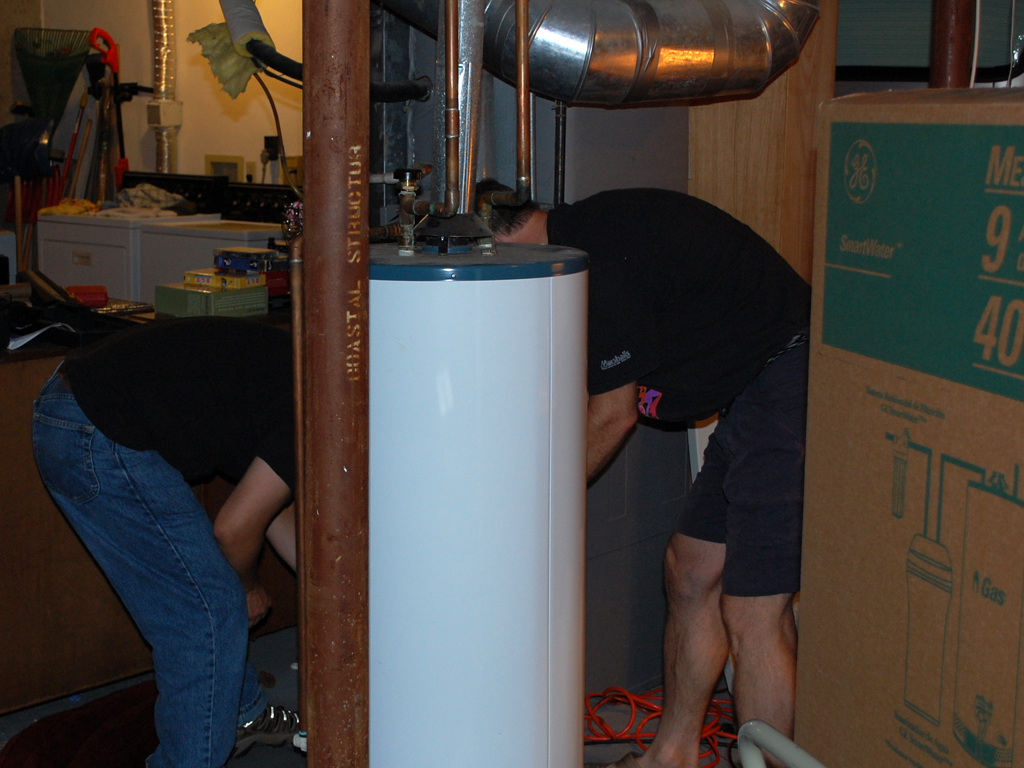
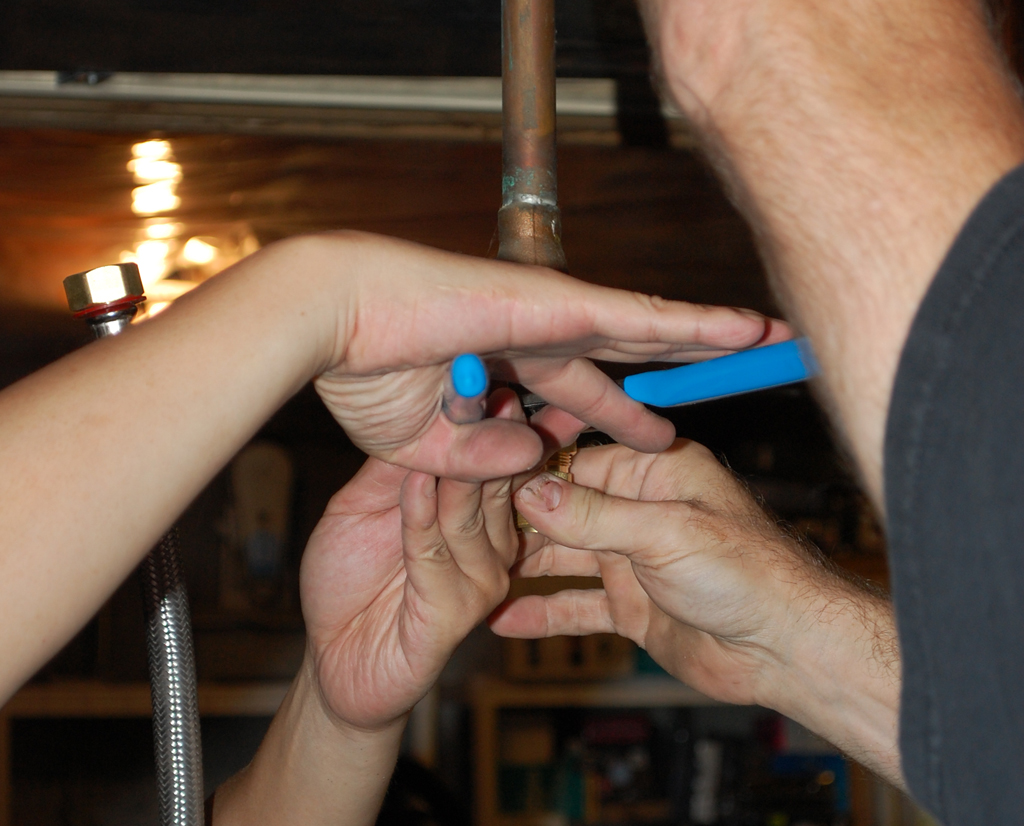
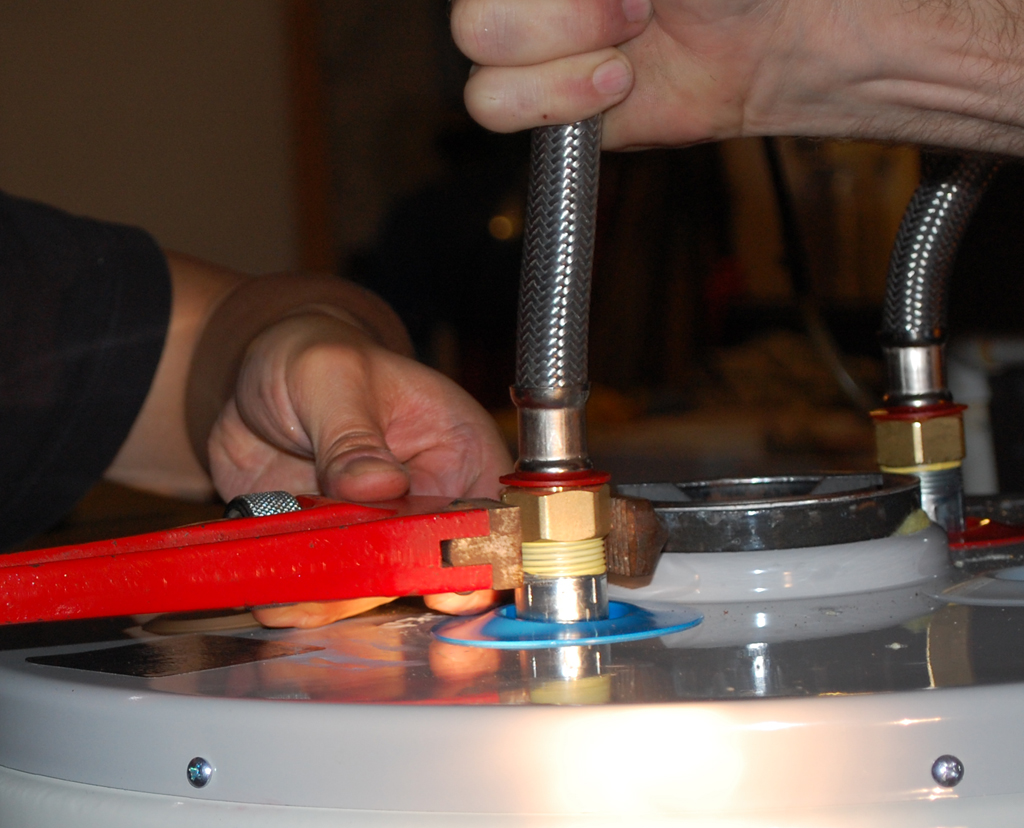
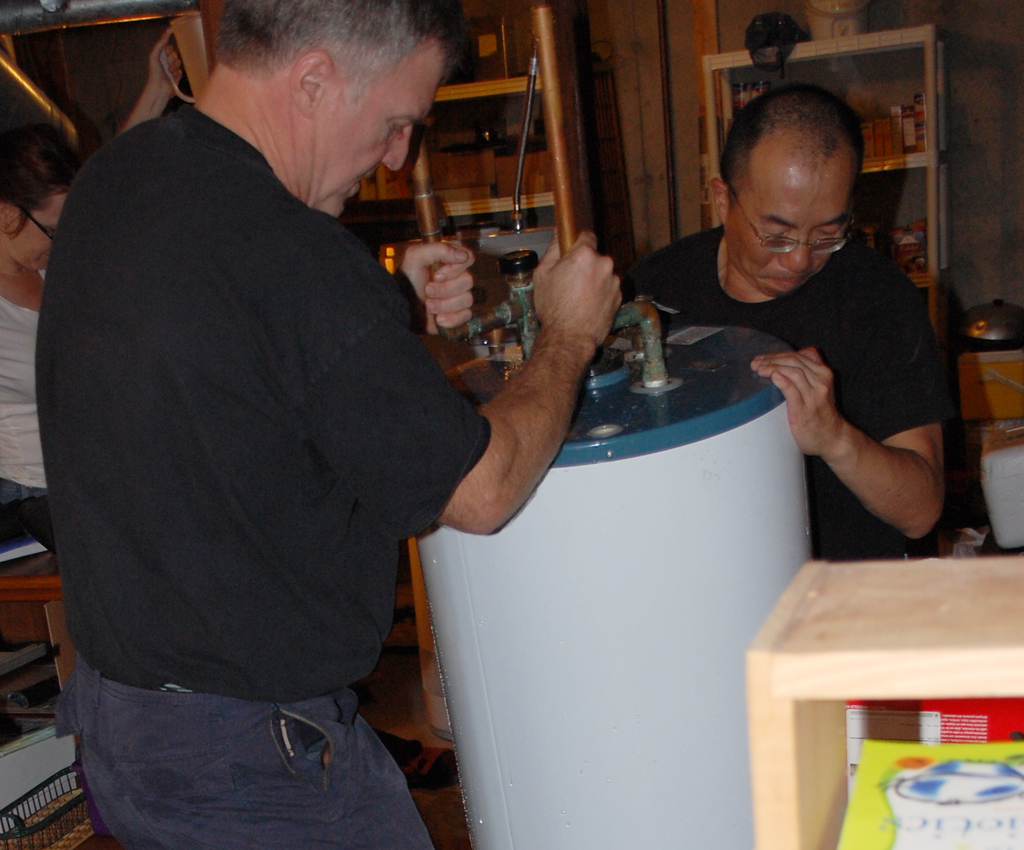
Getting the new water heater into place was a lot easier than moving the old water heater out of the way. To prep for the installation of the tank, we positioned everything and test fitted all the pieces of the kit.
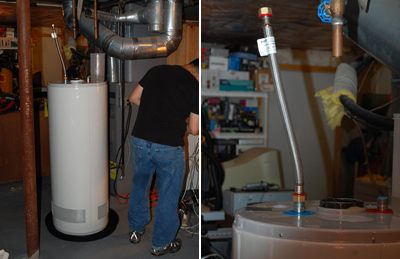
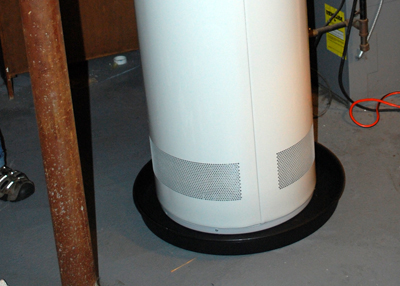
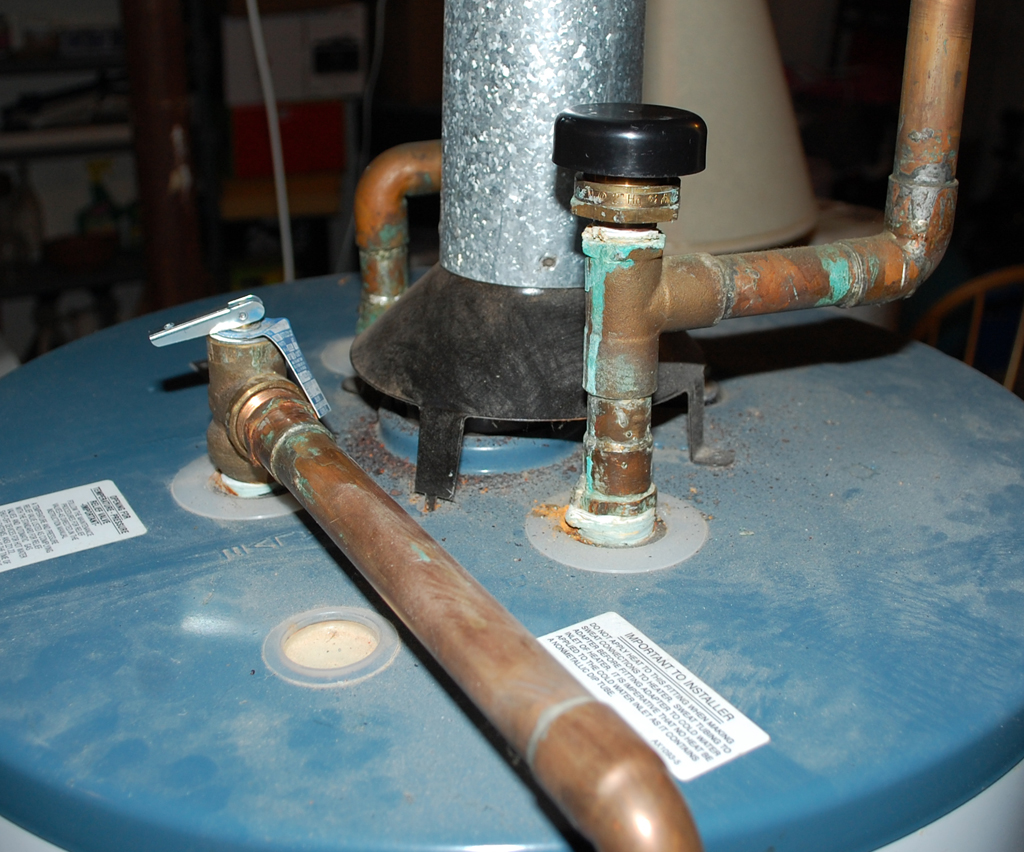
When full, the heater will weigh over 500 lbs, so while it was still liftable we took the opportunity to place the plastic catch tray underneath.
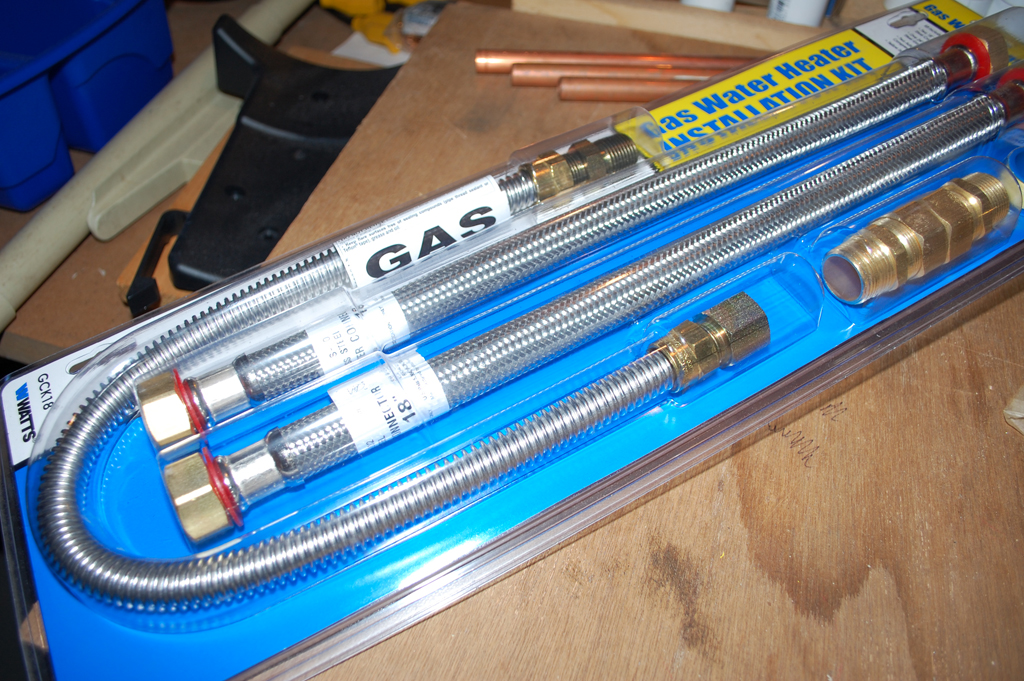
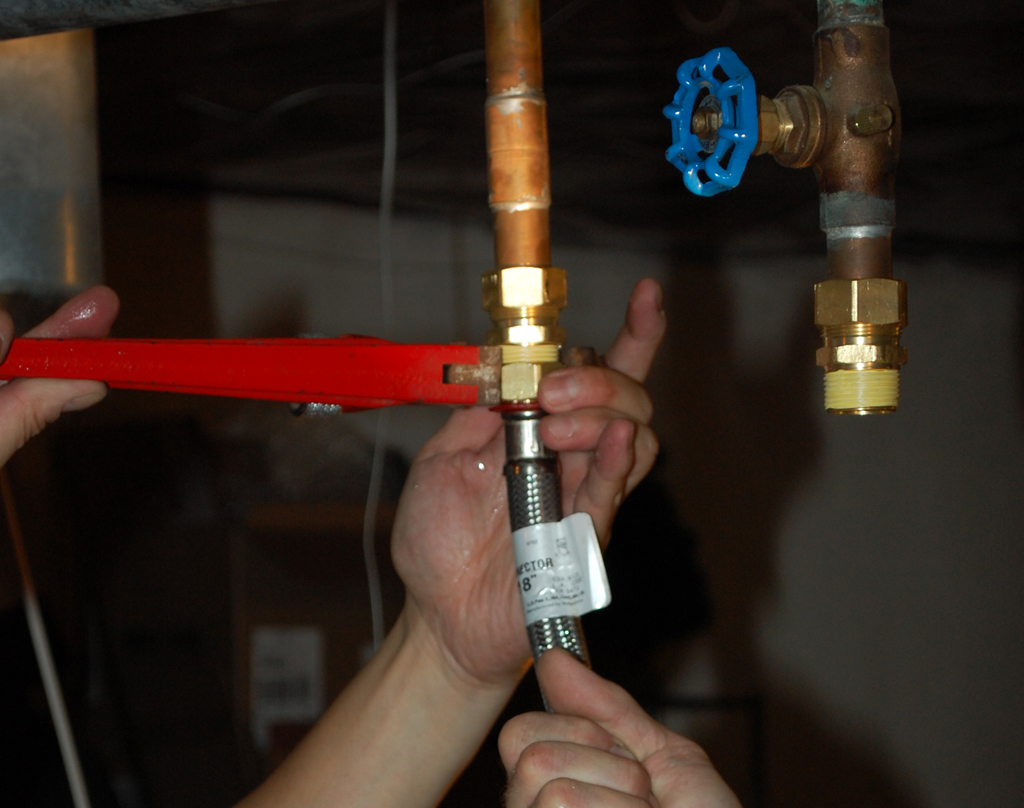
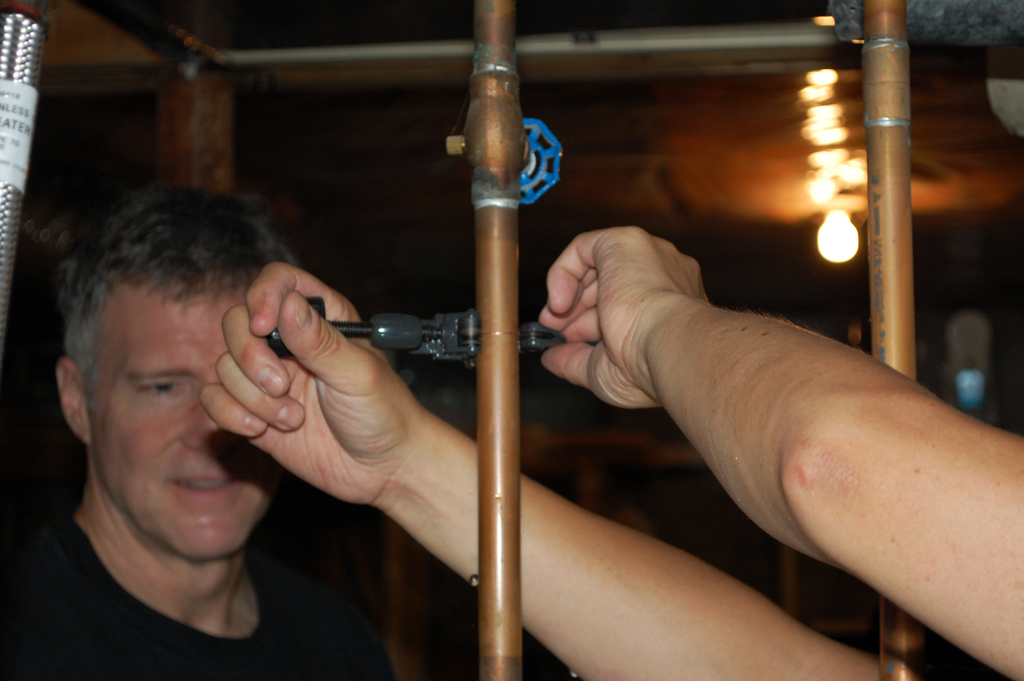
Next step was to attach the compression fittings to the two water pipes. The water-tight fit is accomplished by a nut "squeezing" the internal ring against the pipe. The other end of the connector is threaded so it can accept the flexible stainless steel hose. The key to using compression fittings is to avoid over-tightening, as this will actually cause the joint to leak. The rule of thumb is "hand tighten + 1 turn with a tool."

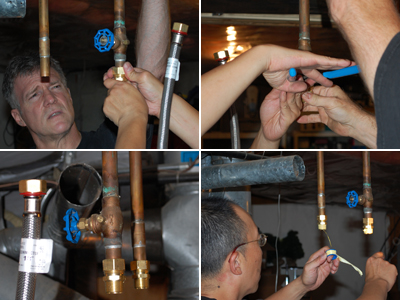
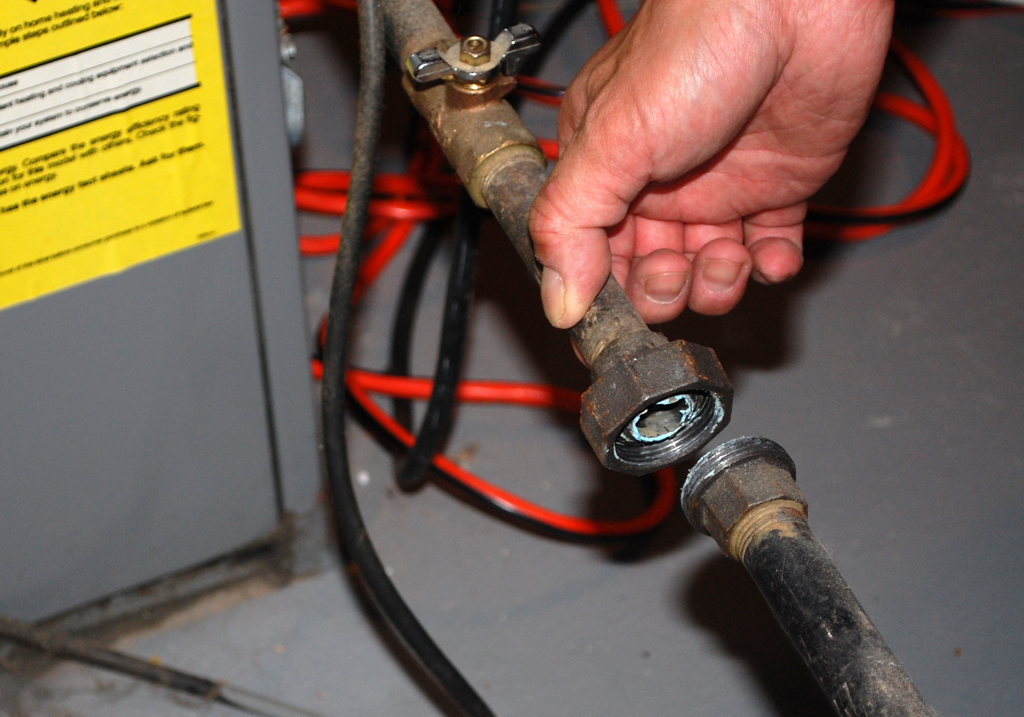
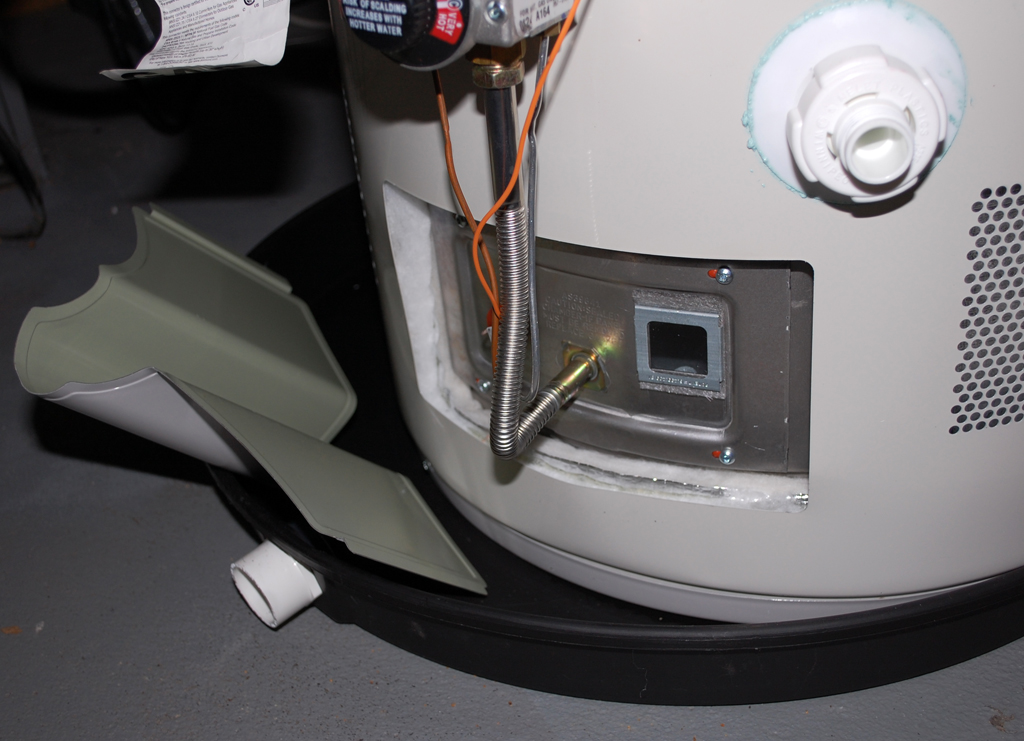
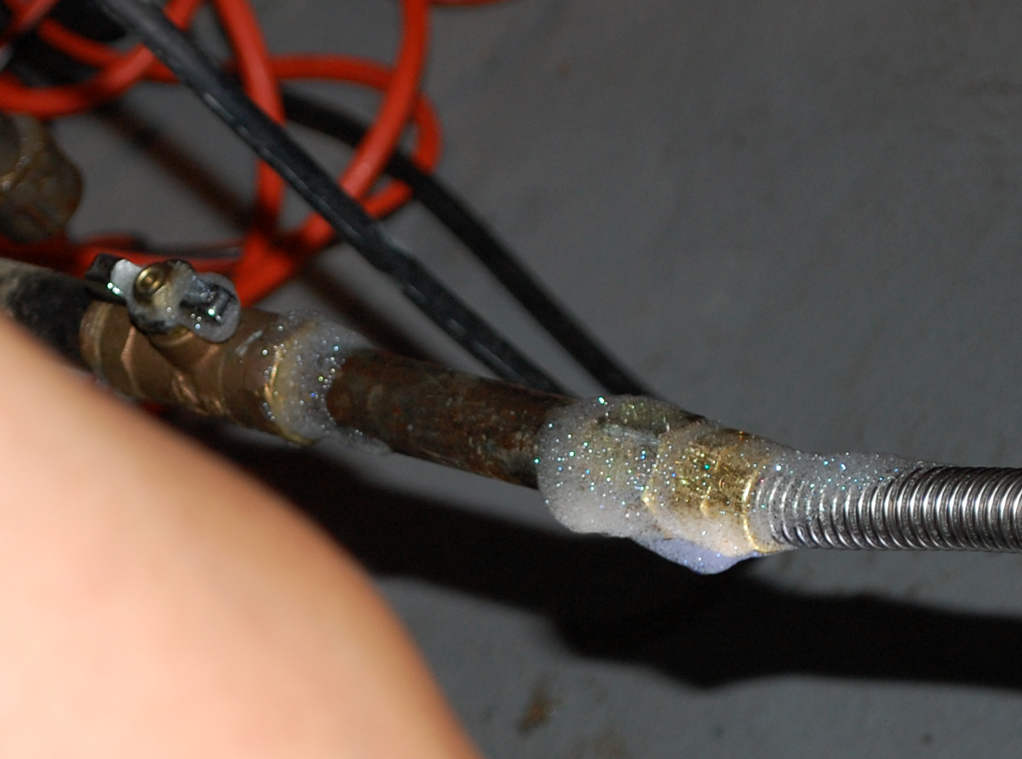
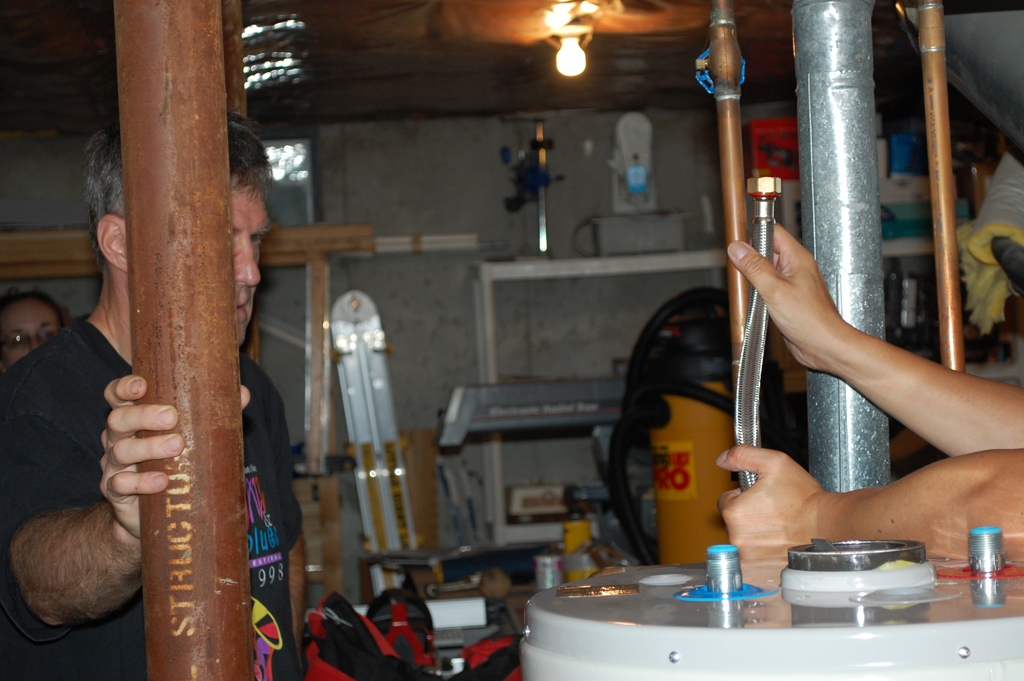
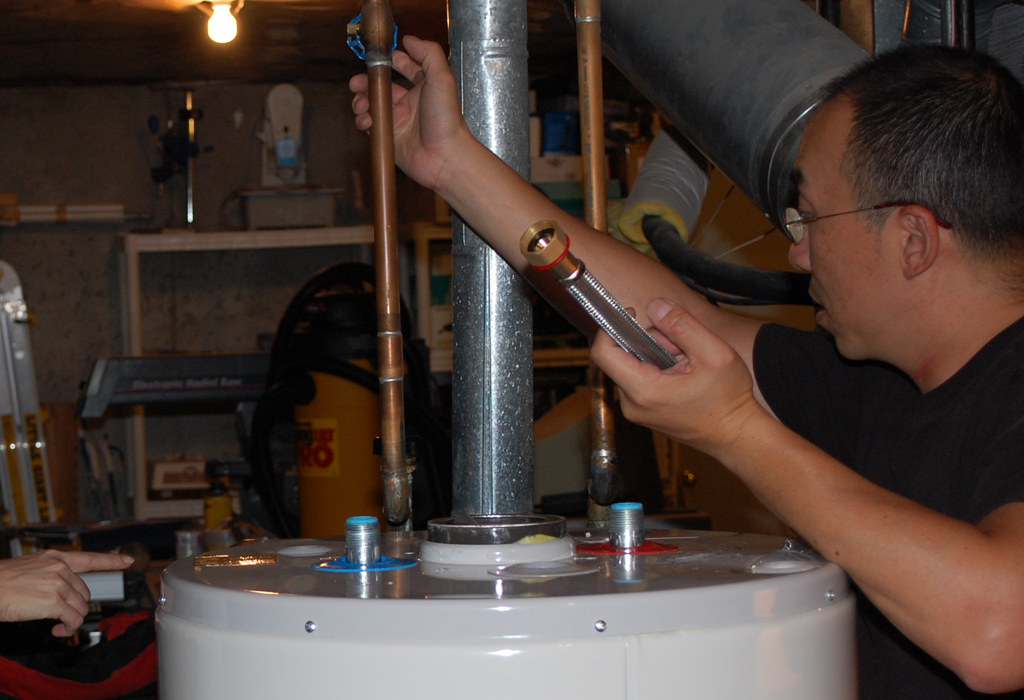
When we disconnected the gas line, we left the joint union on the pipe until we realized it had to be removed in order to attach the flexible gas hose. Two pipe clamps were used, one for keeping the pipe from turning, the other to turn the union.

Once removed, we taped the threads using the Teflon tape that came in the kit, then attached the flexible line to the gas pipe. Two tools were used whenever we did not want the hose or the pipe to turn.
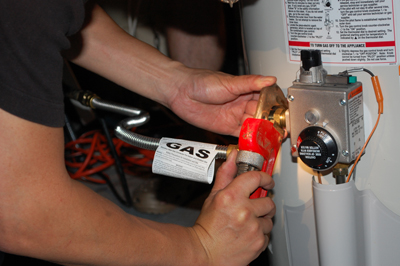
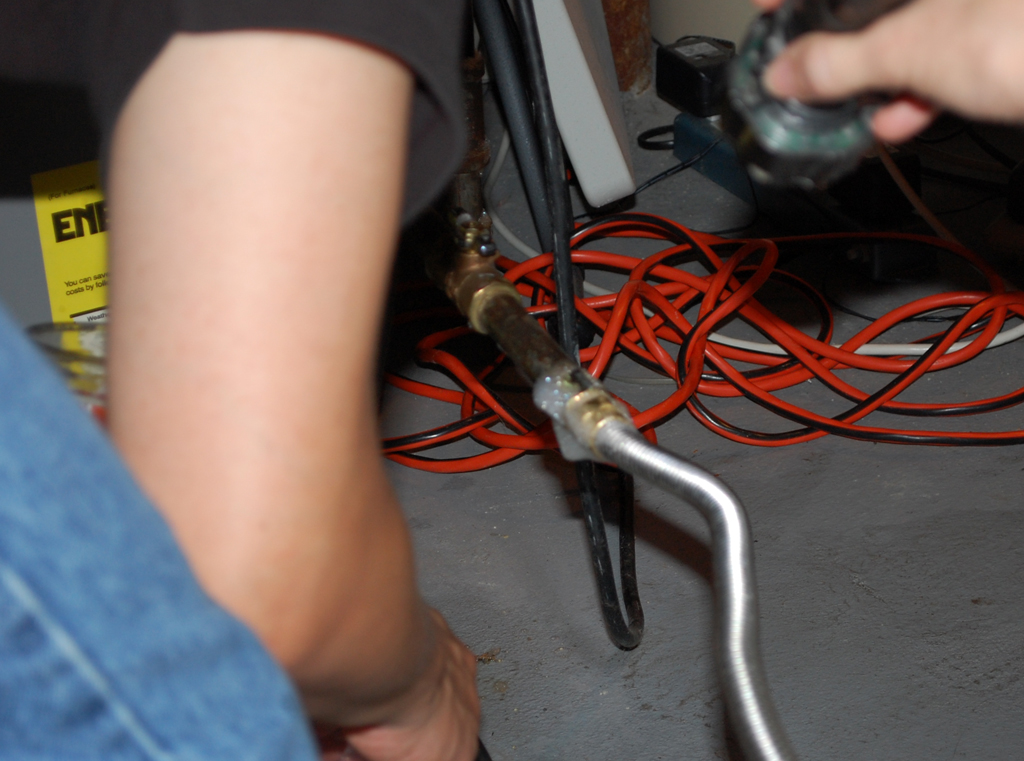
The last gas connection was to the controller on the water heater. Once everything has been tightened, we turned on the gas and checked the connections for leaks.

The only safe way to check for gas leakage is to mix up some soapy water, wipe it on the joints, and watch to see if any big bubbles form. Since it would be "bad" if we had any type of gas leakage, we checked and rechecked the gas line connections and made sure we had tightened them properly.
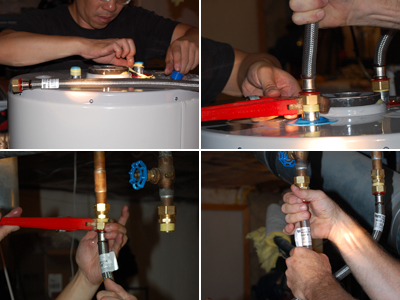
When we were satisfied with our work on the gas line, we wrapped and connected the appropriate water lines to the hot (red) and cold (blue) connectors on the tank. The installation kit, by eliminating all of the soldering work, really made this job SO much easier that almost anyone can tackle this project.

We thought we were done with the installation, but one of the interns noticed that it was not quite yet "Miller Time." The only thing left was to... actually we thought some of you probably could tell us what was left still to do. If you think you know, drop us a note with the subject line "It's almost Miller Time!" and tell us what is still left to do before we should fire up this new water heater. We'll pick a winner amongst the correct answers tomorrow. [Permalink] - Install New Water Heater
|
|
|
When we made the trip to Home Depot for the new water heater, we were confronted with one decision... whether to get a gas unit warrantied for 6, 9, or 12 years. We decided to go with the 9 year warranty because we thought 6 was too soon to have to do this again and difference in cost of the extra 3 years for the 12 didn't seem justified.
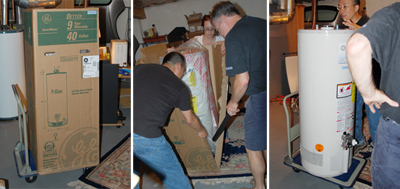
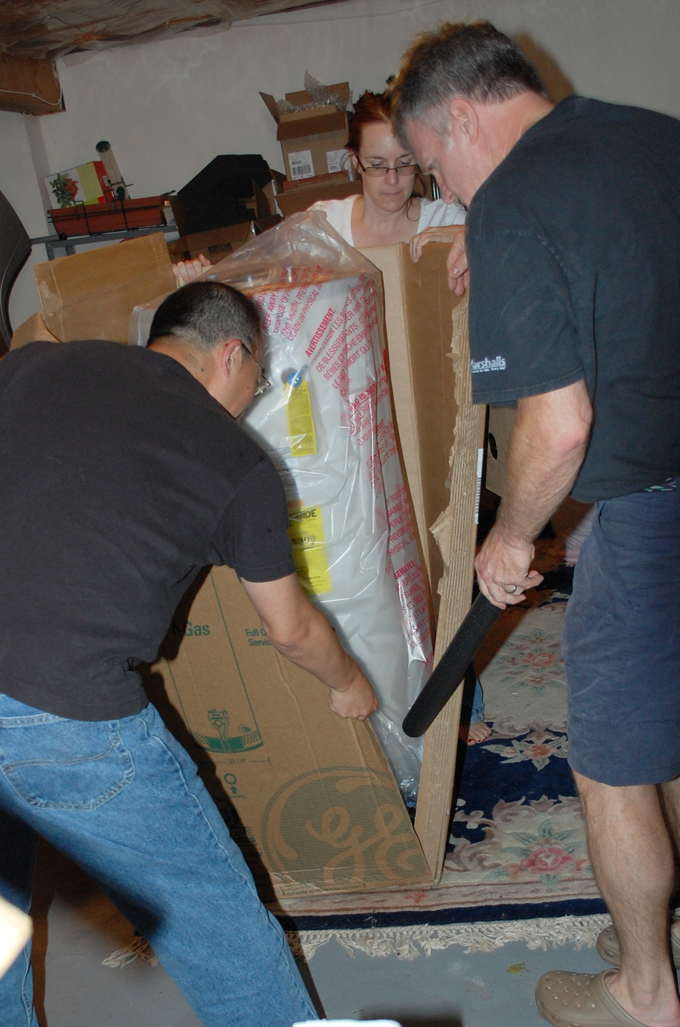
The cart we borrowed from the mail room came in handy for moving the tank around as the unit was still pretty heavy even though it was empty. Once we got the unit down to the basement, our first challenge was how to get it out of the box. One suggestion was to lay it down and slide it out, but just ripping the box ended up being the easiest method.

The new unit was about 3" taller than the old unit. We mesured and marked where we should be making the cut in the copper pipes for attaching the flexible tubing. We also double-checked and made sure the water was off before we began the process of removing the old tank.

We started with the vent as it was the easiest part to remove. The vent ducts were attached using sheet metal screws. The power screwdriver made working at the odd angle much easier.

Cutting the pipes was pretty quick as we had plenty of room to rotate the pipe cutter. We made sure we left enough pipe beneath the cut-off valve for the new fitting to attach. Once cut, there was a little bit of back flow of water, but no surprises.

The last connection was the gas pipe. We checked and made sure the valve was in the shut position before disconnecting it from its coupling. We used two adjustible wrenches to turn the central nut. This was so we could hold the pipe in position while turning the nut.

With the vent, water pipes, and gas supply disconnected, we were ready to move the old tank out. We had not drained the tank because the basement has no easily accessible drain. This made moving the tank a LOT more difficult than we had thought. In retrospect, we should not have been surprised as 1 gallon of water weighs 8 lbs, so the 40 gallons added 320 extra pounds to the 100-pound tank. Good thing Jay had not left on his trip to Europe yet!

With the old water heater out of the way, we are ready to roll the new unit into position, hook things back up, and take a hot shower. Believe it when I say we all needed it :-) [Permalink] - Removing Old Water Heater
|
|
|
Most home water heaters have a life span of about 10 years. The one we have in the basement of the RainyDayMagazine office was replaced around 10 years ago (almost to the day). Some of the editors in the office noticed a big puddle of water in the storage area last week. By Thursday it was clear the water was from the water heater.
To prevent any damage, they turned off the cold water and gas feeds to the hot water tank. This did not stop the water leaking from the tank, but it did slow it enough for them to decide what to do next.

They debated whether they should get it fixed so they could take a hot shower during the day or whether they should wait until the rest of the team returned from NYC. As this appeared to be a great DIY article for RainyDayRenovation, they decided to wait (actually, it was the managing editor who decided that they would wait...).

Replacing a hot water heater is conceptually not difficult. There are four (maybe five) things which need to be detached/attached when replacing the unit:
- connect the cold water feed to the unit
- connect the hot water outflow from the unit
- connect the gas or electric power to the unit
- connect the vent if it is a gas powered unit
- connect a temp/water overflow gauge if needed
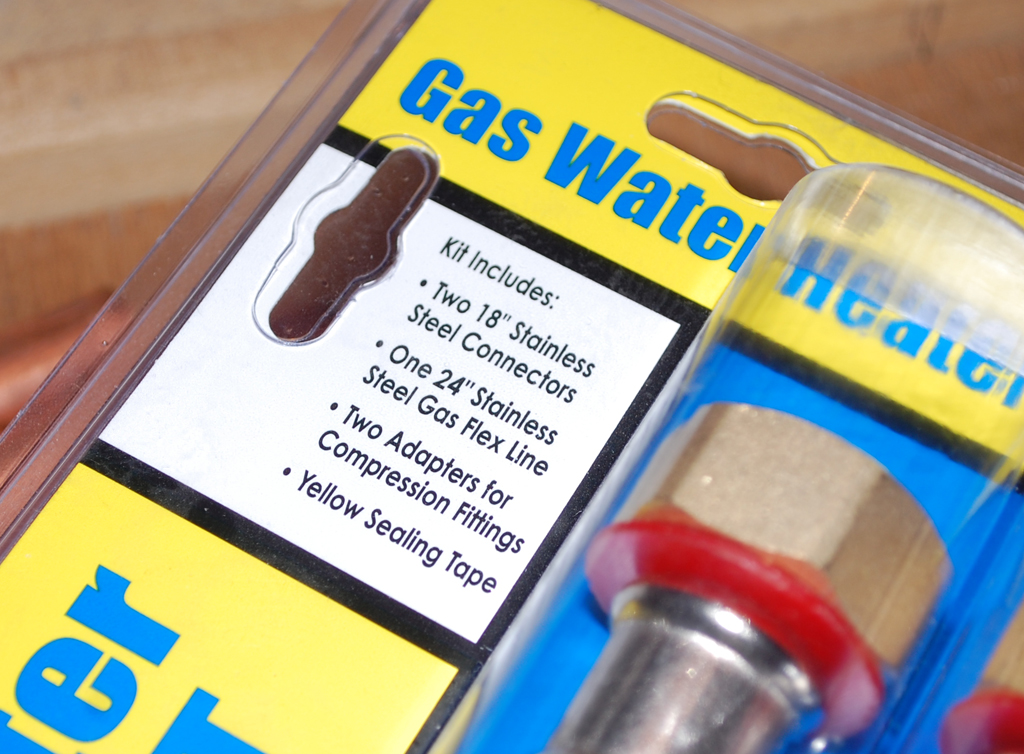
Those who have done soldering of copper pipes before may find this next suggestion excessive. However, we would like to pass it along for those uncomfortable using a butane torch. Home Depot sells a $20 kit which makes soldering unnecessary when installing a water heater. Plumbers may not like this kit as it makes it so that pretty much anyone can replace their own water heater!

The kit contains all of the parts (water hoses, gas hose, fittings, etc...) and the connections are made using compression joints. Another big advantage of using this kit is that its flexible hoses make placement of the water heater less critical than if rigid pipes were used.

The maintenance crew explained the details of the installation project to the editors. They also decided that the editors themselves should attempt the project, since someone (we are not saying who) had remarked within their earshot that, especially with the Watts kit, it looked "pretty simple and straightforward."
The editors, emboldened by the success of their Advantium installation, accepted the challenge. They are now down in the basement looking over the task and are going to draw straws to decide who gets the task of emptying the water from the old tank. We'll catch up with them tomorrow to see how they did. [Permalink] - Leaking Water Heater
|
|
|
|
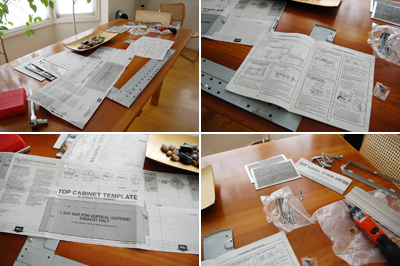
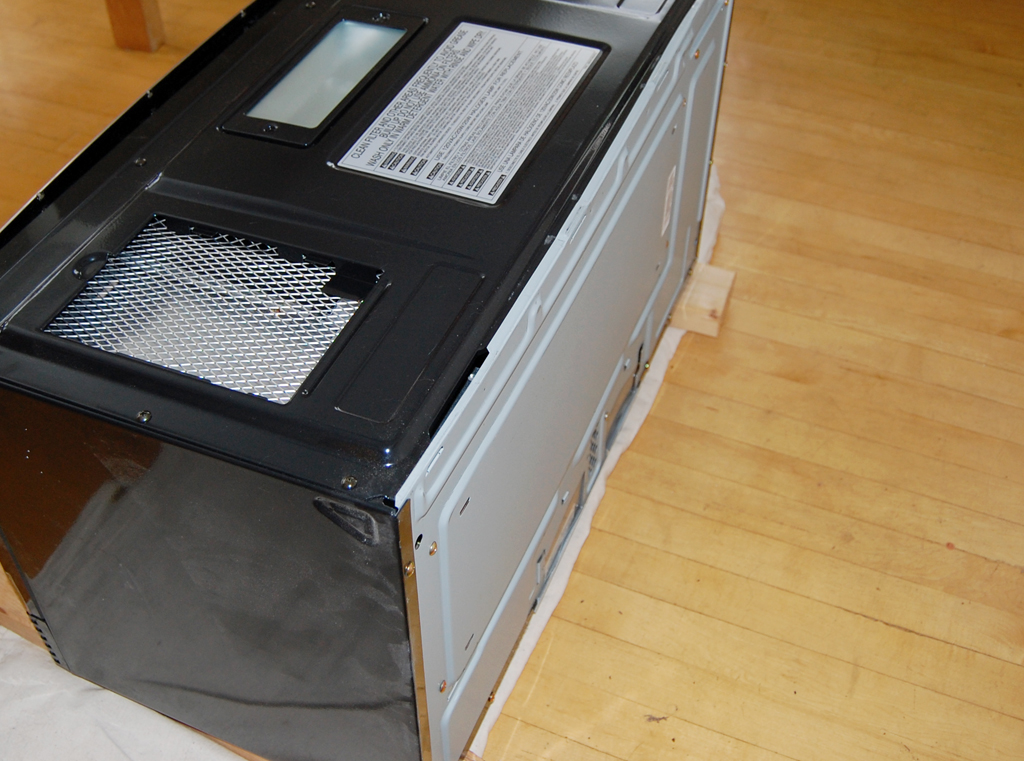
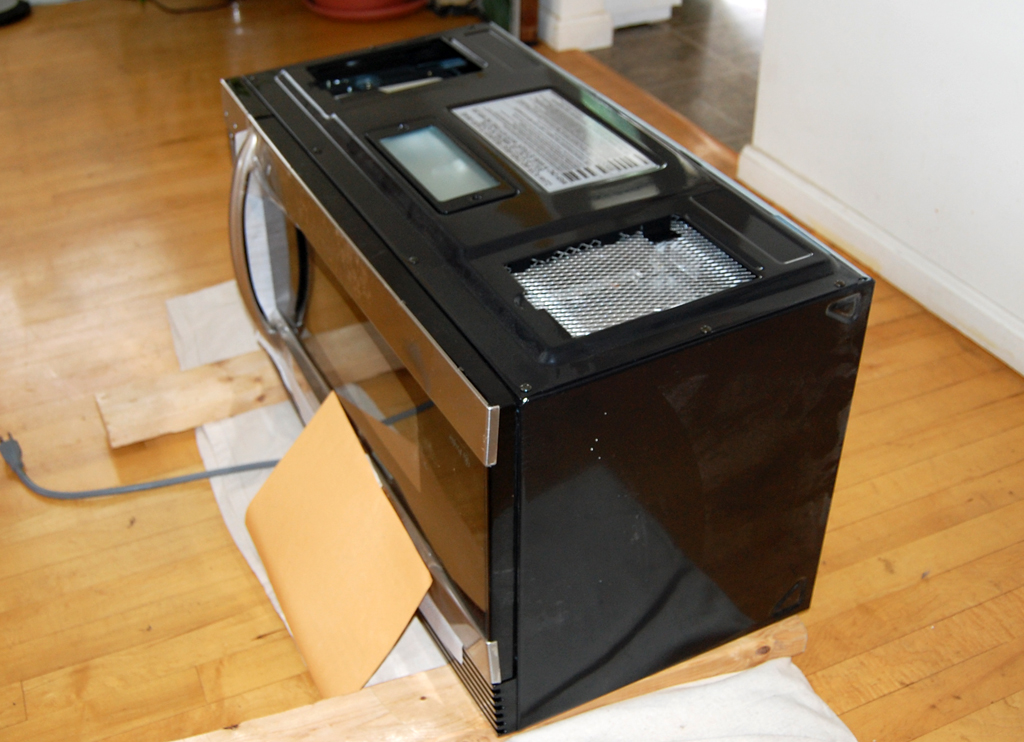
Since the microwave weighed in at about 85 lbs, we made sure we called in some muscle for this job. With Steve and Jay on hand, we were pretty confident that lifting the microwave wasn't going to be the problem.

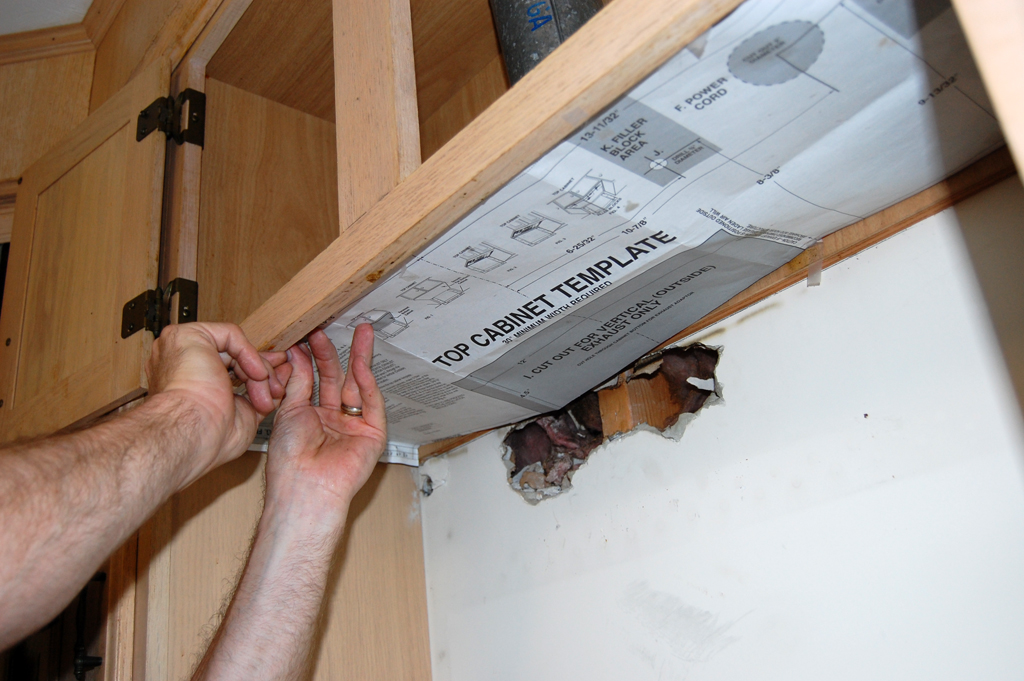
The two steps where this project could go south would be: 1. drilling the holes for the mounting and 2. installing the bracket. To make aligning things easier, GE designed the templates to be attached directly to the cabinet and wall. Once attached, all we had to do was drill where indicated. The giant hole in the wall did come in handy. It meant we didn't need a stud finder :-)
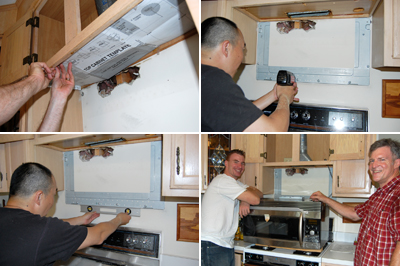
The holes on top and the bracket on the wall had to be sufficiently aligned with those on the microwave for everything to be properly anchored. The problem was we wouldn't know until we tried putting the unit in place.
Ever wonder "how many editors does it take to install a microwave?" Apparently the answer is three. Well, technically, it took two editors and an intern. However, at least two of the three have to actually be able to lift things.
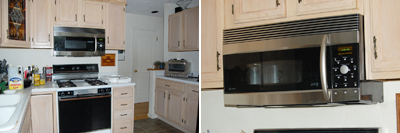
The problem we ran into was that a few of the top holes were a bit too much to the left. We couldn't get the bolts aligned enough to tighten things down. After a few attempts, a bit of grunting, and a lot of sweating, we finally got the unit secured.

This installation was conceptually simple, but the execution required a bit of effort. Next time we'll wait for maintenance. We'll just make sure they know there will be beer in the fridge waiting for them when the job is done! [Permalink] - Wan Chi Lau
|
|
|
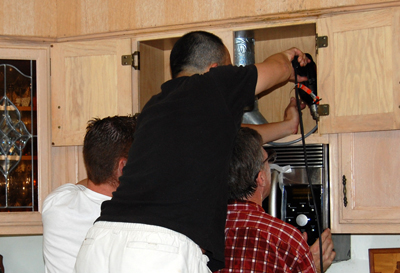
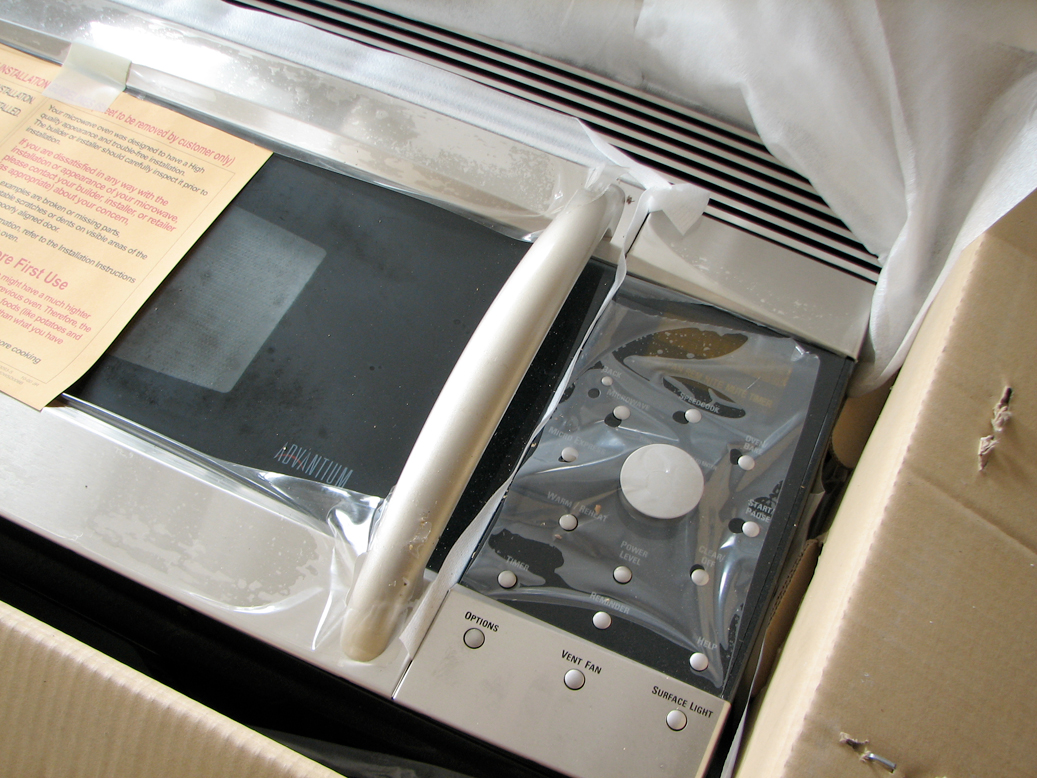
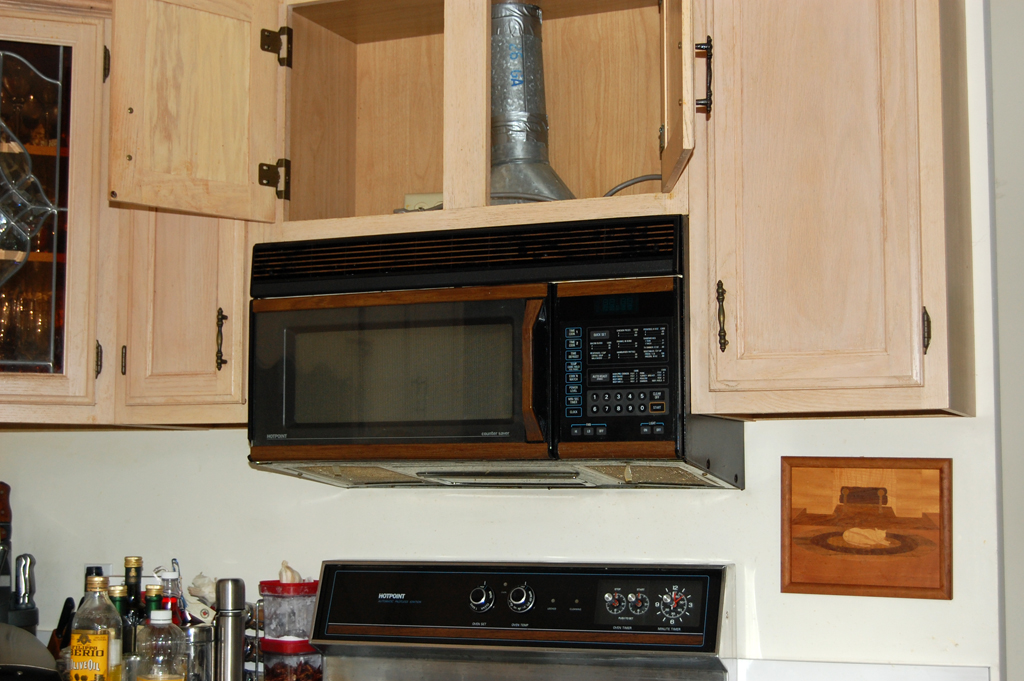
A while back, a GE Advantium microwave oven showed up at the RainyDayMagazine office. The folks in the RainyDayKitchen had been asking maintenance to install it for the past six months. We finally got tired of waiting and decided it was time for the editorial staff to take matters into our own hands. How hard could it be?
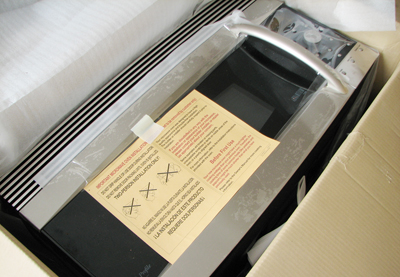
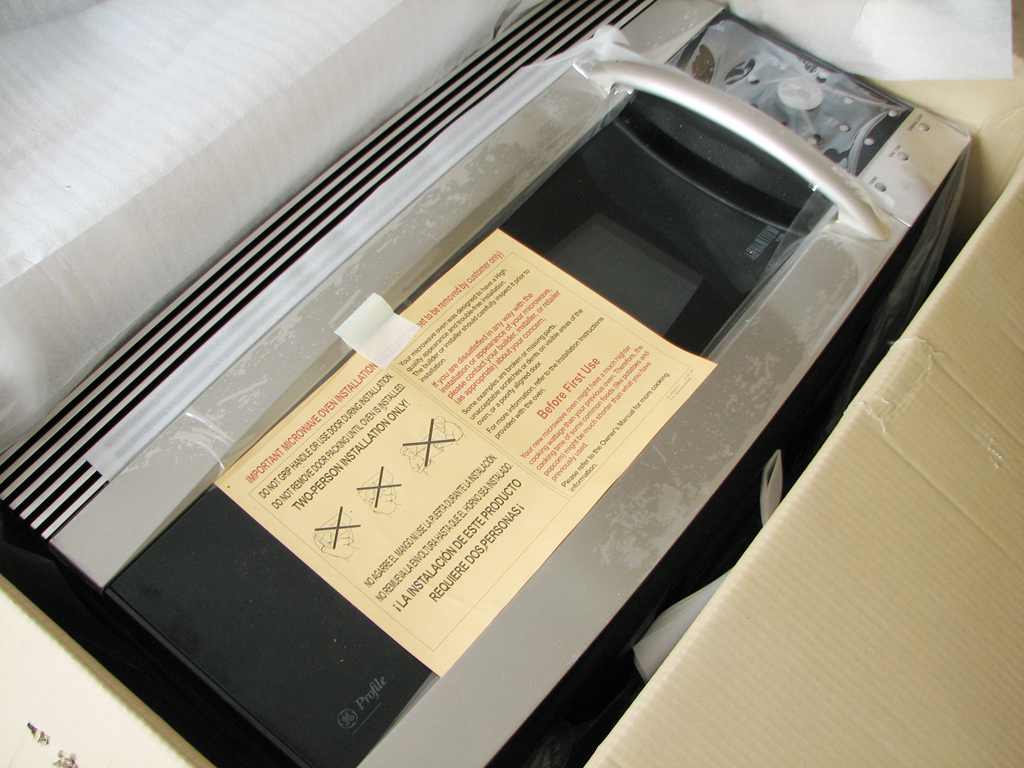
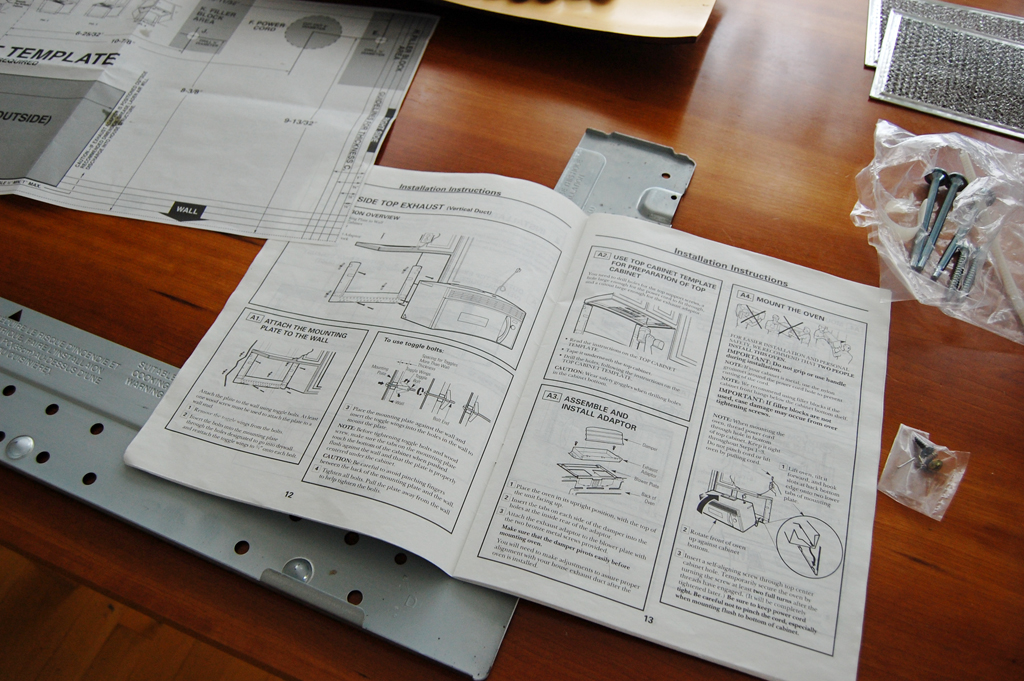
GE certainly made it as easy as they could. With the microwave came all of the normal documentations (plastic-coated tip sheet, user manual, oven specific cookbook).
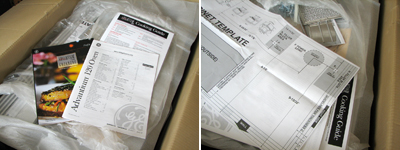
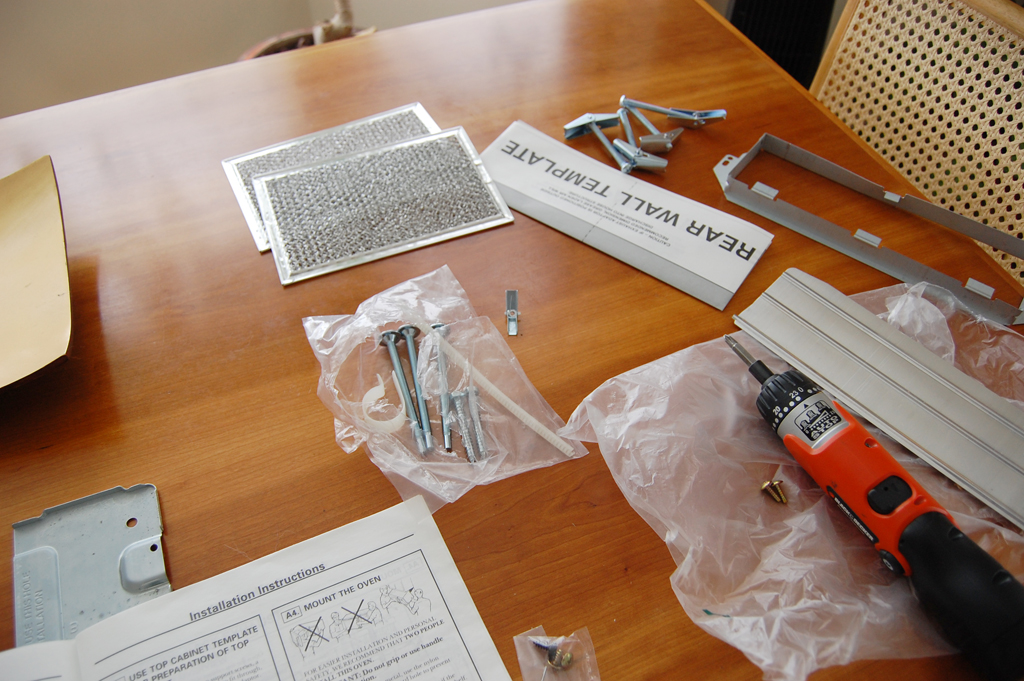
In the box was also the installation booklet, templates, and all of the mounting accessories. The one item which appeared to be missing was the wall bracket. Fortunately, in prepping the unit for installation, we discovered the wall bracket was attached to the back of the unit, which in retrospect, made perfect sense :-)
As none of us had ever installed one of these things before, we thought it best to lay things out and review all of the installation instructions before proceeding.
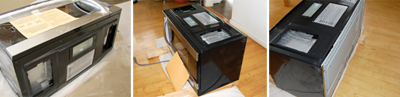
Based on the directions, we only needed a few simple tools (drill, screwdriver, and a level). The old microwave was mounted with bolts on top, vented to the outside, and supported by a wall bracket in the back. Since the new unit will also be vented from the top, we didn't have to redo any duct work.
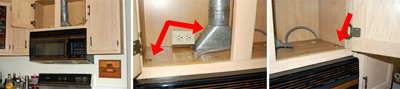
It would be great if we could reuse the same wall bracket, but most likely the mount would be a different size. Getting the unit off the wall was not as "easy" as we had envisioned. After removing the top mounting bolts, the unit should have just tilted forward and out. It didn't happen quite that way.

The wall anchor bolts ripped out the sheetrock. BTW, the big hole in the wall was already there :-) Our best guess was that the electrician who helped build the place made it when he ran the wire for the outlet in the cabinet. In any case, that's the story and we are sticking with it. Tomorrow we'll post the rest of the installation. Next week, we'll check out the features of this Advantium Microwave...just in time for SausageFest!!! [Permalink] - Wan Chi Lau
|
|
|
|
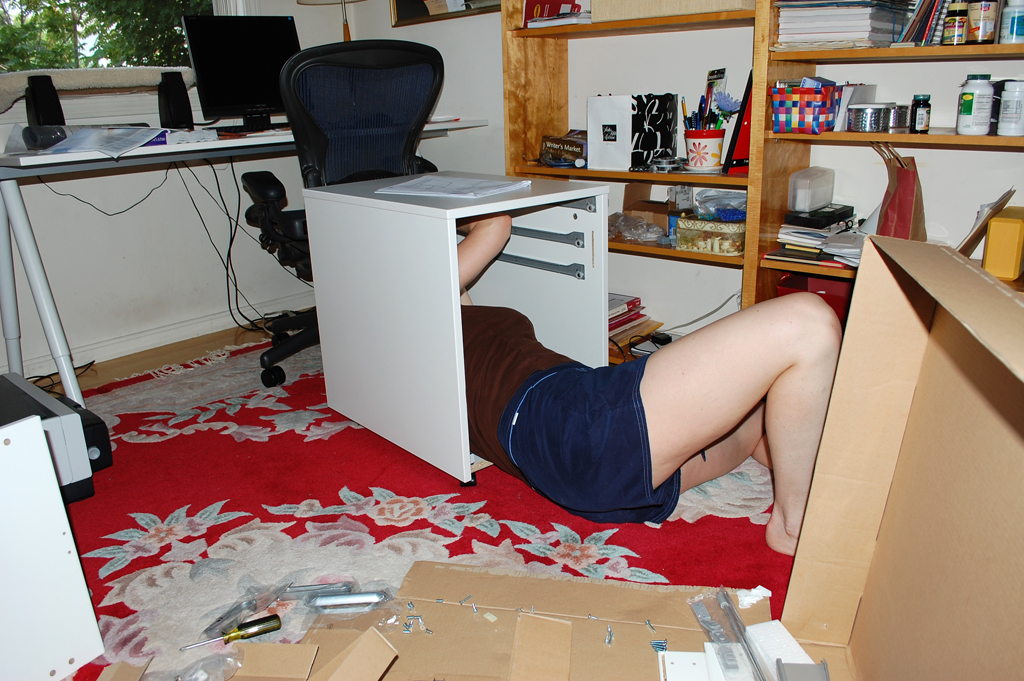
Those of you who came by for the "sale" last week got some nice bargains. We got rid of some good office funiture at some great prices. This weekend, folks here stopped by IKEA and picked up some new items for their workspace.
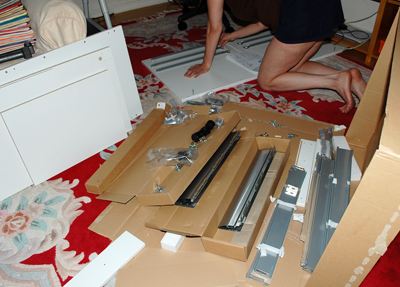
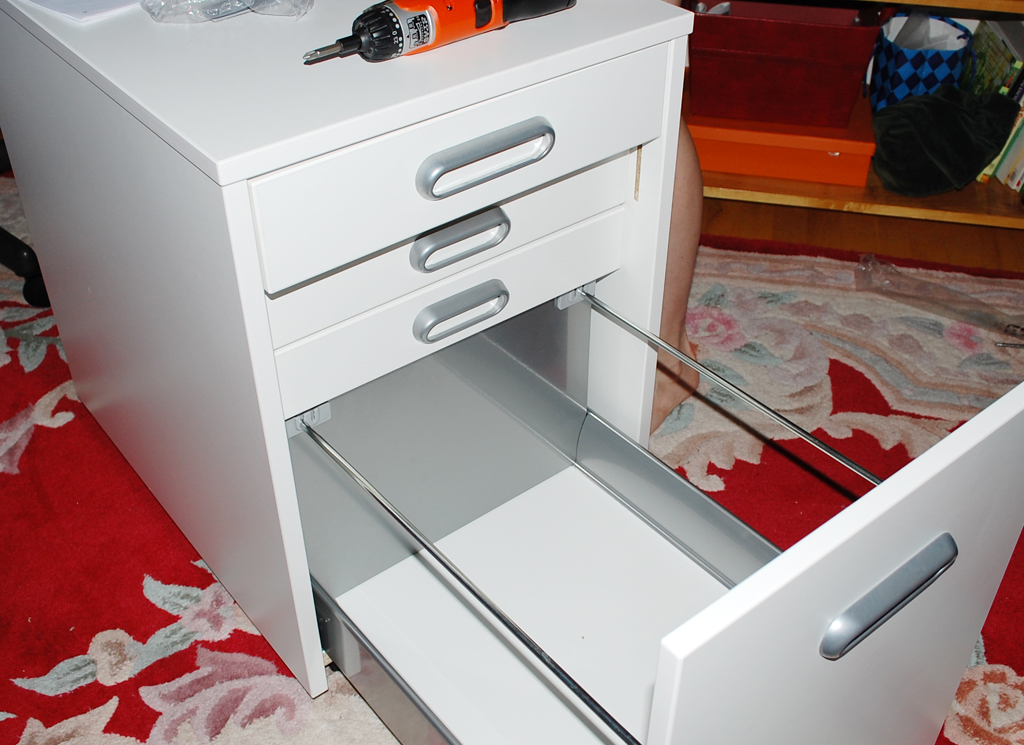
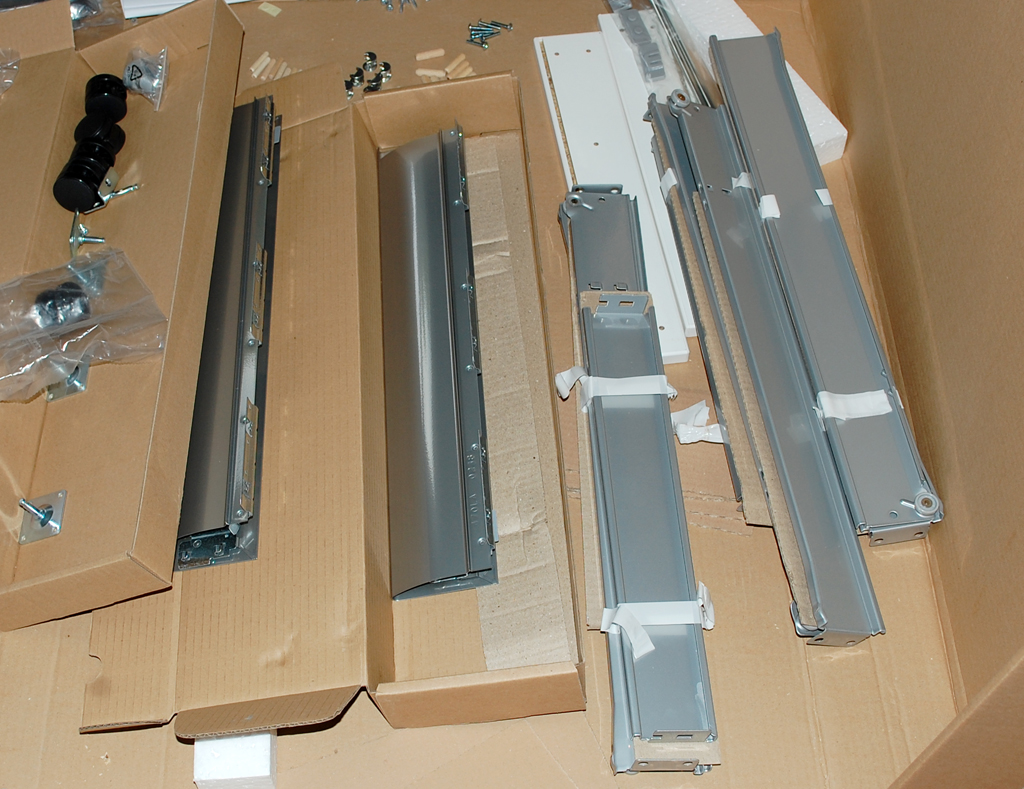
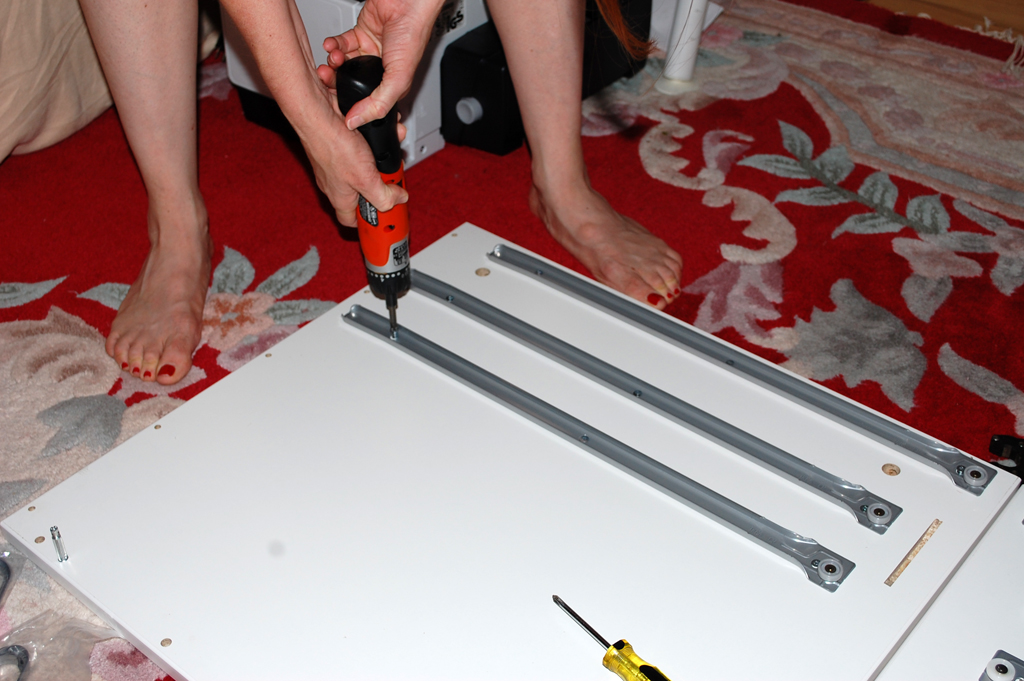
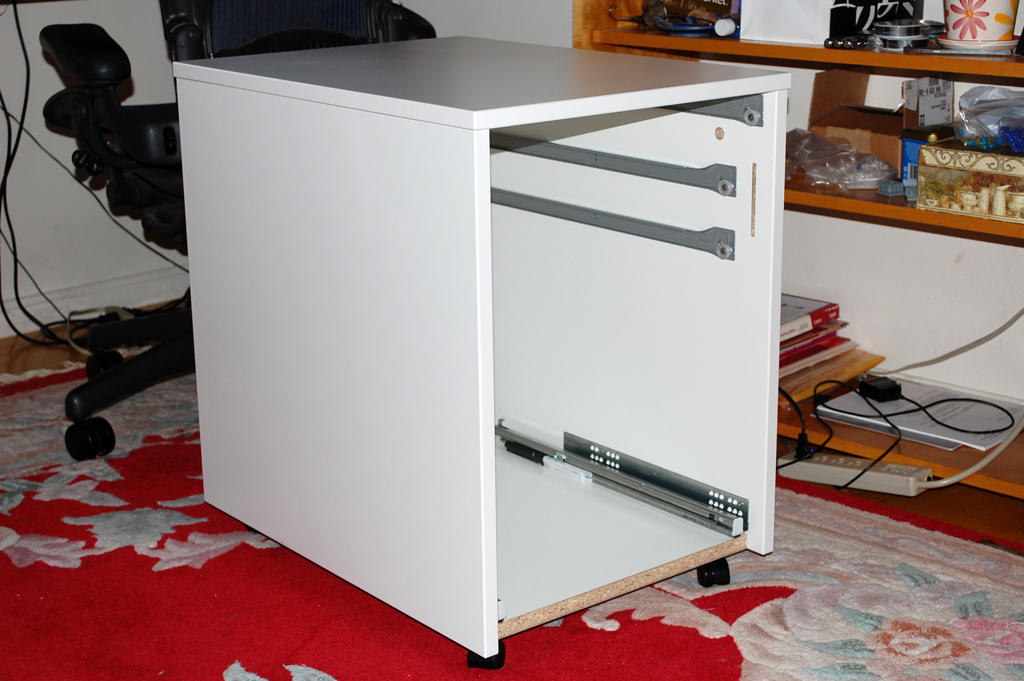
As with all things IKEA, assembly IS required. Putting desks and shelves together are pretty easy. Filing cabinets, on the other hand, are a different story. Carolyn thought it would be "fun" to see just how long it takes to assemble one of these units. We started the clock and off she went.
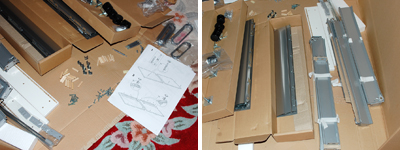
IKEA instructions are all in pictures, no language localization required. Carolyn thought it best to lay things out before diving in. The holes for the guides and rails are all pre-drilled. This made the process a lot quicker. Assembly can be done using a regular screwdriver, but a powered one is recommended.

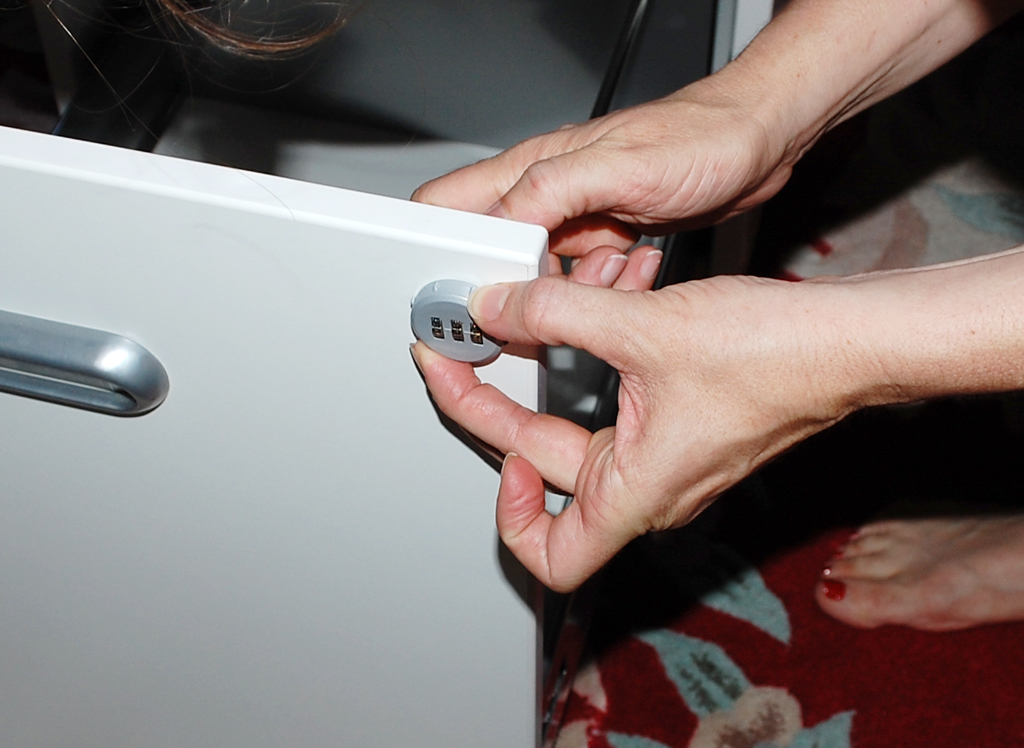
Getting the guides on was the most time consuming part of the assembly process. Erecting the cabinet, installing the lock, and handles were much quicker compared to mounting the guides.
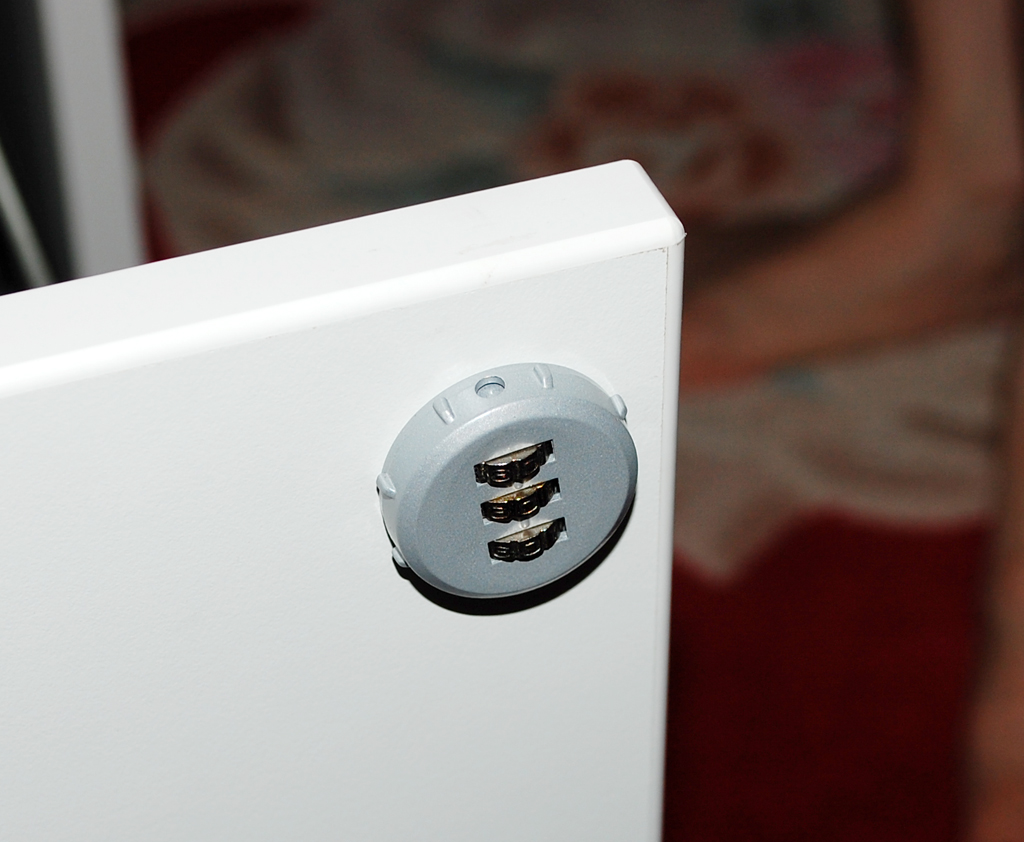
The lock is a combination dial which turns to lower a latch into a slot in the side of the cabinet wall. The lock will secure the file drawer and the two internal flat drawers. The top drawer can still be opened when the bottom part is secured.
Once completed, we noticed that the alignment of the top drawer and the file drawer were a little bit off. The bottom drawer does have controls which allows for some up/down and left/right adjustments, but both of these assumes the drawers are parallel...which they were not. Overall, the build when quite smoothly. The total time it took for the unpacking, assembly, and final adjustments? About 2 hours from start to finish. The completed GALANT cabinet and table look great together, are very sturdy, and should hold up well in most SOHO environments. [Permalink] - Wan Chi Lau
|
|
After two weeks of dry weather, the RainyDayGarden was desperate for some rain. What's the saying? "Be careful of what you wish for?" Well, we had four days of heavy intermittent thunder showers last week.


Everything received a much needed soaking and they all perked up when the sun came out this morning. The rain gauge had registered closed to two inches of rain just from yesterday's late day shower.

Once the sun had warmed things up, the garden came alive with activity. Buffy and Eliot quickly got tired of chasing the bees and butterflies and curled up somewhere for a nap. We went in search of "bug pics." It didn't take us long to get a variety of shots of grasshoppers, bees, and other flying insects crawling on the blooms.


The rain was timed perfectly for the Queen Anne's Lace which pops up around the garden about now. This plant can be a bit invasive. Some even consider it a weed. We don't mind it so much because of the big white lacy flowers. Unchecked, they can spread quickly and grow quite tall. They are very hardy and attract a lot of bees and butterfies. So we tend to let them be unless they pop up in the middld of something or look out of place. [Permalink] - Wan Chi Lau
|
|
|
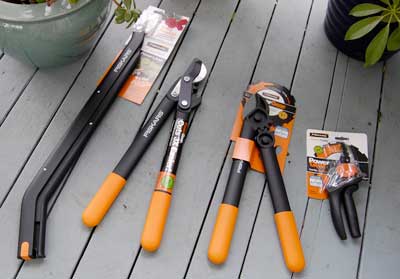
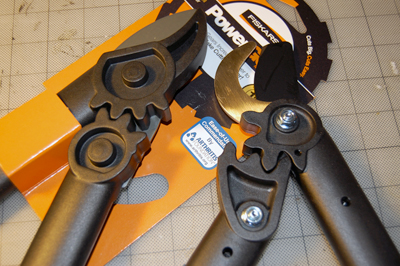
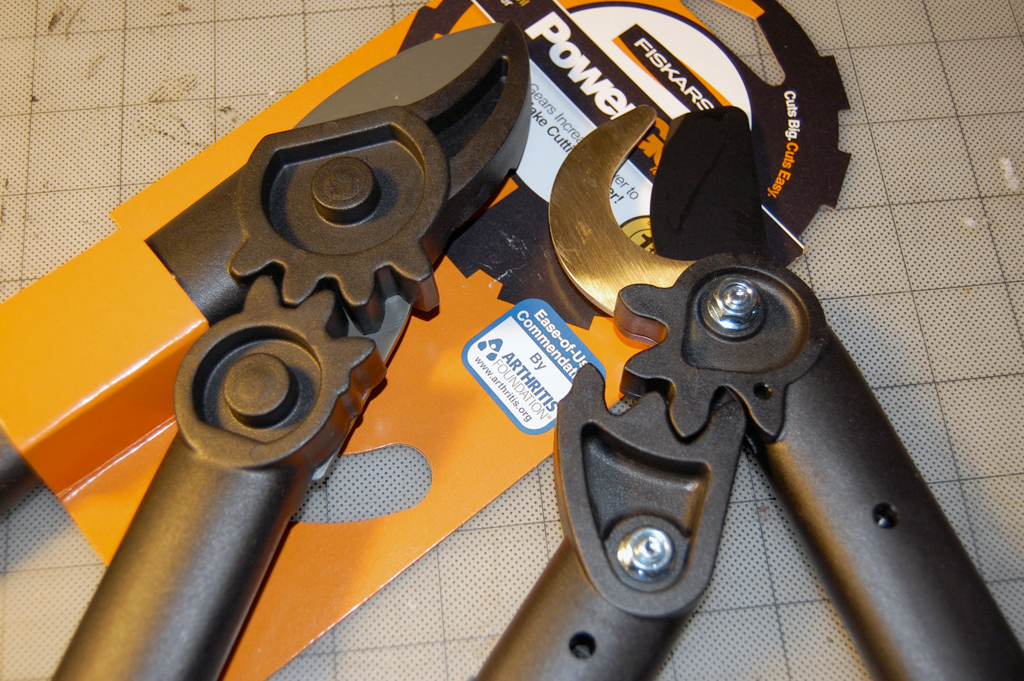
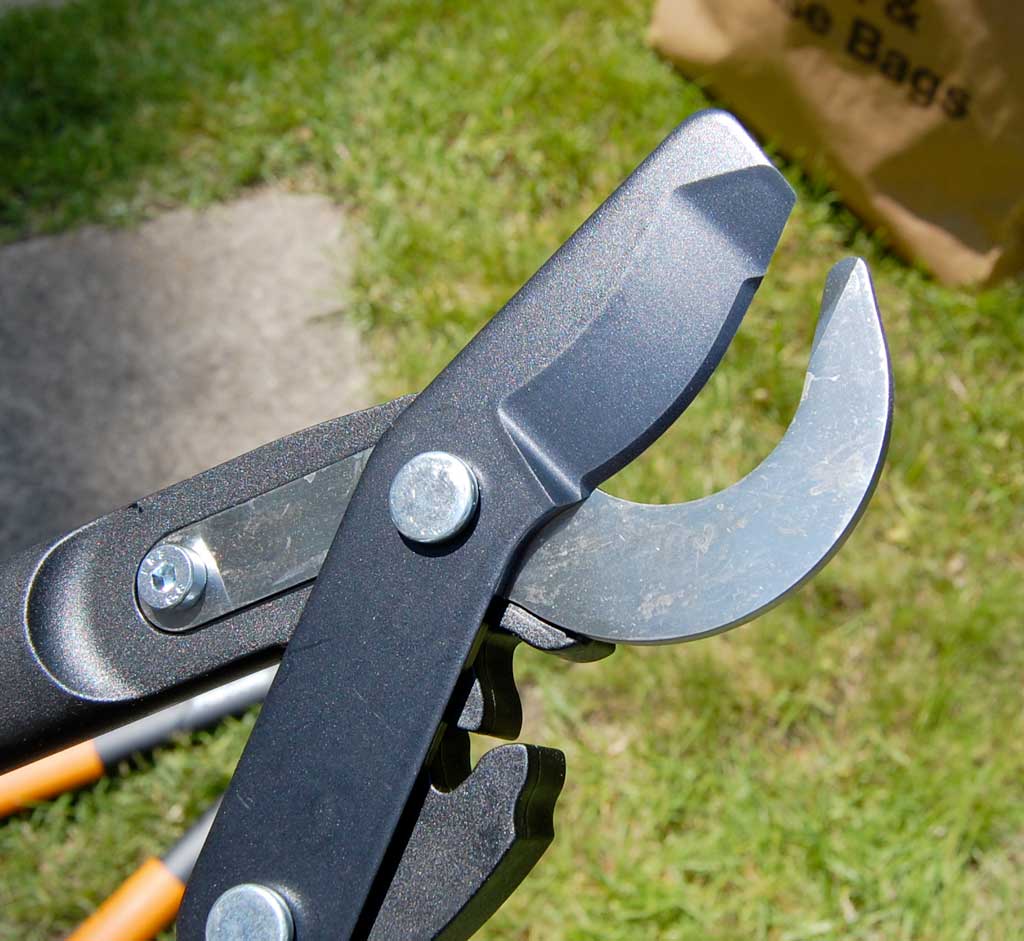
Another week has flown by and the weekend will soon be upon us. Today the temp here is in the low 60s, but tomorrow is suppose to get HOT! Like 90s hot. Maybe too hot to work out in the garden. For those of you who may still want to do some garden work, we thought we would answer some of the emails regarding the actual cutting abilities of the Fiskars loppers we had reviewed last weekend.

We will be lopping of pieces off a bush which did not make it through the Winter. The branches ranged in thickness from 1/4" to 1.5". Click on any of the images to get a closer look at the cuts.

The 15" lopper easily took care of the smaller branches. The cuts were clean and crisp. The leverage afforded by the long handles will enable anyone to use this in their garden, but will be especially suitable for those looking for lighter weight tools which can still handle tough jobs.

The 17" lopper has two steel cutting blades and made short work of the 1.5" thick branches. Very little arm strength was needed. This is due both to the long handles and the well designed cutting blades.

We had a very positive FirstUse experience with these Fiskars loppers. We have an InTheWild follow-up in a few months. Next up will be a look at the Fiskars hand pruner. We are eager to see if the "rolling" grip will enable us to trim for a longer period before getting hand fatique. [Permalink] - Wan Chi Lau
|
|
|
|
We told you about the four Fiskars loppers and pruners last week. Today we took the them out to the RainyDayGarden for a FirstUse. The collection was perfect for the various tasks we had in mind.

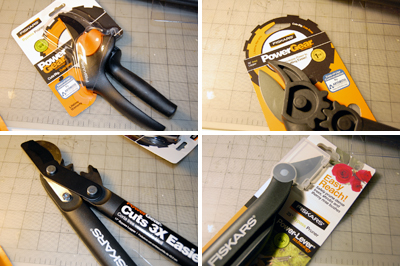
Before we get to the actual trimming, we thought it would be helpful to take a closer look at the business end of these loppers and pruners.

The blades are made from harden steel. The handle and gears are made of a light weight synthetic material. The extra joint in the handles give the user additional leverage for easy cutting.

The blades are shaped to slice cleanly without slipping or crushing. The 15" lopper has a single blade. It is for smaller anvil type cuts. The 17" lopper has a dual cutting blades. One of the blade is curved for hooking around a branch as wide as 1.5" in diameter.

The most surprising unit in this Fiskars collection was the pruner. The bottom handle "rolls" to close the blades. This allows for a much stronger cutting grip and is amazingly comfortable to use. We will have some cutting examples in the second part of this FirstUse report. [Permalink] - Wan Chi Lau
|
|
|
|
May is the time of year when gardens in New England go through a lot of changes. While the tulips and some irises start blooming at the beginning of May, the leaves on the trees don't come in until nearer to the end. By the end of May, things are in full growth mode.


The RainyDayGarden is no different. While many of the plants have started growing at the beginning of the month, Buffy and Eliot were not able to find many shady spots to rest during their daily patrols.


However, the interns were able to observe all of the goings-on today while remaining cool in the shade. Hmmm, we can see Buffy resting, but just what IS that Eliot up to? [Permalink] - Wan Chi Lau
|
|
|
It is the Friday of Memorial Day weekend. Even with gas prices as high as it is, many folks will be heading out on the road. We, however, will be staying around Boston and doing some work on the RainyDayGarden.

One reason is that a variety of Fiskars garden shears came into the office. Since we just got back from being on the road most of the week, the thought of hanging out doing some gardening was pretty appealing.
These Fiskars are some serious garden loppers and pruners. They are lightweight, but their long handles will enable them to cleanly cut some pretty thick branches. We'll have a FirstUse this weekend. [Permalink] - Wan Chi Lau
|
|
|
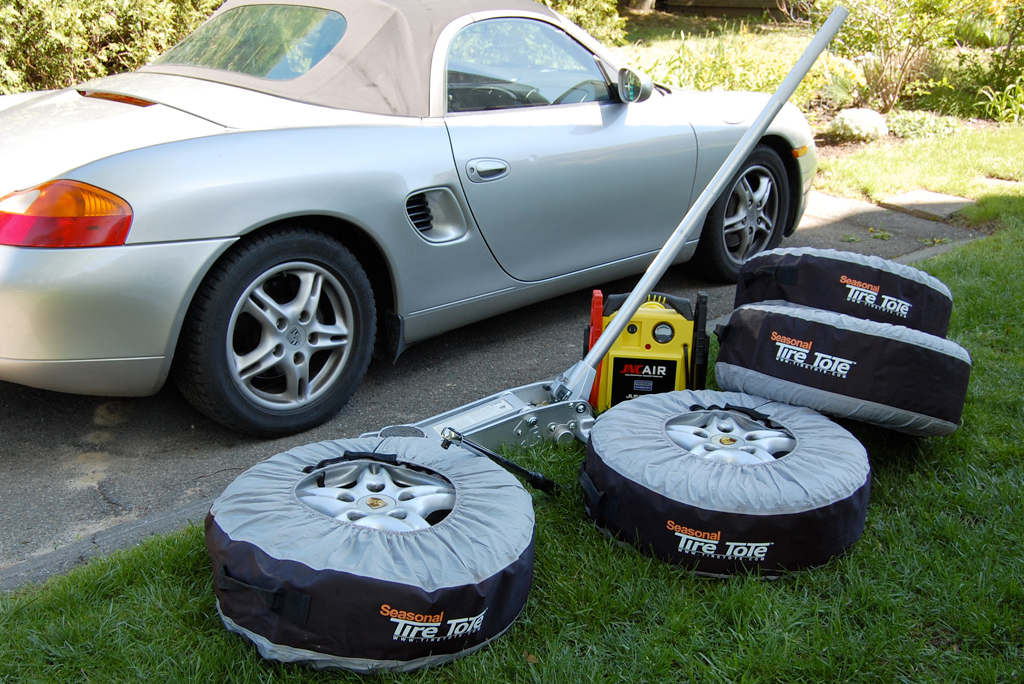
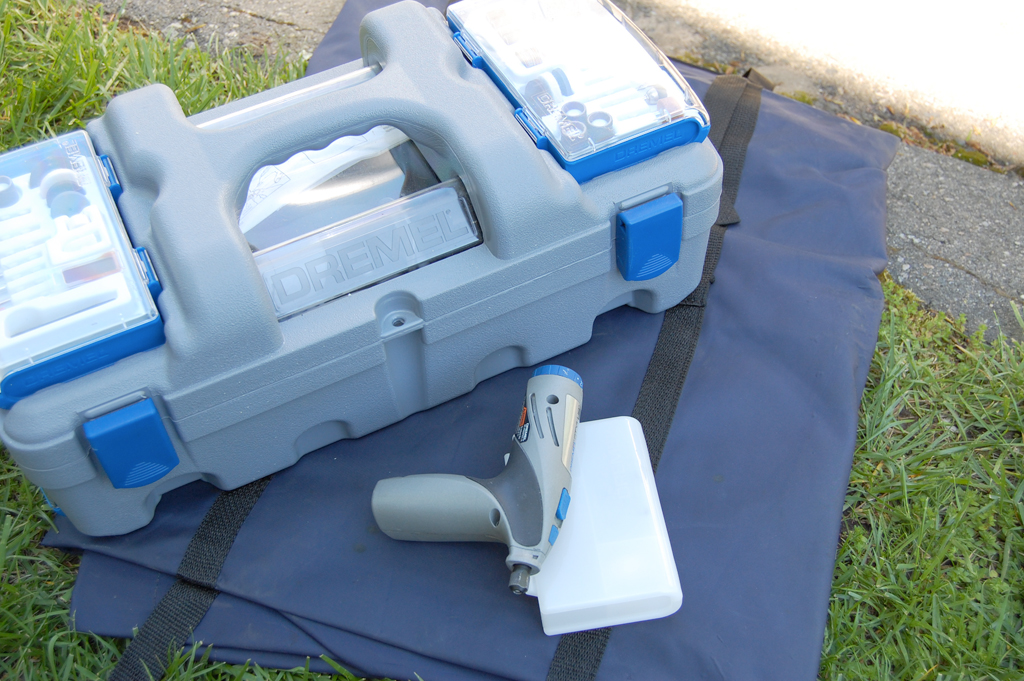
RainyDayGarage reviewed the Kurgo TireTote (FirstLook, FirstUse) last year when we packed up the Summer tires for storage. It is now mid-May and New England's night time temperature has consistently been above 40º. Confidence is high that we will not be getting any more snow, so the Summer tire went back on this past weekend :-)

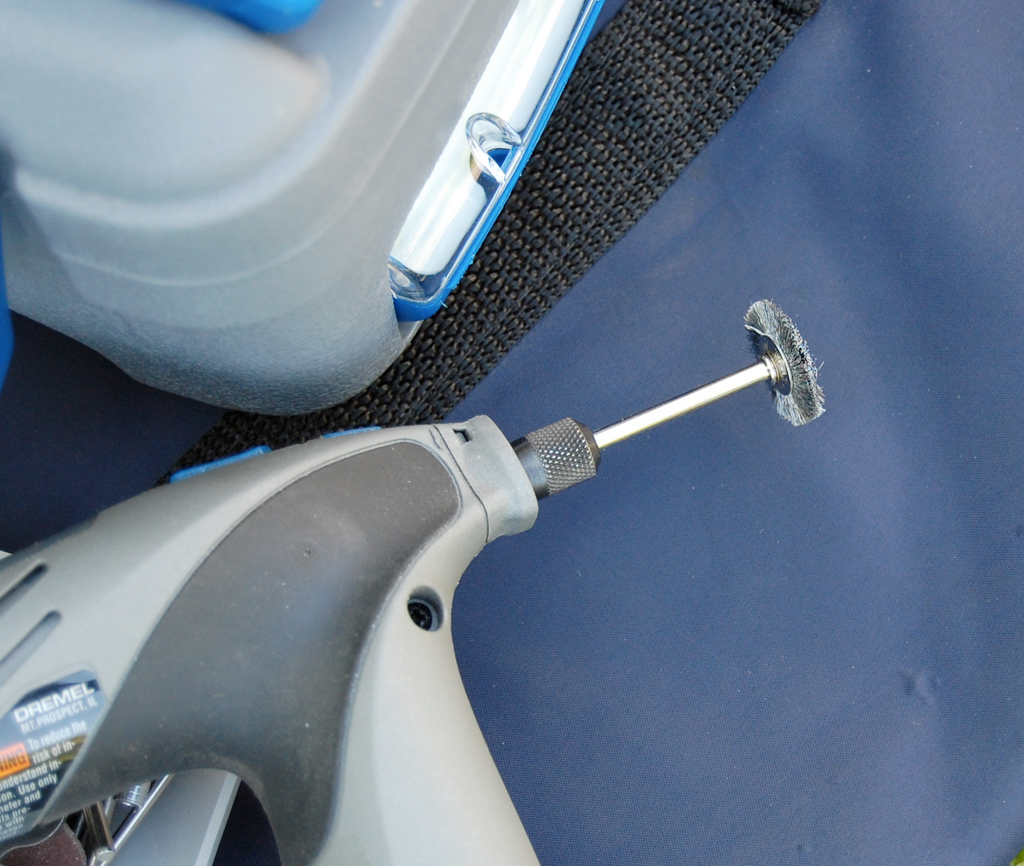
Our usual set of tools for the Winter/Summer tire swap are: torque wrench, soft socket, jack, tire mount rod, air pump, and Dremel tool with a wire brush attachement.

The Summer tires had been in storage in a cool basement since the Fall. Their pressure had dropped a few pounds. The JNC Air got things pumped up (30psi front, 34psi rear) in a hurry.

New England winters can be a bit harsh on the car and some cleaning are usually necessary. The Dremel with a wire brush made short work of cleaning off some of the rust and deposits on the rotor and the bolts.

The Boxster had also develope a slight rattle over the Winter in the driver rear quarter. Our intern had thought it was a loose heat shield on the catalytic converter.

It turned out that a plastic shield which ran underneath the length of the rear had cracked. Buffy said she'll figure out a way to secure it to the frame so it doesn't vibrate by next weekend.

The TireTotes definitely made the process of hauling the tires around SO MUCH easier. If you are "old school" like us and like to use a different set of tires for Summer and Winter, make the process a bit easier and get yourselves a set of these TireTotes! [Permalink] - Wan Chi Lau
|
|
|
This weekend turned out to be both cold AND rainy. However, it did not dampen our efforts yesterday to check out both the annual Somerville Open Studios and the Shobu Aikido "painting party".

There were over 300 artists participating in the event. We did not have time to see them all, but we did spend a bit of time at the Vernon Street Studios.
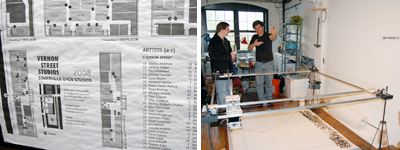
There were a lot of photographers, painters, and mix-media artists at that location. We found some interesting works, but managed to restrain ourselves and did not make any purchases for the office.

We also checked in on our friend Ted Beatie from last year. Ted has some new works from his travels to Morocco and Burning Man.

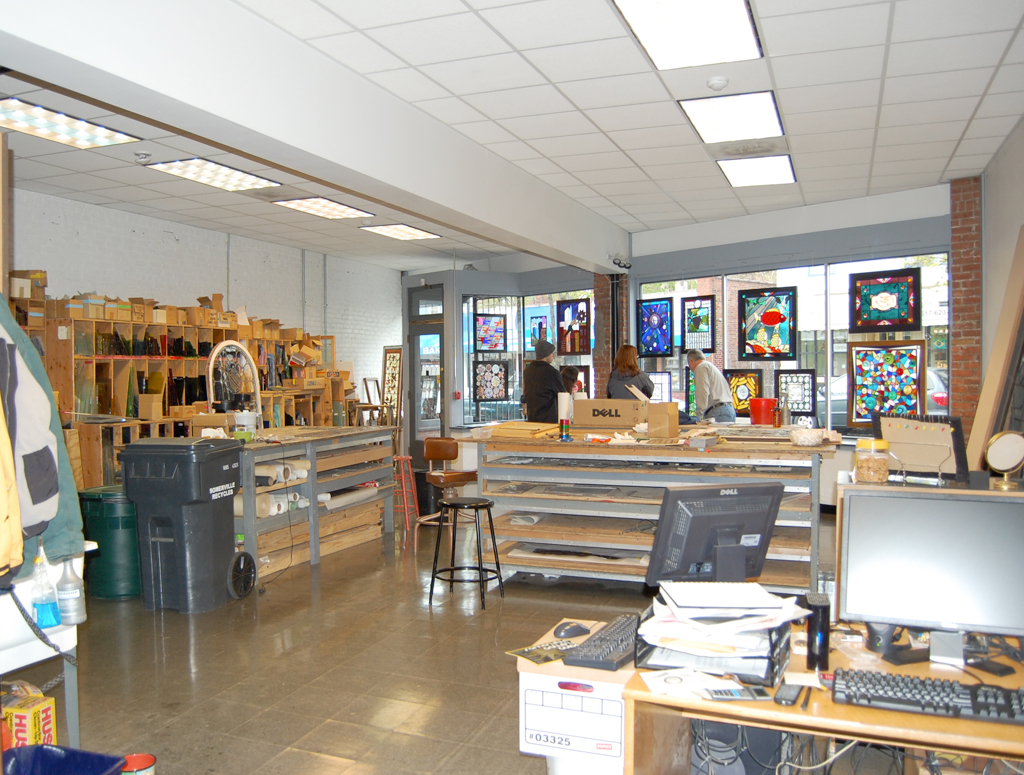
On our way to the Vernon Street Studios we stopped in Daniel Maher's stained glass workshop and had a very interesting chat with Daniel about some of his "found glass" creations and his current restoration work for a church in NYC.

Daniel opened his studio on 500 Medford Street over ten years ago. Back then the neighborhood was just beginning its transition. Today, the studio is in one of the most lively artist communities in the Somerville area.

If you are looking for something to do on this rainy Sunday, put on some walking shoes and head on over to Somerville. The event ends at 4PM today. [Permalink] - Wan Chi Lau
Shobu Aikido of Boston is moving to Somerville. We stopped by the new space to check it out. Apparently we had just missed the painting party. There were still a few of the crew doing some touch-up work and cleaning up.

The new space is beautiful! There are two large garage doors in the front which will be replaced with glass doors. The entire space is free of obstructions (unlike their current space) and will allow students to move freely across the entire mat.

To the side of the dojo is a community garden. The dojo has obtained a small plot to grow flowers and such. The students are really looking forward to being a part of the Somerville community.
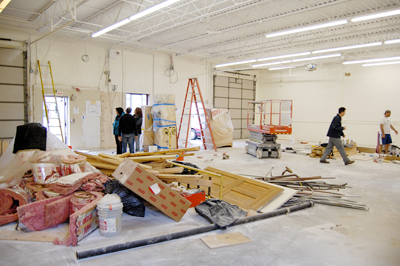
Shobu Aikido is hoping to have the new dojo ready for a June opening. There is still quite a bit of work left to do. The dojo is always looking for corporate sponsors, donations, and help of any kind. If you want to be part of a vibrant and energizing community, we encourage you to check out Shobu Aikido of Boston. [Permalink] - Wan Chi Lau
|
|
|
Apple Macintosh computers have been able to support multiple monitors since the days of the Mac II. Having multiple displays is great, but it does take up desk space. Mounting them on the wall was not practical until the introduction of LCD panels.

Today, we'll show how easy it is to mount your LCD on the wall. A wall mount for an LCD monitor runs between $30 and $200 depending on the number of articulations and the amount of weight it can support.

Our particular mount can be adjusted in the horizontal position. The monitor may be tilted forward or backward from vertical by about 20º, useful for setting the most comfortable view angle. The wall plate has a built-in bubble level to make it easy to set it absolutely vertical. The plate attaches to the wall via 2 large screws. Just be sure the screws are set into the studs and not just the sheetrock.

The mounting plate's hole locations are standardized, so attaching to the monitor was simple. We did have to use the supplied spacers because the screws were too long. With the wall plate attached and the arm mounted to the LCD panel, all we had to do was slide the arm onto the wall plate.

Once the monitor was on the wall, we adjusted its position to a comfortable viewing angle and tightened down the joints. Total time for the project...19 minutes from start to finish :-) [Permalink] - Wan Chi Lau
|
|
|
|
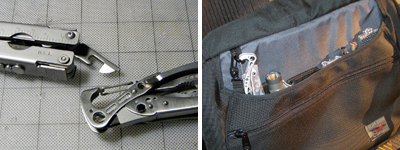
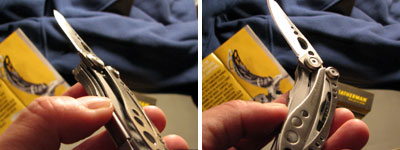
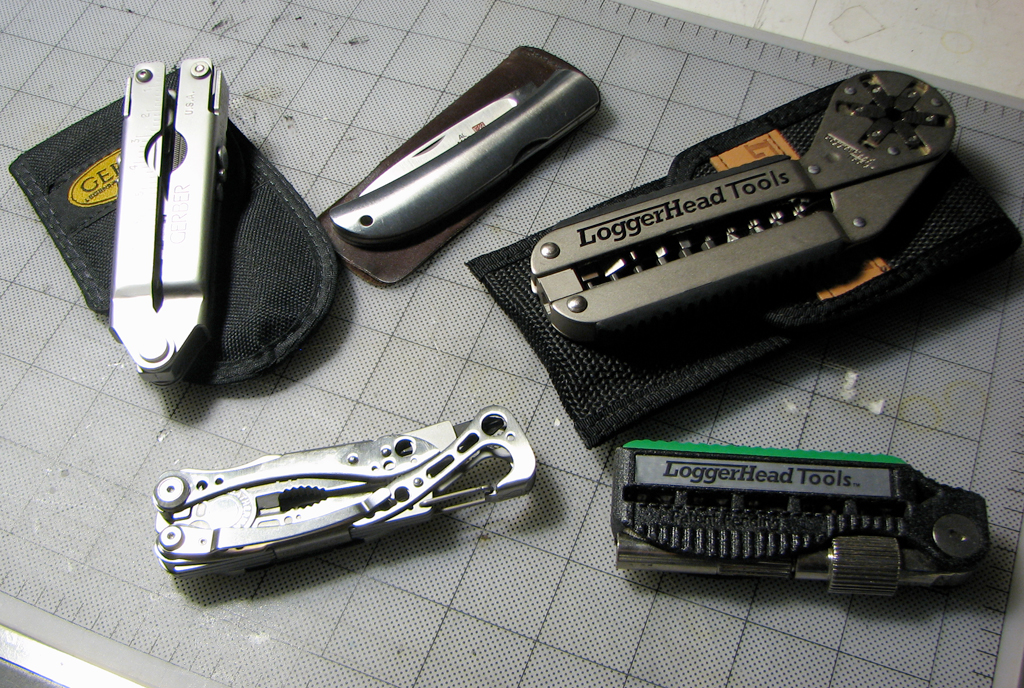
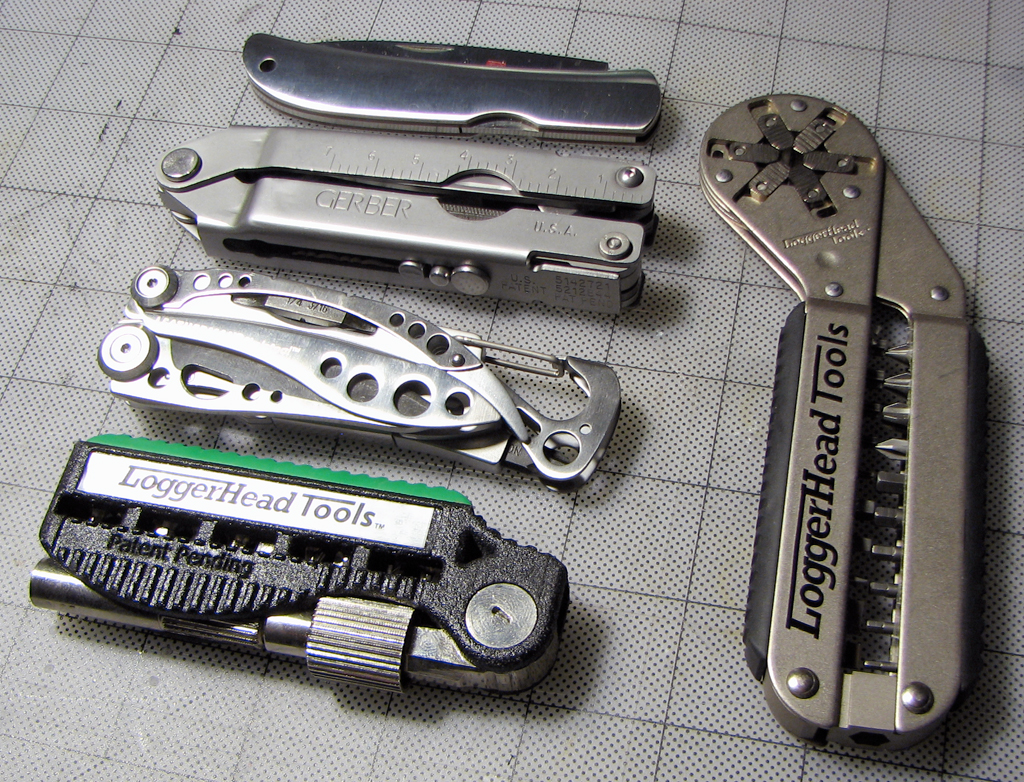
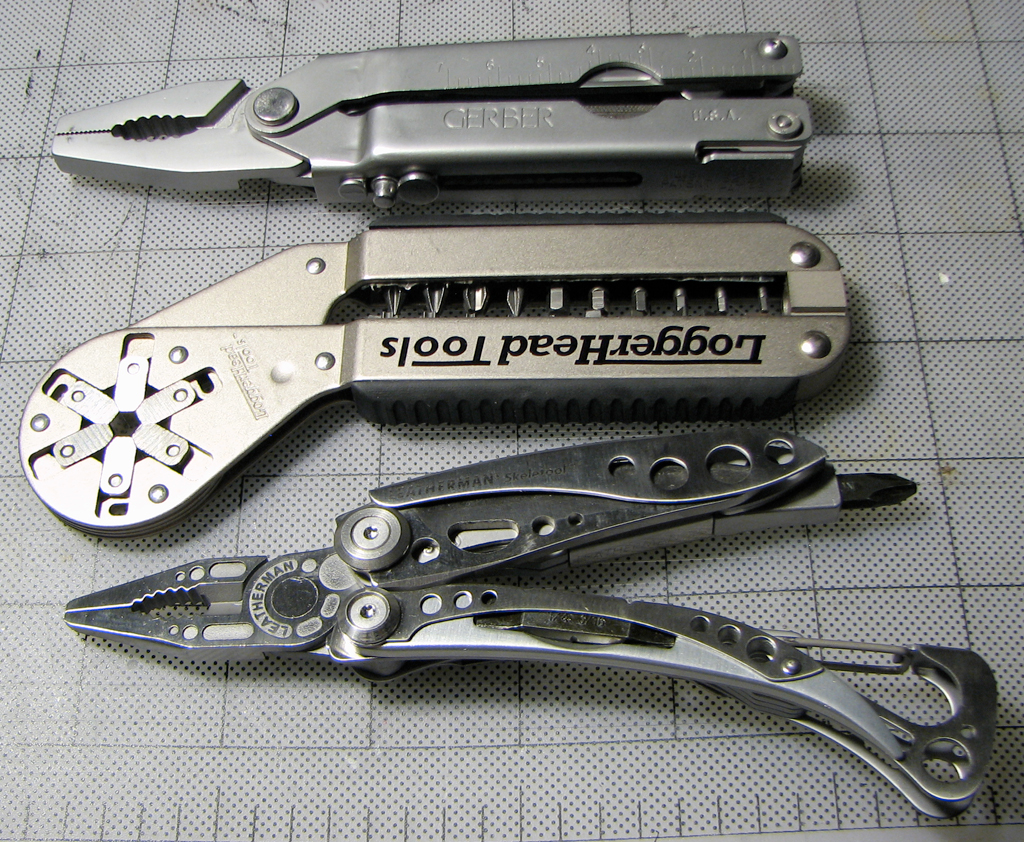
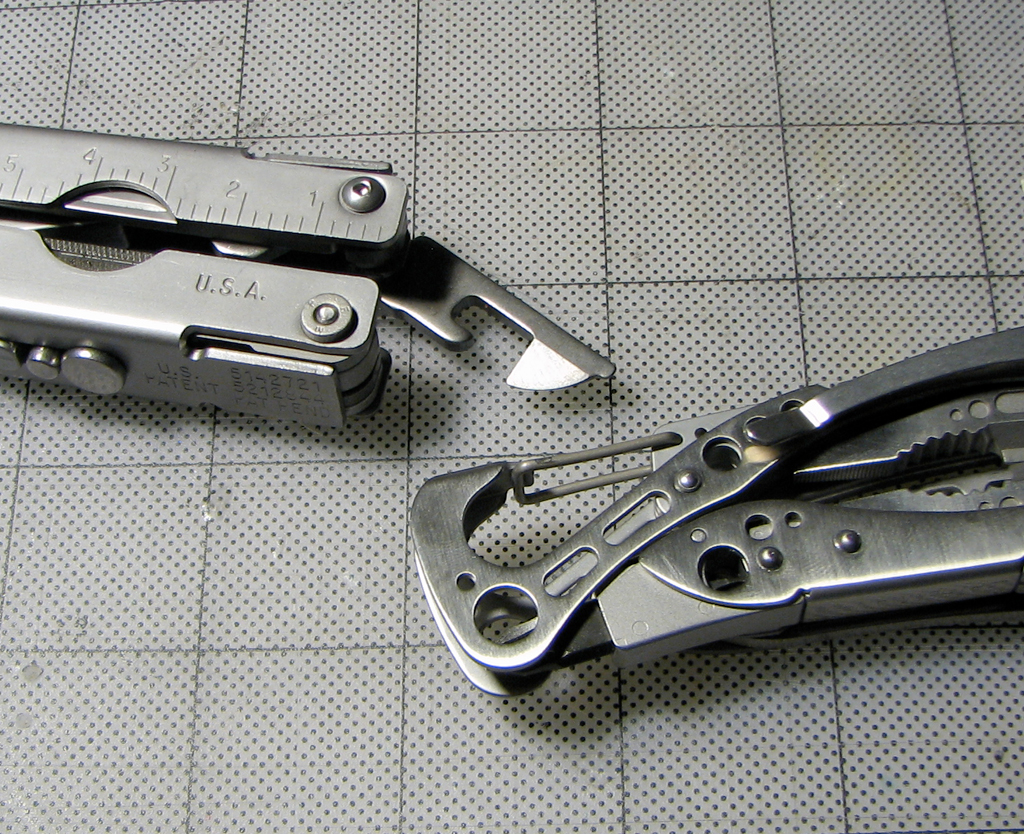
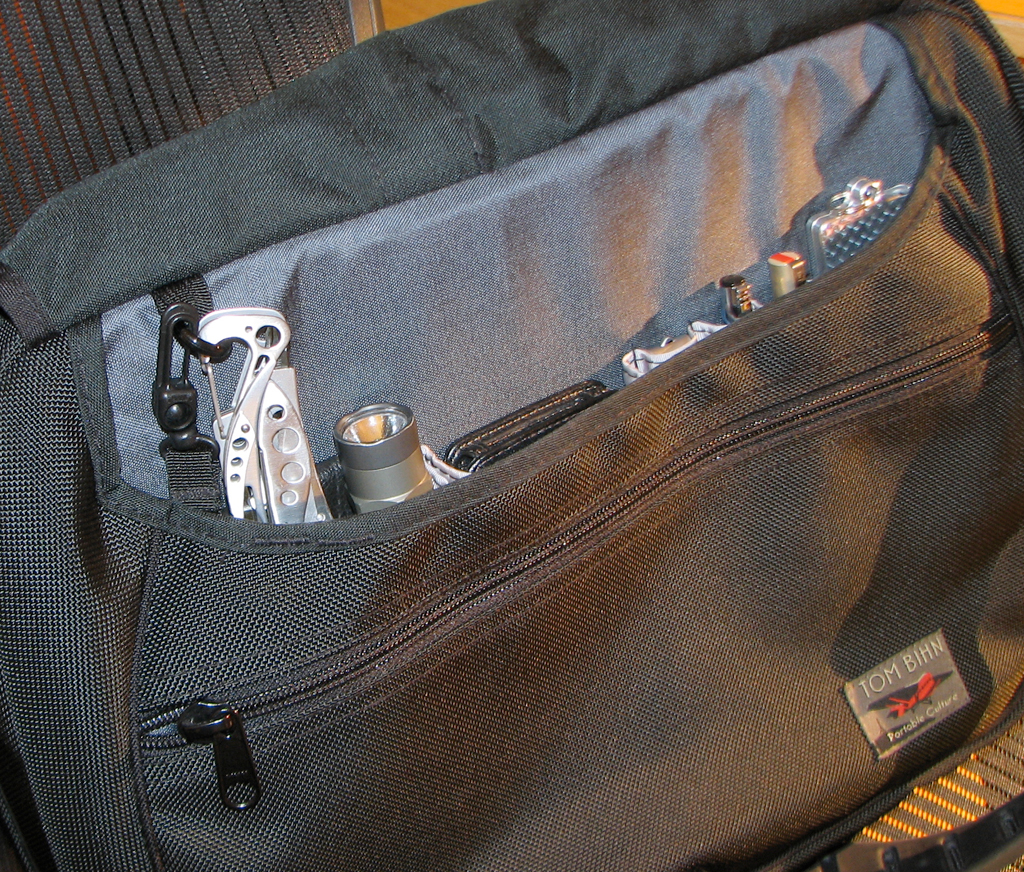
All the folks here in the office carry different pocket tools. One of the tools is single purpose, but most are multi-functional gadgets. We thought it would be interesting to take a quick look at the collection and ask, if we could only carry one...which one would it be???
The five tools (Gerber, Al Mar, Leatherman, LoggerHead) all have some functions in common. All but one can be used to tighten something. Three of them have a blade. Two have multiple bits for screws and nuts.

Four of the tools are approximately the same size when folded. All may be carried either on the belt or in the pocket of a pair of jeans. Everyone felt that the Loggerhead Tools, while useful in certain situations, is just not versatile enough to go solo.
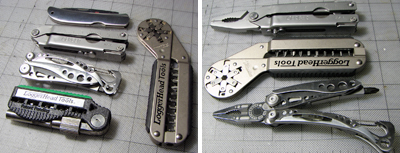
The Gerber, Loggerhead, and Skeletool either have pliers or a plier-like capability. The Al Mar, Gerber, and Skeletool all have a blade of about the same size, but the blade of the Skeletool is the most substantial of the three and is as comfortable to hold as the Al Mar Folder.
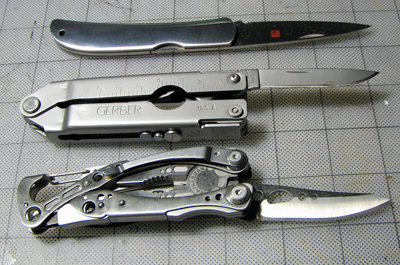
We also agreed that the Al Mar Folder, while a great looking pocket knife, just can't compete with the multi-purpose Gerber and Skeletool, especially if there is a need to open some beer bottles!
Given our criteria of having to carry just one, we all picked the Skeletool. Not because of its awesome looks but because of its "just right" set of tools. We think Leatherman was spot on in their picks of what to include in the Skeletool. We'll report back in a few months to let you know if we still feel the same way. - Wan Chi Lau (permalink)
|
|
|
|
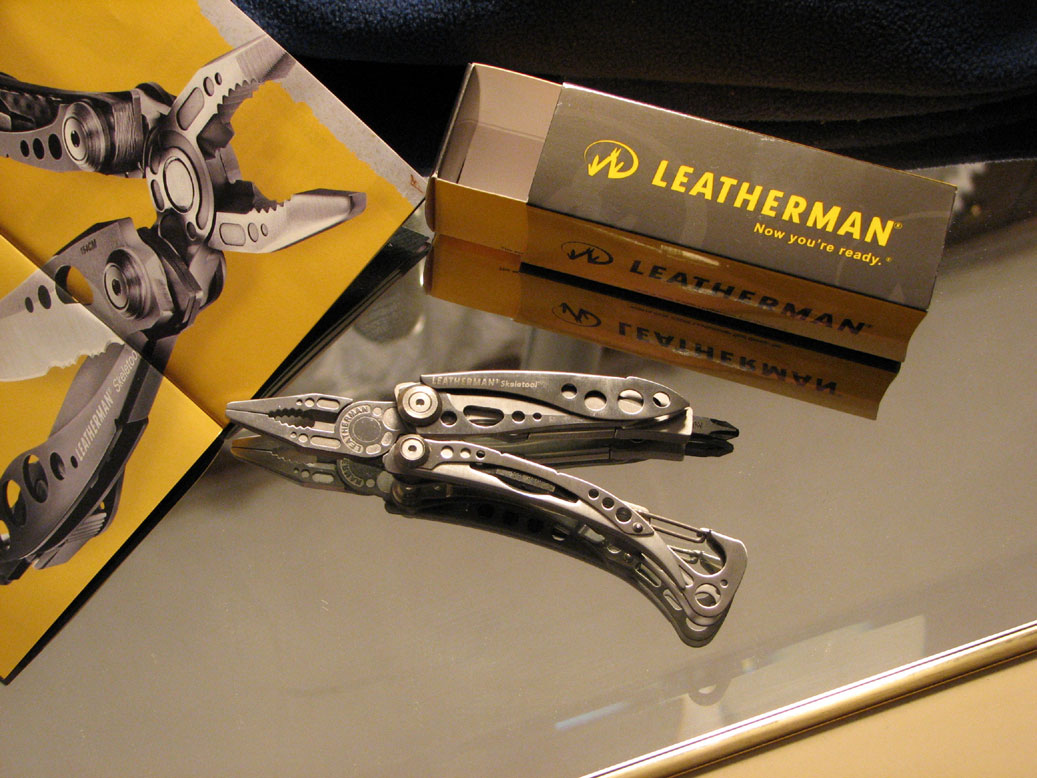
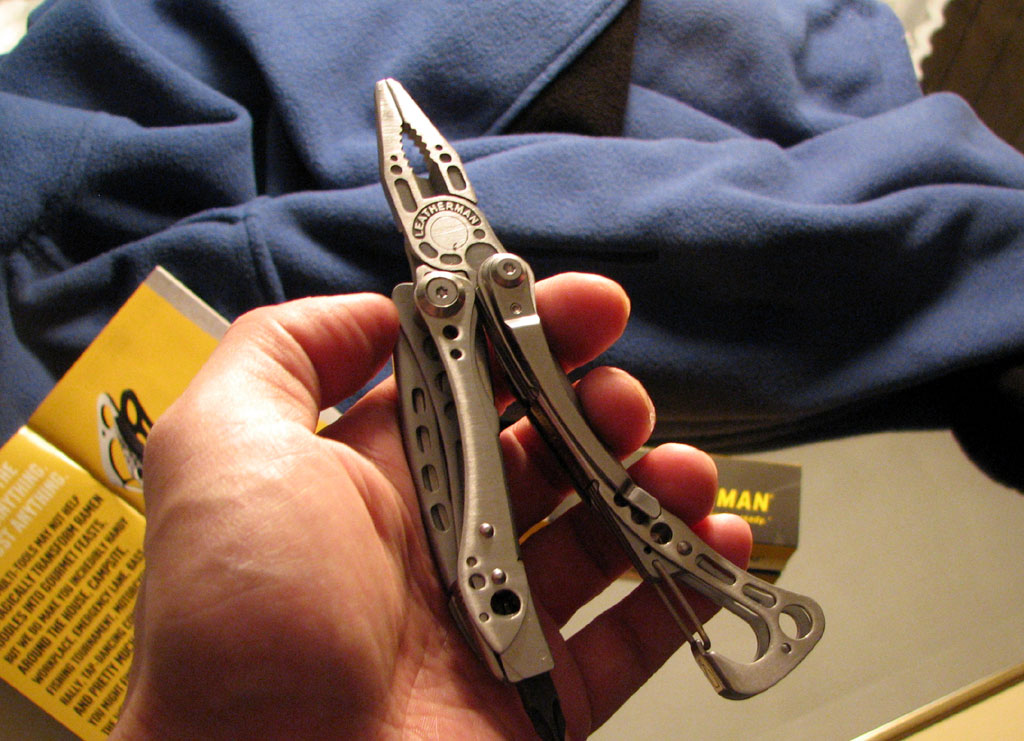
When Leatherman announced the Skeletool last year, RainyDayMagazine was one of the first in line waiting for a unit. We were hoping to get them under the trees of a few our our readers. Unfortunately, Leatherman decided to delay the holiday shipment. WHAT? Holidays are when merchandizers biggest sales. Why would anyone pass that up???
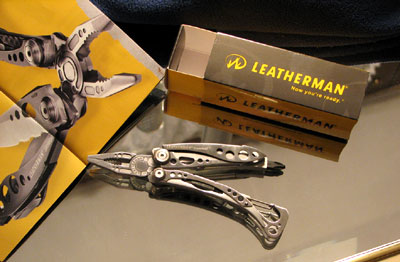
Apparently, Leatherman was not satisfied with the quality of the some of the units coming off the lines. Some companies would have let those slip by to unsuspecting buyers and handle it when they fail in the field. However, that is not the Leatherman way.

They would rather delay one of their biggest launches in recent memory AND pass up on the 2007 shopping season rather than put something into the wild that may not live up to expectations. We can live with that.

Fast forward to March, the Skeletool is now shipping and it is phenomenal! The build quality, fit, and finish of the stainless steel version exceeded all of our expectations. This tool will feel right at home on display at MOMA or tucked in the glove compartment of a 20 year old pickup truck.
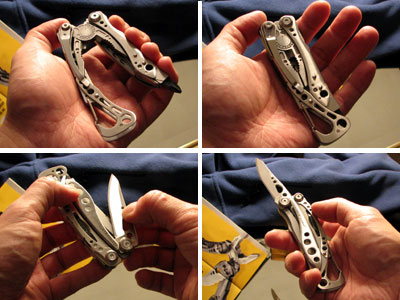
The Leatherman Skeletool is a minimalist's multi-tool. It has a pair of plier, a blade, wire cutters, bit driver, and a bottle opener. It is made of aluminium and stainless steel. Weight have been strategically removed from the structural components such that strength has not been compromised. It also made the tool look totally awesome.

This Skeletool feels great and looks great. We can't wait to put it to work! The FirstUse review will be in a few weeks. Something tells us Leatherman better crank up its production line because we expect dealers will be have a hard time keep these in stock. If you want to get your hands on one, you better get your order in today. - Wan Chi Lau (permalink)
|
|
|
|
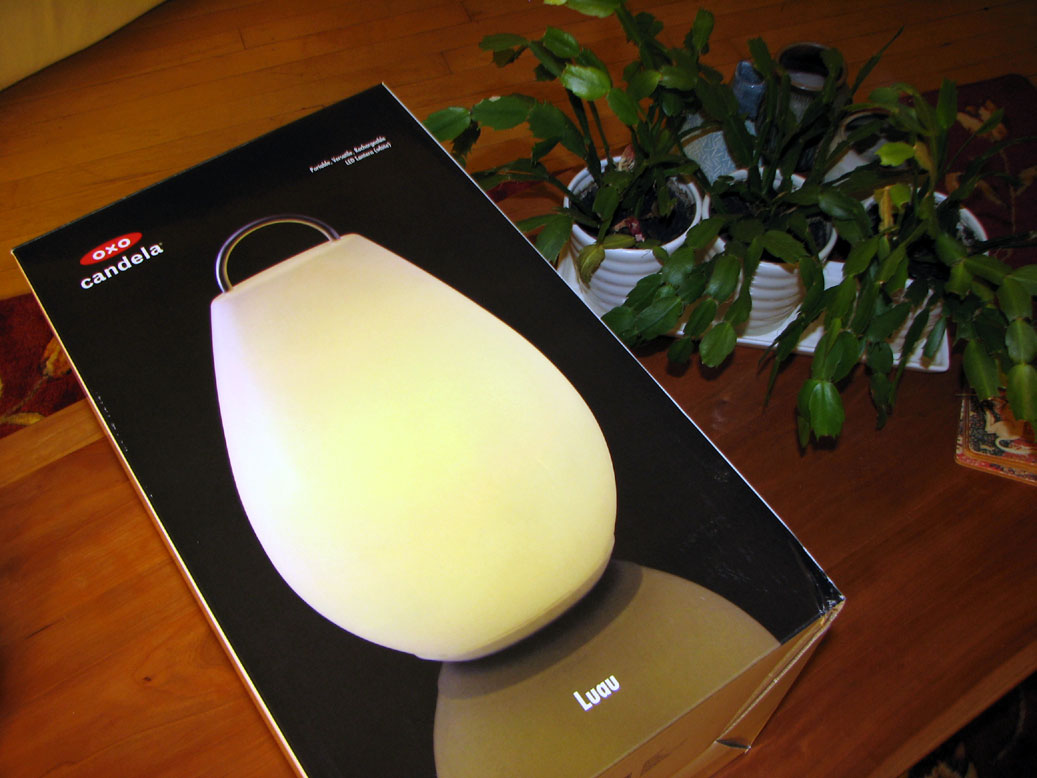
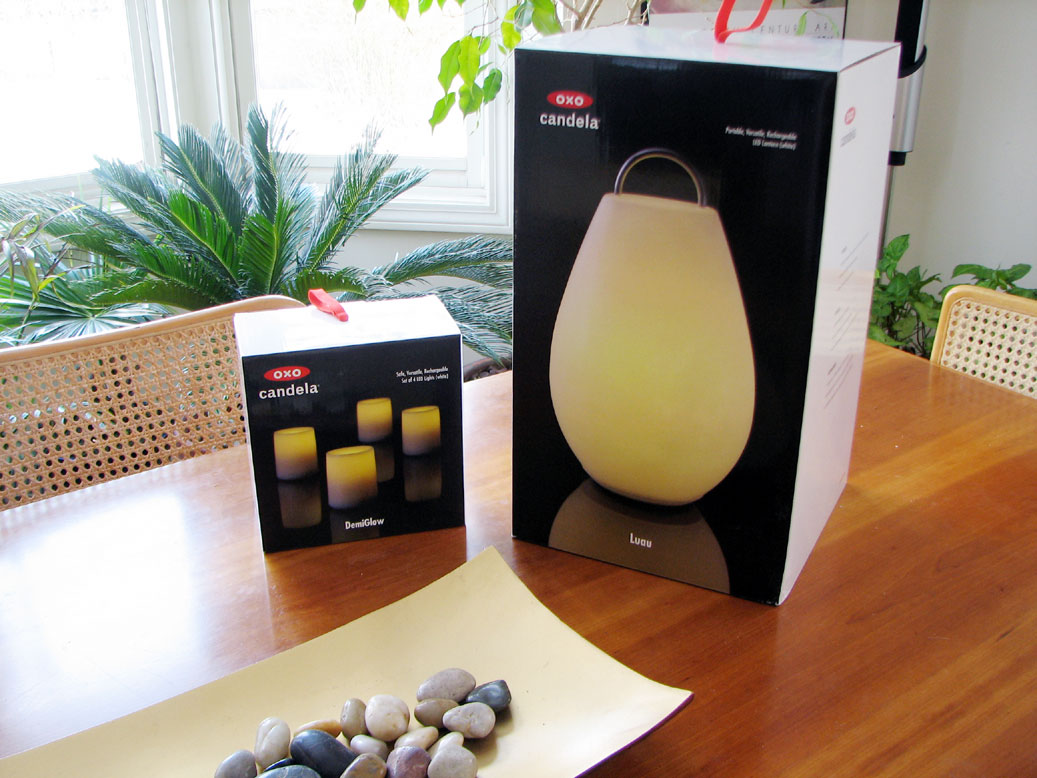
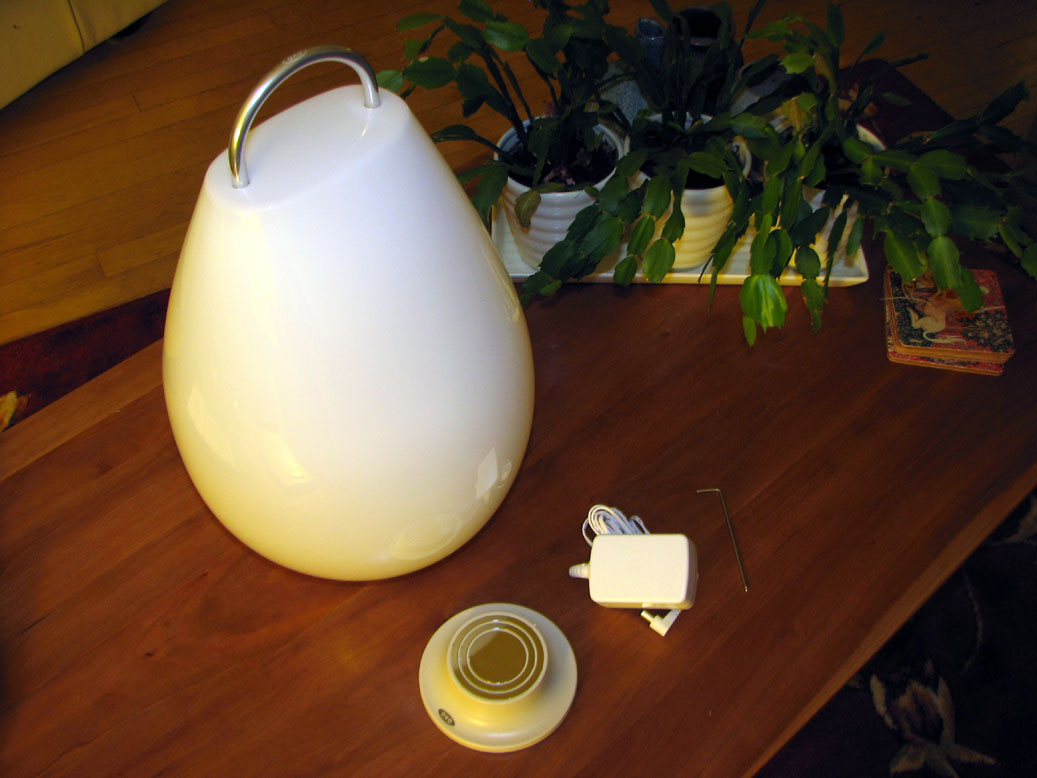
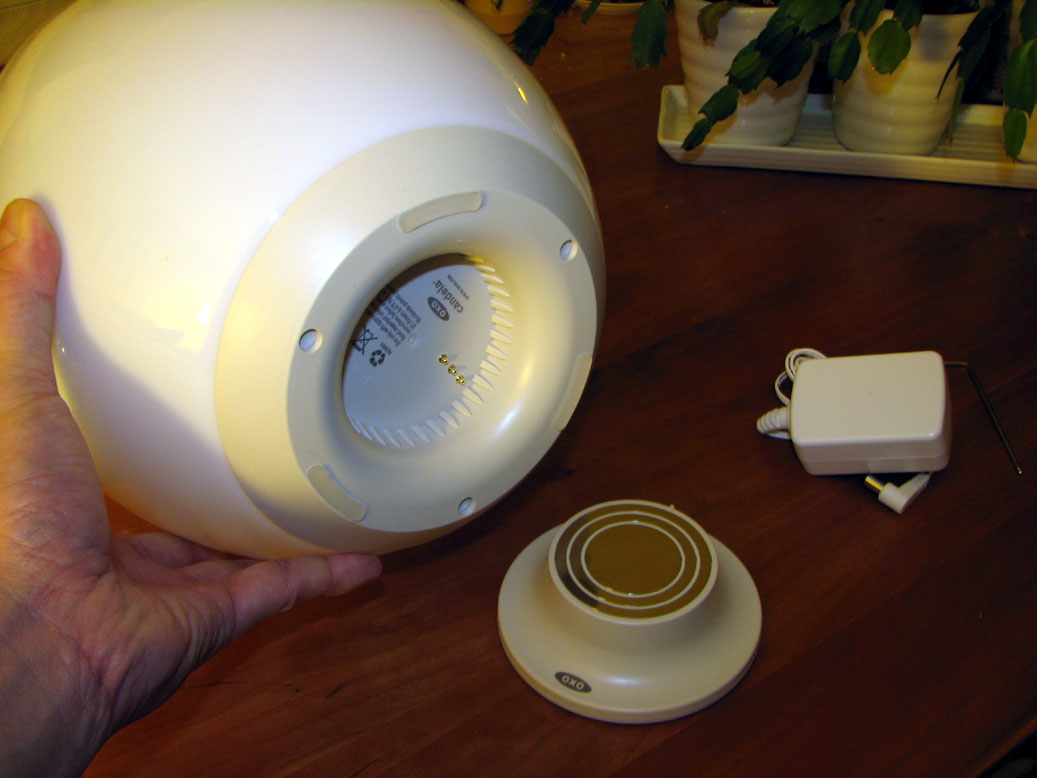
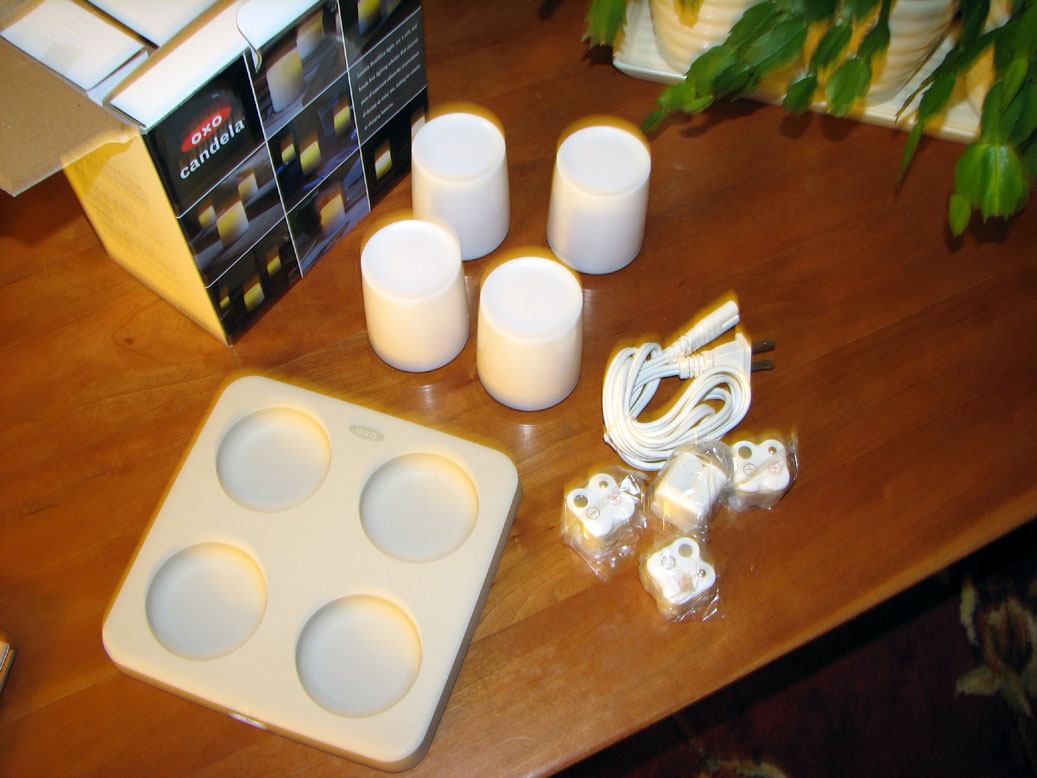
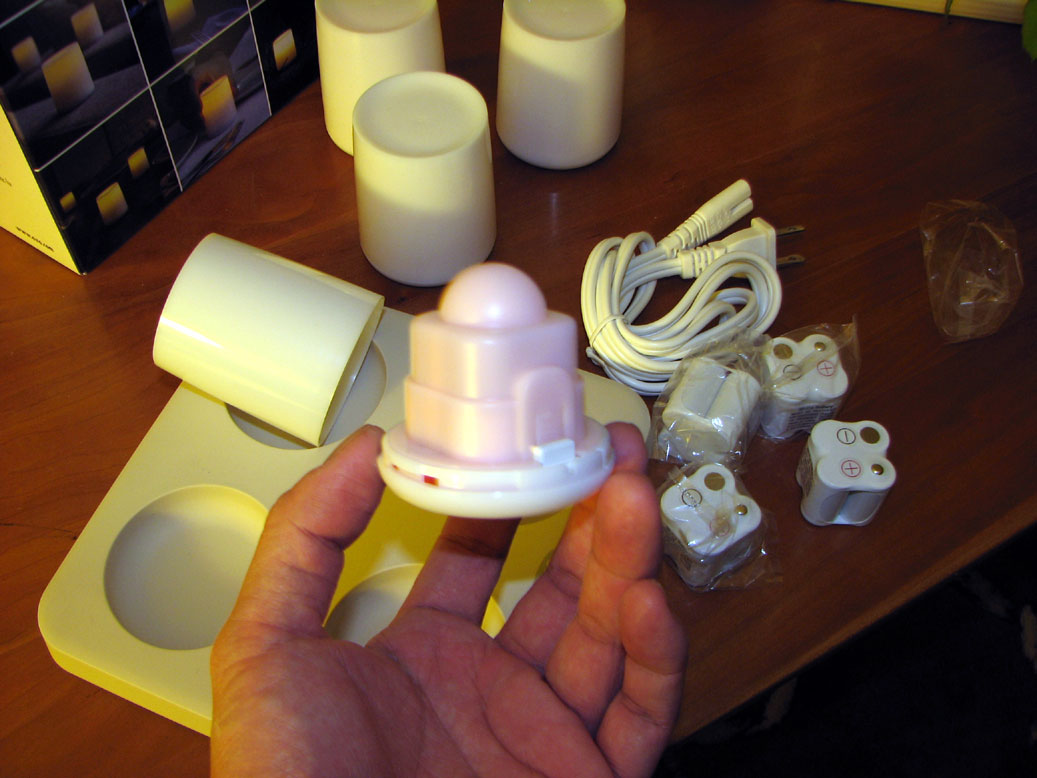
Judging from the emails, many of you are just as interested in the OXO Luau as with the DemiGlow. We were going to post the Luau's FirstLook on Monday, but thought we would post it this weekend since there were so many questions.

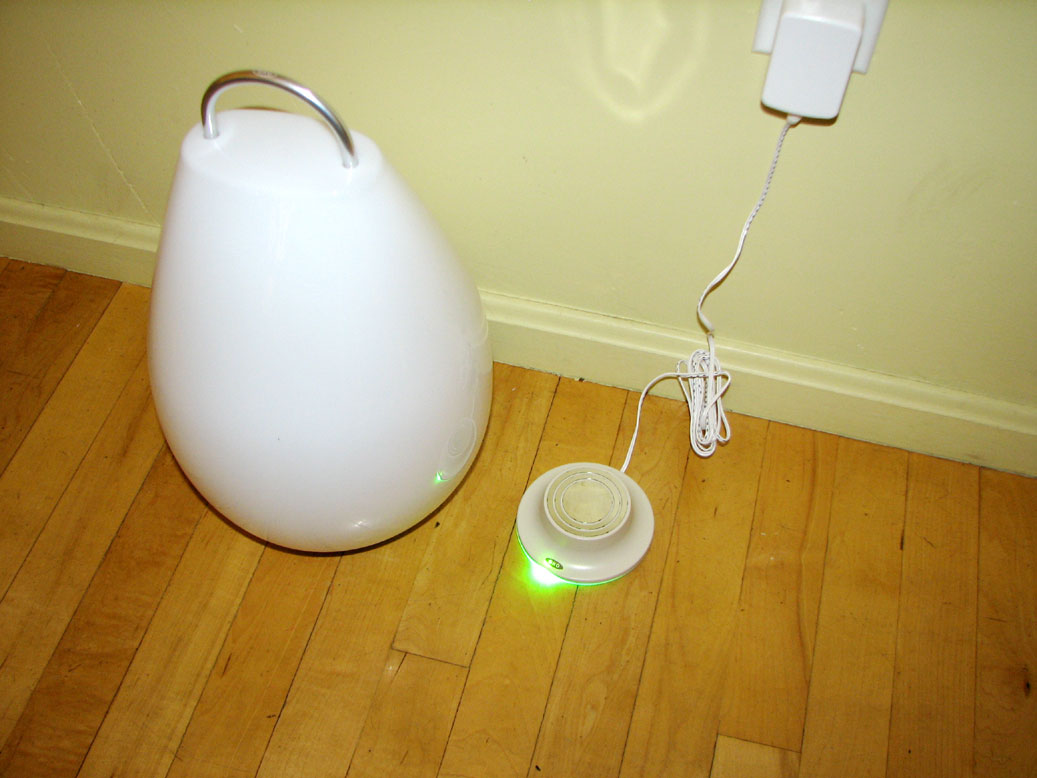
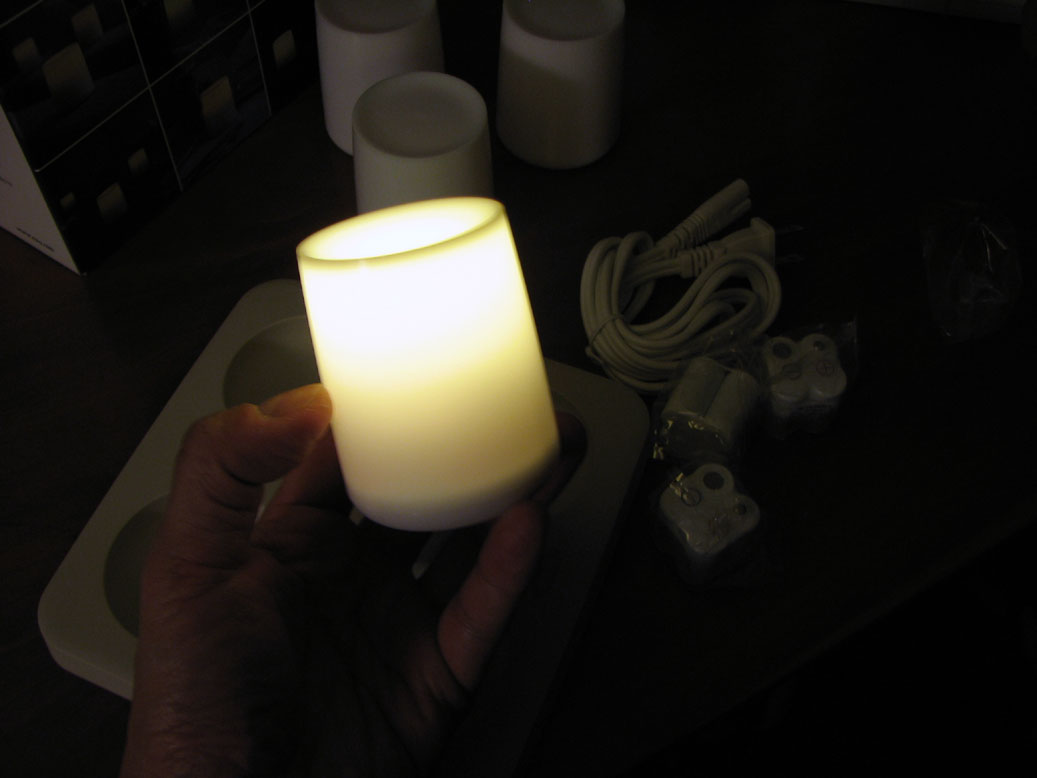
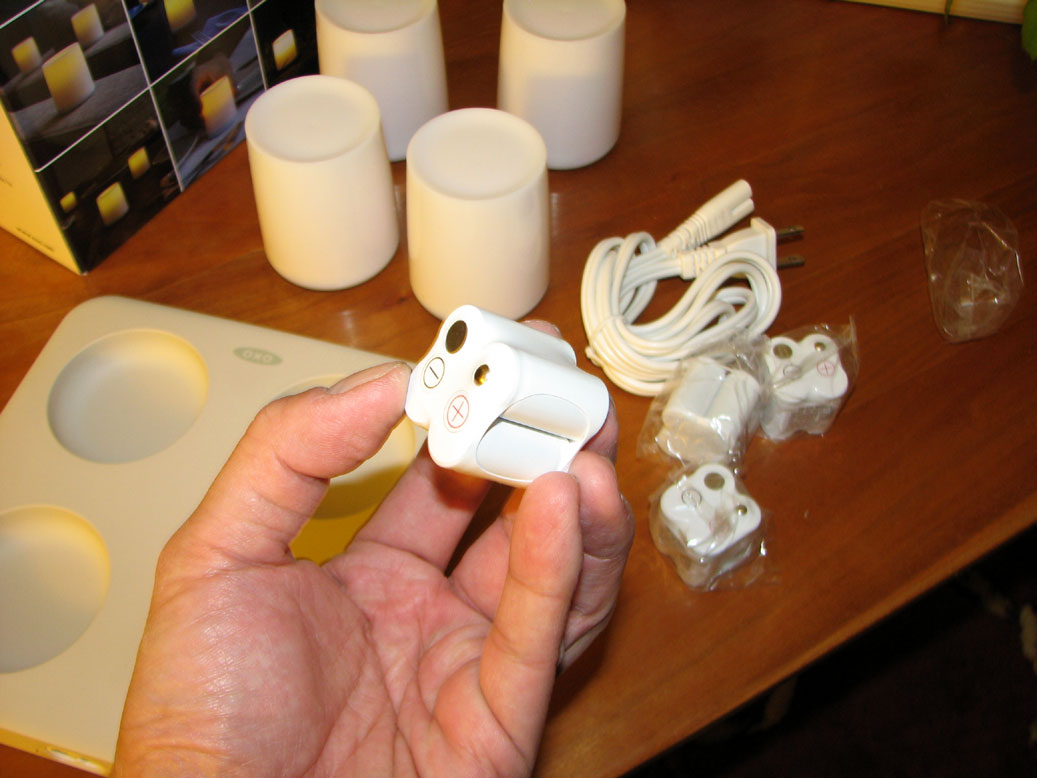
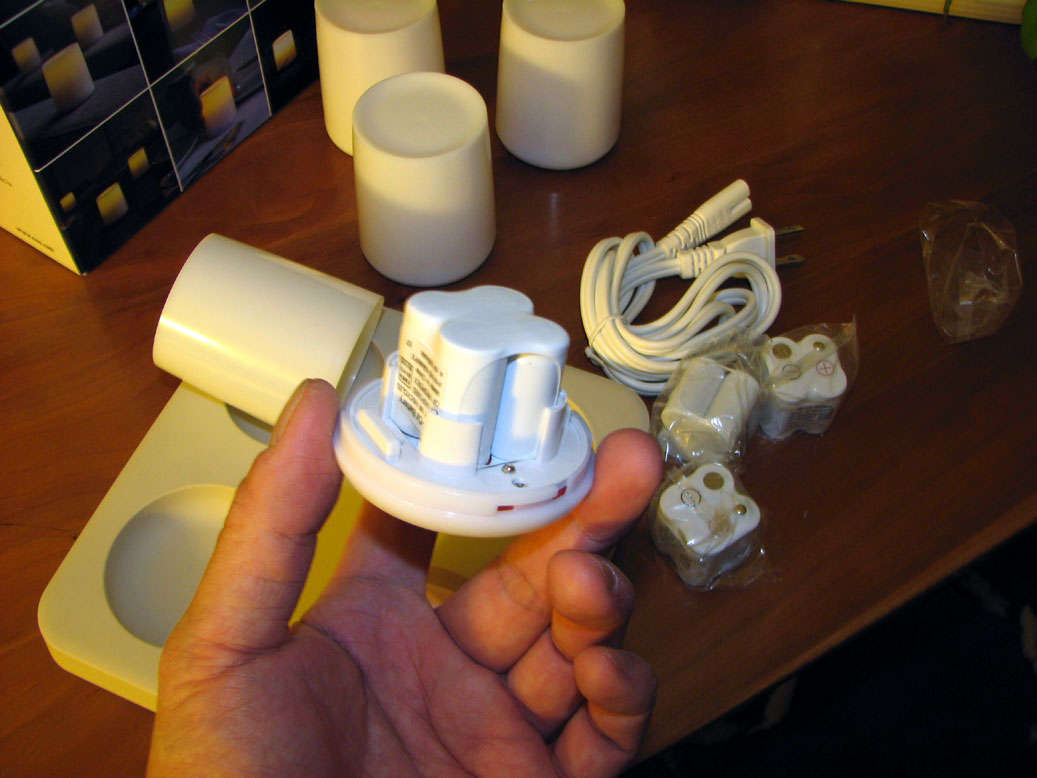
The Luau rechargeable LED lantern package has three pieces: a lamp, a circular charger, and an AC wall adapter. A dimmer is cleverly integrated into the bottom of the lamp. The brightness of the lamp may be controlled by rotating the entire base.
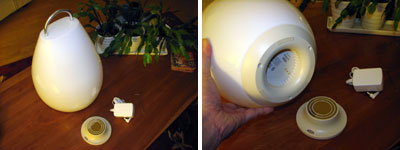
The shape of the Luau's charger is circular. This design ensures the proper placement of the lamp on the charger and eliminates the need to orient the contacts. The bottom of the charger has a channel to allow the wire to fit into the base so everything lays flat on the floor or table.

The charging base glows green when the lamp is removed and orange when charging. Like all Candela lamps, if charged, the unit automatically turns on when removed from the charging base.

We really like the execution of this Luau rechargeable LED lantern. It is great looking, surprisingly light, comfortable to hold, and is rated to last for about 6 to 10 hours on a charge. This Luau will be a nice lighting companion whether for sitting out on the patio or on walks along the beach at dusk. Folks here will have more comments once they have taken it out for a stroll. - Wan Chi Lau (permalink)
|
|
|
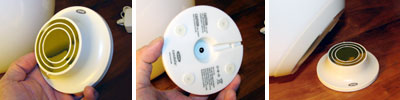
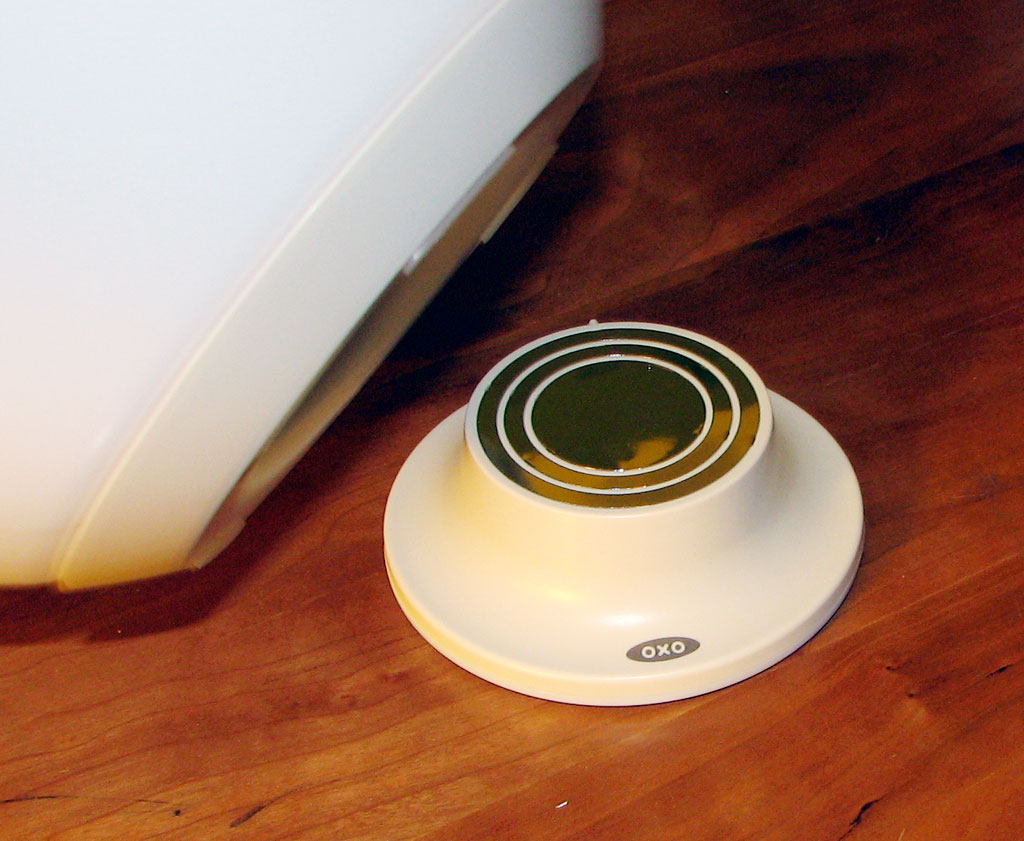
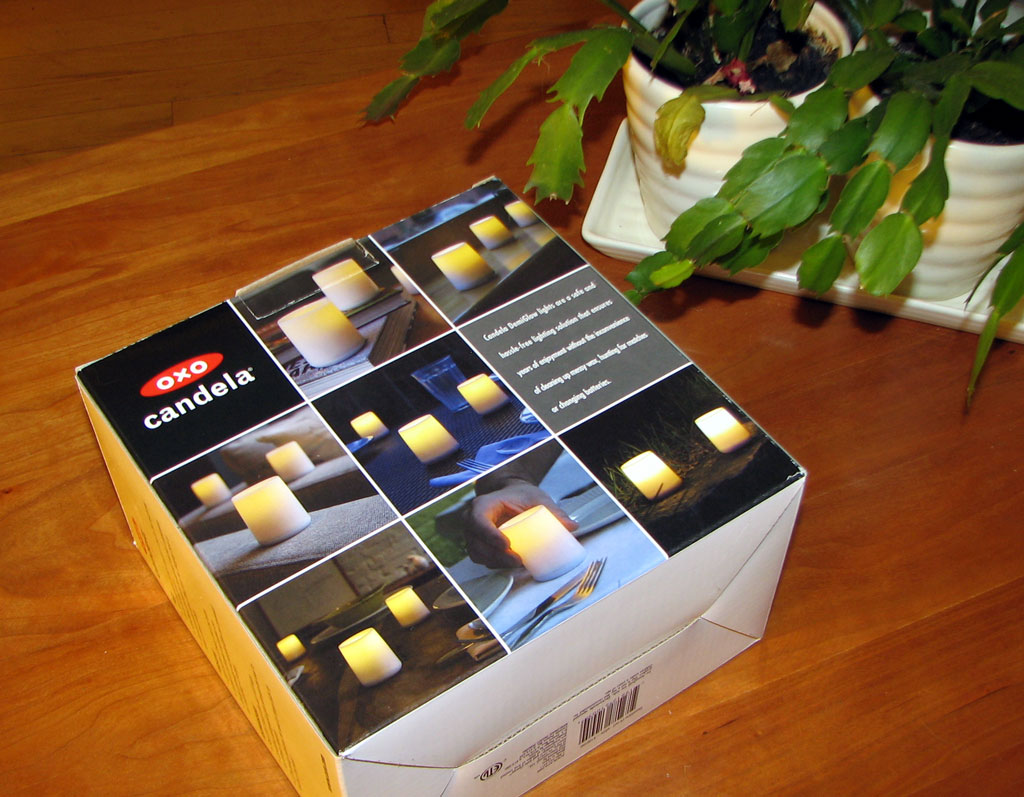
A week or so ago we mentioned that Candela has been sold by Vessel to OXO. OXO has extended the line with the introduction of a few new lamps based on the Candela technology.

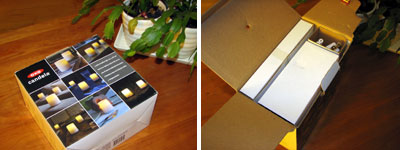
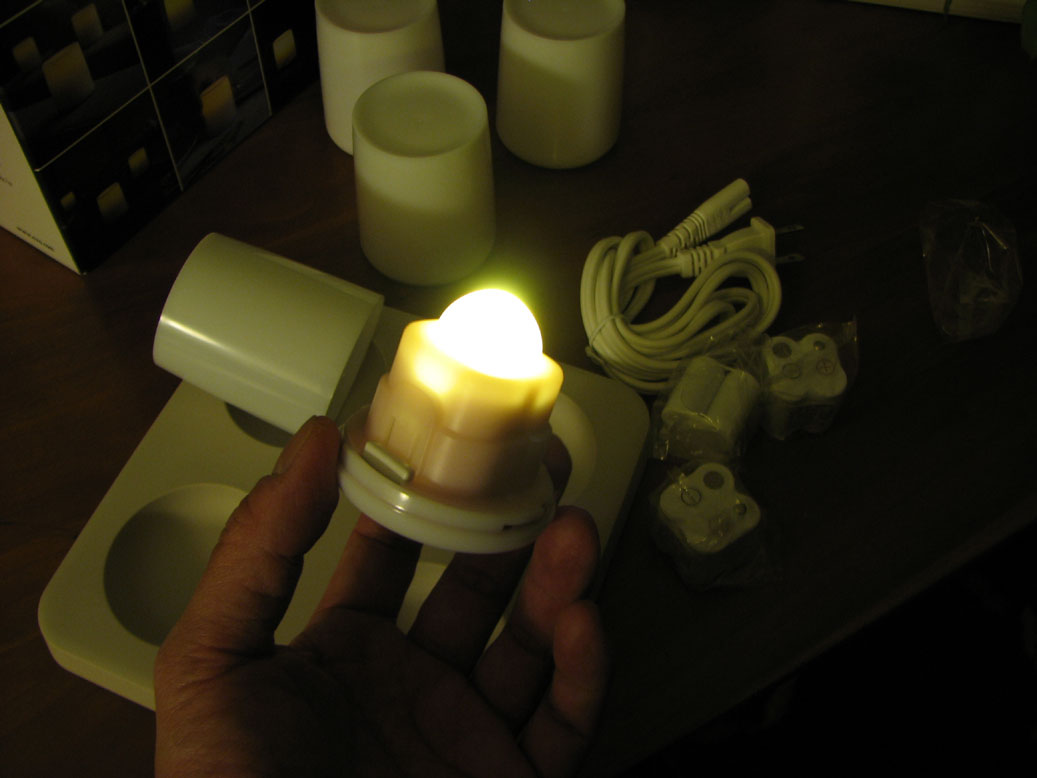
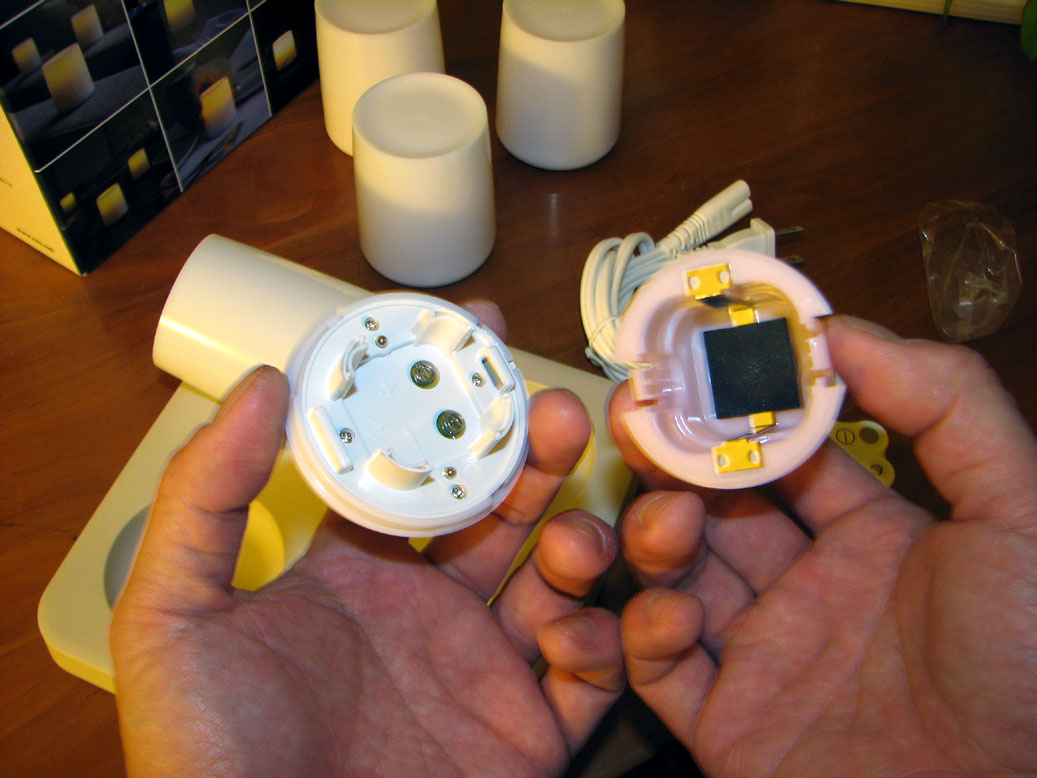
Today we will be taking a FirstLook at the DemiGlow. The DemiGlow is based on the same recharging mechanism as the original Candela, but updated with an energy efficient LED instead of an incandescent bulb.
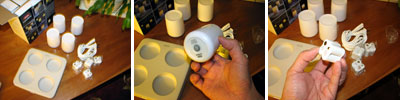
These smaller DemiGlow lamps are sized to be used in place of the normal votive candles. The obvious advantage with the Candela lamp is the safety aspects of a contactless charger and the flameless light. The use of an LED now makes the DemiGlow more reliable. A separate battery pack will allow the unit to be easily serviced when it needs to be replaced.
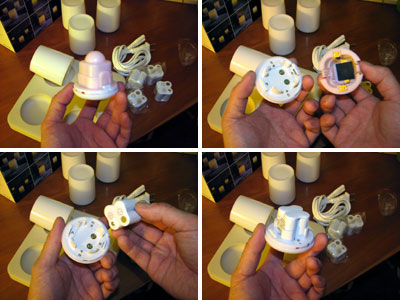
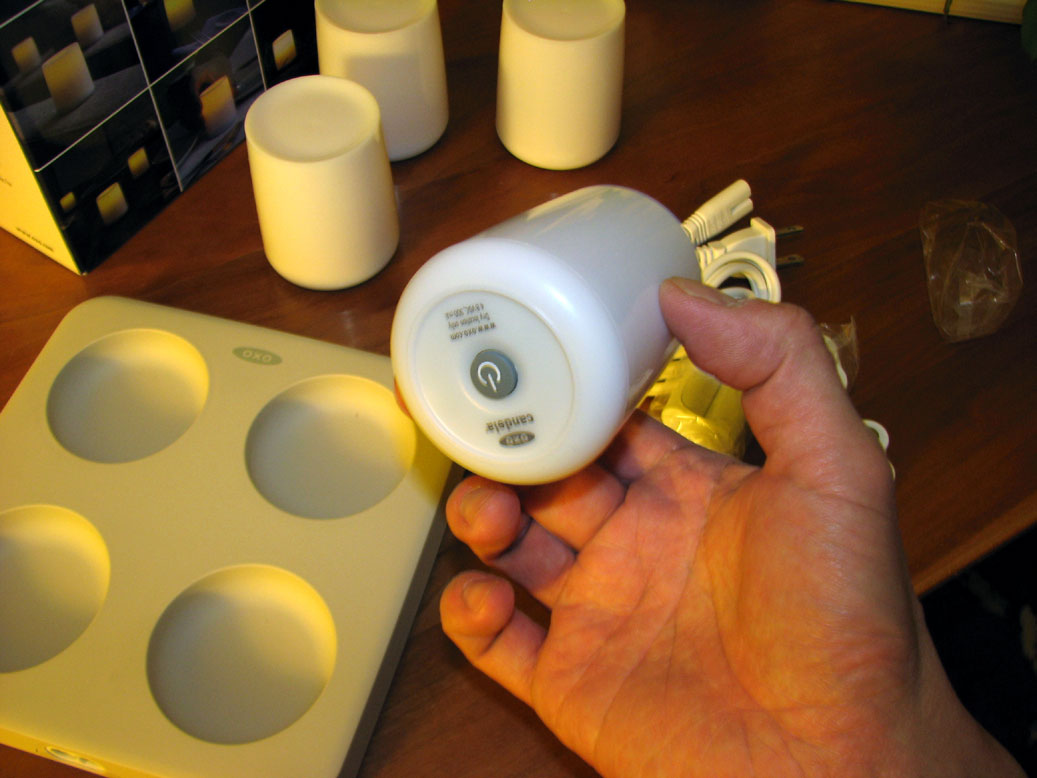
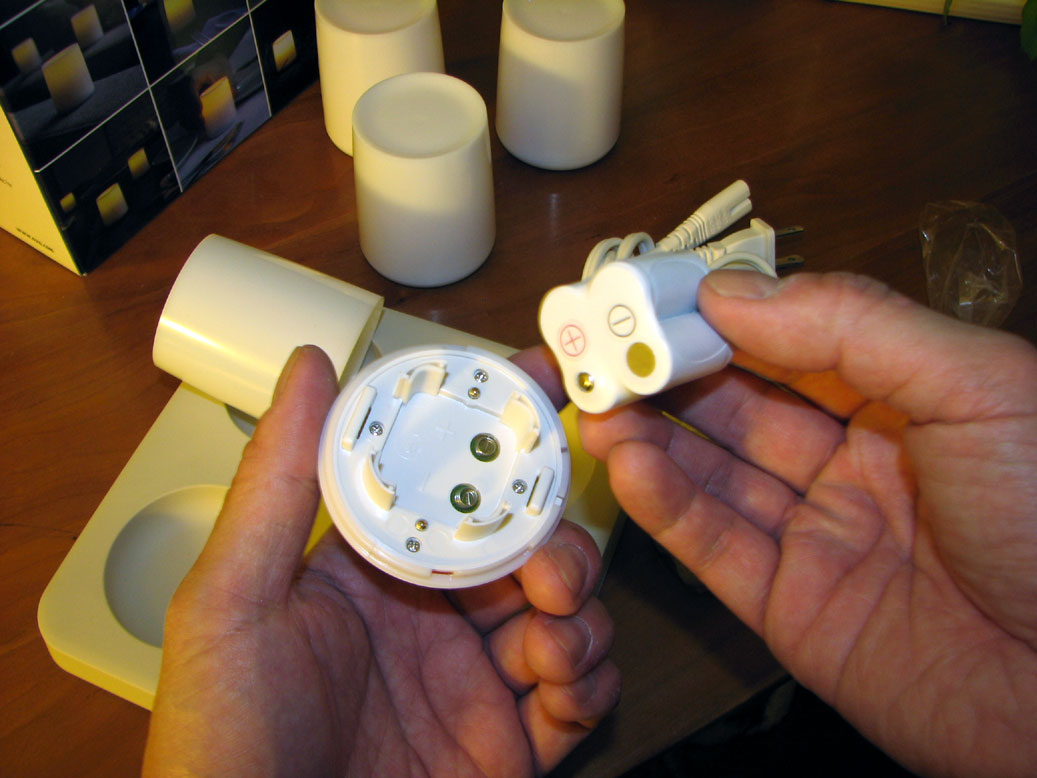
The battery packs were shipped separate from the lamps, but ssembly was very simple. The lamp module is released from the shade with a twist of the base. The +/- orientation is clearly marked on the battery and the holder.
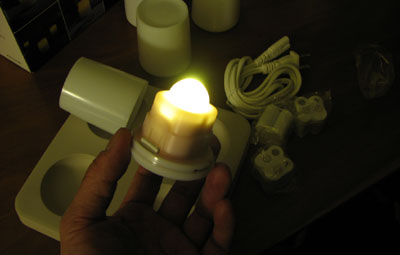
The batteries all have a small charge in them. This was useful for testing whether the lamp and battery were properly assembled. The recommendation is to let the battery fully discharge then recharge it overnight.

In the photo, one of the unit already appears dimmer than the others. We'll let them all discharge fully overnight before the first charge. - Wan Chi Lau (permalink)
|
|
|
|
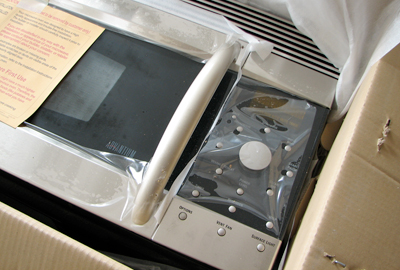
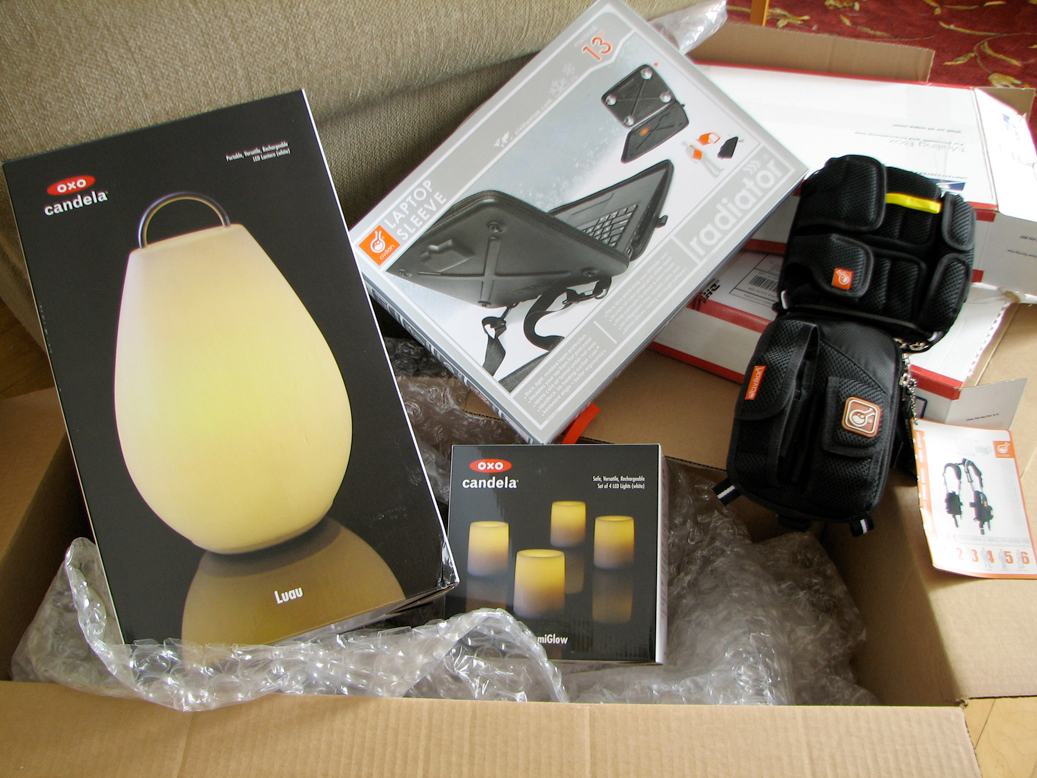
Another week has passed, but the post-CES stream of gear coming into the office continues to give the delivery guys a rigorous workout. Quite a few interesting things showed up on the loading dock the last few days.

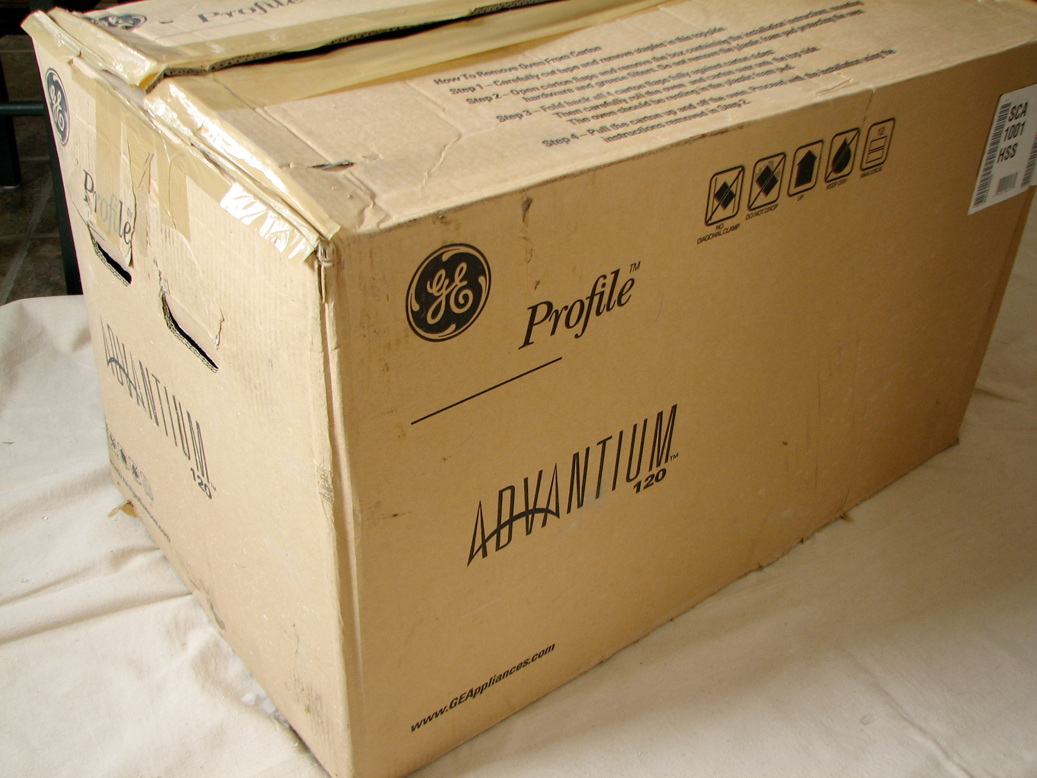
The largest item is the GE Advantium Microwave Convection Oven. It is the next of the DIY projects for the RainyDayKitchen, a series we started at the beginning of 2008.
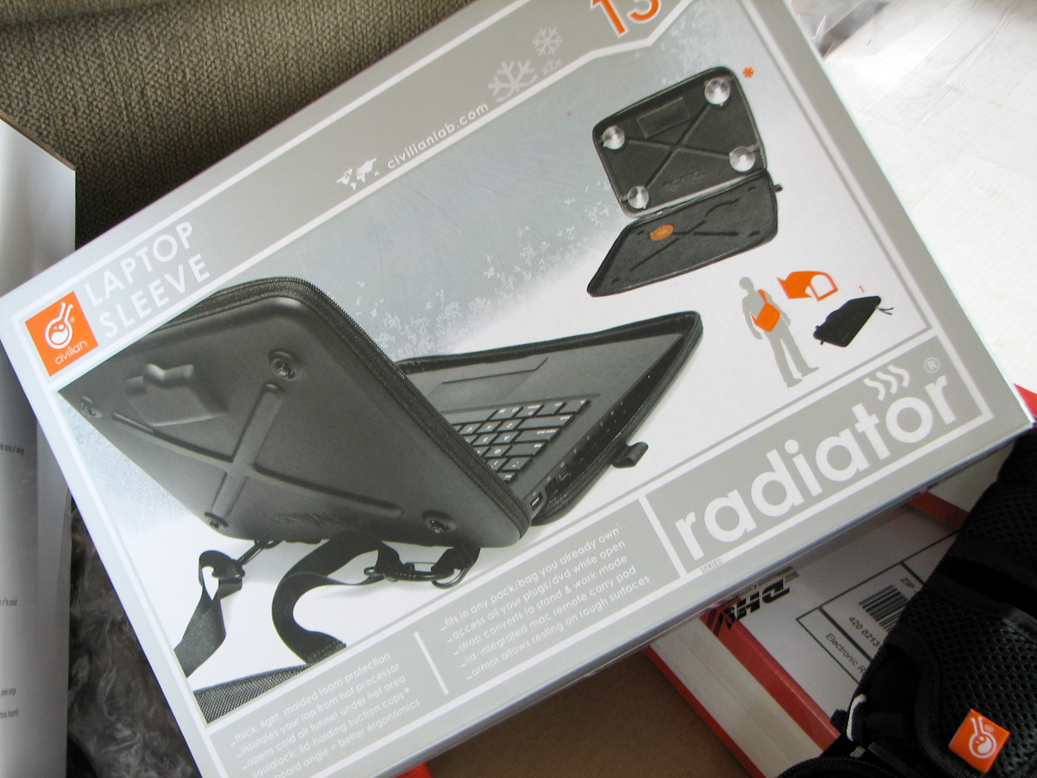
The other items which showed up were equally innovative. We came across a company called Civilian Lab. They make a line of unique gear harness and case for active folks. We'll have an indepth look at both in the upcoming months.

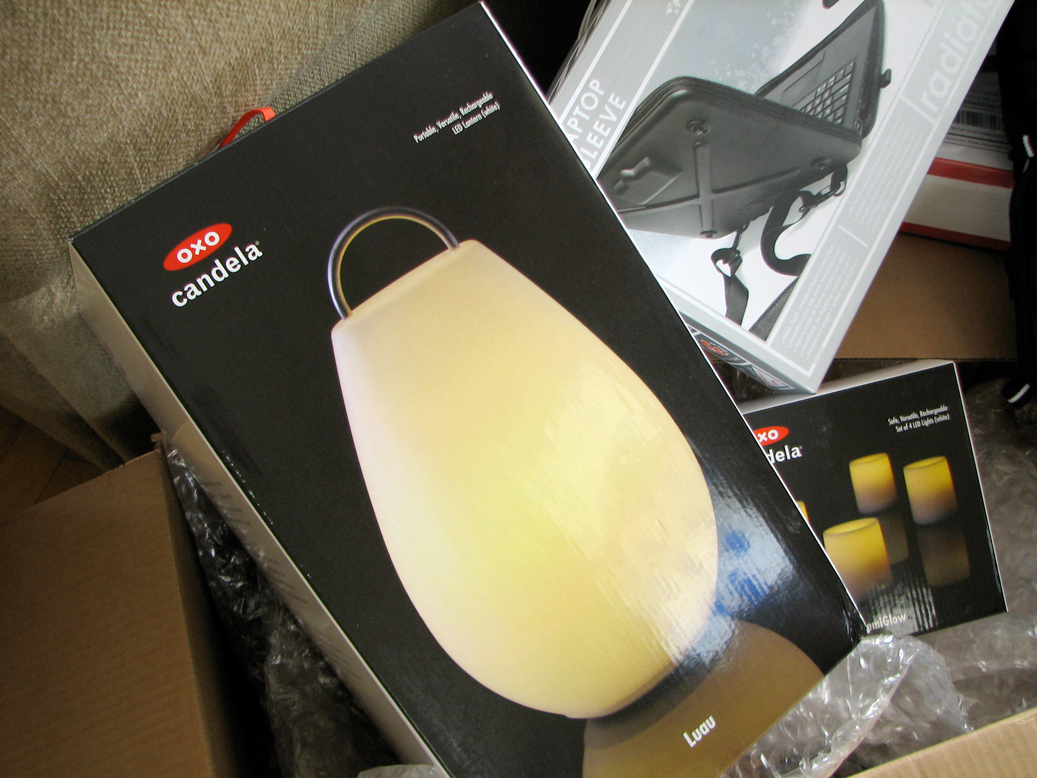
We also had a most interesting conversation with OXO, the kitchen utensils people. We learned that they have since acquired the Candela line and have put their manufacturing muscles behind this fantastic product. We will be looking at some of the new Candela offerings (Luau, DemiGlow) later in February.

Some RainyDayMagazine readers may find this next little bit of information more useful than others :-) One trend we appreciate very much is the shift to using flash drives for sending out PR/Marketing materials to editors. Not only is the information in a much more usable form, but once we no longer need it, we still have a perfectly useful flash drive and no paper to throw out or recycle! Leave it to the Dirt Devil folks who make stuff to help us all clean up to think of ways to give us less stuff to clean up! - Wan Chi Lau (permalink)
|
|
|
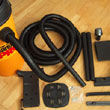
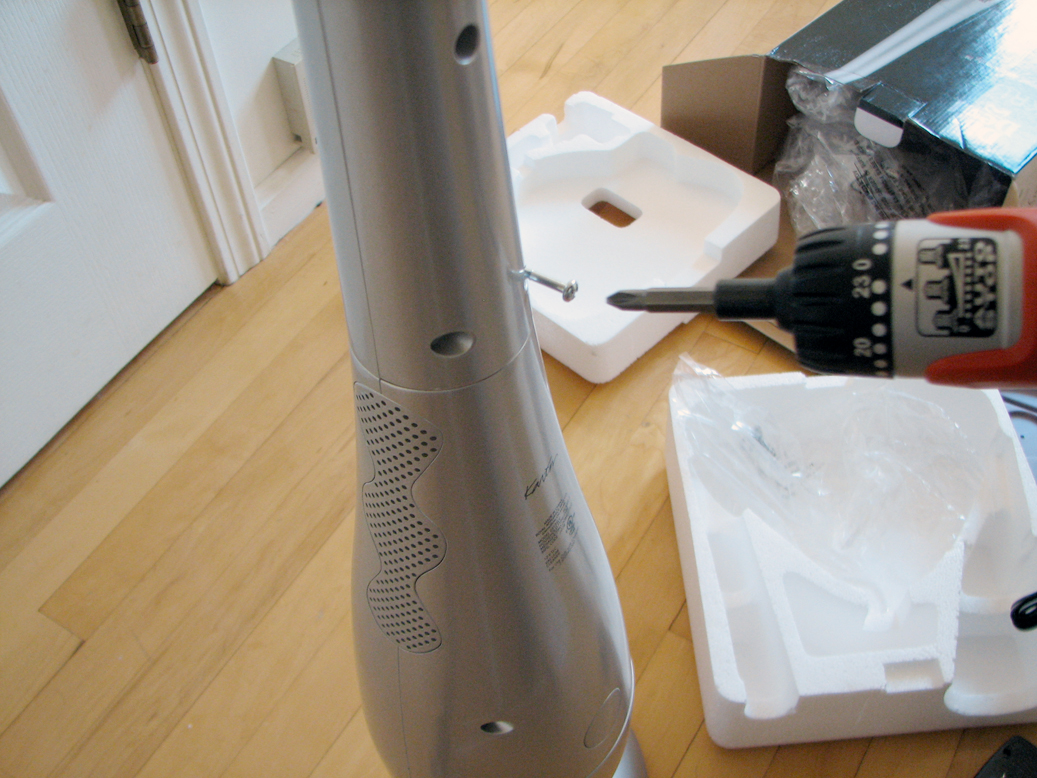
The crew in the RainyDayKitchen has tested their share of cleaning tools and gadgets. When we asked them to check out the new Dirt Devil line they were thinking it would be more of the same. However, when they saw the new Dirt Devil line, volunteers were suddenly a lot easier to find.

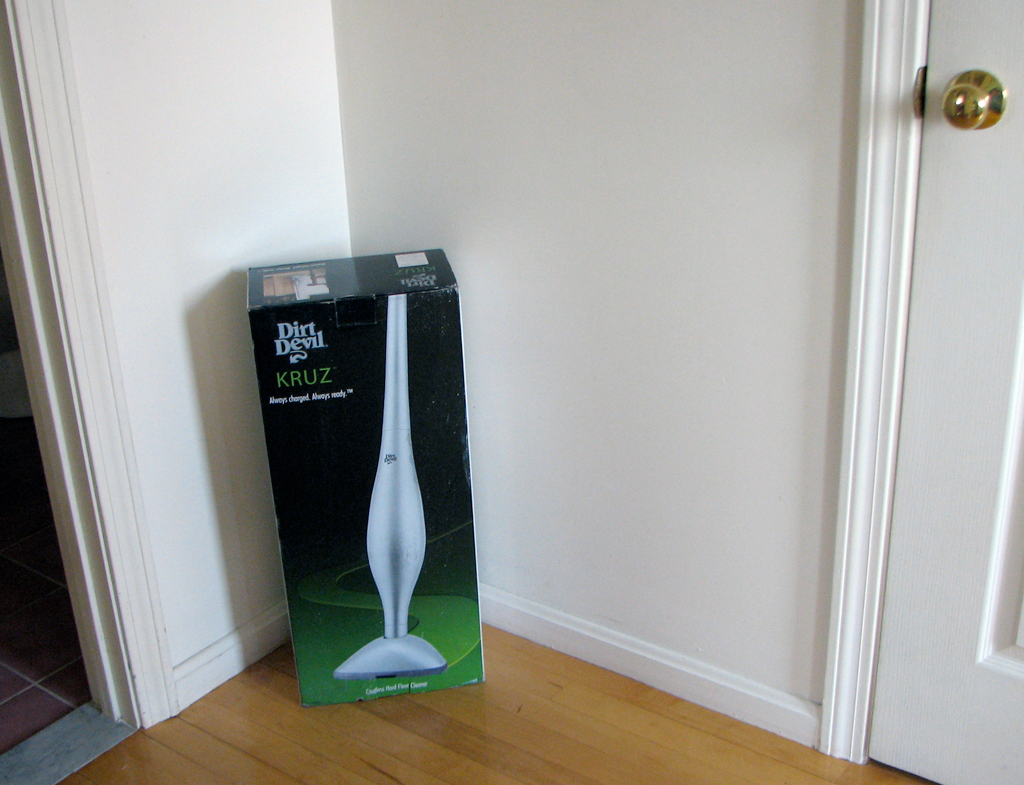
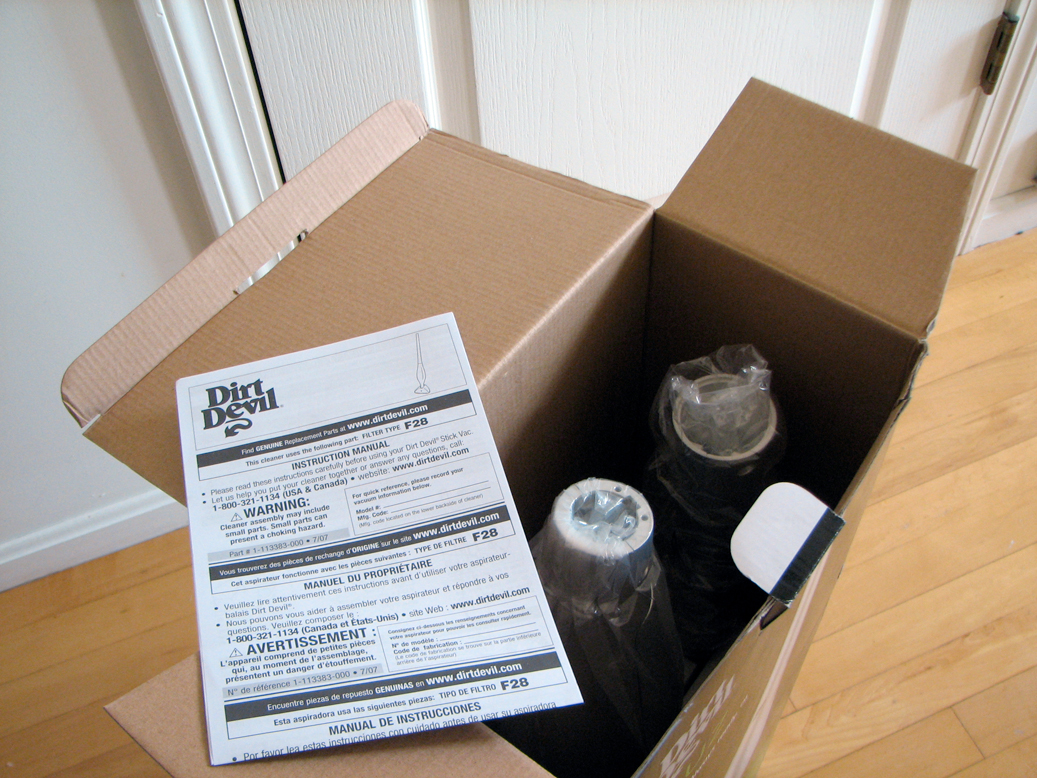
First up is the Dirt Devil KRUZ. The KRUZ is a cross between a dust buster and an upright vacuum. It is designed for chasing down dust bunnies and quick crumb cleanups.
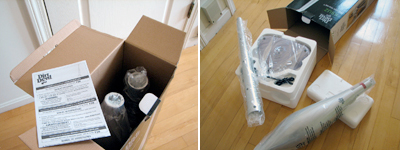
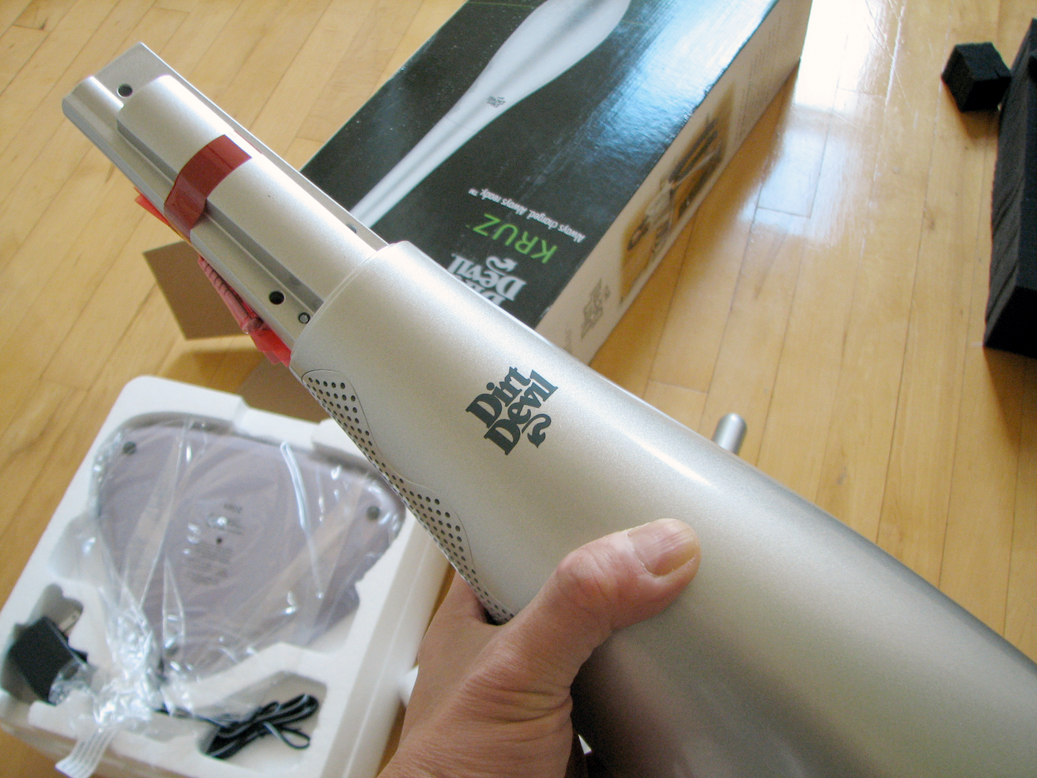
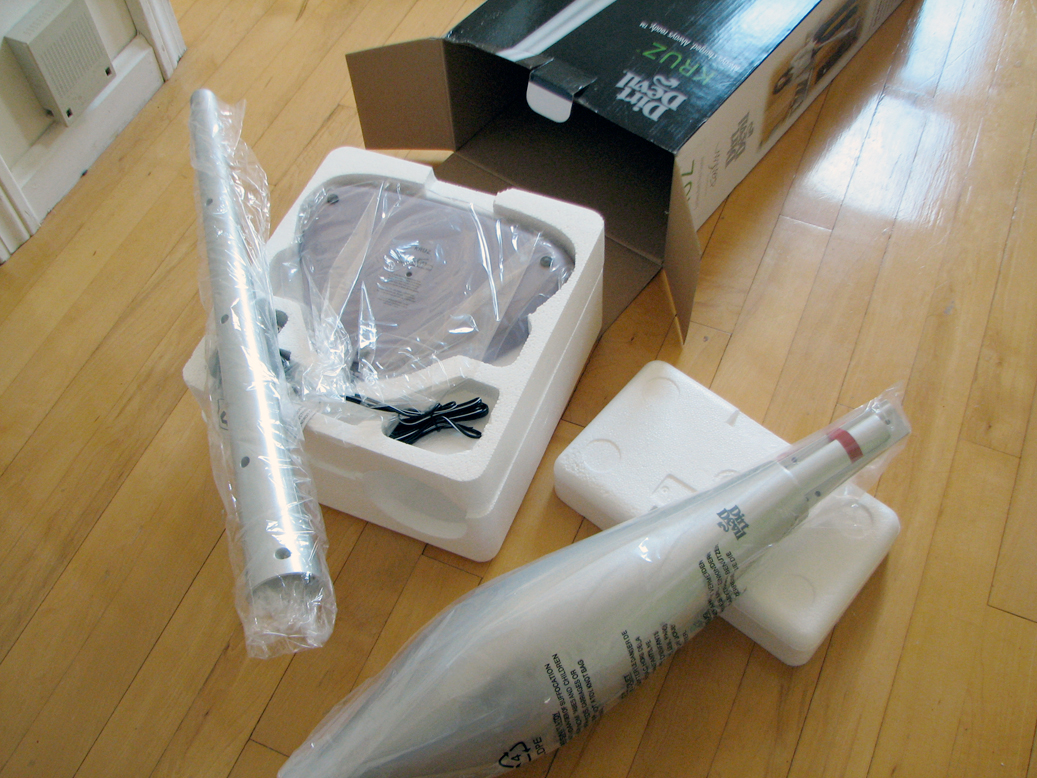
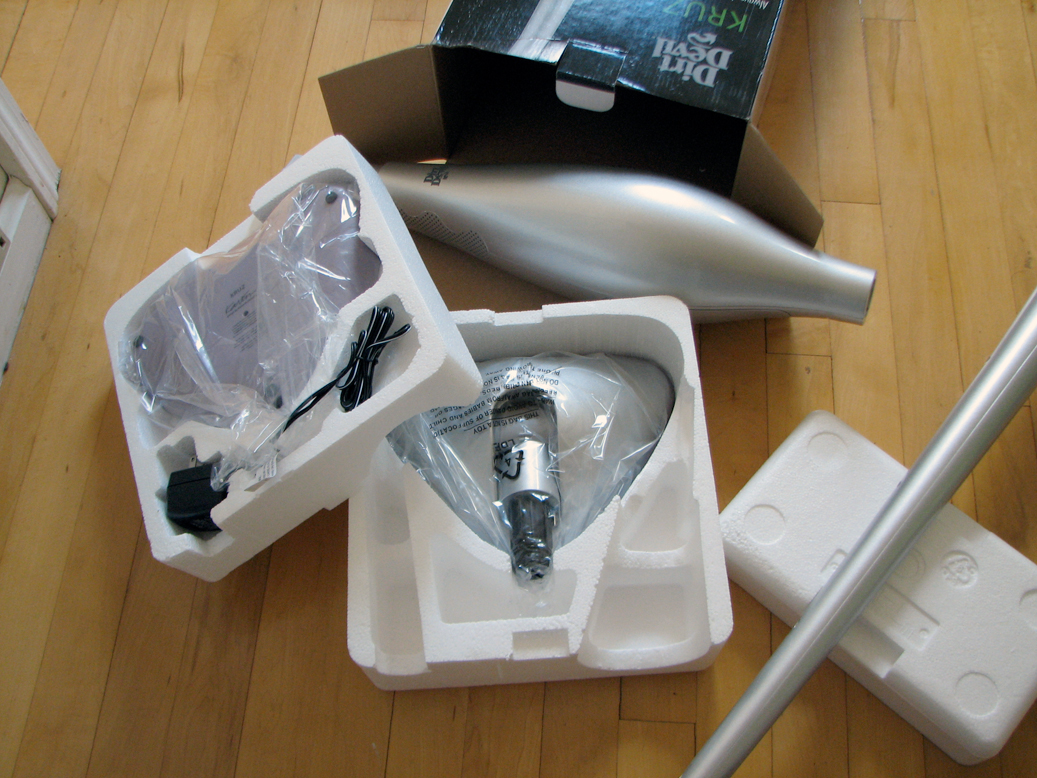
The KRUZ comes partially assembled. There are three main pieces (handle, motor, base) which fits together to form the unit. The connectors are all designed to align and mate uniquely. Most will find it simple to assemble the pieces.
We probably should read the directions, but since we rarely do...we saw no reason to start now :-) The assembly steps seemed logical enough: attach the handle and base to the motor. You will need a Philips screwdriver.

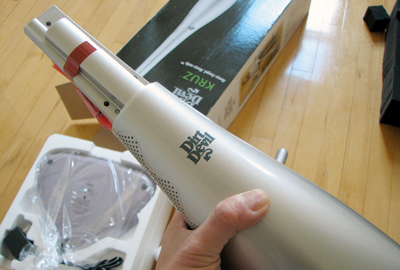
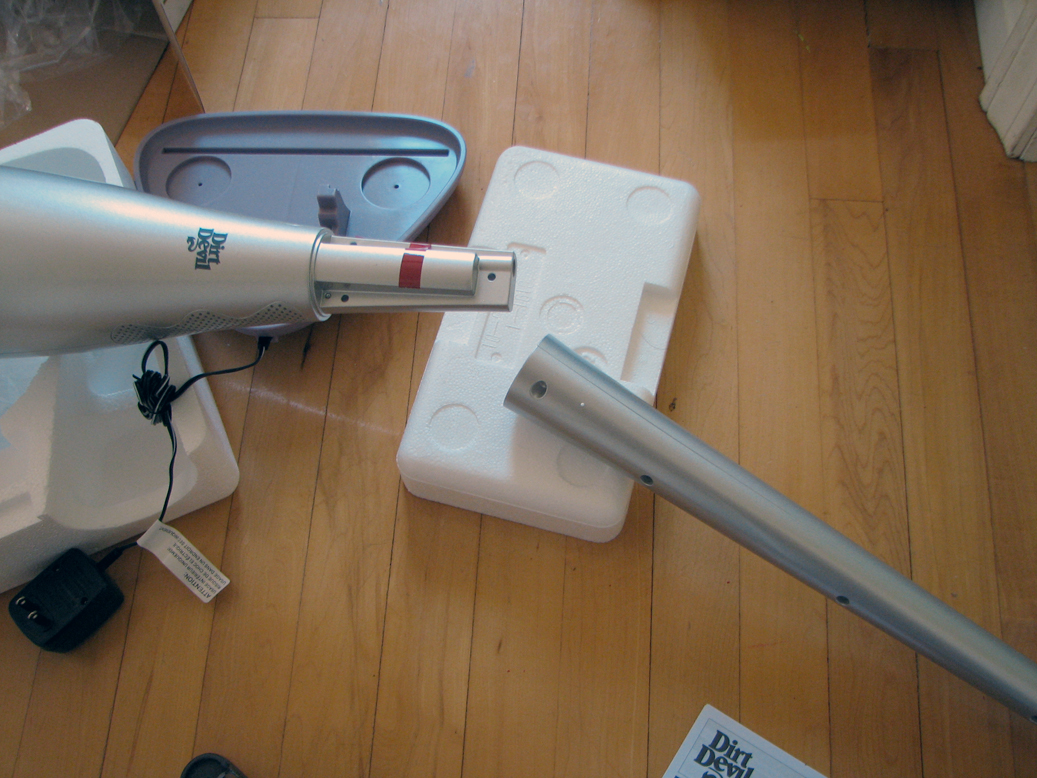
The base of the unit plugs into the motor via a central tube. On the side of the tube are two metal pins. There are matching holes at the bottom of th motor unit. The two pieces snaps and locks together.

The handle attaches to the upper part of the motor by sliding onto it. It is held in placed with three screws. Again no force is needed to mate the two pieces. If it does not fit, you have the orientation wrong. The entire assembly process took us about 15 minutes.
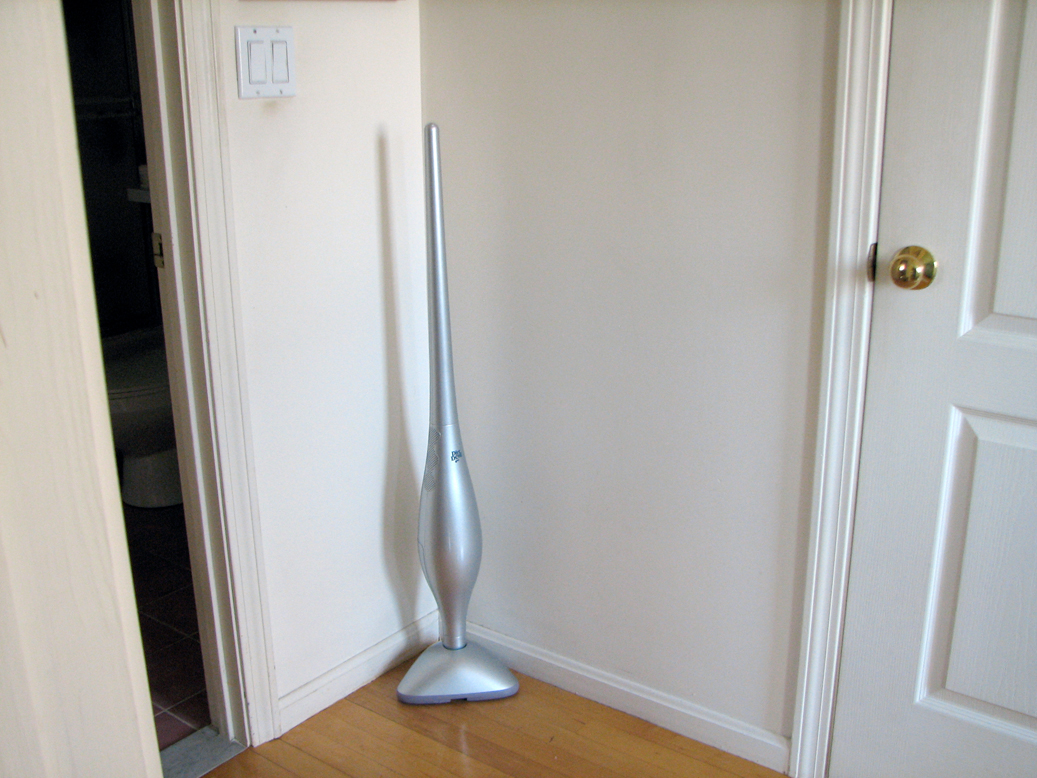
When fully assembled, the KRUZ stands about 4' tall. The switch is at the top of the handle. The unit will fit neatly in a corner. We will let it charge overnight before taking it on its FirstUse run.

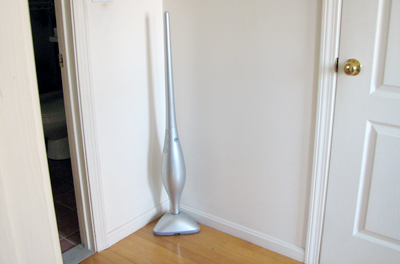
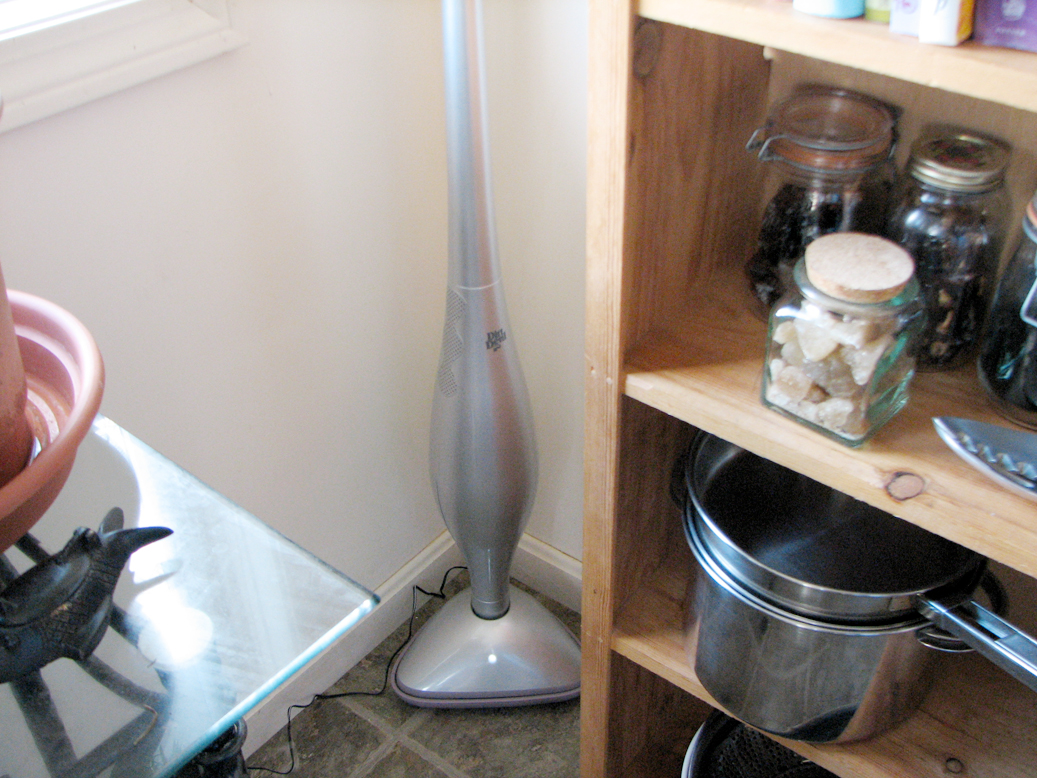
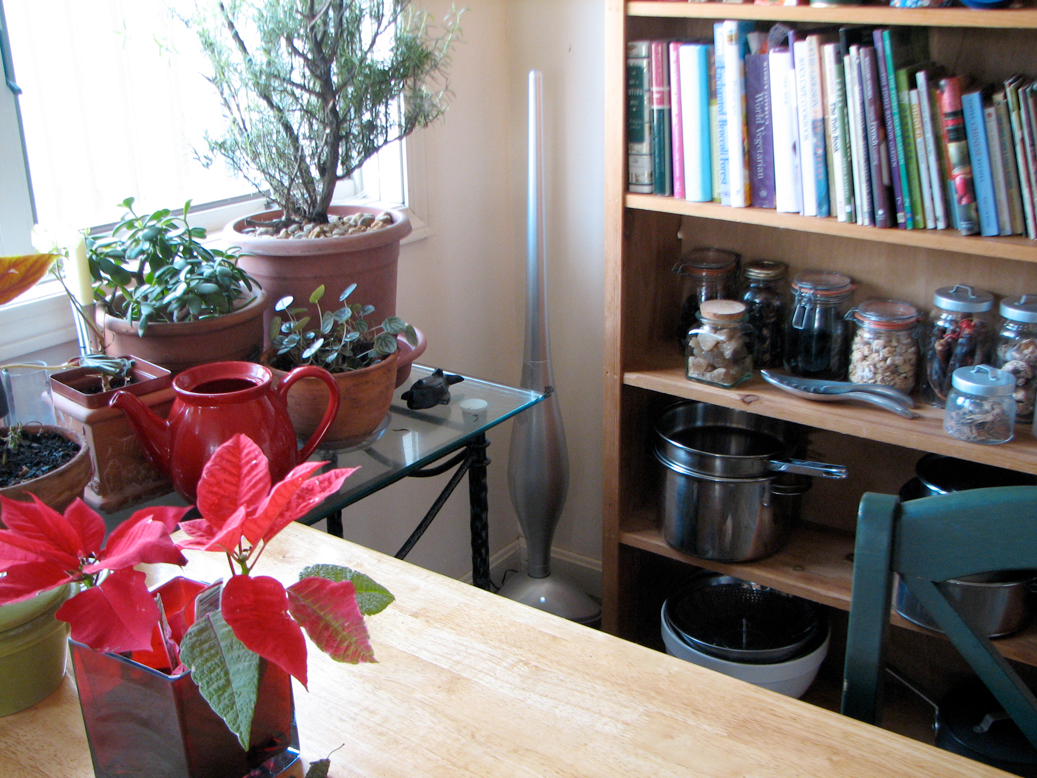
The KRUZ, with its tiny footprint, can be stored just about anywhere there is a free square foot of space. There is a perfect spot in the kitchen in the corner next to the bookcase. It will be readily accessible, but yet mostly out of sight. However, the KRUZ is so good looking that you may not care even if it is out in the middle of the room! - Wan Chi Lau (permalink)
|
|
|
|
Dirt Devil became a household brand when they introduced the hand vac back in the 1980s. Years later, the original Dirt Devil design was reissued as the "Classic."

Fast forward to 2007: the entire Dirt Devil line has been revamped by Karim Rashid, with an eye toward both modern forms and innovative functions.

RainyDayMagazine will be reviewing them in our RainyDayKitchen section this year. Some will be featured in this year's Spring Cleaning issue. Others will be used in our Fall Cleanup project. Look for a RainyDayPuzzler at the start of February where you can win something and get a jump on your own Spring Cleaning (hint, hint). - Wan Chi Lau (permalink)
|
|
|
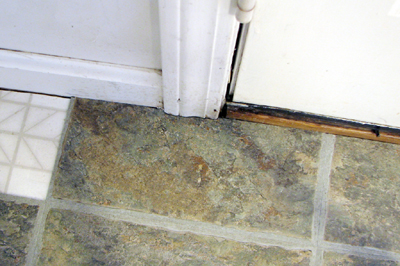
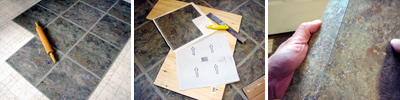
Yesterday we laid down all of the whole tiles in the center of the room in about 2 hours. Another five hours were spent on making the single cuts for the various tiles along the edge. Today, we finished up the more difficult compound cuts of the corners and around the door mouldings.
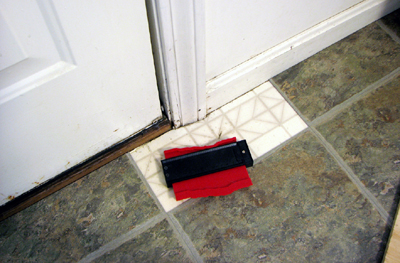
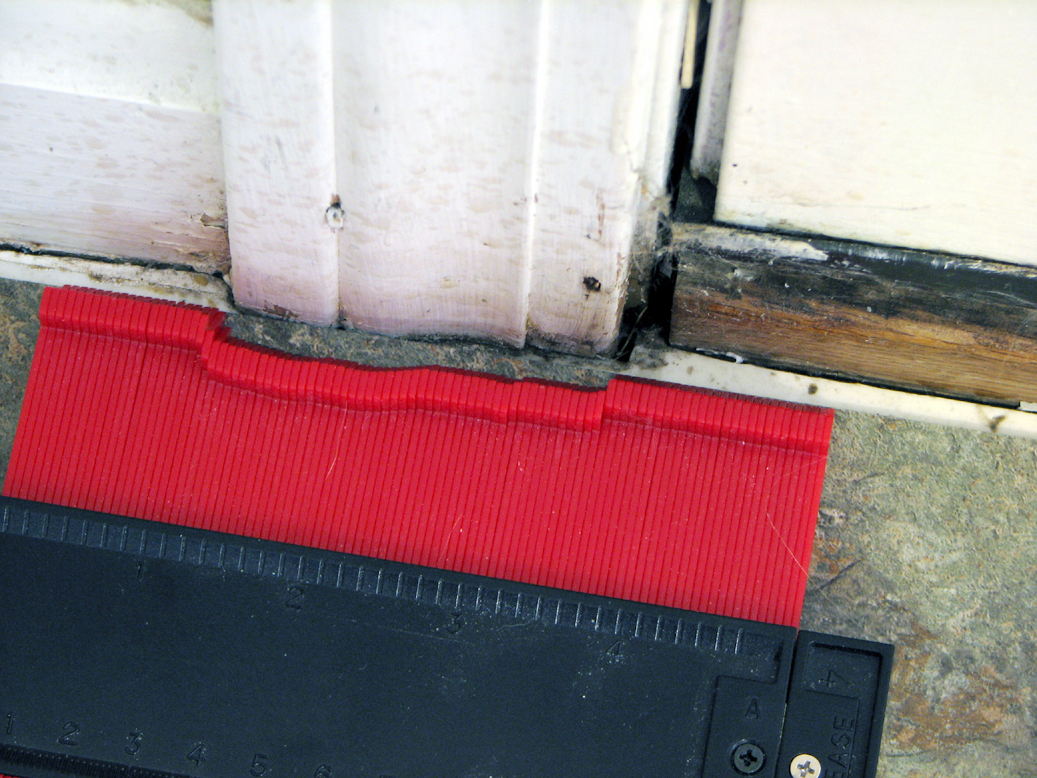
There are two ways to place a tile around door mouldings: under it or around it. To place the tile under the door moulding, the moulding must be removed. To place the tile around the moulding, the tile needs to be cut. We opted for the latter option.
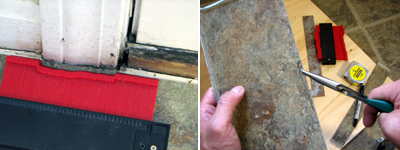
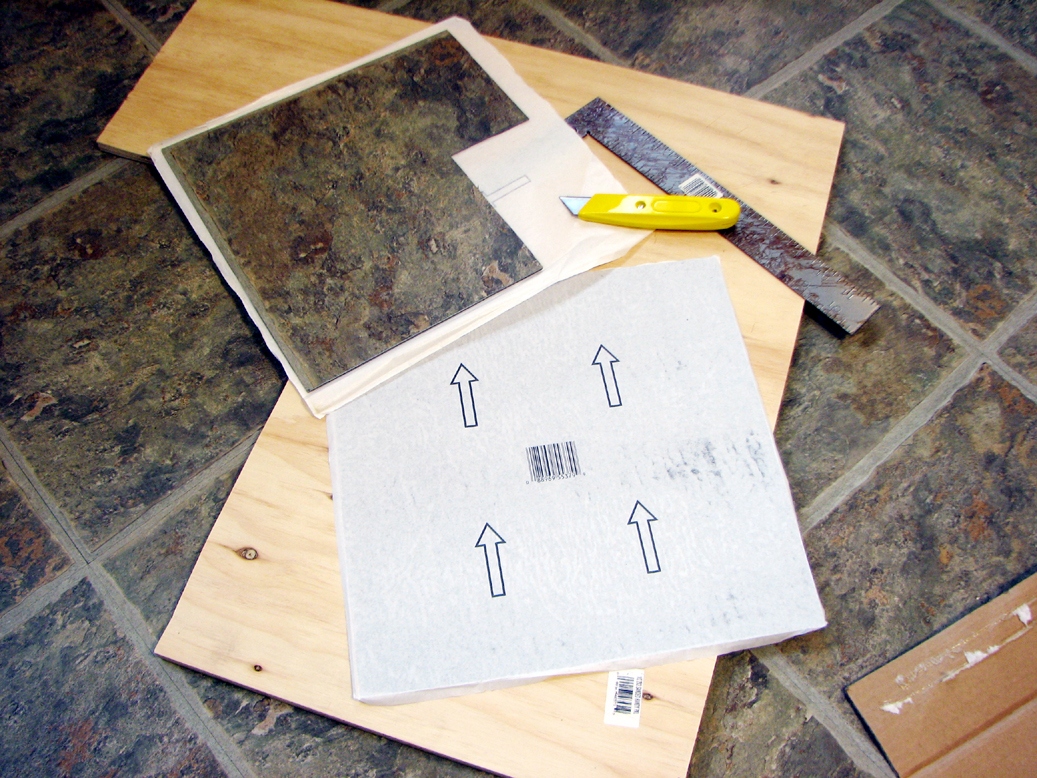
The easiest way to fit the tile around a moulding is to use a form tracing tool. The tool is simple to use. Just press it against the shape, trace the outline onto the tile, and cut. We found that it was not necessary to cut too deep into the tile, just deep enough so it can be removed using some needle-nose pliers.
There is a compound cut every time a tile hits a corner. There were ten of them in the kitchen. We found the old saying "measure twice, cut once" really was something one should take to heart when making these compound cuts.

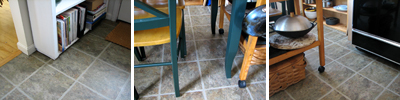
This size project can easily be completed by two people in one weekend. The main recommendation we have is to work from the center, take care in aligning the tile edges, and to wear knee pads :-) - Wan Chi Lau (permalink)
|
|
|
|
Indoor renovation projects in the Winter are great because not much can be done outside :-) It is also feels good to have accomplished SOMETHING right at the beginning of a New Year!!!

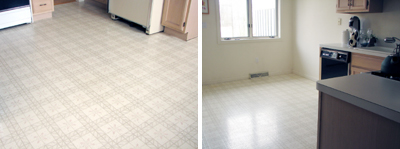
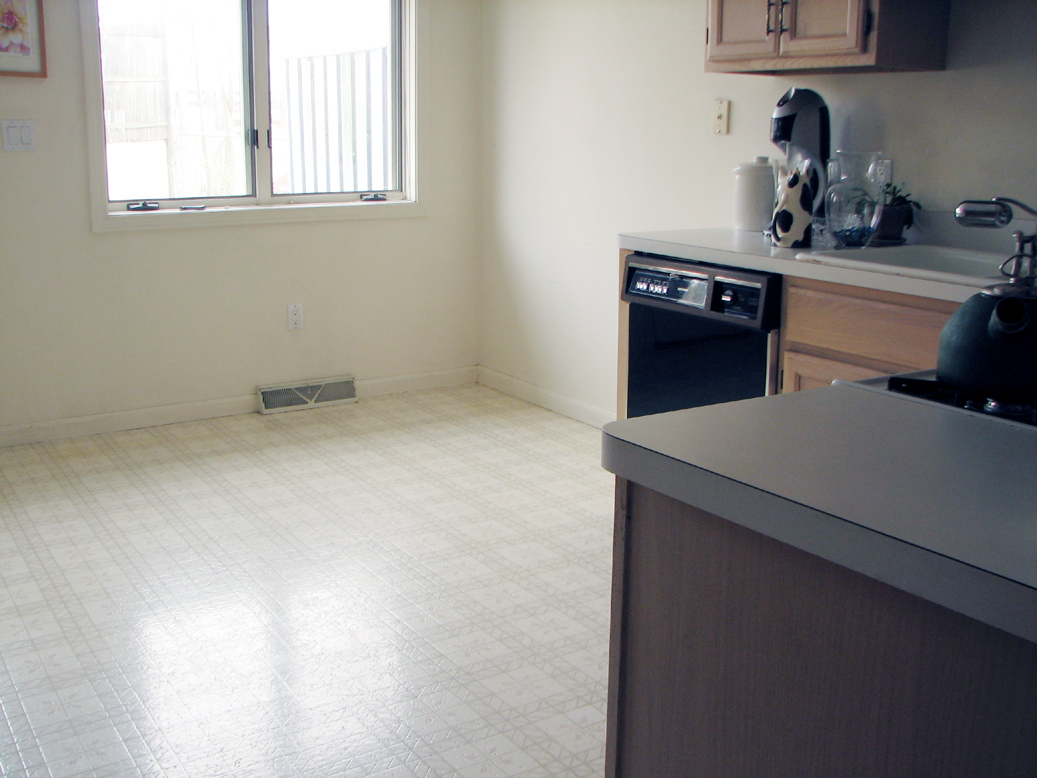
We decided our first RainyDayRenovation project of 2008 is going to be retiling the floor in the kitchen. The floor which is there now is a single sheet of patterned linoleum. The light color gave the 10x15 sq ft room a nice spacious feel. However, it easily shows dirt from the traffic and it is difficult to keep clean. We wanted something which will both warm up the room and make it a little easier (ie: show less dirt) to maintain.
The original floor in the RainyDayKitchen was still in pretty good shape so there was no need to pull it up or put down a new plywood subfloor. This saved us about a day's worth of work.

The interns spent a few days moving all of the stuff into another room, vacuumed and washed everything. For good adhesion, it is VERY important for the floor to be grease and particle free.
To complete the entire project will take most of the weekend. Our recommendation is to lay down all of the whole tiles first, next do the ones which requires only a single cut, and finish with the more complex ones.
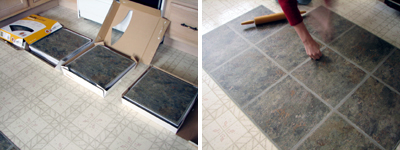
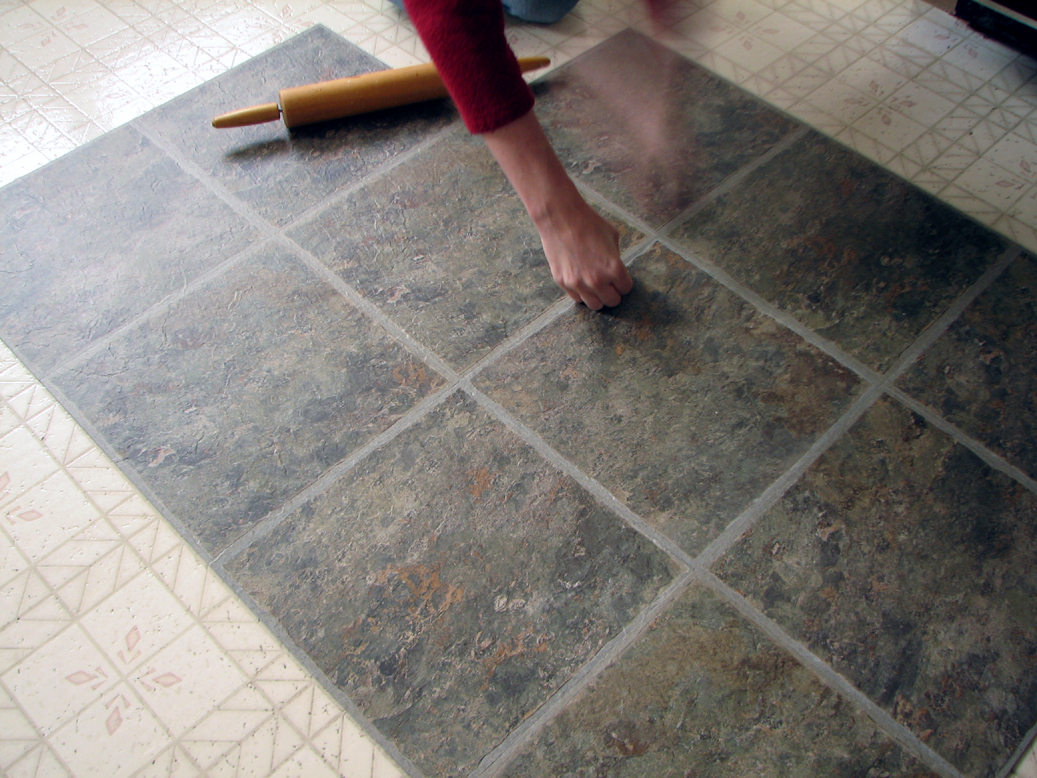
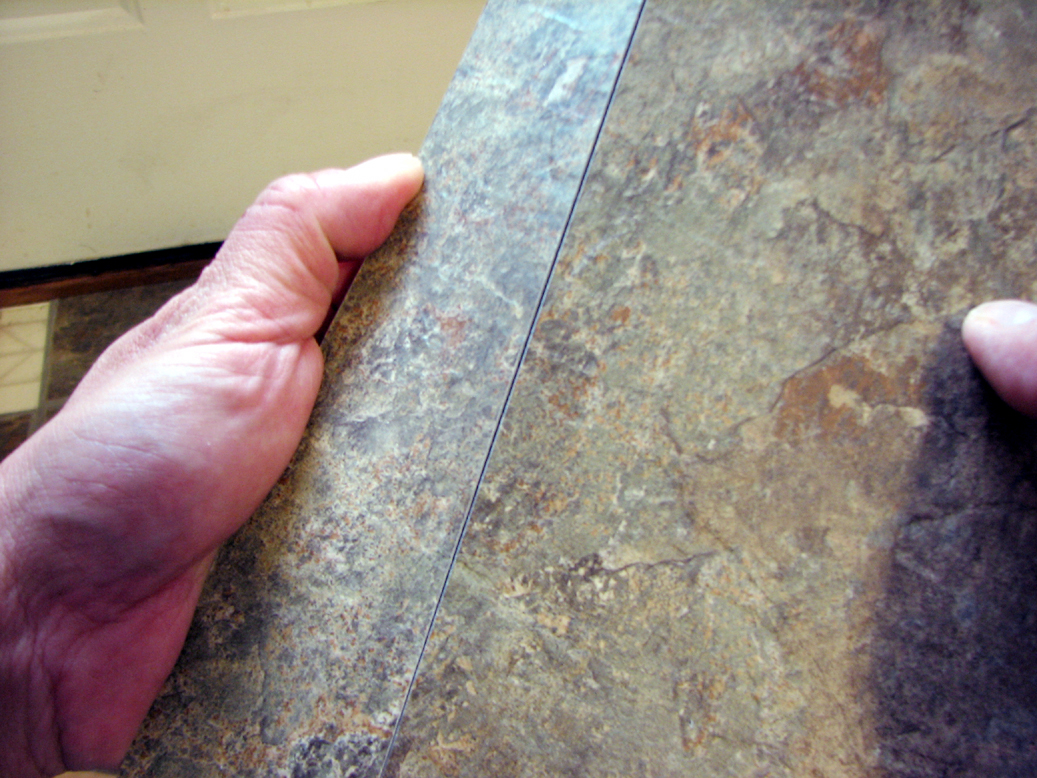
Laying down the tiles are pretty easy, just peel and press. The key to a good looking job is to realize that little errors will accumulate over the course of several tiles...so LINE THINGS UP before proceeding on to the next tile. The tools required are simple (rolling pin, angle square, box cutter).
For a 150 square foot room, a reasonable estimate is between 10 to 12 hours of work. This is excluding all of the "prep" work: moving, cleaning, buying tiles. The job can be done in much less time by the pros, but it will cost you about 10x more :-)
Tomorrow, we'll show you the completed project. If you have started your own RainyDayRenovation projects, drop us a line or send us some pics when you are done. We'll be happy to share it with everyone! - Wan Chi Lau (permalink)
|
|
|
| |
RainyDayRenovations 2007
RainyDayRenovations 2006
RainyDayRenovations 2005
|
|
|


