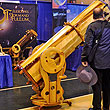
Last week we gave a quick FirstLook of the BlueChick v4.2 CNC kit. Today we'll walk through the assembly of the deck portion of the build. There is an excellent video on how to put the deck together so we won't go into detail on the process. What we will do is to give readers some of our observations on the process and provide some suggestions which may make the task easier.
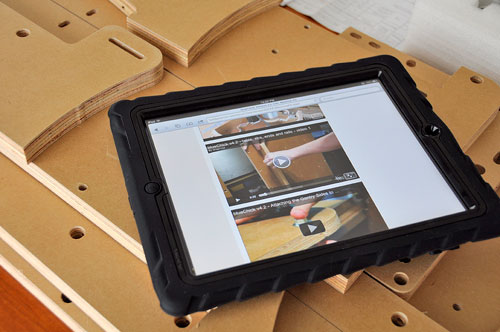
The first tip is to make sure you have plenty of room to work. While this may sound obvious, it may not be if you have never put together a kit this large. We used a (dining room) table which was twice the size of the CNC machine. We find it best to lay out all of the pieces so they can be accessibled. We also find that sorting the parts based on similarity (screw pile, washer pile, etc...) will help quite a bit when trying to find what is needed. It is also helpful if the table is not up against a wall so one can walk around it during the assembly process. The final suggestion is, if you have one available, to use an iPad for viewing the assembly videos. A laptop will do, but using an iPad will be much better. The iPad is small and can be placed anywhere on the assembly table, even in amongst the pieces being worked. The touch interface made it easy to start and stop the video, but best of all, easy to rewind (we did that a lot).

The deck is one long piece of Medium Density Overlay (MDO) board strengthened by three support pieces bolted on underneath. They are attached using steel machine screws and cross dowels. The assembly process was simple and required nothing more than a simple Philips head screwdriver. In the video, it was mentioned that one should note the alignment of the support pieces before attaching them as they were asymetrical. However, the design must have been updated as our pieces were symmetical. The key point to note when aligning the supports is to make surethat there is still sufficient room for the end support pieces to be attached flush with the deck. As long as that is true, then everything should be fine.

While the deck and rail could be assembled using just a manual Philips head screwdriver, a cordless electric driver makes the process go a lot faster. Depending on the torque-strength of the electric unit, you may want to tighten all the screws by hand as a final check.

The assembly of the deck took about forty minutes from start to finish. All of the holes were perfectly drilled and were easily aligned. We did not run into any problems or difficulties. Next up is the assembly of the X and Y axis of the BlueChick CNC machine. The process is similar and requires the same simple tools. Unlike the deck, some of the pieces are actually NOT reversable and attention must be paid to their proper orientation before connecting. The good thing with the design is that mistakes can be easily rectified as all of the pieces are attached using machine screws. We'll point out the potential "gotcha" points to help make the assembly easier. Look for it tomorrow. [Permalink] - BlueChick Deck Assembly
|


