|
|
 |
| |
RainyDayKitchen's content can now be licensed for your print magazine or web site. Please contact us directly here. If you want to see something reviewed, then drop us a note with a link and we'll be happy to take a look.
|
| |
| December 9,2009 |
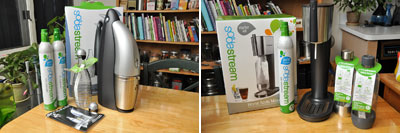
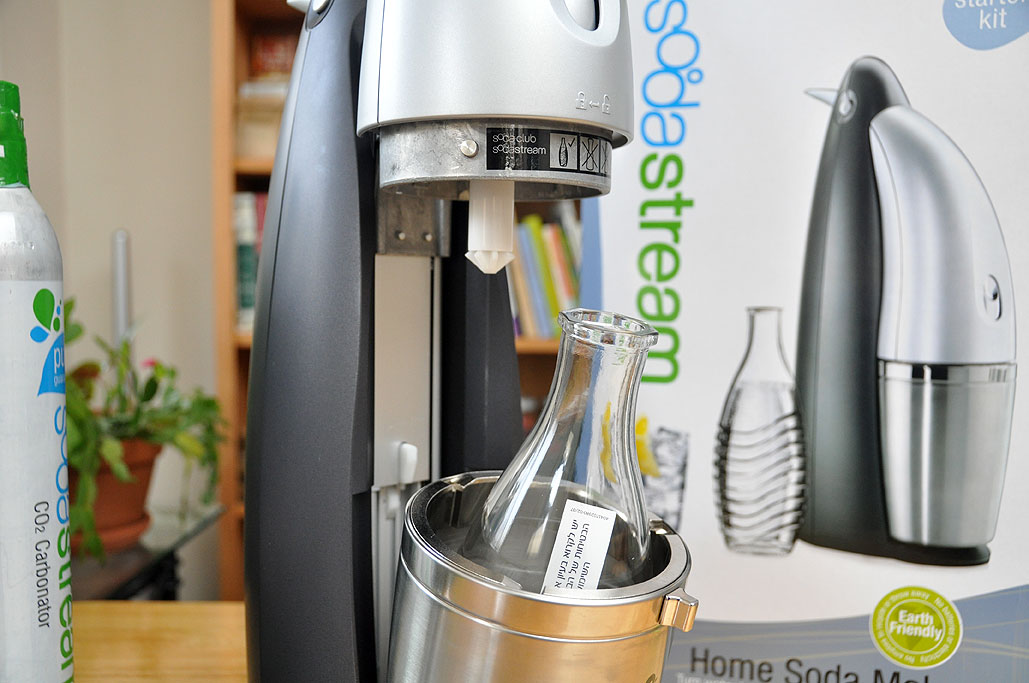
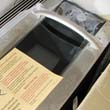
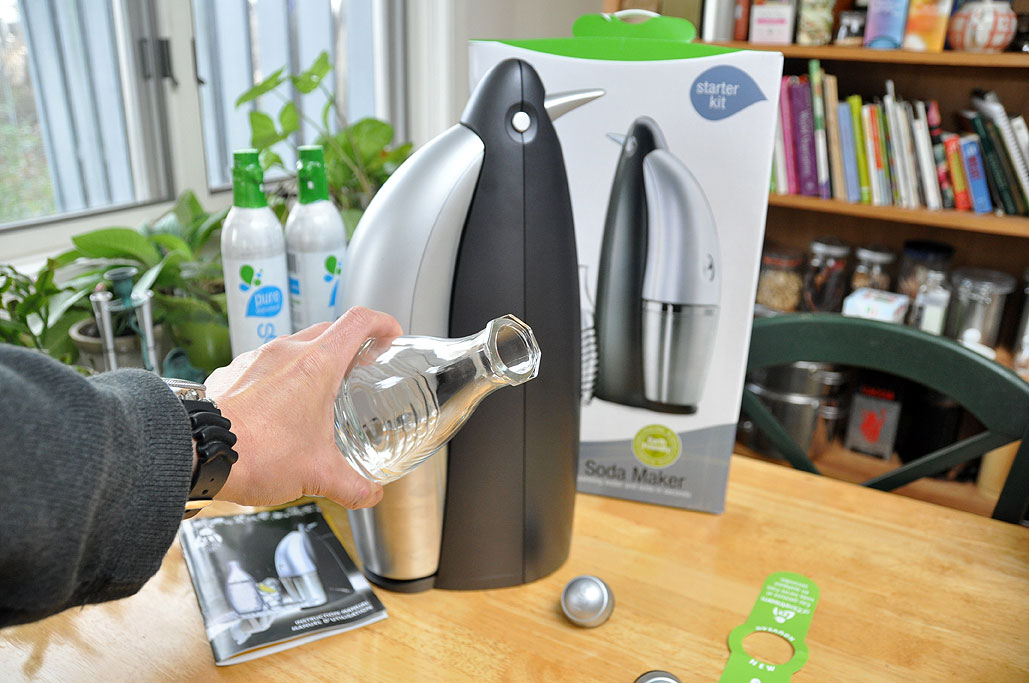
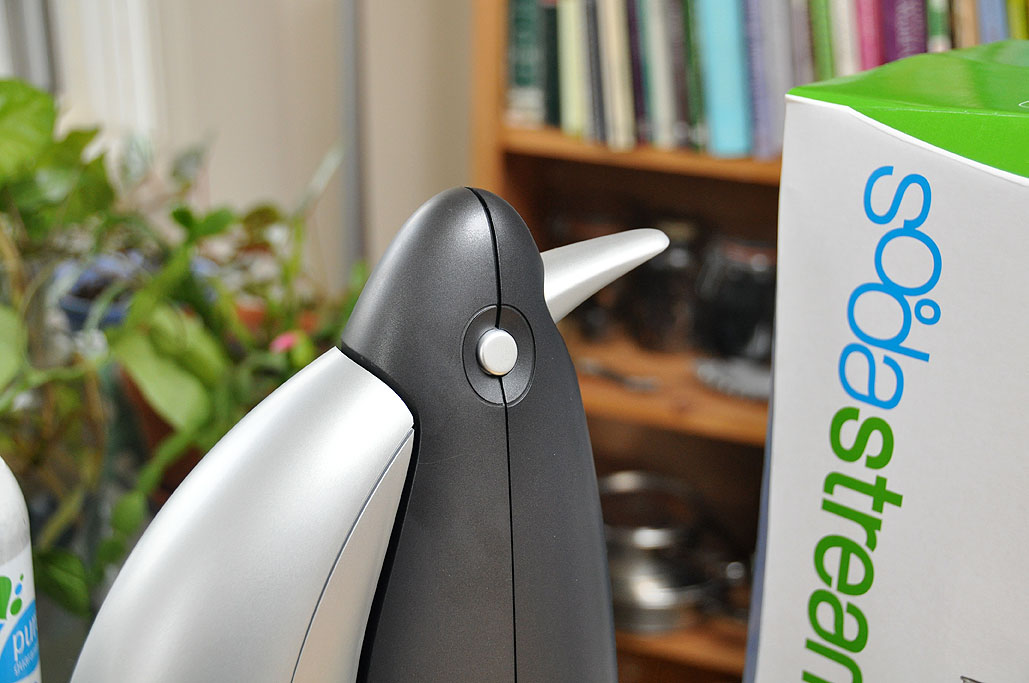
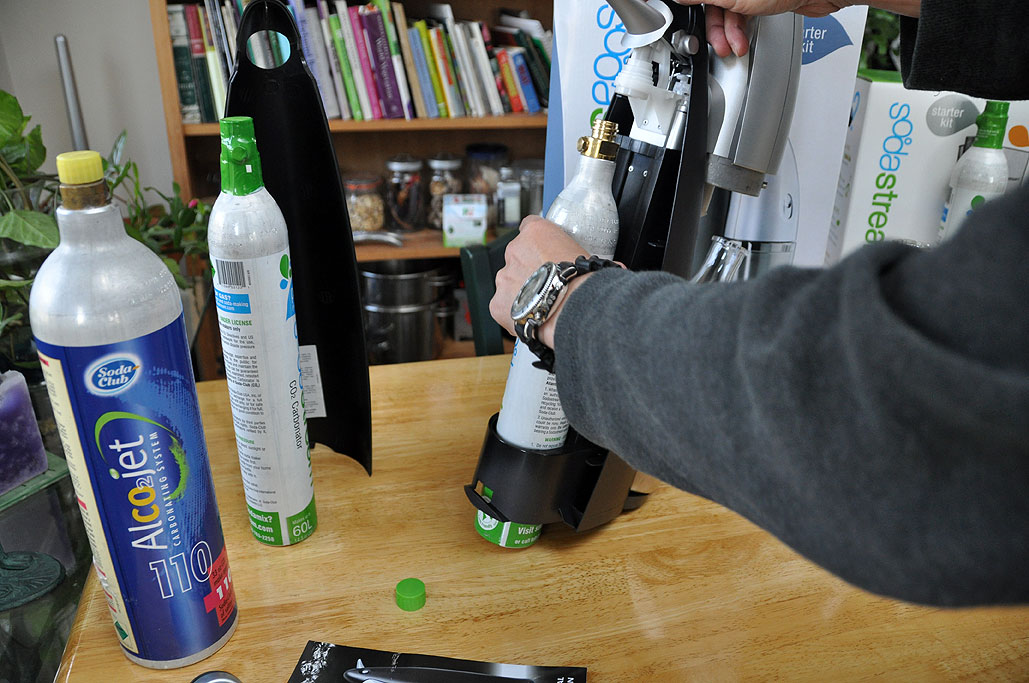
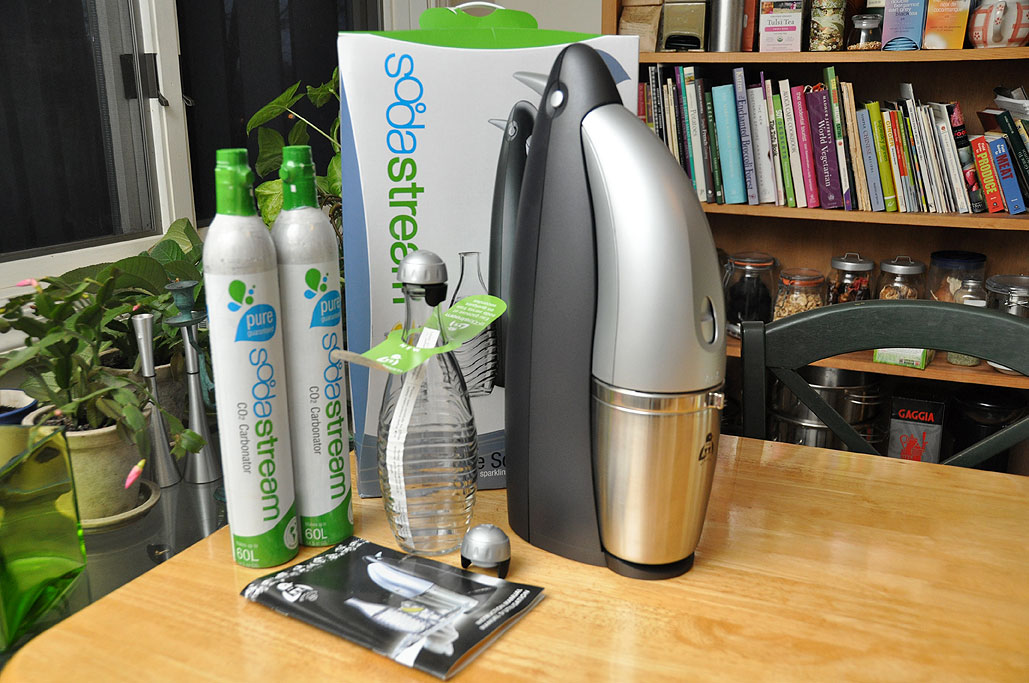
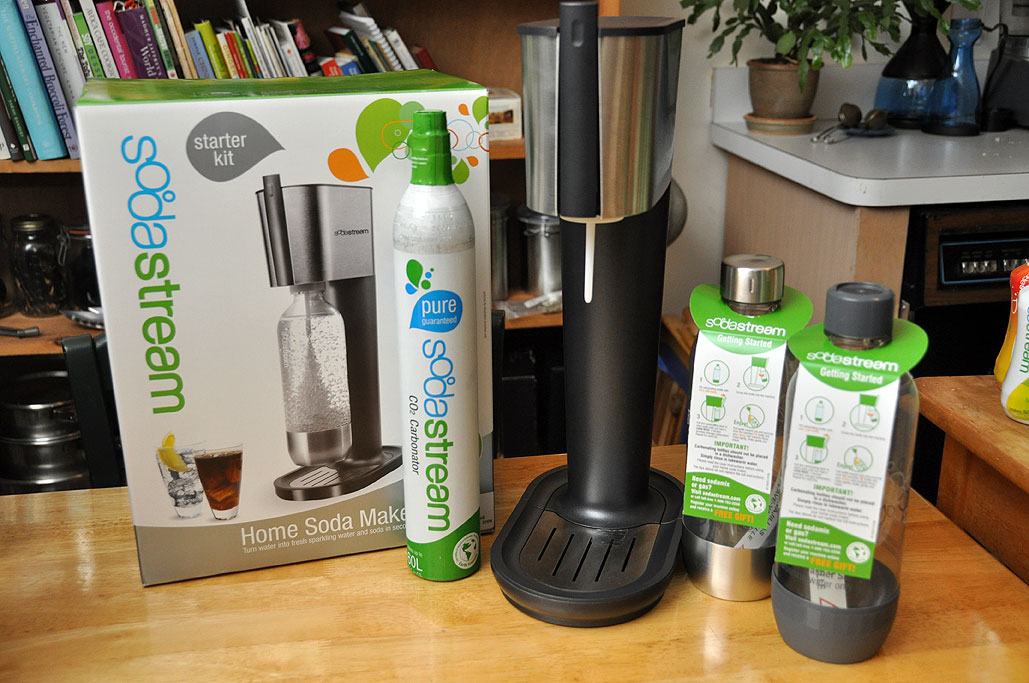
Last week we posted a quick mention of the new Soda Stream machines. Today we are going to take a FirstLook at the Penguin unit. The "Starter Kit" comes with the carbonator, two CO2 cartridges, two glass bottles/caps, and an instruction booklet. The unit comes pretty much assembled. The only thing to do is to insert the CO2 cartridge and the system is ready for use.
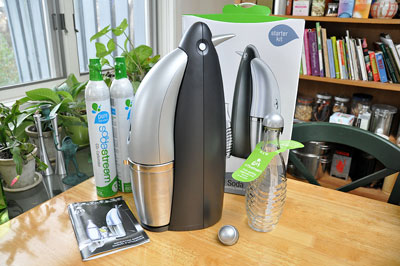
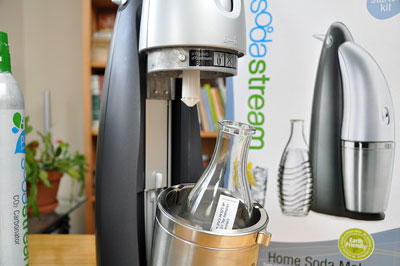
The Penguin is the only unit in the Soda Stream line which supports the use of glass bottles. The glass bottles are sized specifically for the Penguin. The bottles have a textured pattern for a sure grip and a hexagonal lip that accommodates the slip-on reusable screw-down cap.
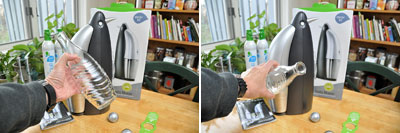
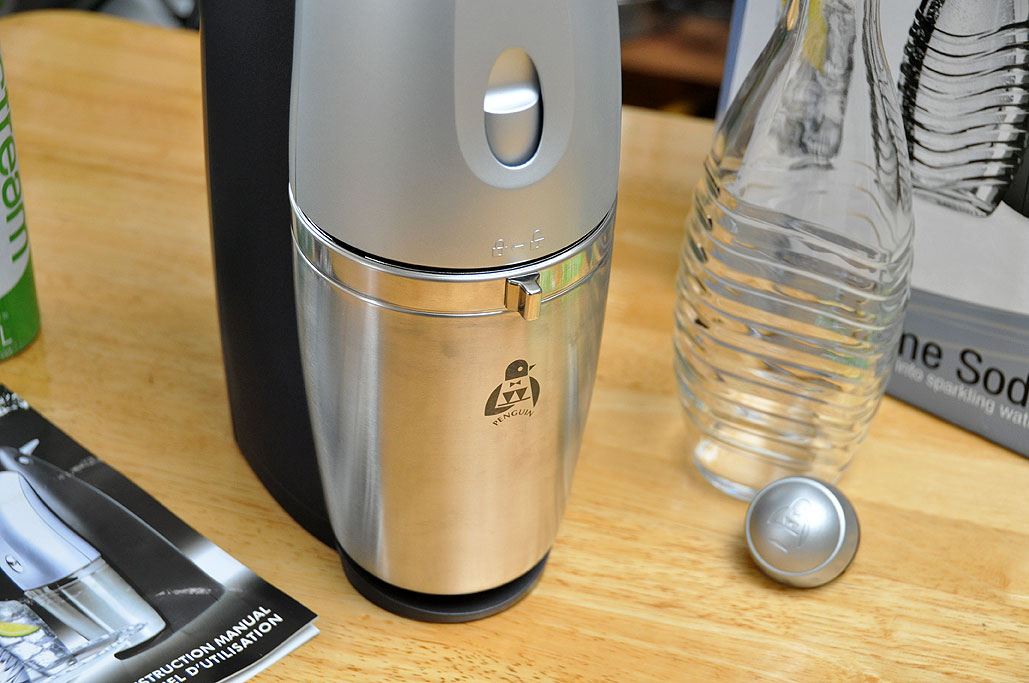
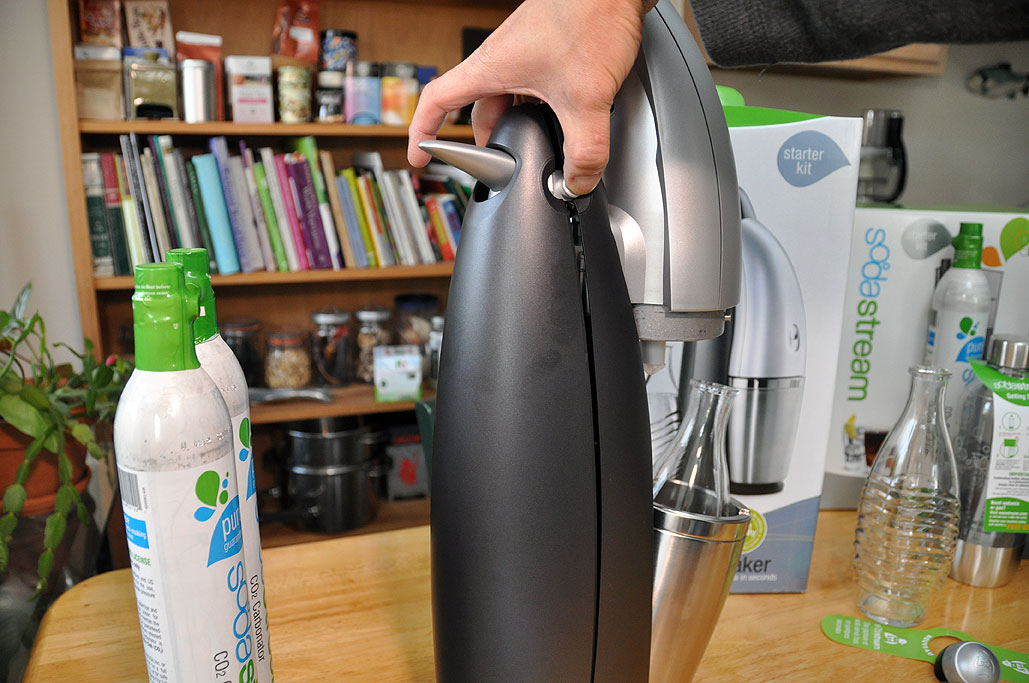
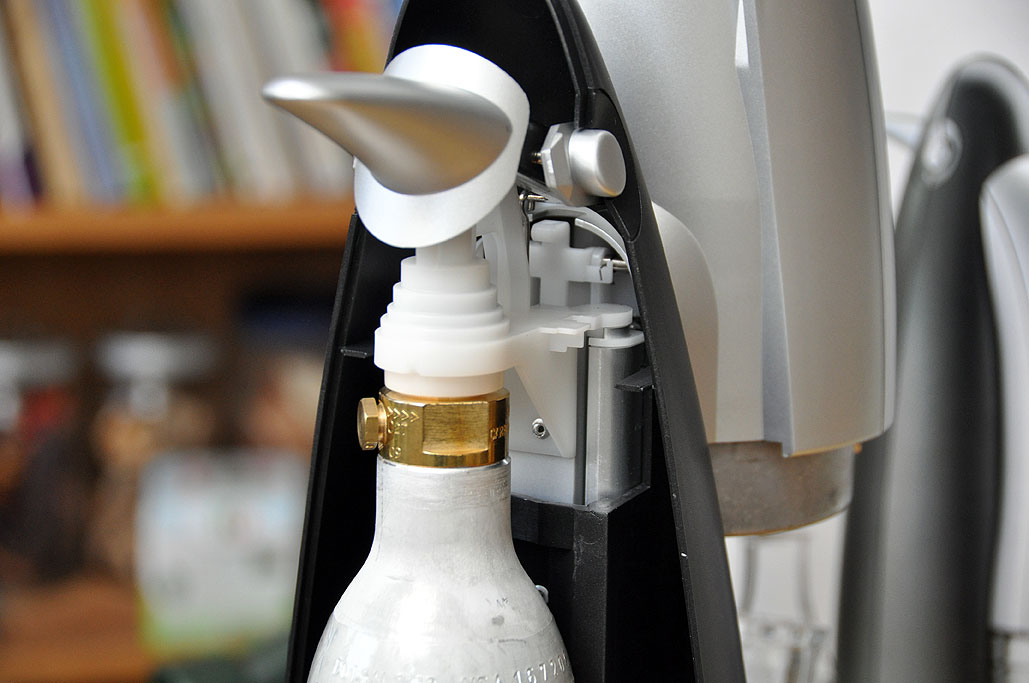
Unlike the older unit, this carbonator completely encases the bottle while it "does it thing." This is a really good safety-conscious design decision on Soda Stream's part, because glass is a funny thing. Glass is a solid. Techically, it is an amorphous solid. And as such, it has no crystalline structure. If glass does break, it can create some pretty sharp edges. The Penguin was designed to reduce the likelihood of injury should there be an issue resulting from "over-carbonation" or "bottle malfunction."
For obvious safety and liability reasons, Soda Stream only recommends their own specific bottles for use with their Penguin carbonator. The interns are, of course, not bound by such constraints and will be trying it with all kinds of bottles and containers :-) Whether they will be able to tell anyone about their "experiments" will be up to our Legal Department. Common sense should be the rule when using the Penguin lest one wants to be a nominee for the Darwin Awards.
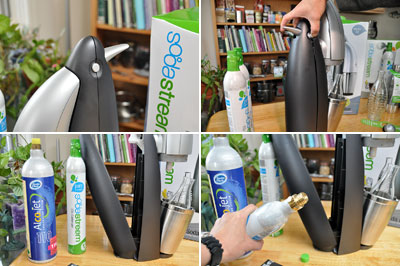
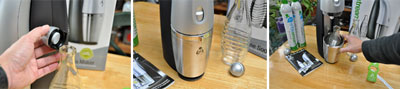
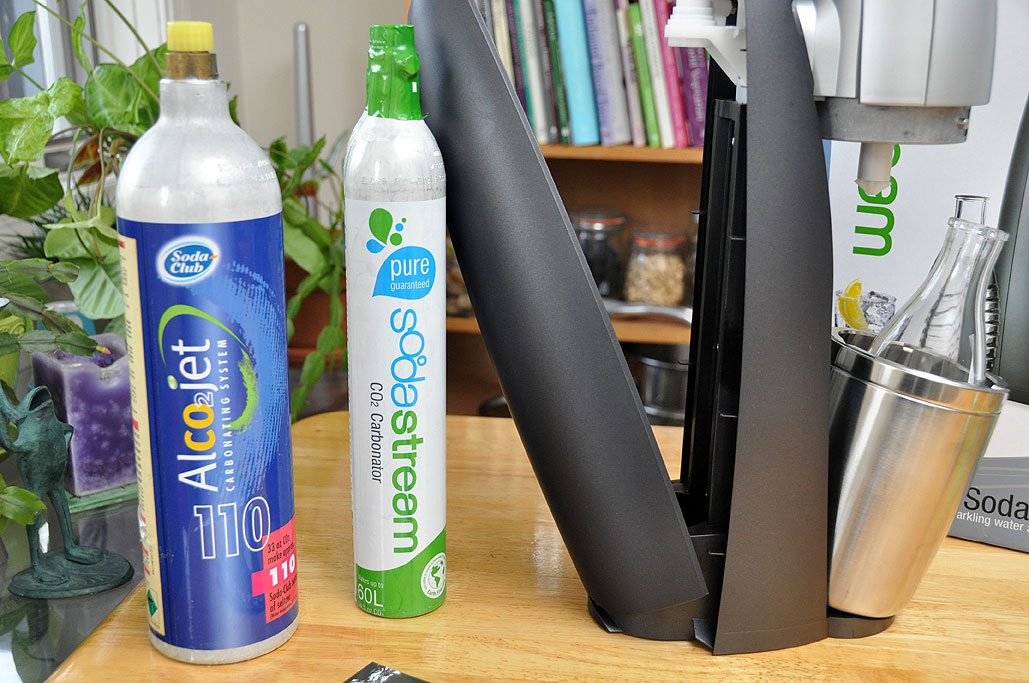
The Penguin gets its name from the carbonator's profile and color scheme. The "beak" is the lever for releasing the gas into the bottle. The "eyes" are the release for cover of the CO2 cartridge housing. The newer cartridges are slimmer than the ones we use with the older unit. The slimmer cartridges does allow the carbonator to be smaller, but it obviously contains less compressed CO2 and thus will need to be replaced more frequently.
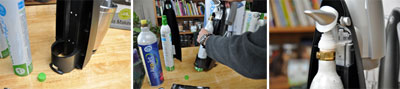
Installing the CO2 cartridge in the Penguin is easy: open the back cover, insert the cartridge, screw the cartridge into the connector. There is not much that can go wrong with the sequence.
Overall, we really like the funkier look and sturdier build quality of the Soda Stream Penguin as compared to the Edition 1. The glass carafes are definitely a nice alternative to the plastic bottles. However, if you have an "active" household, the liter-size plastic bottles may be more practical. The only slightly negative comment we heard was directed at the plastic "helmet-shaped" bottle stopper. We have to admit that the caps do not really fit with the look of this higher-end system. The interns have offered to look around for a more attractive alternative. We'll keep you posted :-) [Permalink] -SodaClub Penguin FirstLook
|
|
|
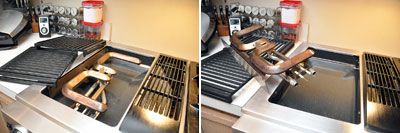
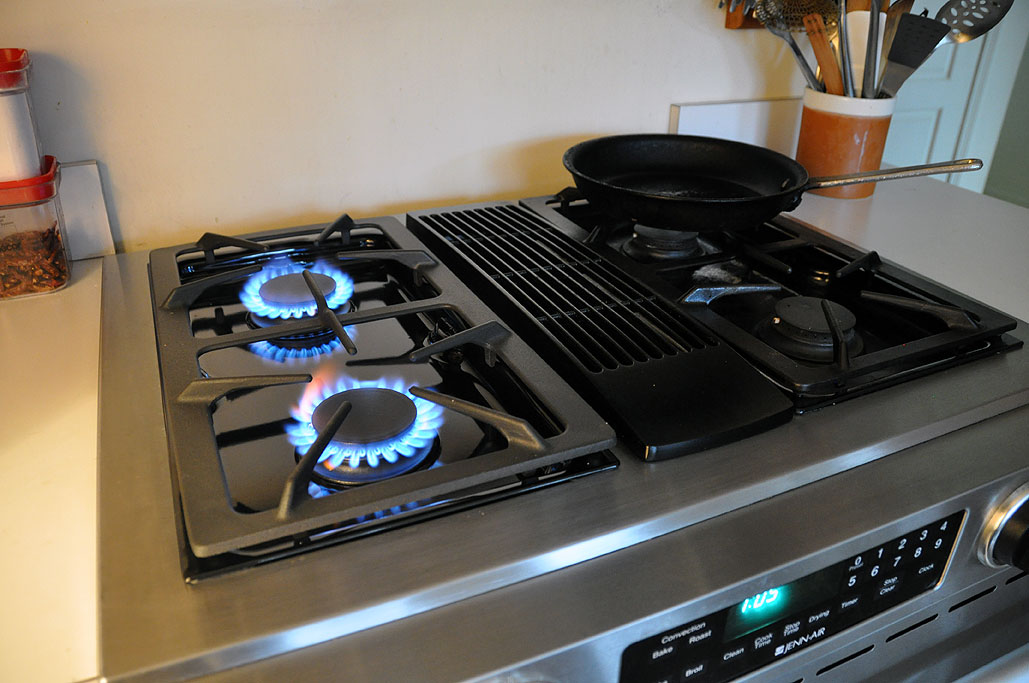
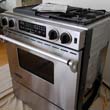
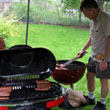
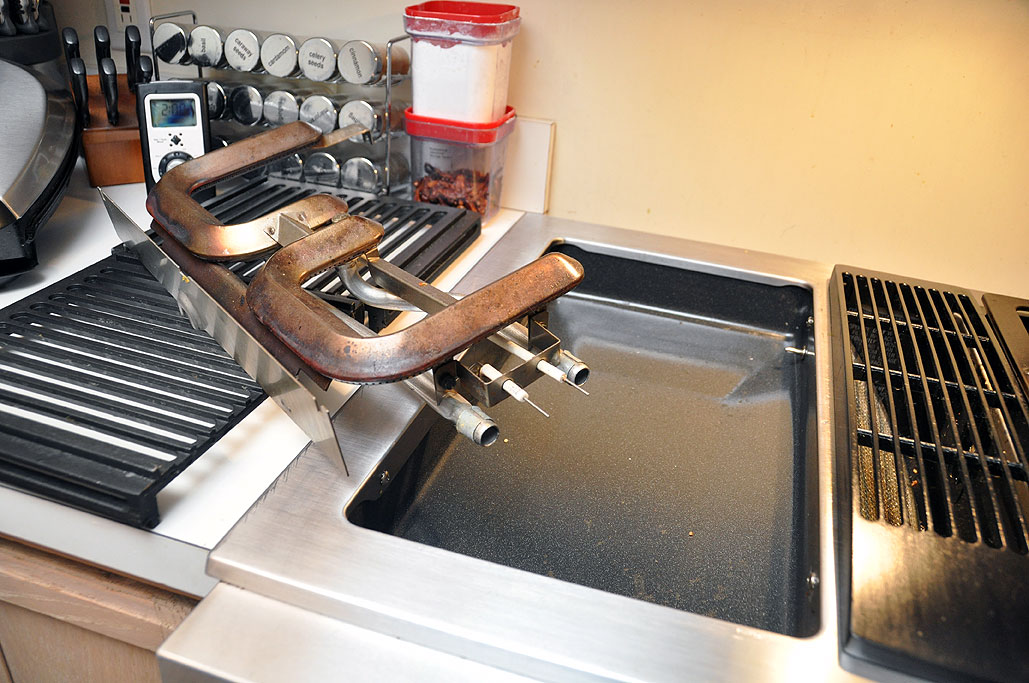
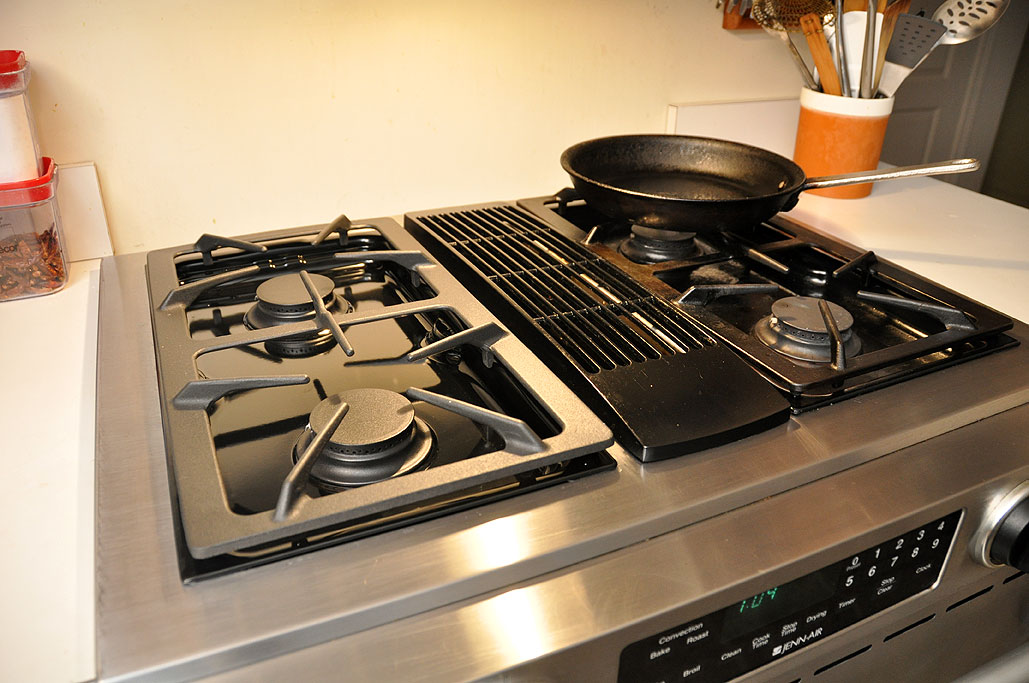
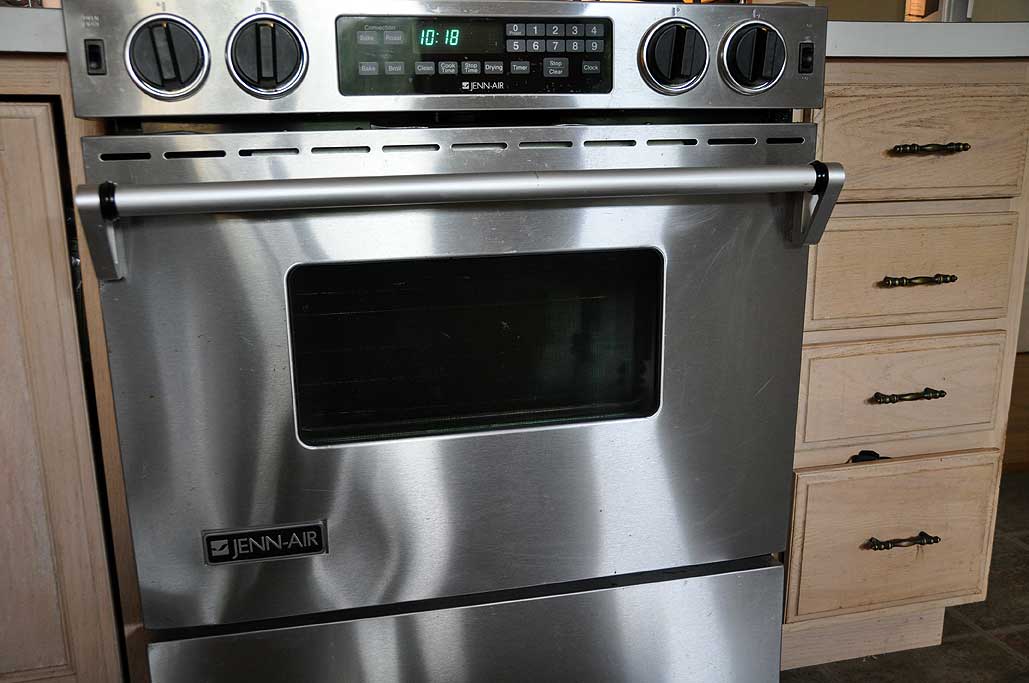
The RainyDayKitchen's new (well, new to us) Jenn Air stove has been getting a constant workout since it was installed over a year ago. However, after using it for more than a year, we realized that we did not use the grill section as much as we thought we would.
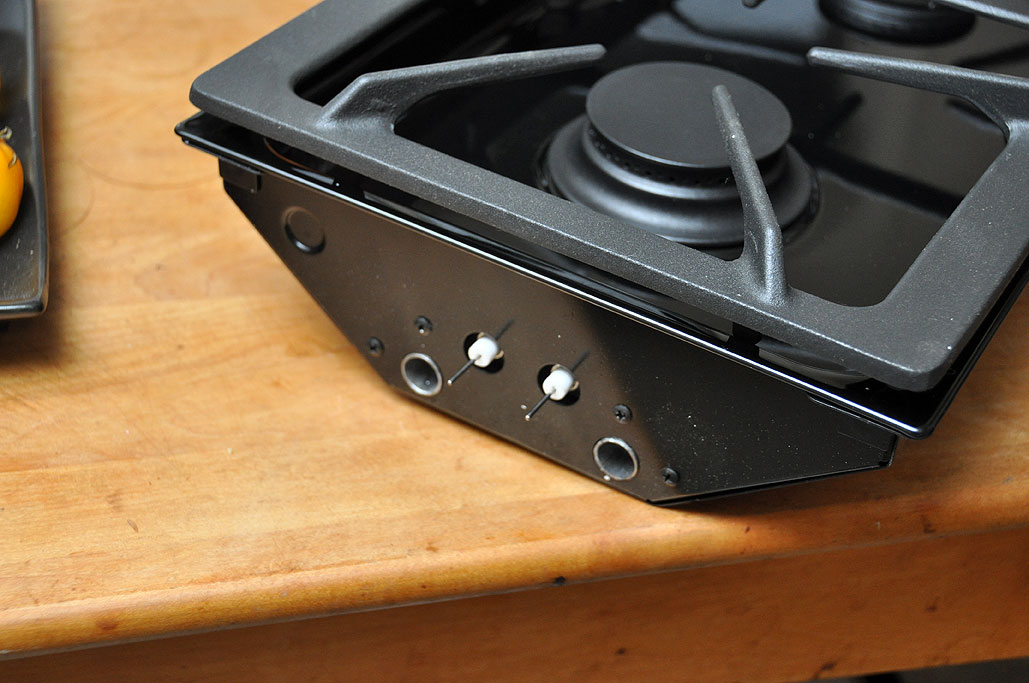
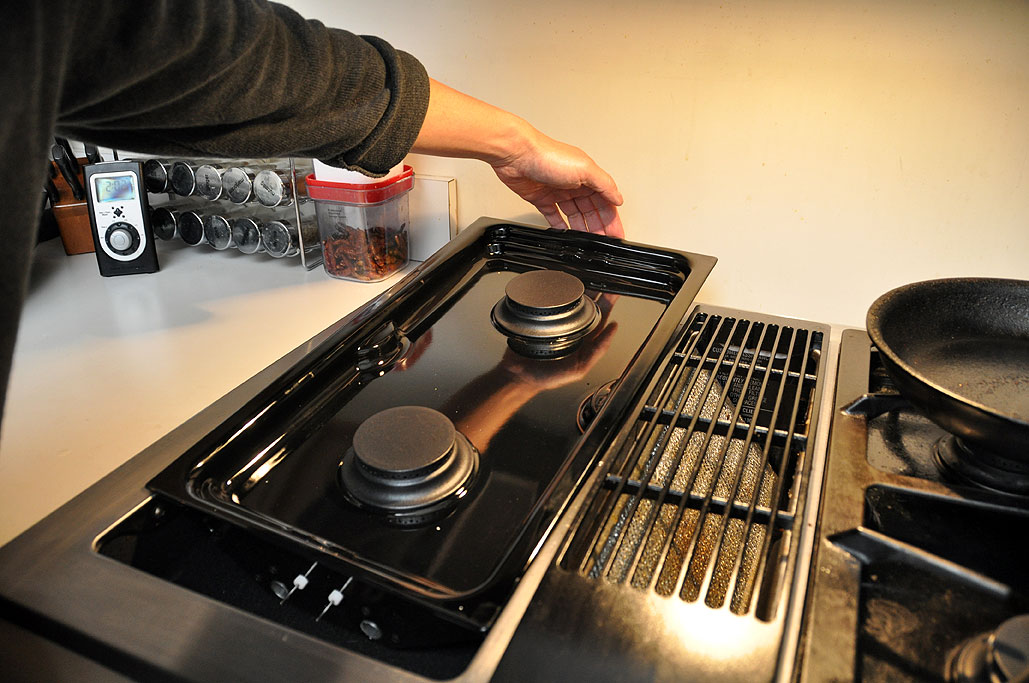
One of the many great things about this Jenn Air range is the easily swapable burner modules. The first step is to remove the grates, the next is to slide out the grill cartridge. No tools are needed to change out one unit and change in another. This design makes it easy to clean the sealed drip burner surface and simple to repair or replace the modules.
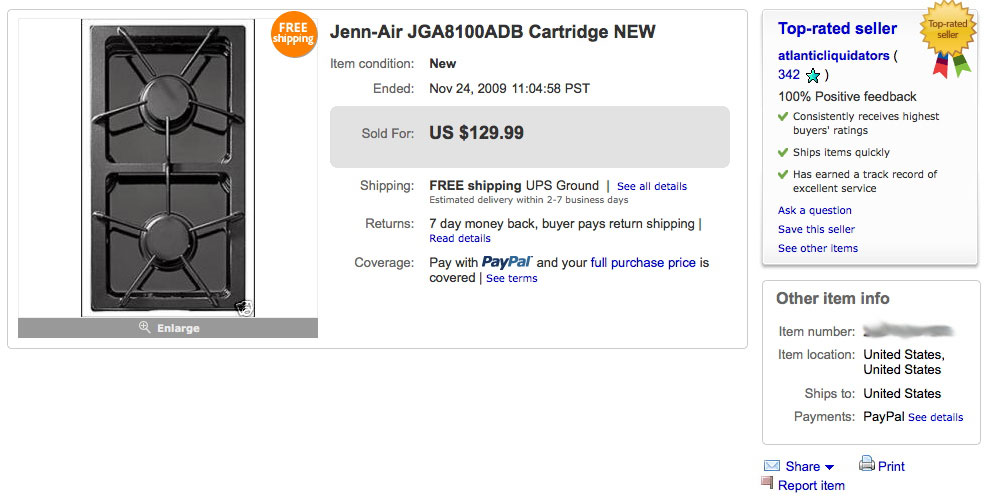
We did some online research for the best prices on a two-burner module. The best price we could find was around $130. This was almost half of the price of many of the other retailers. When an online deal is too good to be true, it sets off our "scam alerts." One way to to a background check is to see if there is a "complaint site" set up about that company. The easiest way to find such a site is to Google it with the phrase " company xyz.com complaints", "xyz.com problems" or some such variant.
We did just that for the online store in question (btw...we are not naming names because we have no direct experience with that seller, so it would not be fair to pass on hearsay) and found that they had a REALLY BAD reputation regarding returns. Normally we would not care as long as the item works. However, it was clear from the posts that this company often immediately charge the credit card, ships out the wrong or defective parts, but refuses to make good via a replacement. Well, no one needs THAT kind of hassles.
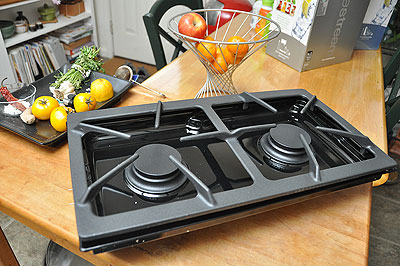
Instead, we went on EBay to see if we could get lucky. There were a few sellers with a two-burner cartridge which would fit our Jenn-Air range. One of them was a Buy-It-Now listing at $129 complete with FREE shipping! This too felt too good to be true. However, THIS seller (AtlanticLiquidators) had a spotless reputation with over 340 sales, so we were pretty confident that they were not some fly-by-night operation. We pulled the trigger on the purchase. Six days later a brand new Jenn-Air cartridge showed up at the office. We have been using EBay for over 10 years and it still amazes us every time we use it.
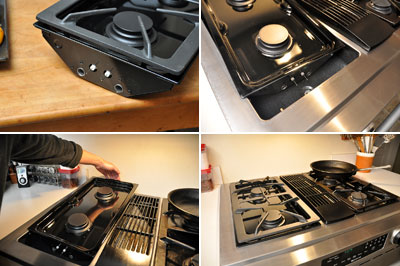
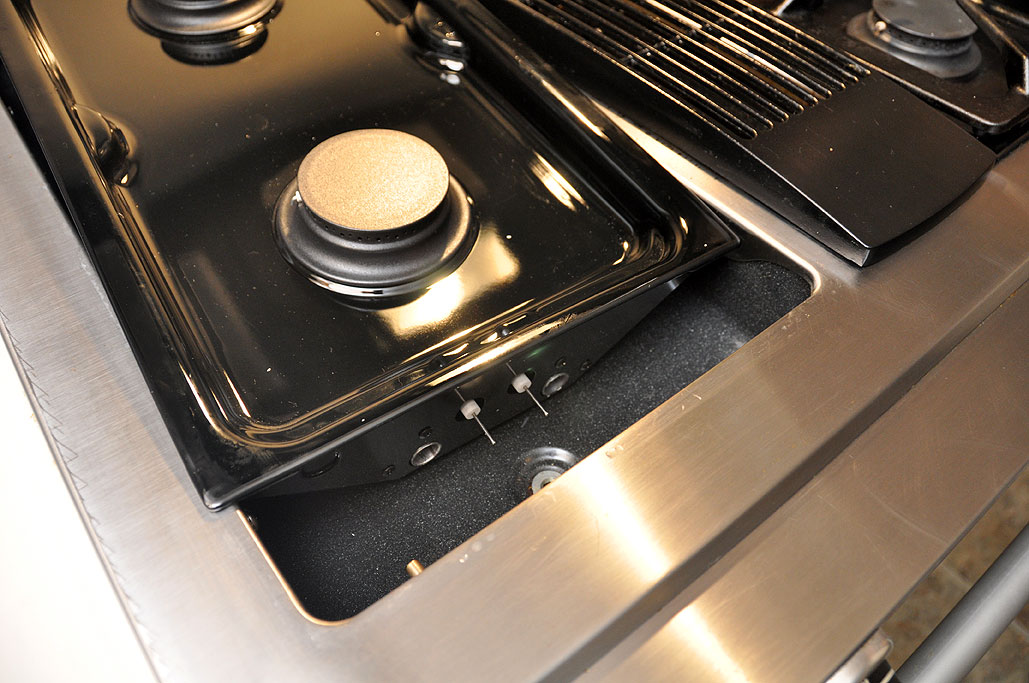
The two-burner cartridge has a set of connections (electric, gas) exactly like the grill module. The replacement steps are: align the connector with the ones on the range, slide the cartridge into place, and place the grate on the burner. Done.
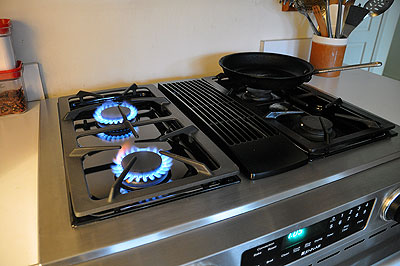
The new burners worked without a hitch. The entire swapping process, from start to finish, took less than five minutes. Check the LED clock on the front of the range if you don't believe us. We now have four burners on the stove, but can switch in a grill unit at a moment's notice. How cool is that? There are other accessories for the stove top (cutting boards, griddles, etc.) that we may take a look at in the future. For now, we are going to enjoy the new "upgraded" 4-burner Jenn-Air range. [Permalink] -Jenn Air Burner Swap
|
|
|
|
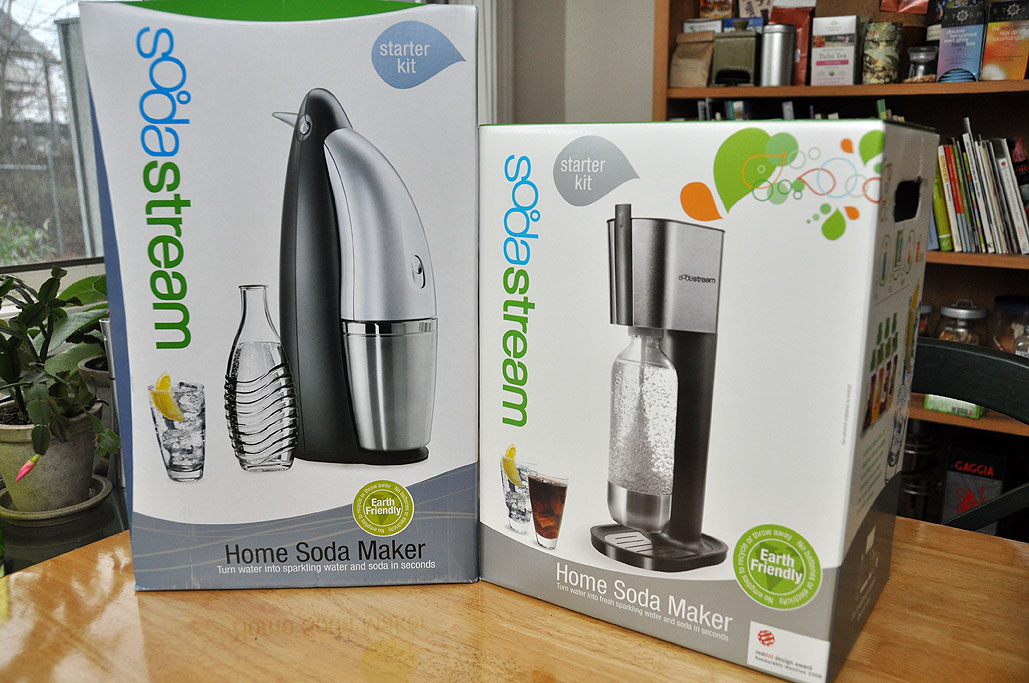
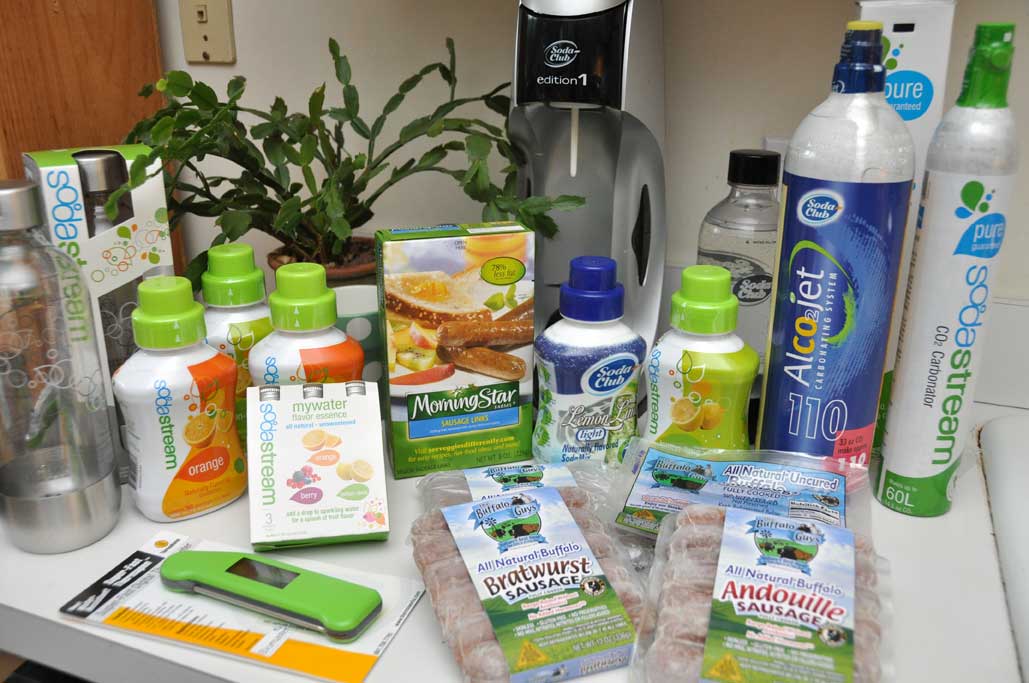
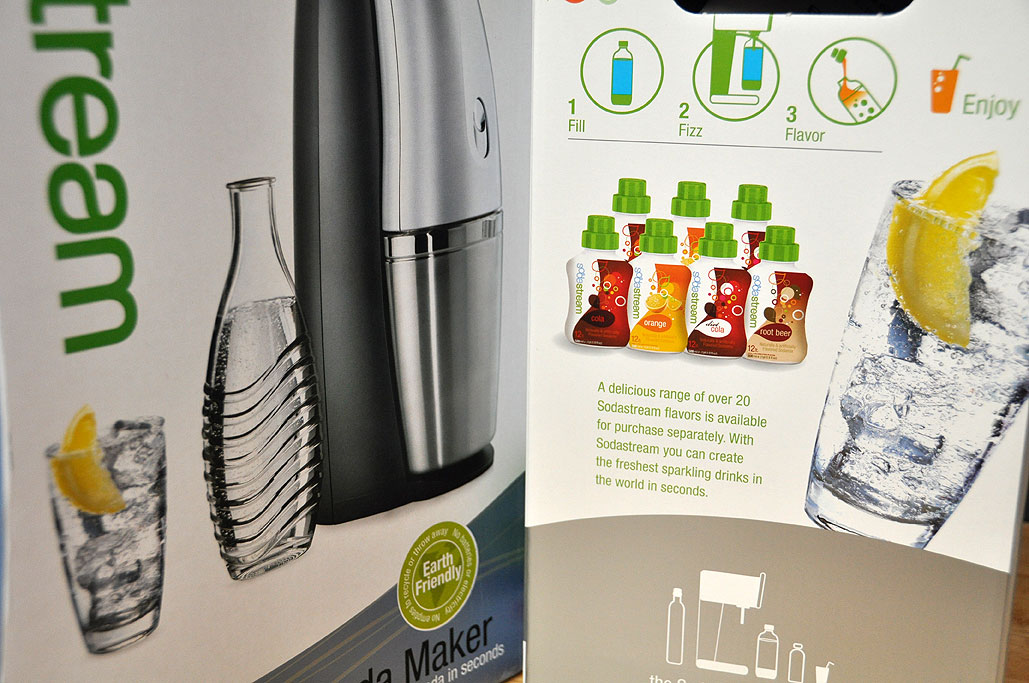
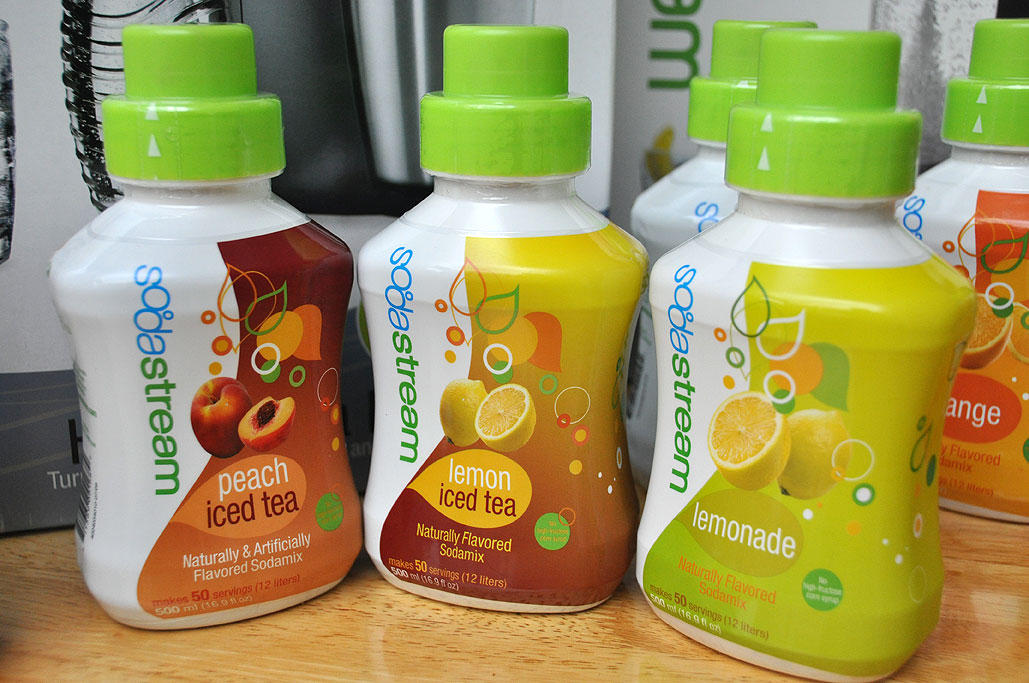
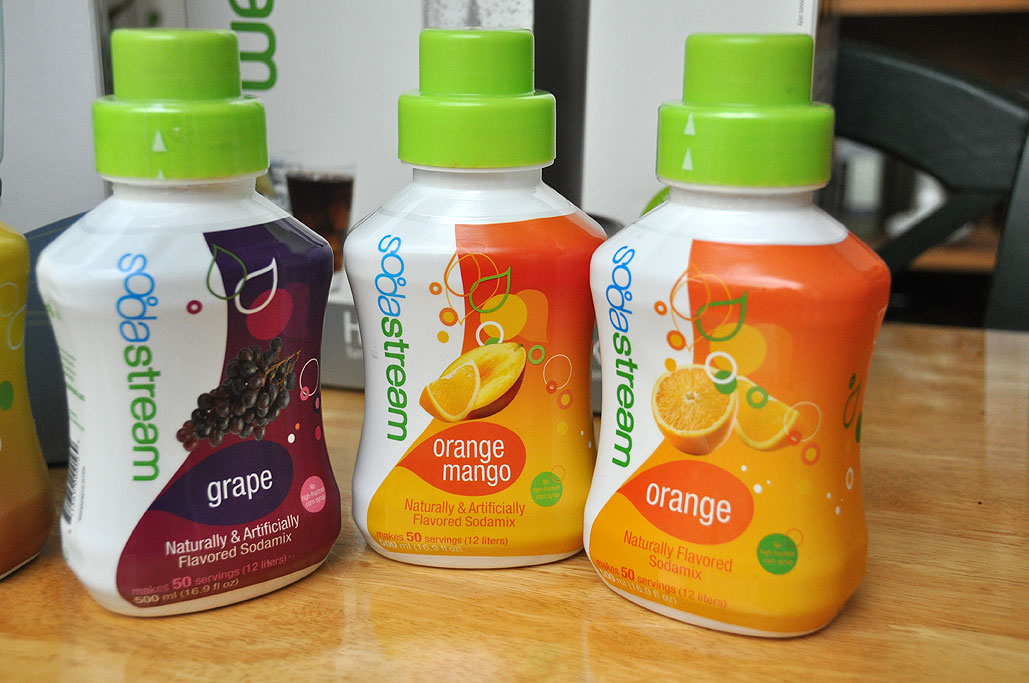
We have had a Soda Club soda maker in the RainyDayKitchen since 2005. It has saved us a LOT of money over the past four years. Even better than saving a boat-load of money was the convenience of making fresh, fizzy soda in whatever flavor whenever we want. Oh yeah, we also created less plastic waste than if we had purchased the prepackaged stuff from the "big guys." Coke and Pepsi...yes, we are talking to you :-)

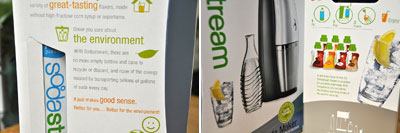
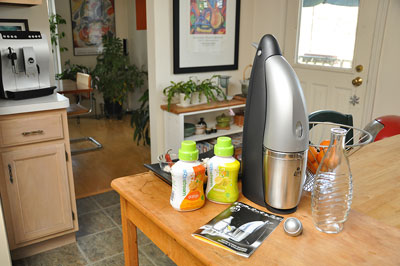
Soda Club has not been standing still these past four years. They now have a full line of soda makers. The RainyDayKitchen folks thought it was time we took a look at some of their new ones. The two we will be reviewing are the Penguin and the Pure. The Penguin soda maker is unique in that it accommodates an elegant glass carafe. The Pure soda maker, with its minimalist approach, was designed to blend seamlessly into a modern kitchen.

Ok...let us say this up front. You cannot make a cola drink that tastes as good as Diet Coke with the SodaStream maker. We have tried, but Coca Cola still has no rivals. HOWEVER, SodaStream's flavors are fantastic. They have a LOT of them and most people will find something they will like. We LOVE the new Orange Mango. The great thing about having your own soda maker is that you can experiment and make your own flavor! Maybe YOU will be able to recreate Coca Cola's secret recipe (it is not patented, only secreted).
We'll take a closer look at SodaStream's Penguin and Pure models in an upcoming FirstLook article. We'll also give you our thoughts on how they compare to the Edition 1 unit we've been using for four years.
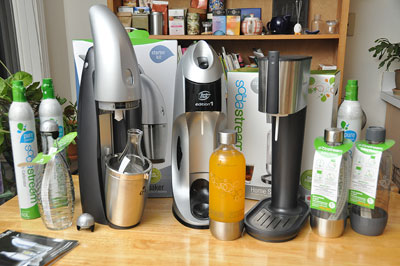
The Soda Club machines are well made and will last a long time. We are pretty heavy-handed with the stuff we use around here, so we know :-) We think the benefits of owning a soda maker makes so much economic and environmental sense that even if you don't drink a lot of soda each year, it may still be a worthwhile addition to your kitchen. If you do buy any kind of carbonated beverages (fizzy water, sports drink, etc...) then it is a no-brainer investment. [Permalink] -Soda Club
|
|
|
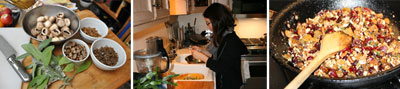
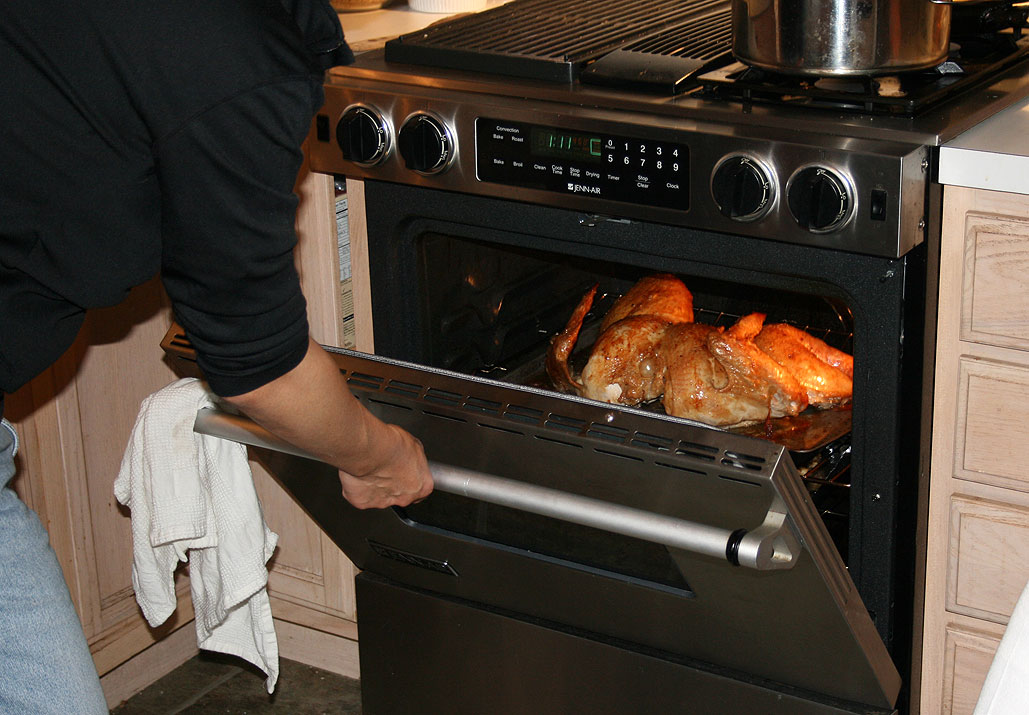
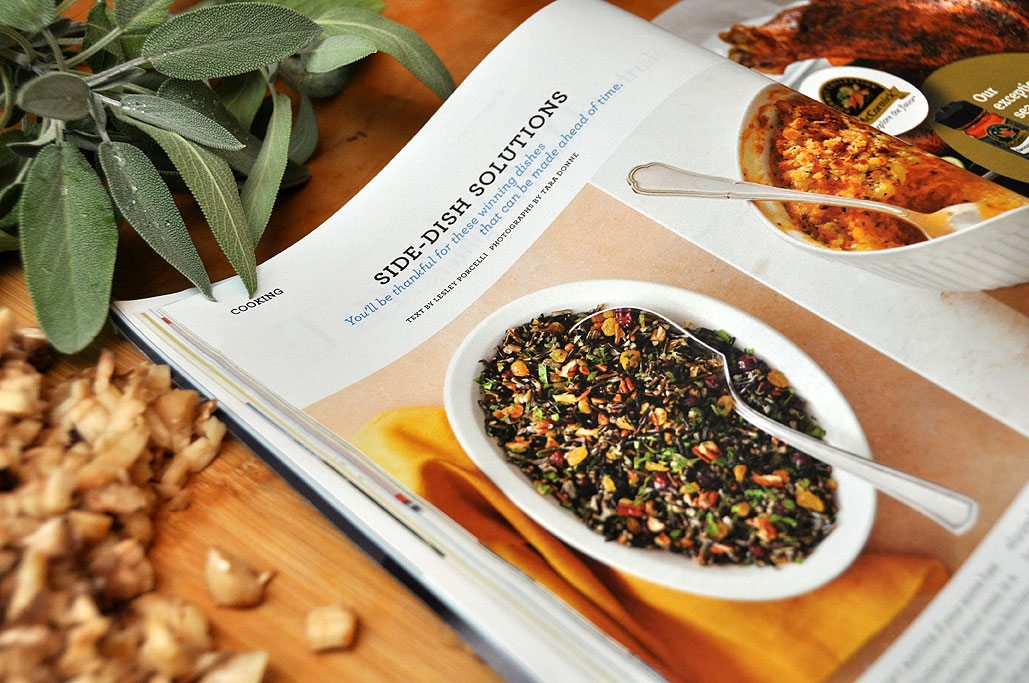
Intriqued by the "Roast a turkey in 70 minutes" article in the November Martha Stewart Living, the crew decided to incorporate some of the recipes from that issue into this year's RainyDayKitchen Thanksgiving event.

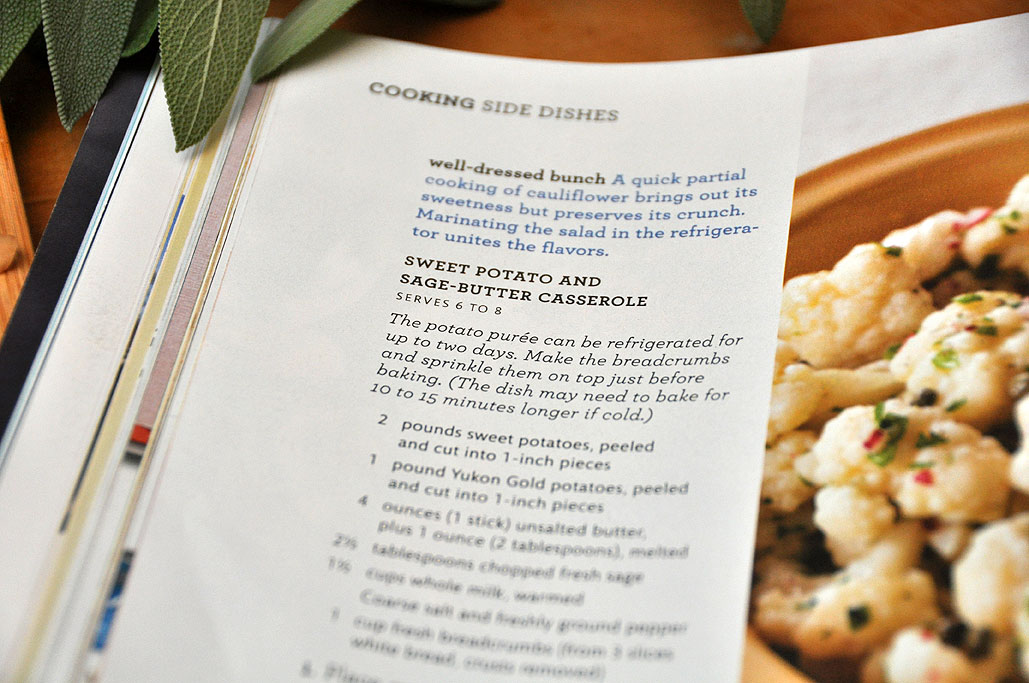
The dishes chosen from Martha's Thanksgiving menu included the wild rice with cranberry and pecan, sweet potato and sage-butter casserole, and roast spatchcocked turkey. The menu also had the traditional fixings such as green beans, sausage stuffing, and a mushroom pie for the turkey-free.

Normally, we would try out a recipe before serving it at an event, but there was not enough time to do a test run, so we placed our faith in Martha and went "all in." The rice and potato casserole recipes looked pretty fool-proof, but the claim of a 70-minute roast turkey had some of us a little worried. This was because none of us have never spatchcocked a turkey before.
Our schedule had us putting the turkey in the oven by noon and guests sitting down to eat at 2PM. If the spatchcocking ended up being more difficult than we had anticipated or the 70-minute roasting thing didn't work, then we would all be having just sides and fixings for Thanksgiving.
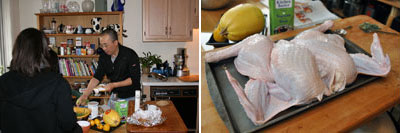
Fortunately, Martha's spatchcocking instructions were flawless and the time estimate for roasting was spot on (with some adjustment for a 15 lb instead of a 12 lb turkey). The only snag we ran into while spatchcocking was not realizing we were trying to cut through a thick piece of plastic holding the backend of the turkey together. Once we worked that out, we were able to remove the backbone and flatten out the turkey.

True to our schedule, the turkey went into the oven at noon. By 1:11, the bird was golden brown. We did a temperature check and found it to be a little under 155º at the thick part of the breast, so we put it back in for another 10 minutes. The next temperature check showed it at 177º. Perfect! BTW, we have to give the ThermoWorks folks a shout-out here. Their new splashproof Thermapen is awesome!
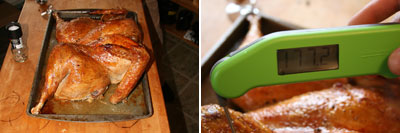

With just 80 minutes of cooking, it meant we didn't have to get the bird in the oven at 8AM. The short cooking time also meant the bird did not need any basting nor did we have to worry about it drying out. Of all of the turkeys we have ever cooked, this was by far the quickest, easiest, and juiciest of the bunch. If you are thinking of roasting a turkey this holiday season...check out the spatchcock method. You'll save a lot of hassles, get better results, and have more time to spend with your guests! [Permalink] -Martha Stewart Thanksgiving
|
|
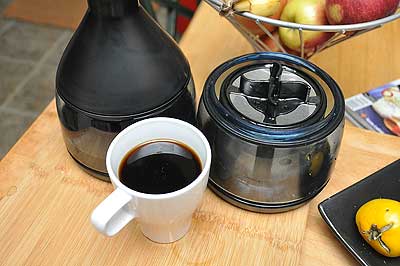
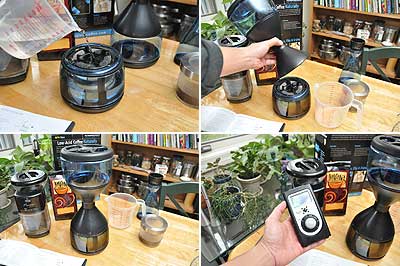
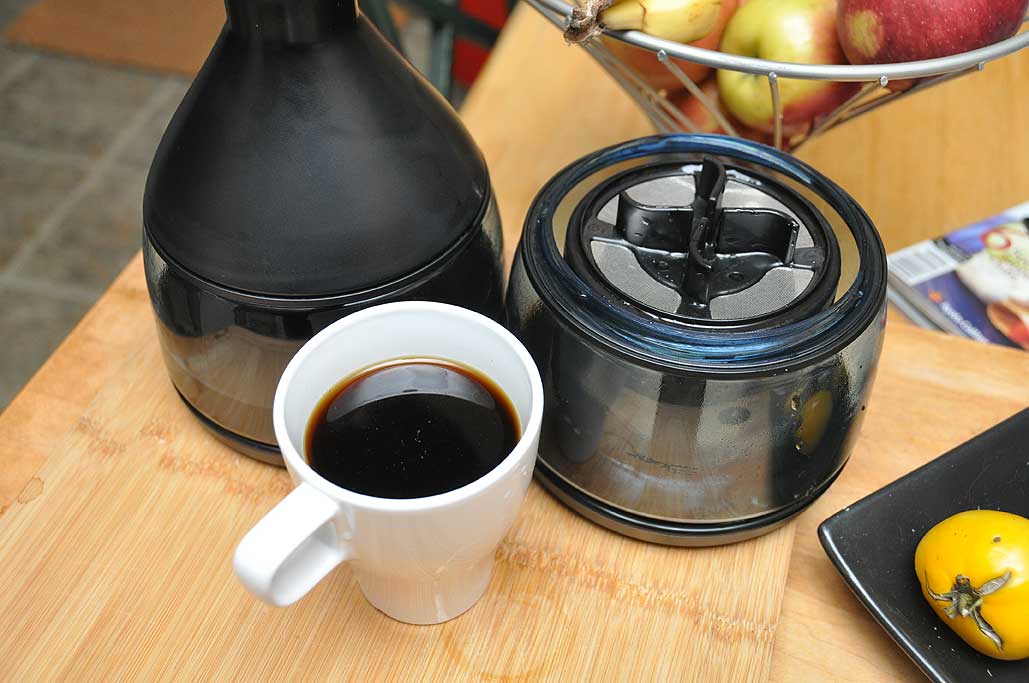
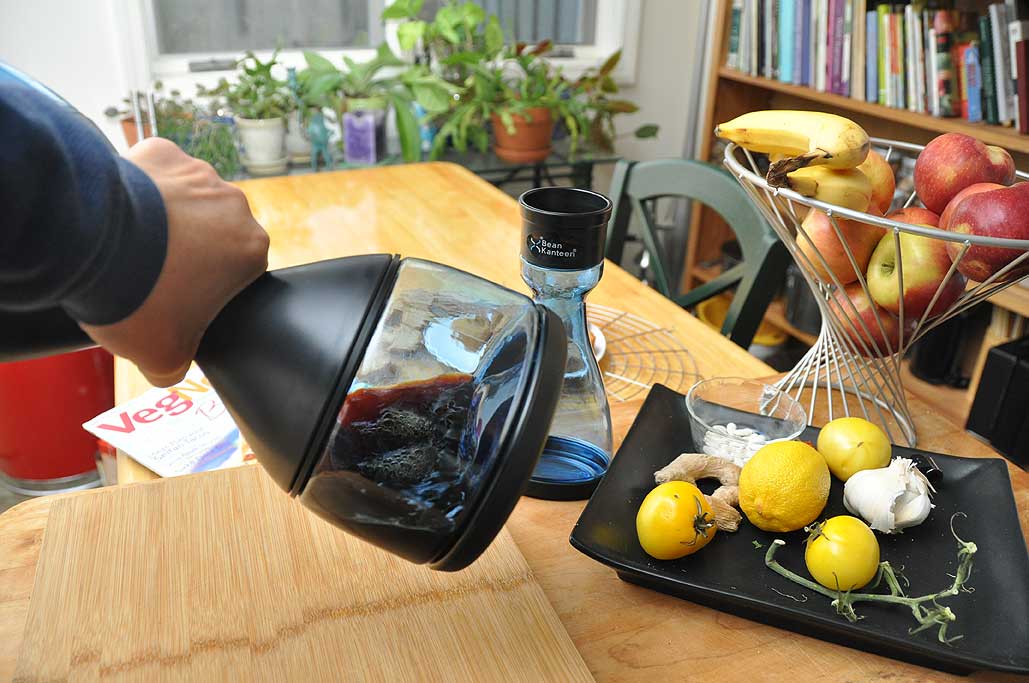
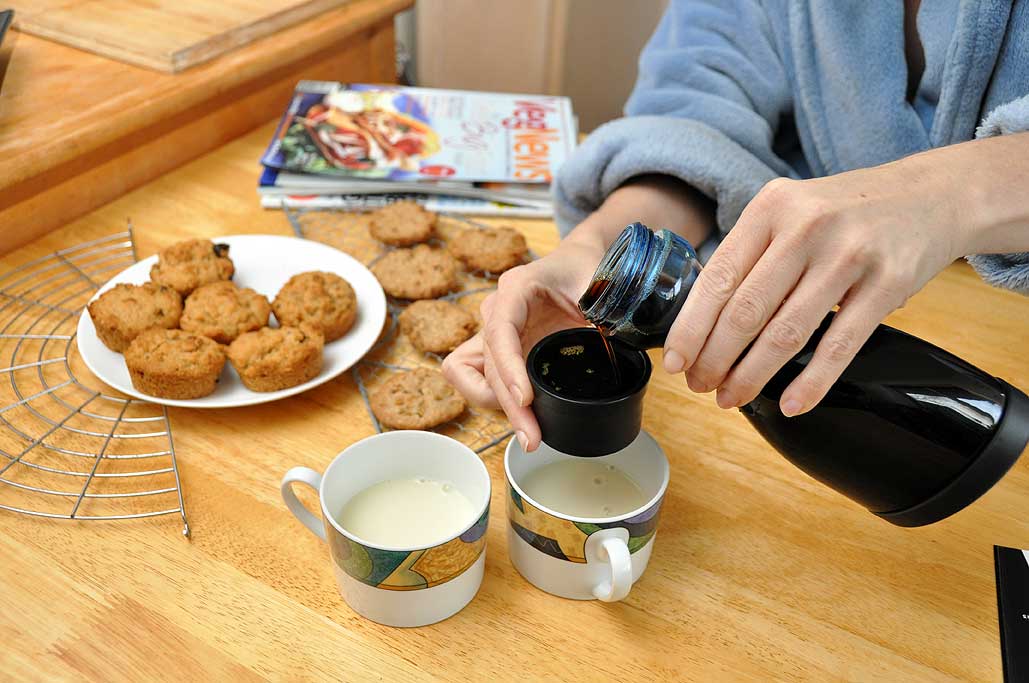
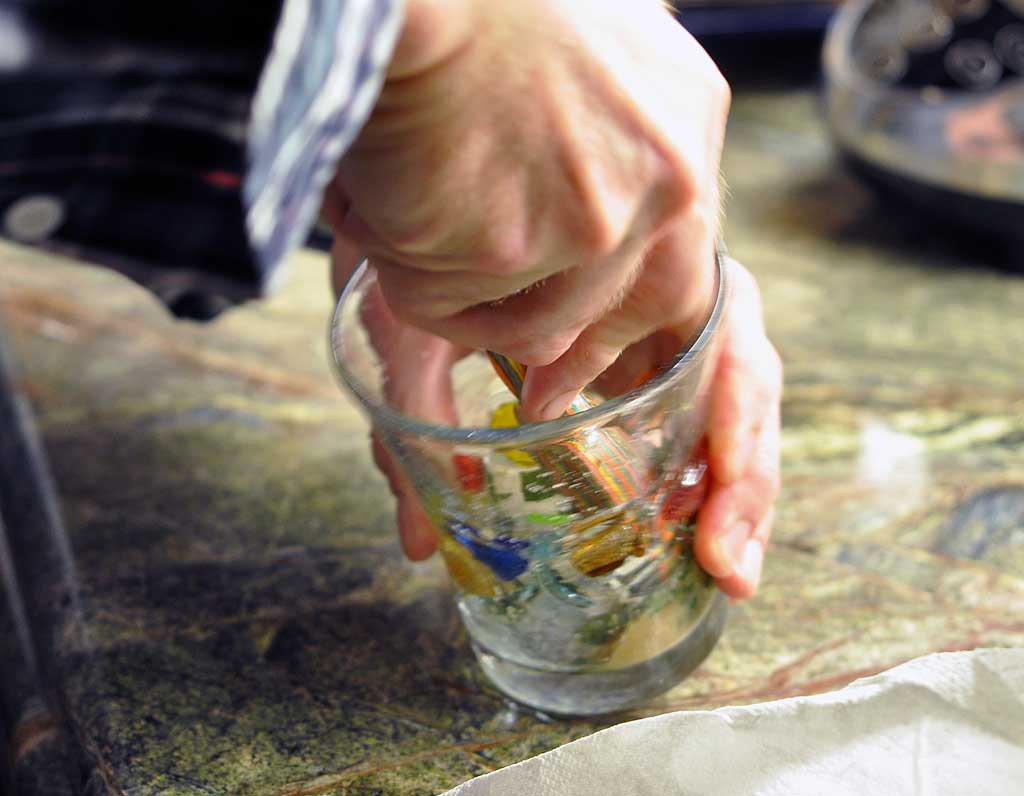
The cold-brewed coffee was ready in 12 hours. The color of the coffee was very dark, but clear. The directions state that for a stronger extract, it can be left to steep for up to 72 hours. We'll try that next. For now, we wanted to see if the we could taste the difference between a minimum brew-time cup of coffee and a "normal" one.
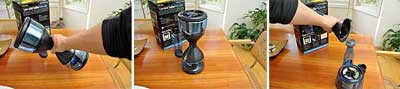
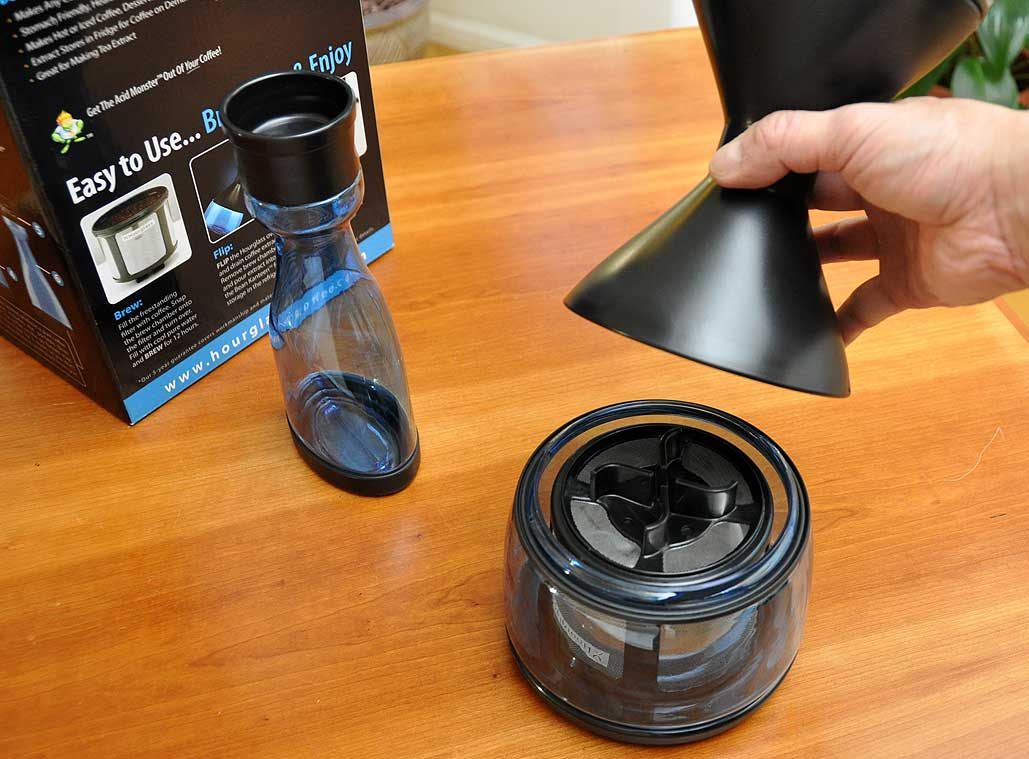
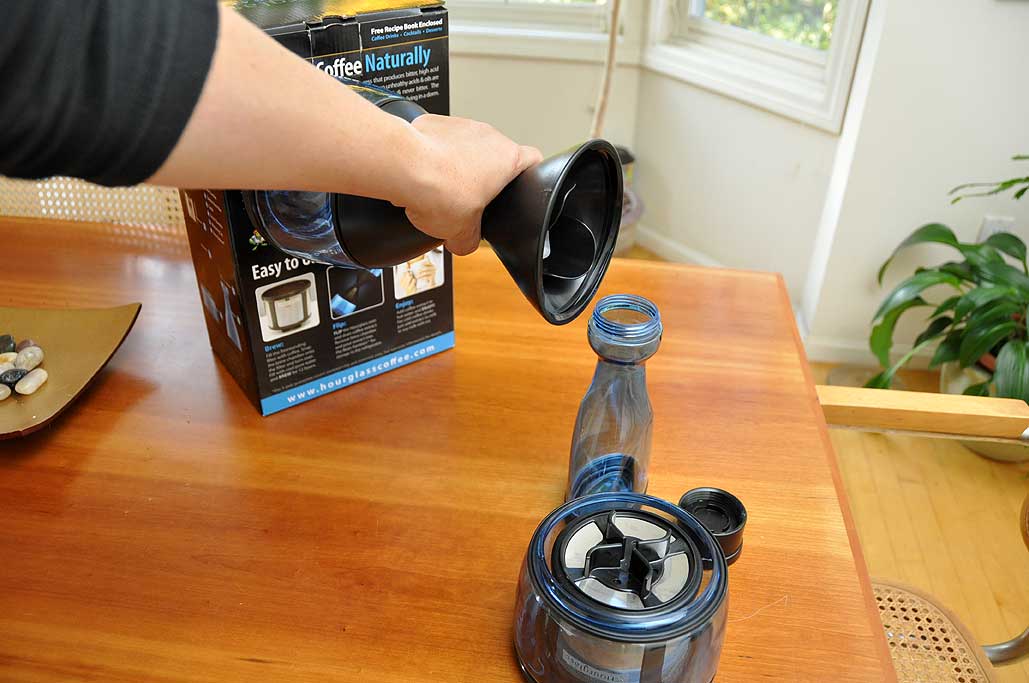
A simple flip of the brewer drained the liquid into the other bowl, ready for transfer to the carafe. Everything worked exactly as designed. No leaks, no mess, no electricity required.

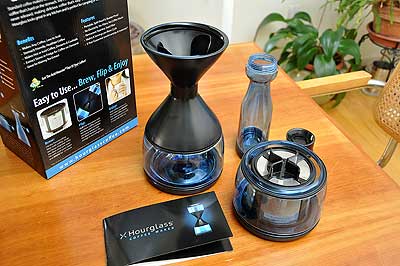
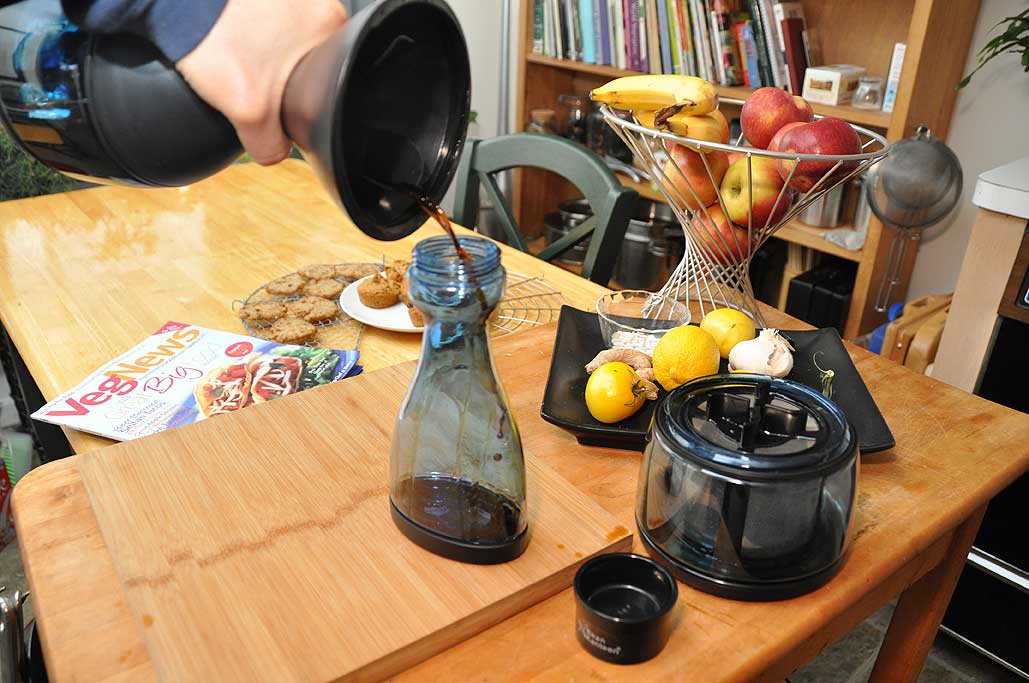
The other end of the hourglass funnel has a pour spout integrated into the design. It probably would have been smarter to do the transfer over the sink, but the spout made it easy to direct the stream into the carafe. One might not have guessed by looking at the bowl and the carafe that their volumes were exactly the same.
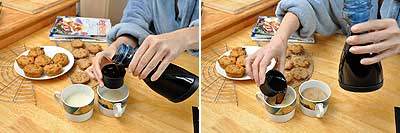
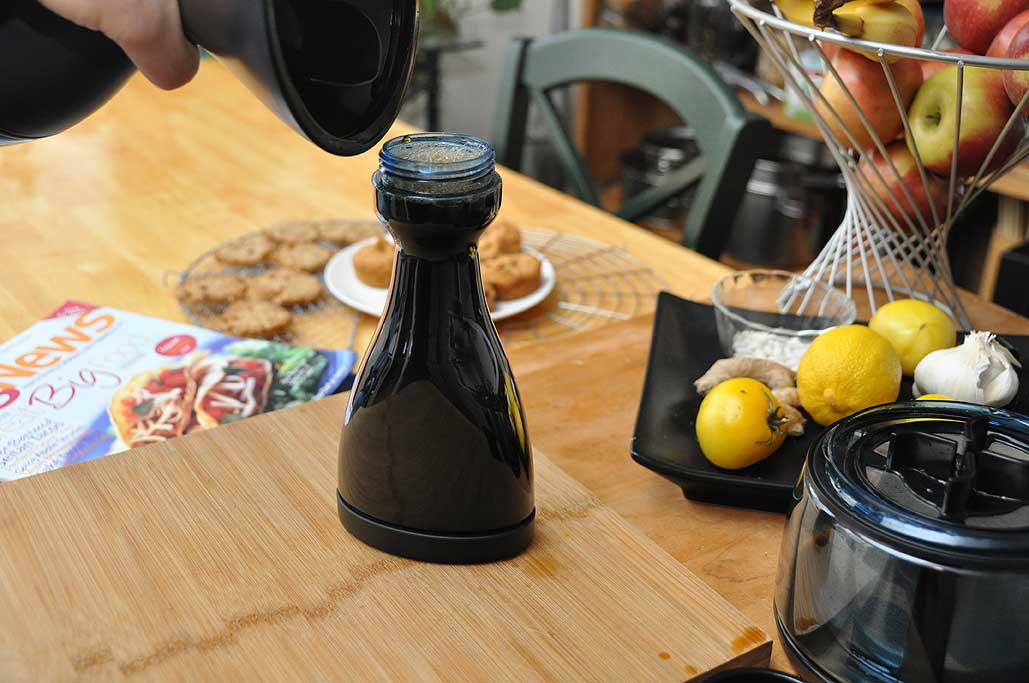
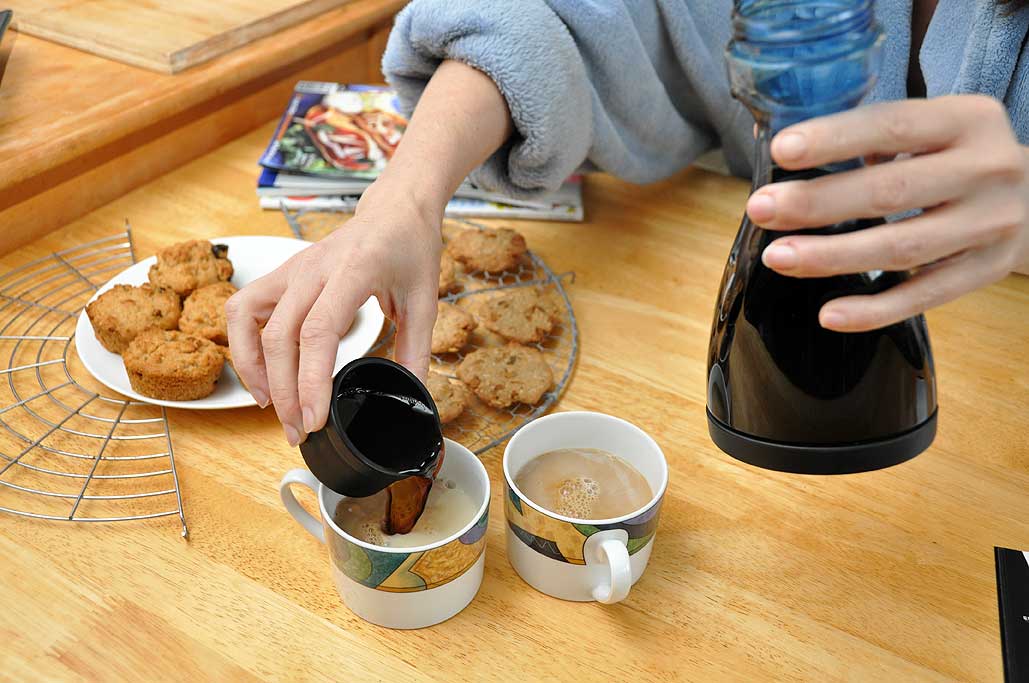
To make the coffee, the top of the cap of the carafe served as a measuring cup. We used one shot for a cup and tried it both straight and mixed with non-dairy liquid creamer. Forty-five seconds in the microwave and the coffee was ready for the moment of truth.
In short, this was the SMOOTHEST cup of coffee we have ever had. The taste was rich and had absolutely no trace of bitterness. We think we have a new way of making coffee and will be serving it to our guests this Thanksgiving. [Permalink] - Cold Brewed Coffee FirstTaste
|
|
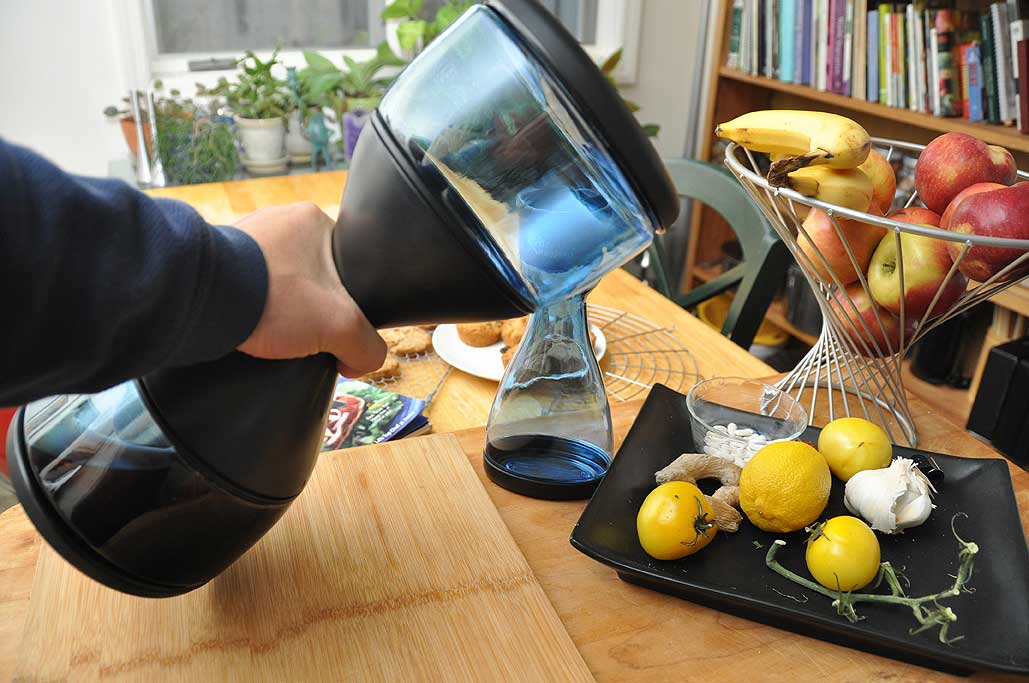
We had a lot interest regarding the Hourglass Brewer, but had to put its FirstUse off a few weeks due to the pre-Holiday schedule. It seems every year the Holiday season starts earlier and earlier. However, due to the requests for it, we shifted some things around and did the FirstUse test this weeked. Timing was perfect as folks were testing some new (vegan) muffin and cracker recipes.
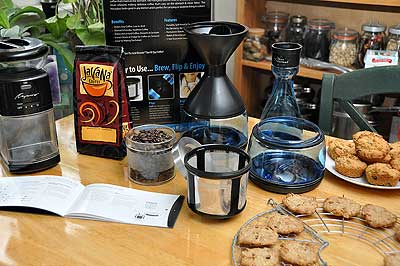
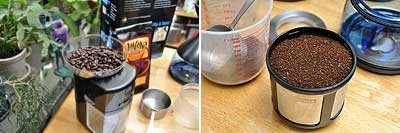
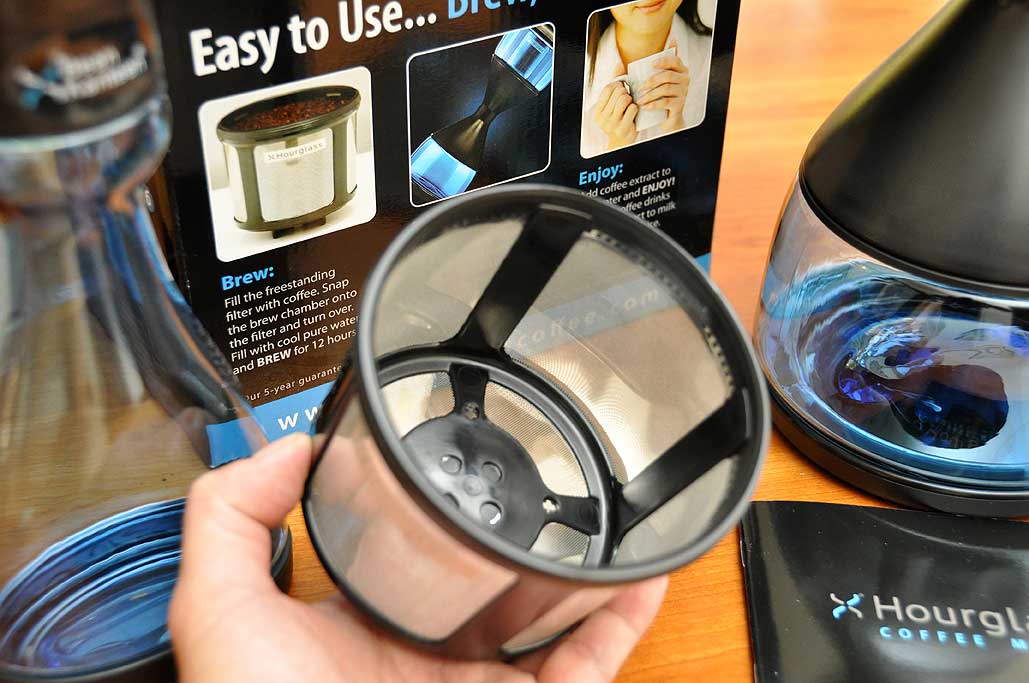
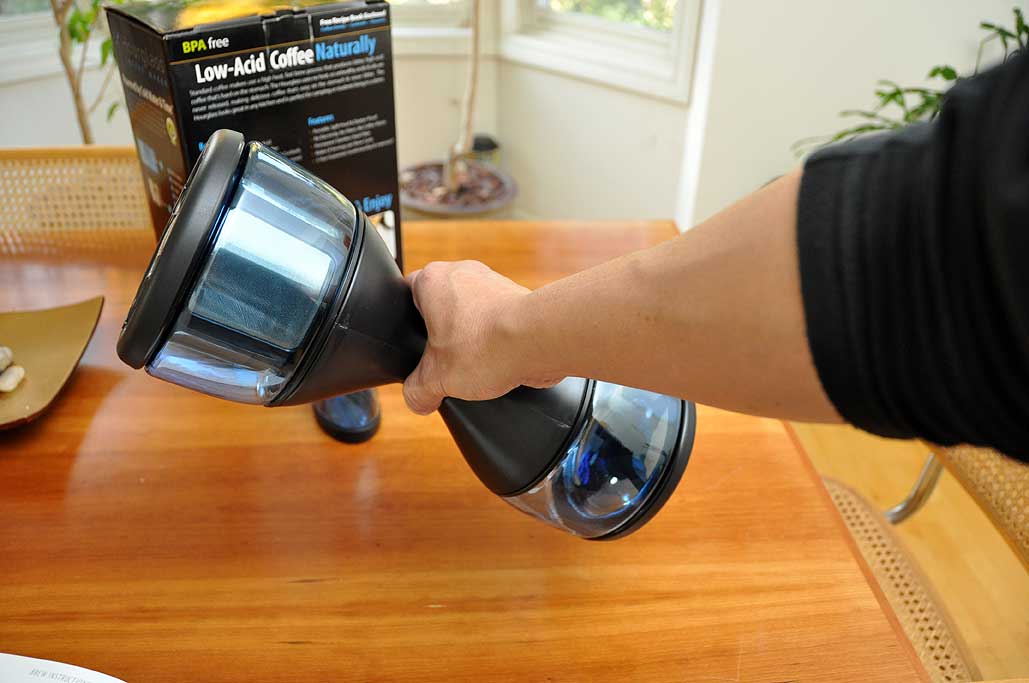
The setup for brewing was quick and simple. We followed the "coarse" grind recommendation for cold-brewing. The brewer's filter will hold two and a half cups of ground coffee. This Hourglass Brewer was so simple to use that we are confident that next time we do this it will take us just a few minutes.
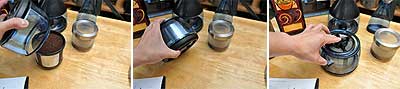
The setup is very simple: fill the filter, secure bowl to filter, flip and add water. The bowl can hold about 3.5 cups of water. This will make a concentrate which can be diluted for about 8 cups of coffee. Once filled, the other part fits over the bowl and acts as a cover. The brewing setup is now complete.
The minimum brew time is 12 hours. We'll let this sit from 6PM to the next morning. One does not have to have a special brewer to make "cold-brewed" coffee, but using one designed specifically for the process does make it easier (and less messy). We think it is worth paying for one if the coffee turns out to be good. In the next segment, we'll discuss the most important aspect of "cold-brewed" coffee...the taste! [Permalink] - Hourglass Coffee Maker FirstUse
|
|
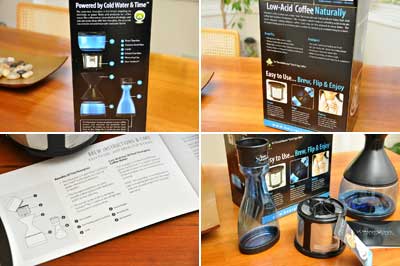
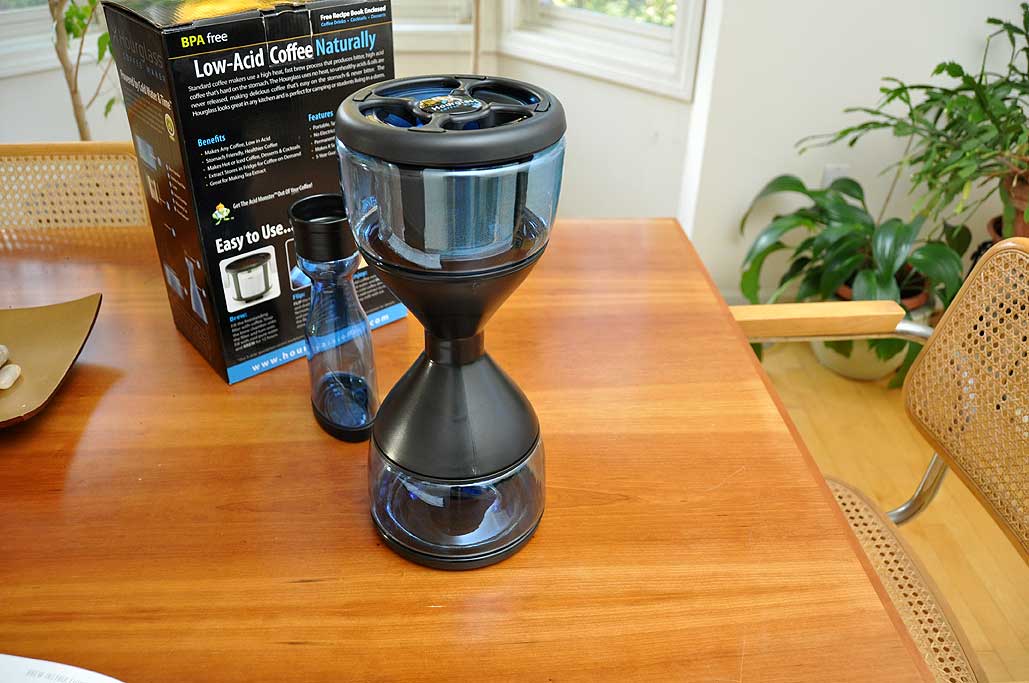
We have some experience with coffee brewers. There are a lot of different ways to make good coffee. Over the years, folks in the RainyDayKitchen have tested, used, and dissected their share of coffee makers. However, they, like many people, did not realize it was possible to brew coffee without using heat. When they were asked to take a look at the Hourglass Coffee Maker, they did some research on the cold-brewing method. What they learned surprised them and got them excited about the task!

It appears that cold-brewing has quite a few advantages over the more typical heated process. The biggest benefit is the much lower acid content in the coffee. A lower acid level should translate to better tasting coffee and less irritation for sensitive drinkers.
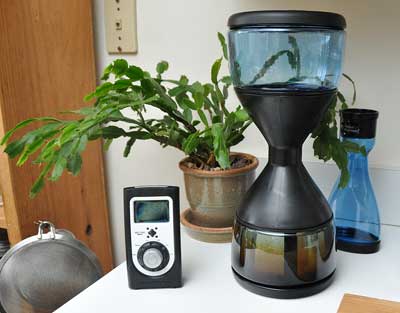
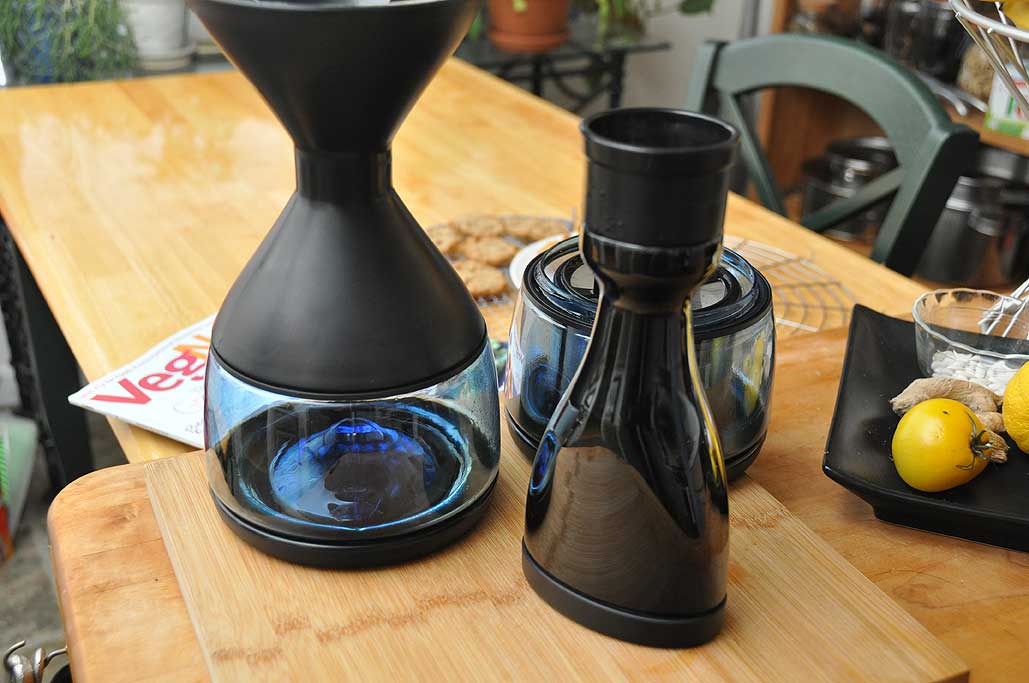
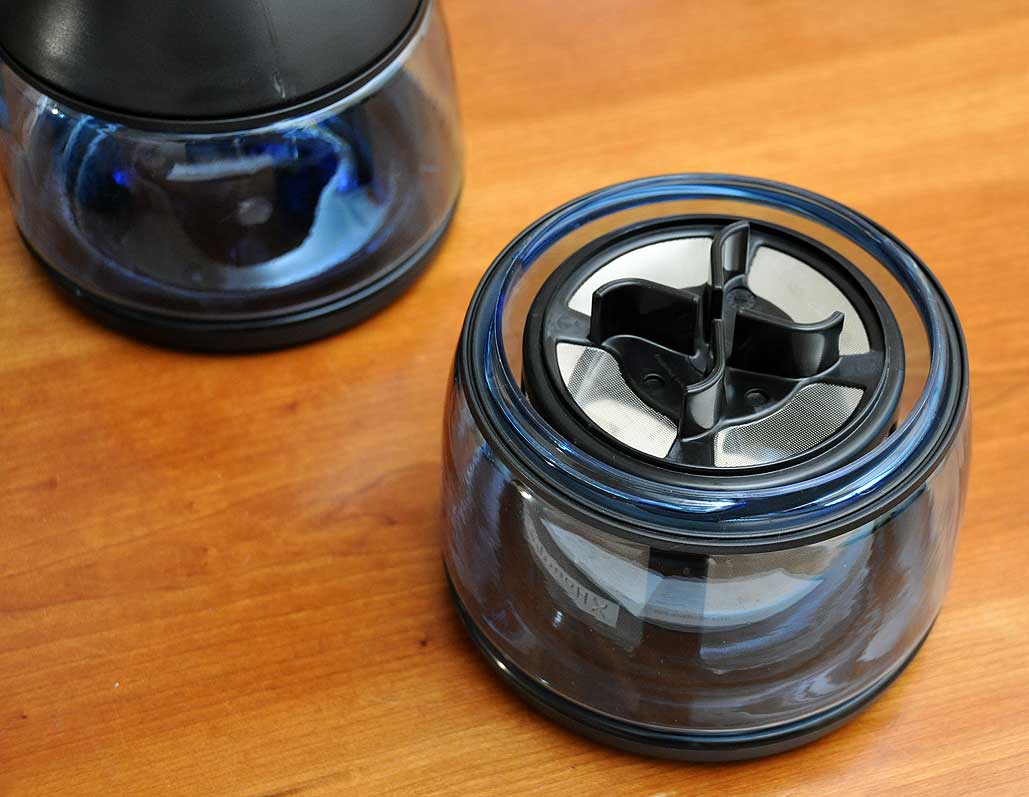
The Hourglass Coffee Maker is attractive and simple. The package includes a reusable stainless steel filter, a carafe, and a storage bottle. Both the carafe and the storage bottle are made of strong thermo-plastic.
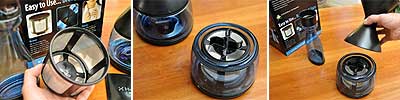
Using the Hourglass Coffee Maker appears to be simple as well. Freshly ground coffee is placed into the filter. The brewing bowl is pressed onto the filter and filled with cold water. The carafe is placed over the bowl and left to do its thing.
After the desired brewing time has elapsed, the carafe is inverted, pouring the coffee extract into the bowl at the other end. The bowl with the filter may then be removed and the coffee extract emptied into the storage container. The coffee extract can then be mixed with water to make fresh coffee anytime for up to a week.
The directions give three different recommendation for brewing times (12hr, 24hrs, 72hrs) for different strengths. We are going to try three different times to see if we can detect the difference. Look for the FirstUse report in November. [Permalink] - Hourglass Coffee Maker
|
|
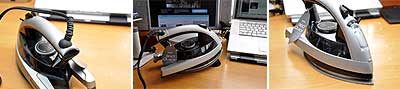
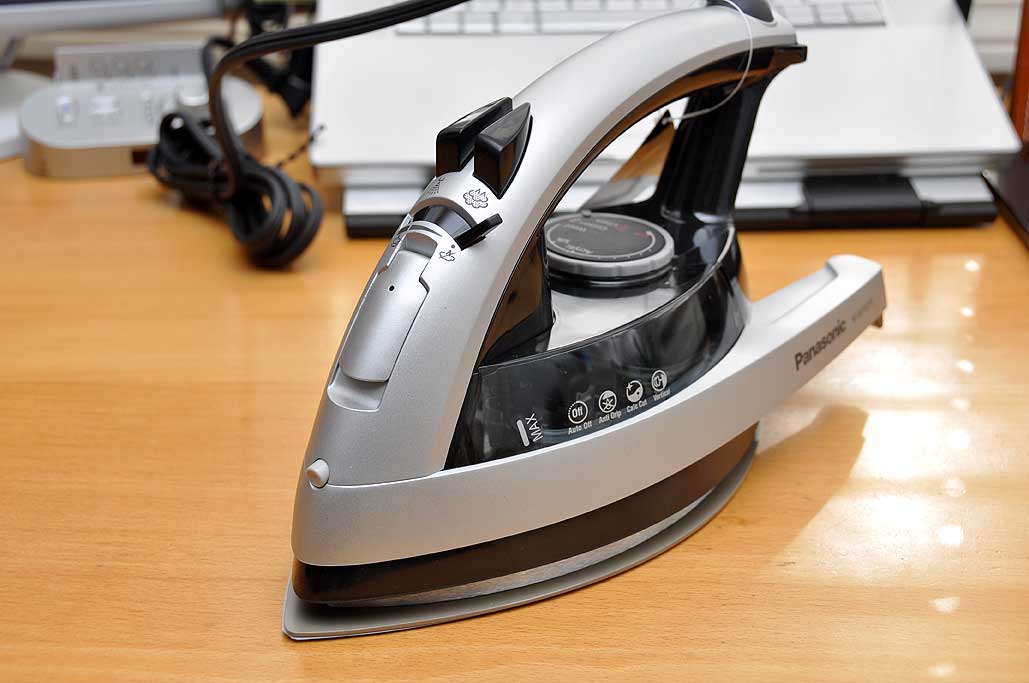
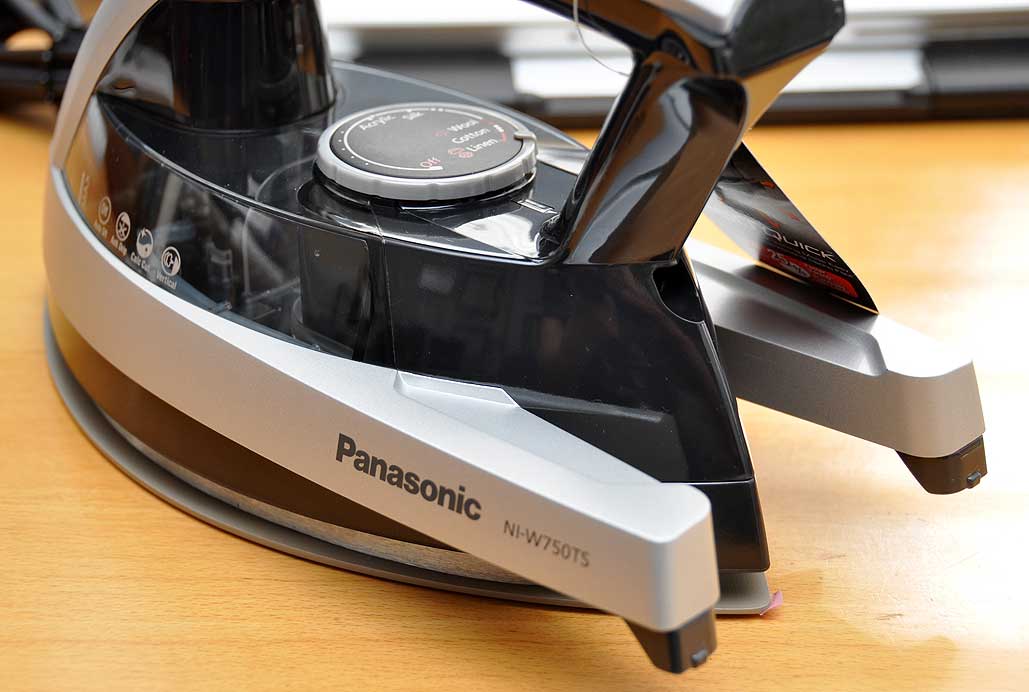
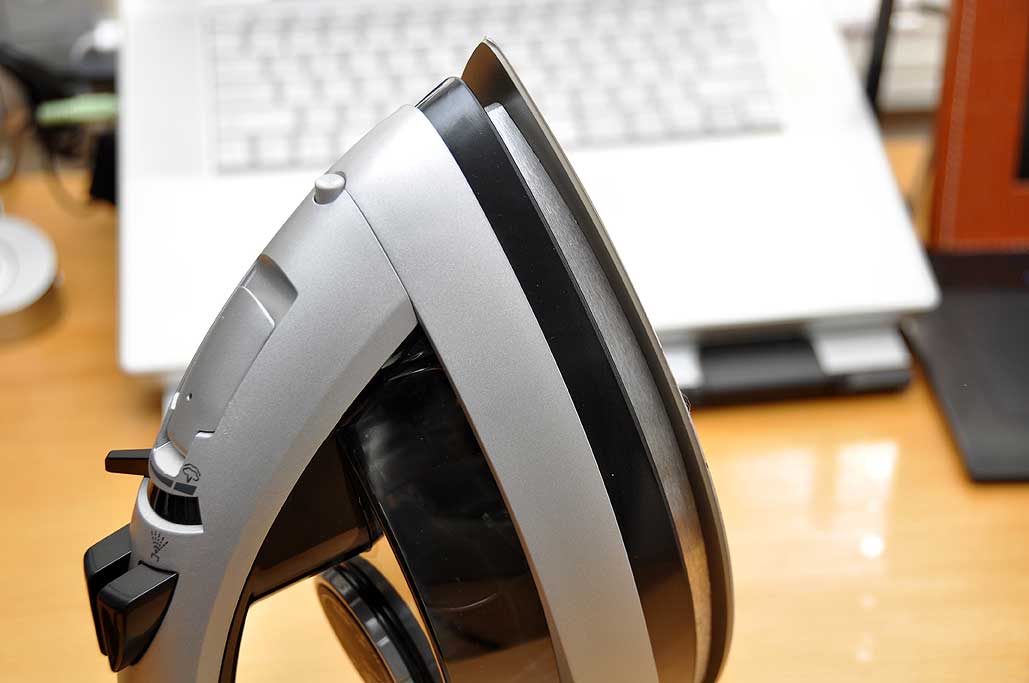
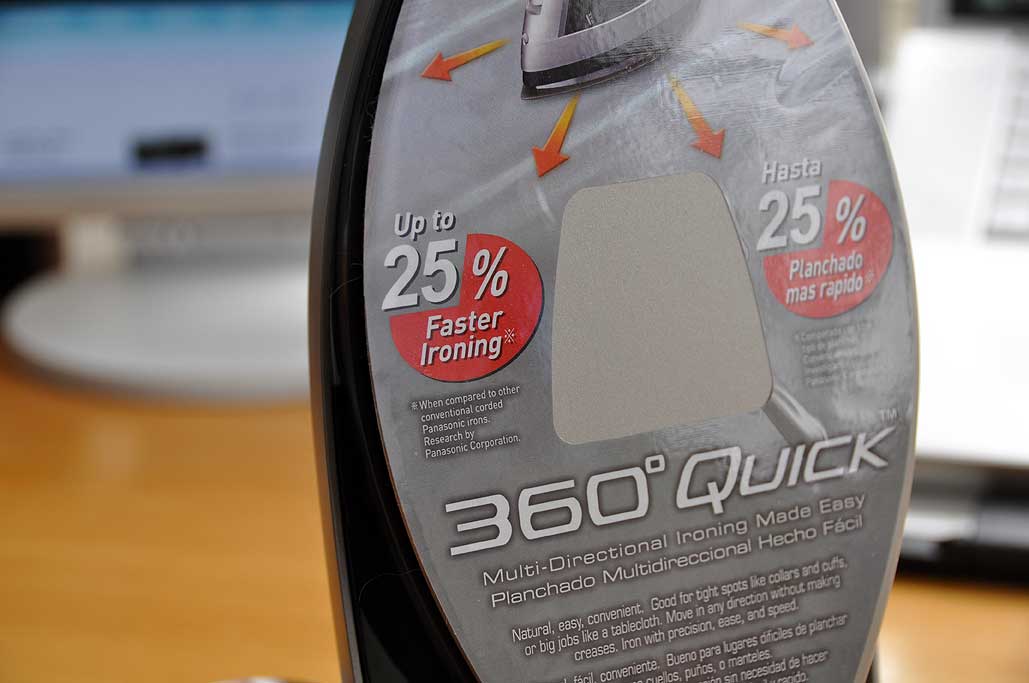
The gadget on our desk is not a model of some intergalactic space ship. It is, in fact, the latest in clothes-ironing technology. The iron is the 360 Quick from Panasonic.
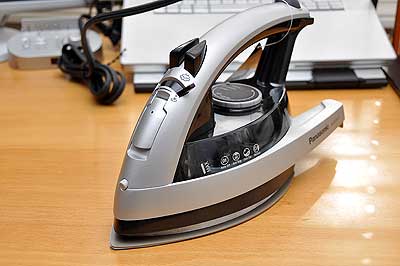
Like most readers, ironing clothes is not on the top of our interns' list of favorite things to do. However, they just suck it up and do it. To make the task faster and less troublesome, Panasonic has put some fresh eyes on this household gadget and came up with some interesting features which may help.

The 360 Quick takes its name from the new elliptically-shaped soleplate. This design allows for fast multidirectional movements of the iron, decreasing overall ironing time by 25%. The surface of the soleplate is made with scratch-resistant material such as ceramic and titanium. These materials are 6X more durable than stainless steel!
In addition to the Panasonic 360° Quick Iron’s unique design, the steam/dry iron also features:
- Temperature control dial to set precise heat for all fabrics, including silk
- Adjustable steam from all steam holes to effectively tackle large areas without repeated attempts
- Extra jet (burst) of steam with self-cleaning steam vents to get out stubborn wrinkles
- Large soleplate to speed jobs such as tablecloths and curtains
- 3 way auto-shutoff safety feature to avoid worry

We have a bunch of dress shirts and other things assembled for the interns to iron. They will have a full write-up on the time-saving claims once they are done with their current task of cleaning out the gutters. Gotta love them. They are so freakin' enthusiastic. [Permalink] - Panasonic 360 Quick
|
|
|
Yesterday we gave a photo rundown of the Jura Impressa Z5 disassembly process. Today we will go into detail about the cleaning and relubrication of the brewing unit.
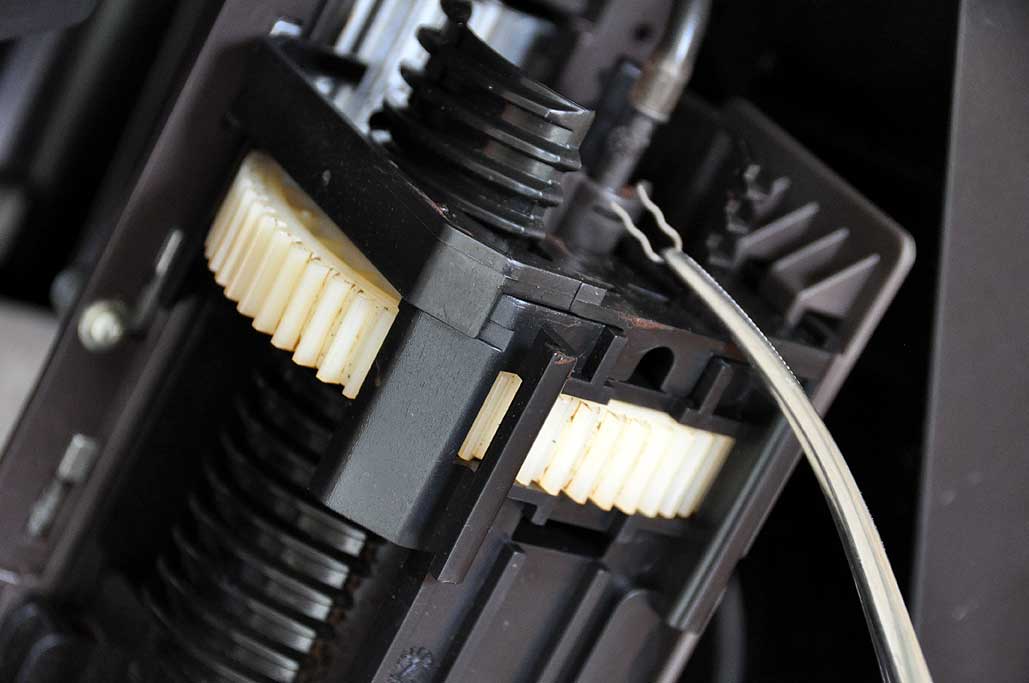
While the mechanical aspects of the cleaning procedure were not complicated, we had to make sure we did not force any of the gears. An inspection revealed that coffee grounds were caked in the crevices, but nothing much which would gum up the works to the extent that the machine would stop making coffee after one cup. This led us to conclude that we must lubricate everything once everything had been cleaned.
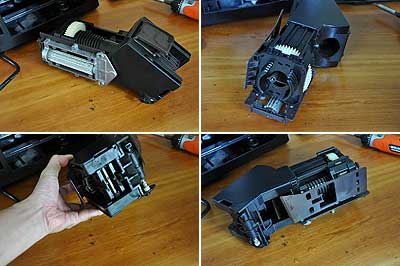
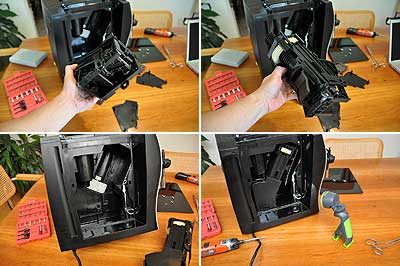
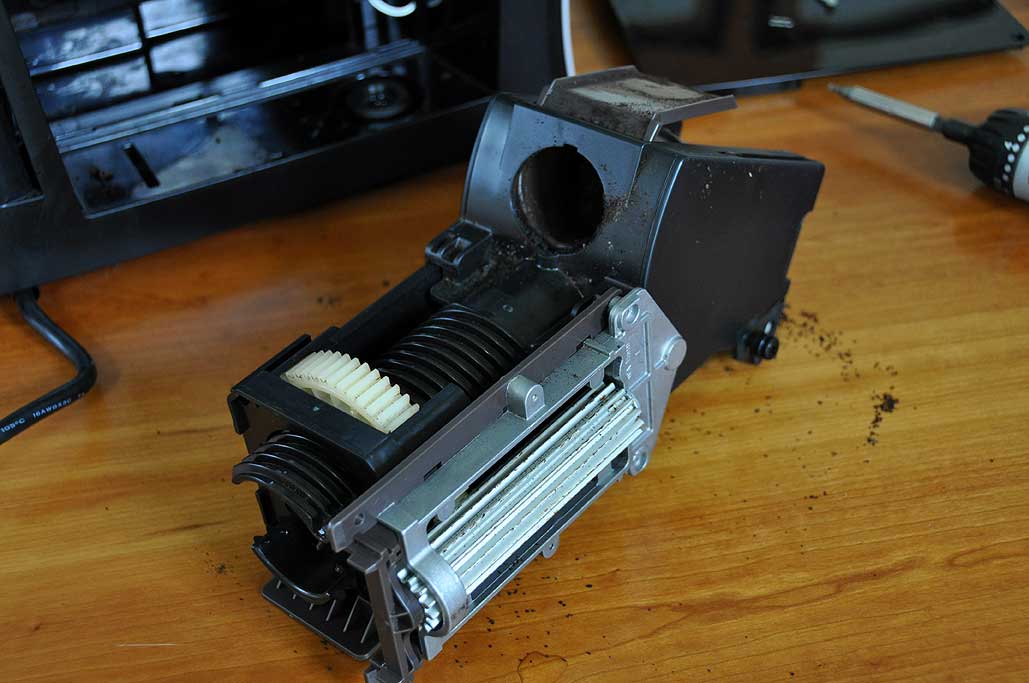
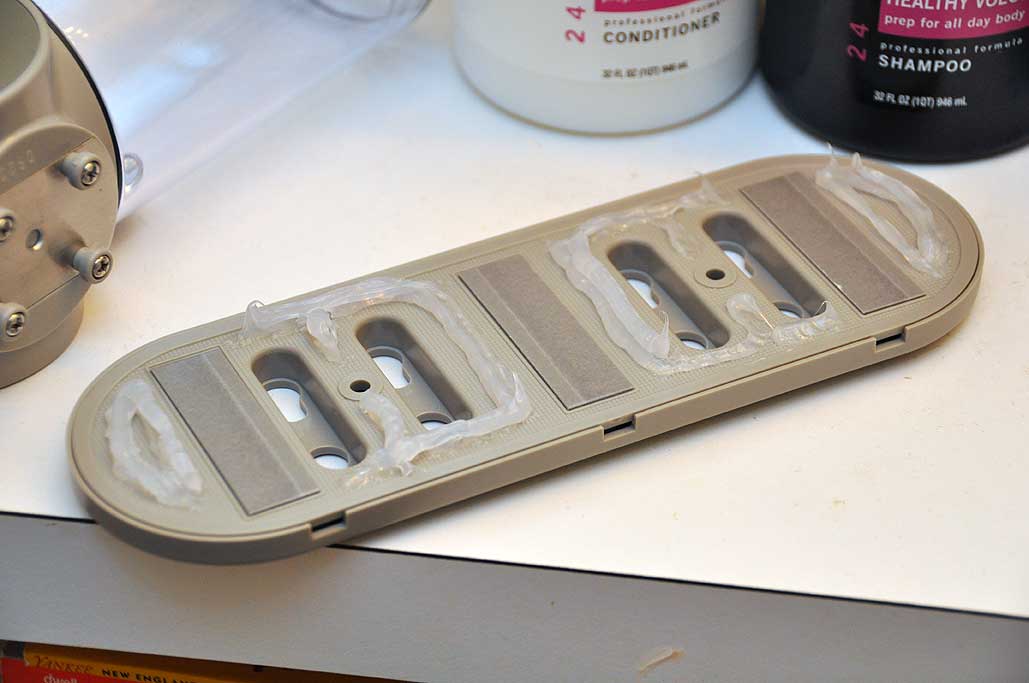
The first step was to remove the two non-black pieces (brown guard, silver vertical gear). These two items may be removed without tools. The guard just pulls off and the gear slides off.
The brewing unit has large side panels which are retained by tabs. We popped them off using a small flat screwdriver to reveal the details of the slide and other works. With the pieces removed, we flushed the unit with water to clean it.

We used compressed air to blow out the trapped water from the nooks and crannies. No further assembly was needed, but all of the obvious contact points were lubricated using a food-grade silicone spray. The gears were worked manually to make sure the lubricant was evenly distributed.
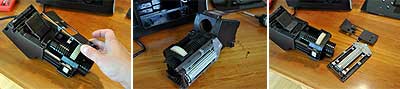
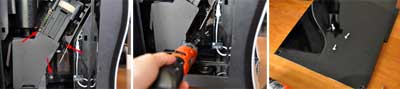
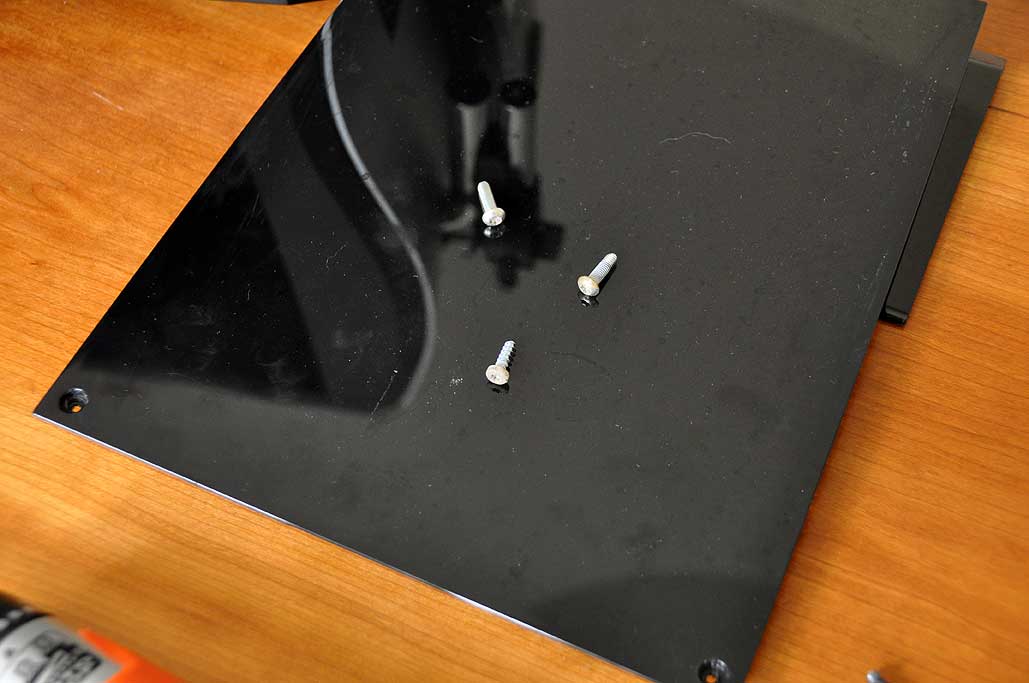
Putting the brewing unit back into the machine was a breeze. The three screws and the hose clamp were all replaced without any problems. We did call on the help of our little handy BlackFire Clamplight to illuminate the internals of the unit for placing the upper right screw :-)
This Jura Z5 repair project was most illuminating. We don't know why Jura thought it necessary to use non-standard screws to secure the side panel. All it did was make the access problematic (read: annoying), not impossible, for DIYers. We replaced them with standard screws so that when we have to do this again in a few years, it will be a 10-minute job. [Permalink] - Jura Z5 Brew Unit Lubrication
|
|
|
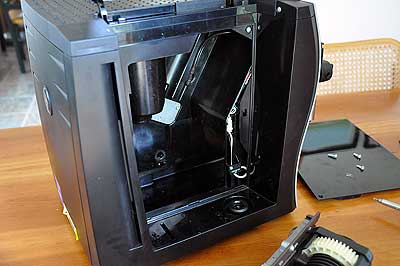
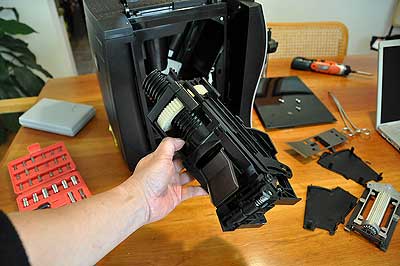
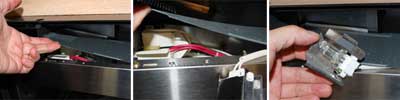
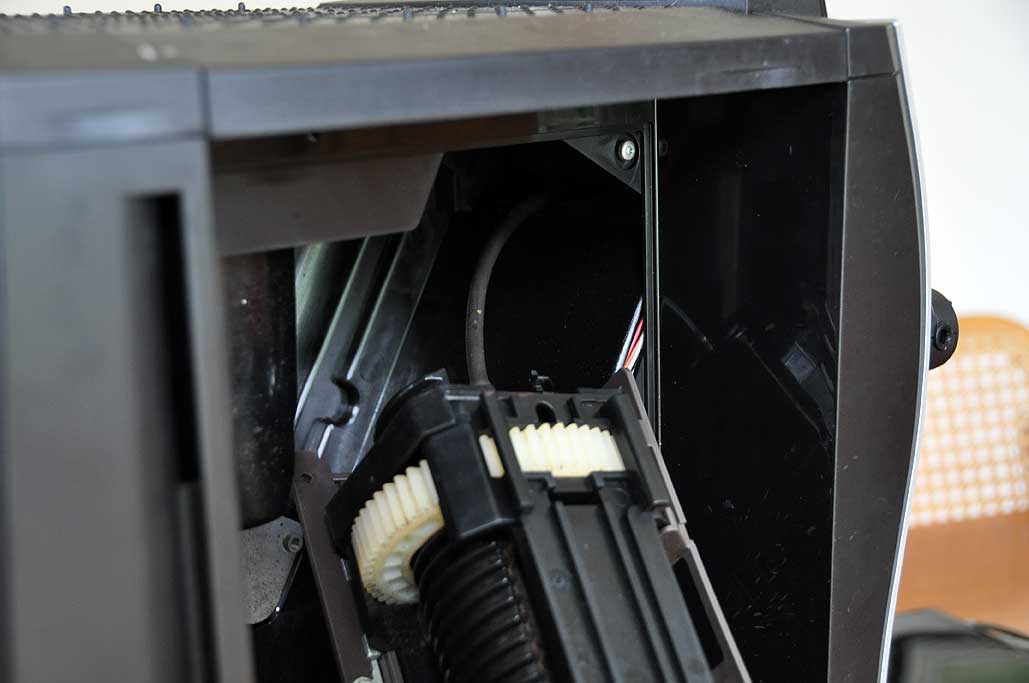
The Jura Impressa Z5 has been a work-horse around here for years. A few months ago, it started to throw an "Error 8" after making one cup of espresso. We would let it rest for a few hours, then make ourselves another cup. Clearly this was not an optimal situation.

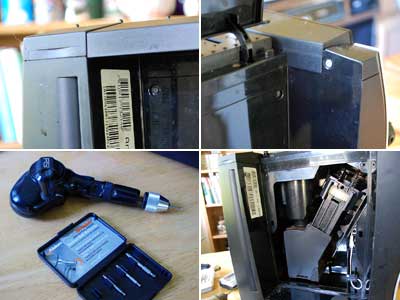
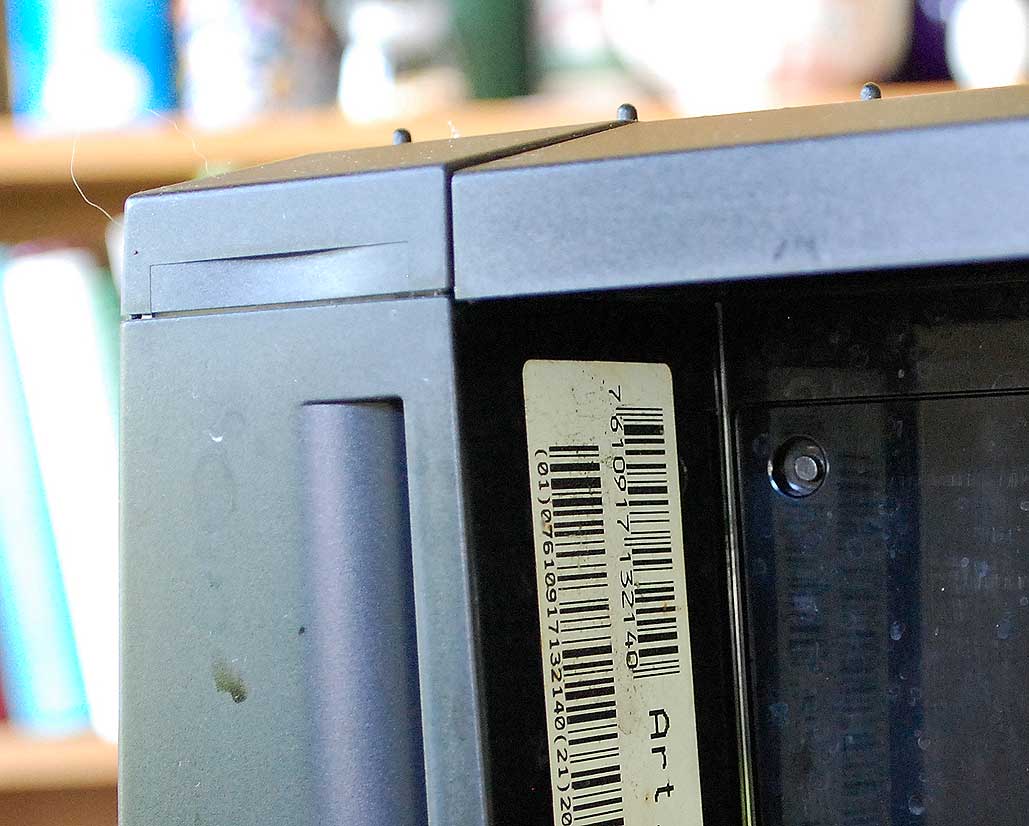
We decided to see what we could do about the problem. What should have been a one-day project turned into something quite a bit longer. The first problem was the two oval "security" screws used in securing the side panel. We could have tried to locate the proper tool, but decided to drill out and replace the screws instead.
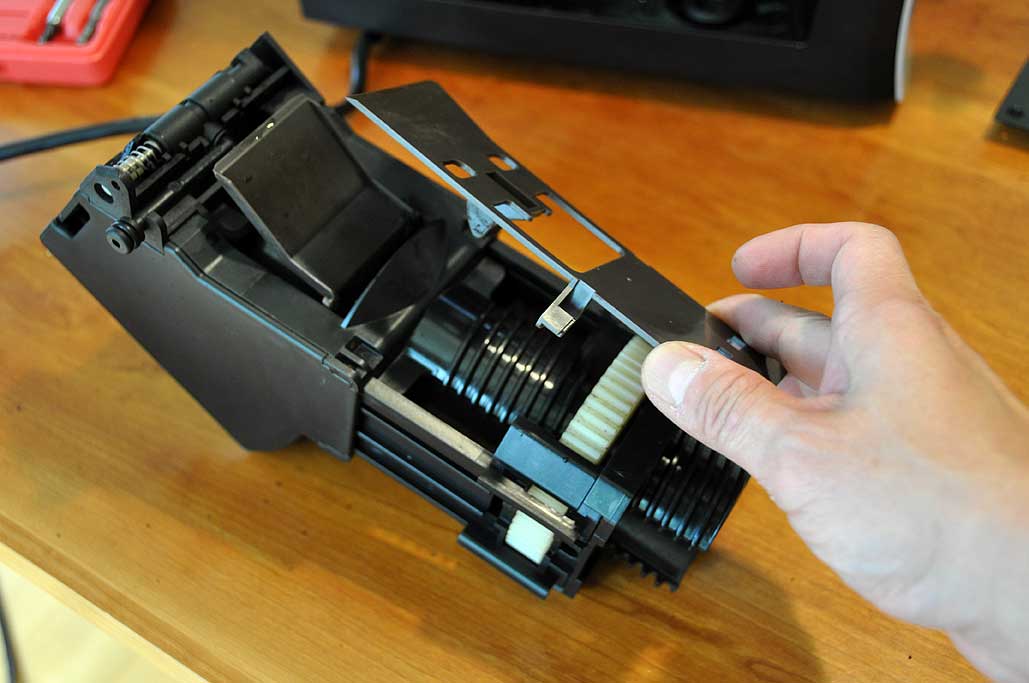
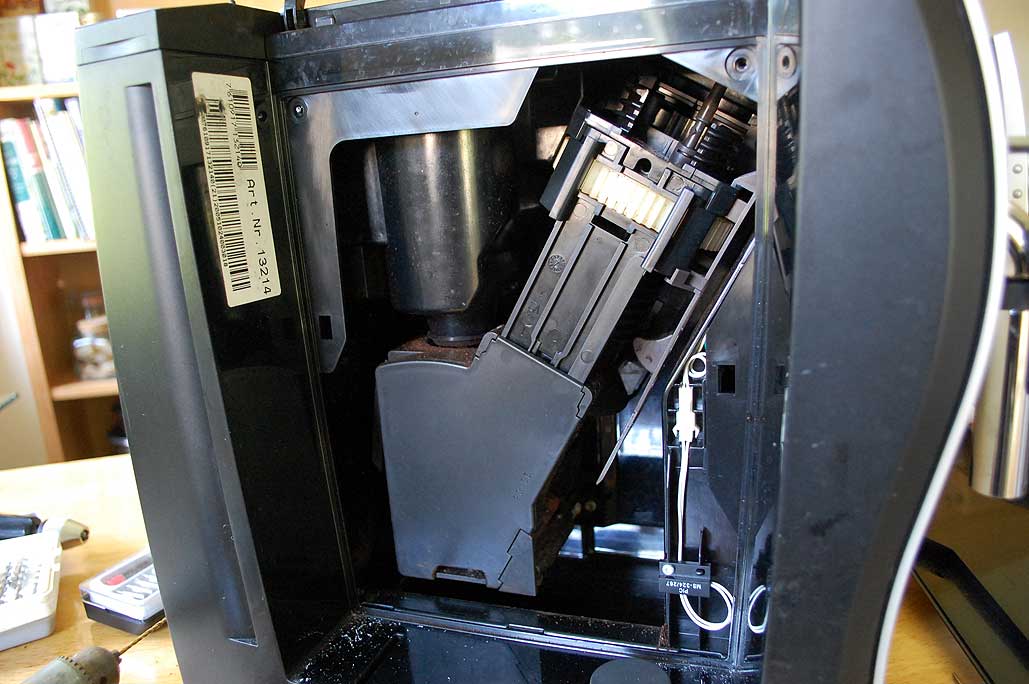
With the side panel removed, the brewing unit was easily accessible. Three screws (two upper, one lower) held the brew unit in place. We noted that they were not all the same; the bottom screw was different than the top two.
Even after the three screws had been removed, the brew unit was still connected to the housing via a hose. The hose is held in place by a retaining pin. The pin must be pulled out before attempting to disconnect the hose.
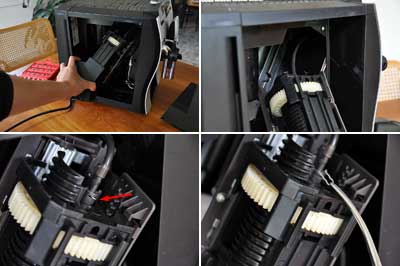
With the hose disconnected, the brew unit may now be extracted from the housing. The gears were made mostly of plastic, but are very rugged. None of it appeared chipped or broken...a good sign. The brew unit was coated with quite a bit of coffee grime, so a good cleaning was obviously required.

Now that the brew unit has been successfully removed, it was time to see about the next steps: disassembly and relubrication. We'll cover both in the next installment of this series. [Permalink] - Jura Z5 Brew Unit Cleaning
|
|
|
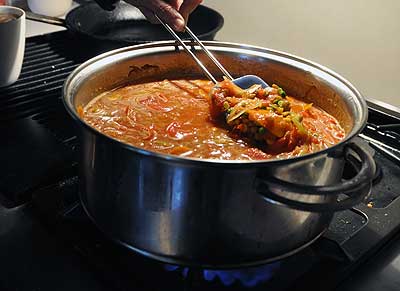
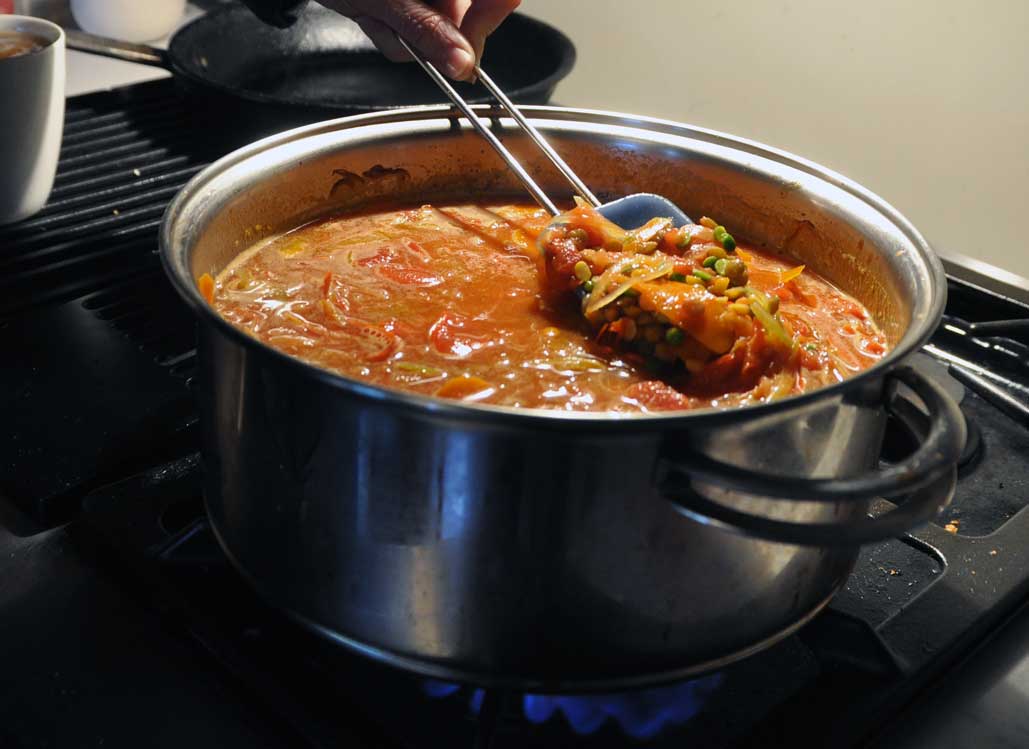
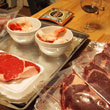
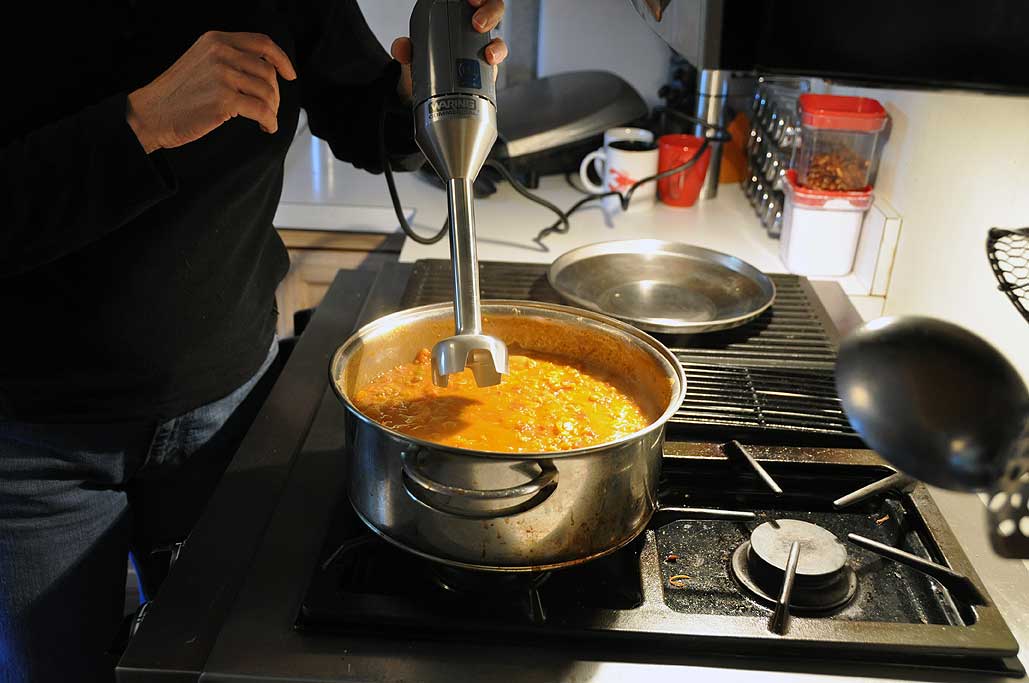
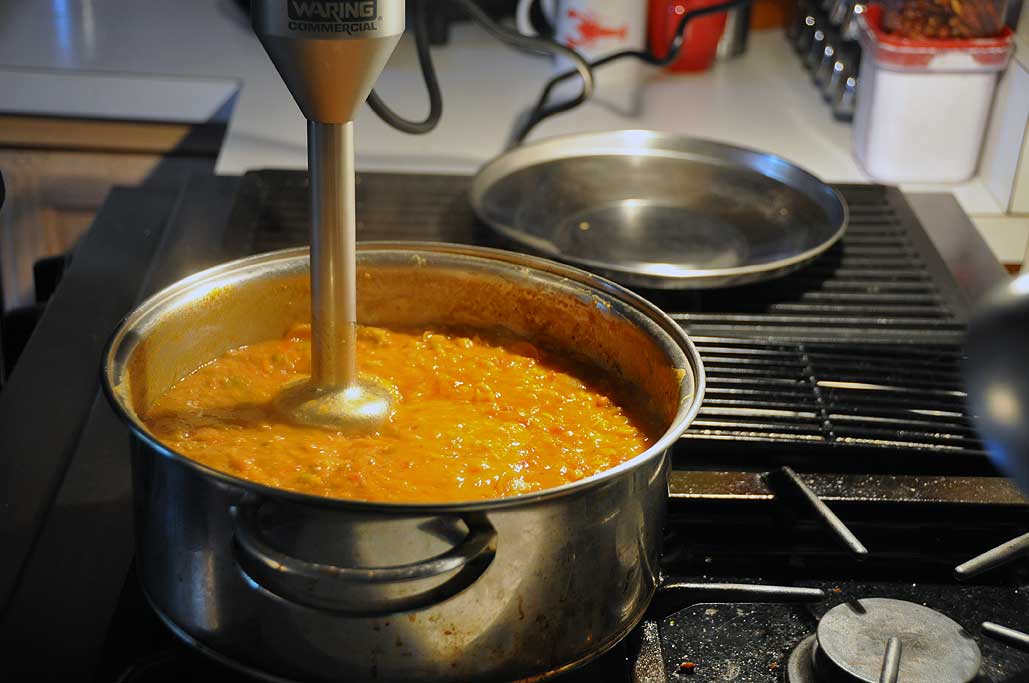
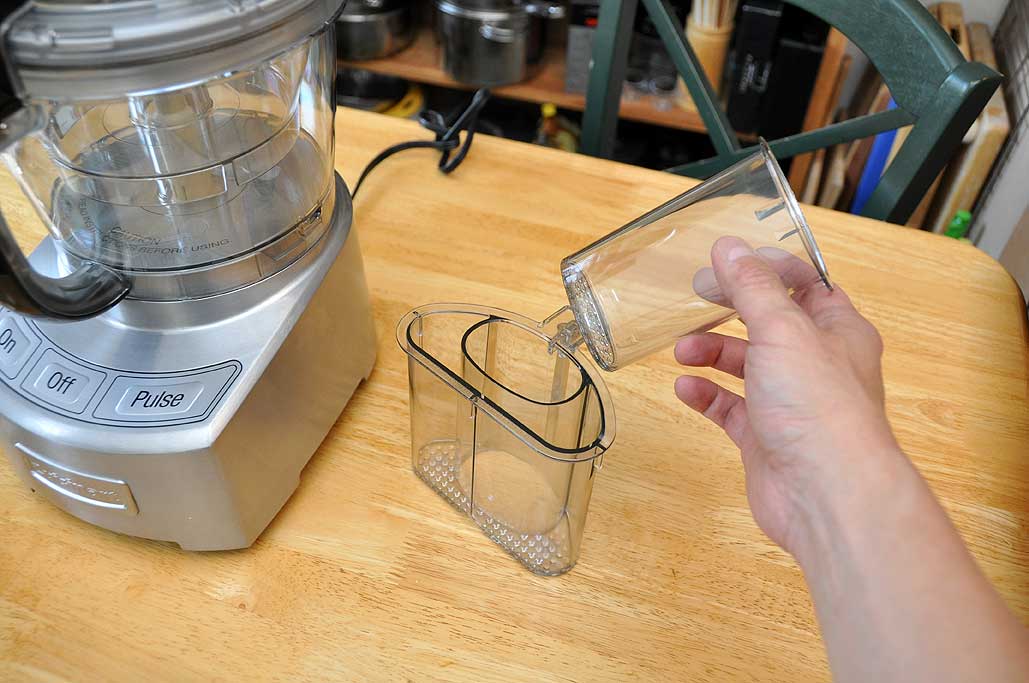
The RainyDayKitchen folks have been busy testing the new Cuisinart food processor. Vegetables were being sliced, diced, and minced all week long. By Friday, they had accumulated an impressive assortment of nicely "processed" vegetables. They realized the best thing to do with a big pile of veggie bits was to make vegetable soup :-)
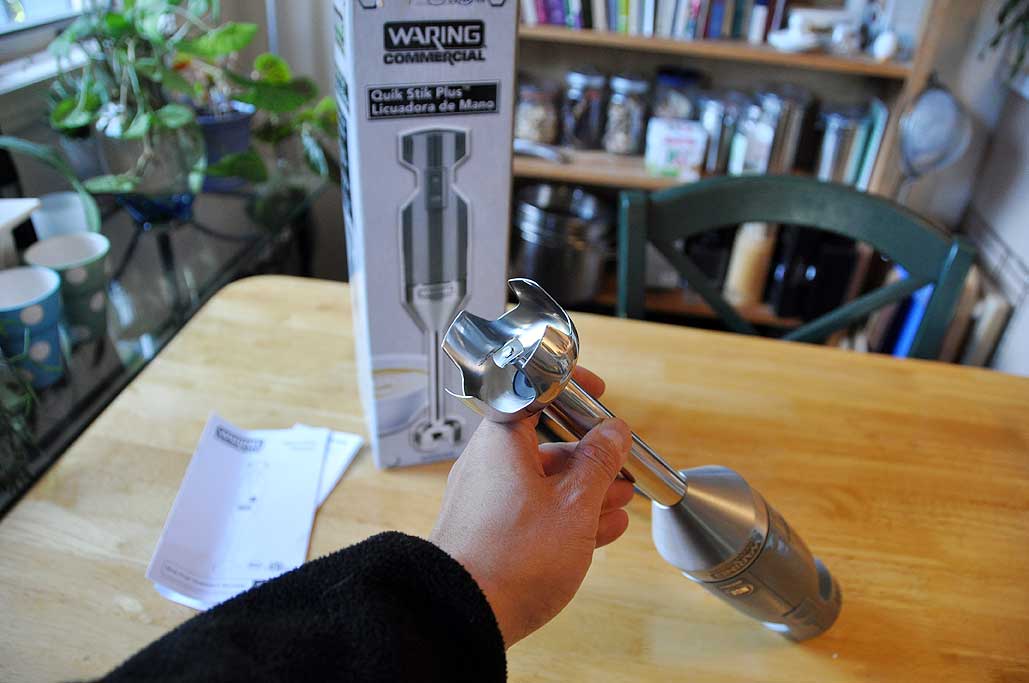
As it turns out, making soup was also a great excuse for folks to try out the new Waring QuikStik Immersion Blender. The QuikStik is a commercial quality (steel blade, 2 speed, 100W motor) unit. It has a 7" insertion depth and is very comfortable in hand. The stainless steel touches are practical and attractive.
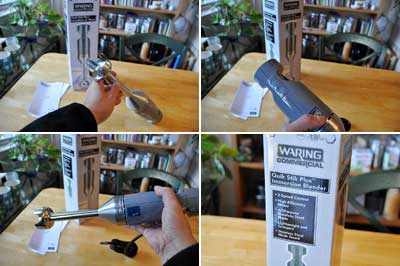
This is a corded unit, so you will need to be near an outlet to use it. Waring does make cordless units, but they are about 7X the price. So unless you need to use one everyday, we say save the money and get the corded one.

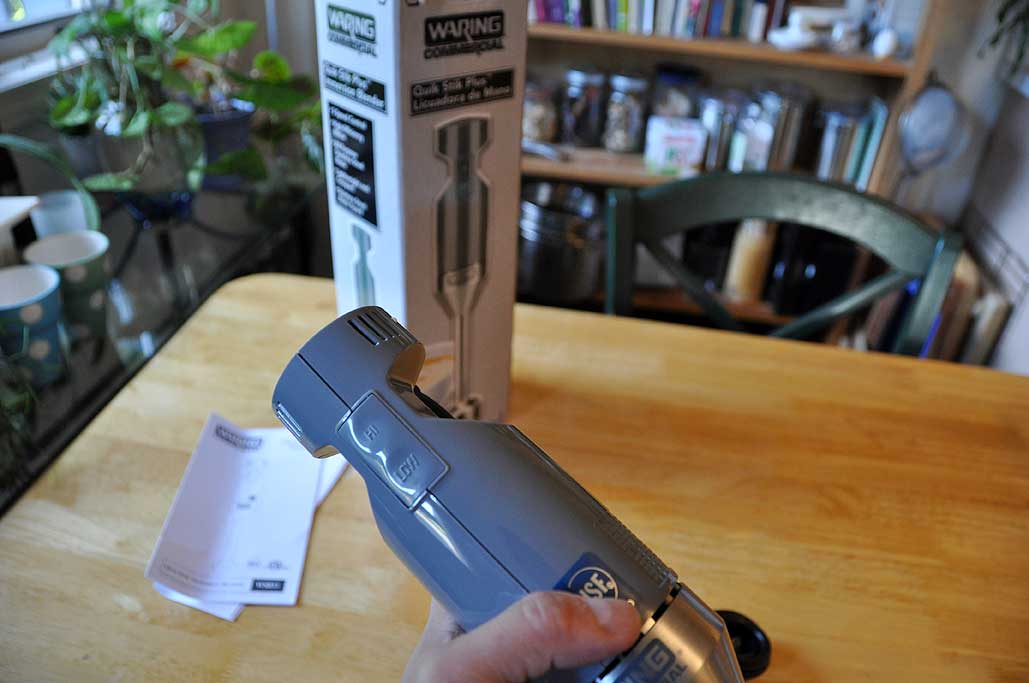
Using an immersion blender is simple. Just put the tip into the liquid, press the switch, and move the wand around. The only thing to remember is DON"T lift the blade out of the liquid when it is still spinning. Smoothness (of the soup, in our case) is controlled by the amount of time blending.
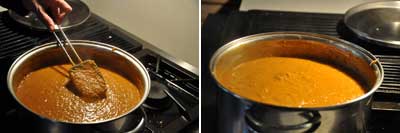
The QuikStik worked flawlessly out of the box and the entire process took just a few minutes. We could hae done all of this with our standard blender, but it would have meant transferring batches of the hot liquid from the pot to the blender and back. It definitely was a lot easier to just blend everything right in the pot.

The Waring QuikStik is a versatile and powerful handheld blender. It won't replace a heavy-duty countertop unit, but it is an excellent complement to one. Get yours at where we got ours, at Everything Kitchens. [Permalink] - Waring Quik Stik Immersion Blender
|
|
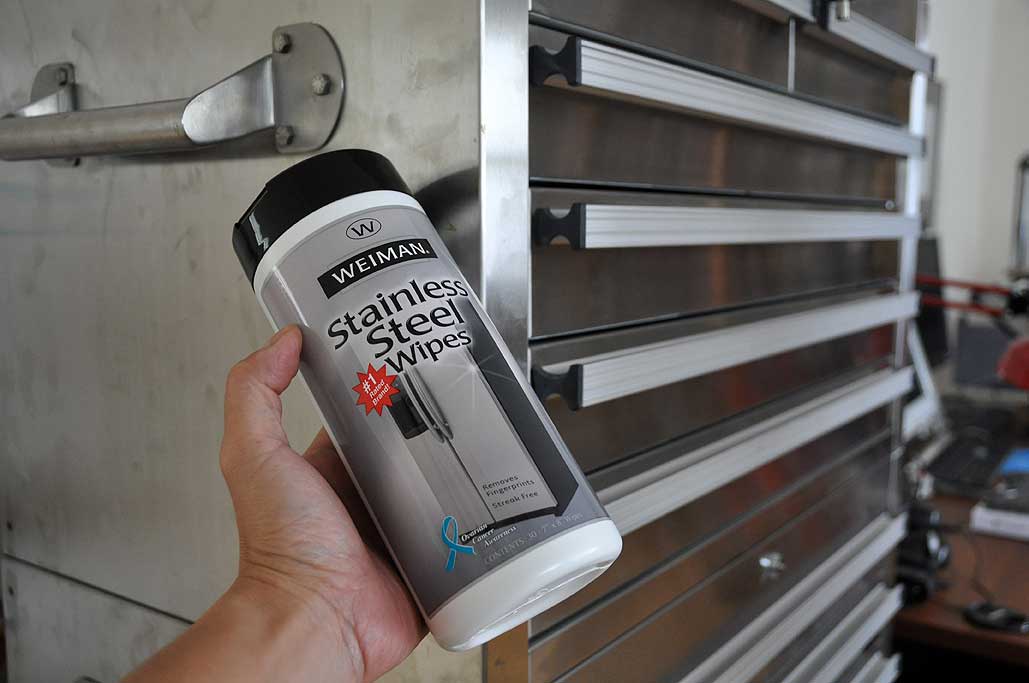
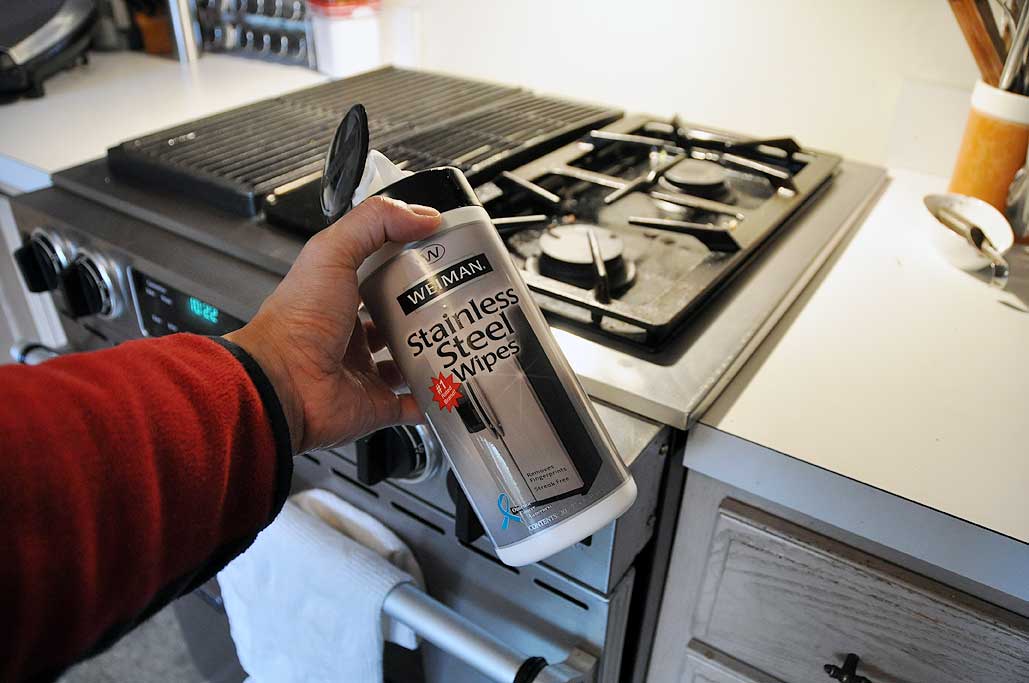
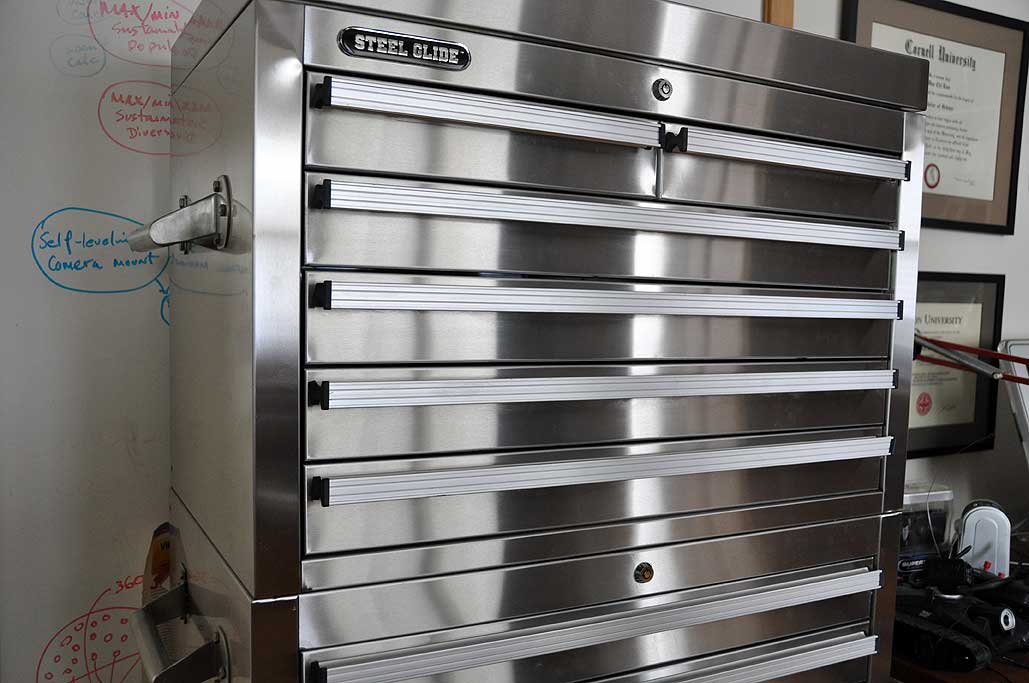
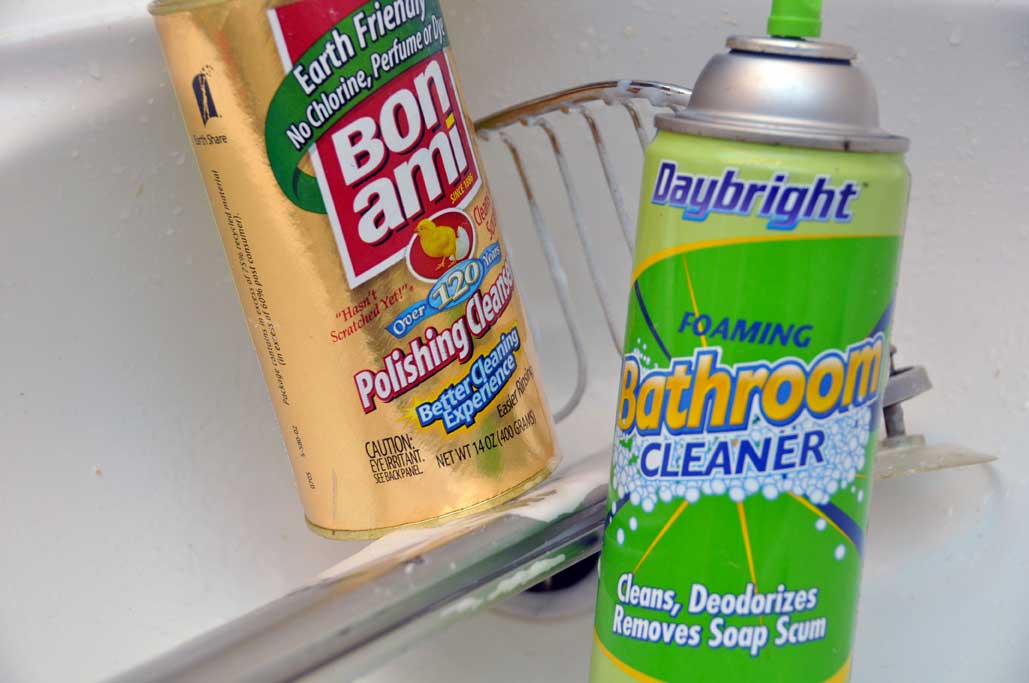
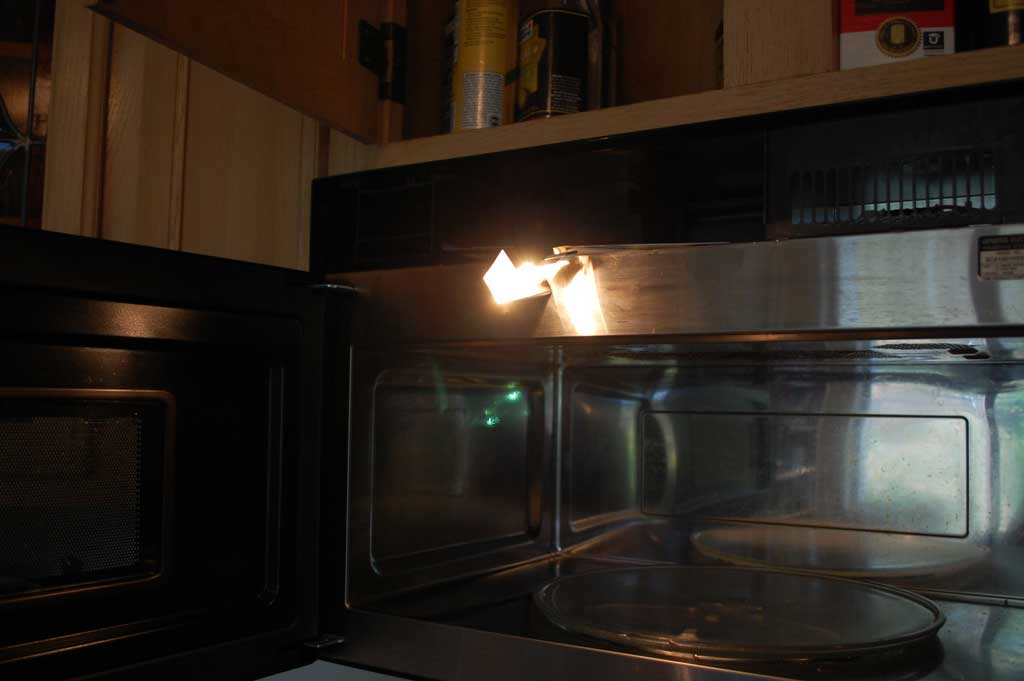
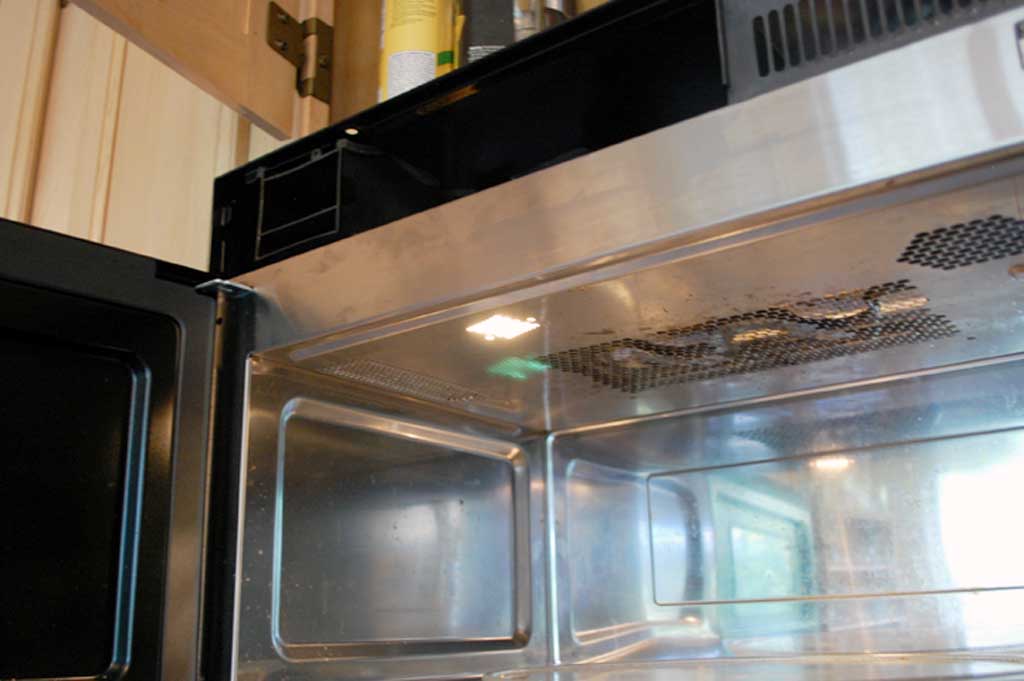
Once in a while, we come across a product that far exceeds our expectations. When we do, we like to show it off :-) The Weiman Stainless Steel Wipes is such a product. It is relatively inexpensive, and it works amazingly well.

While stainless steel surfaces are "stain" resistant, they are actually fingerprint magnets. The oils from the fingers are quite difficult to wipe off and a clean surface will become covered with them quite quickly. No one here can be accused of being a "neat-freak," but we do clean up every once in a while. When we do go on a cleaning bender, we like to get it done with as little work as possible.

The Weiman wipes definitely made the task of cleaning our stainless steel surfaces a simple wipe-on/wipe-off process...REALLY! The towelettes are pre-moistened with the special cleaning solution. All we had to do was wipe it on in a circular rubbing motion, let it dry, and wipe it off.
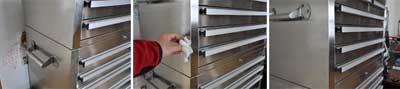
The gleam and shine was impressive. The fingerprints completely disappeared. The surface was left clean and smooth. The wipes left a thin layer of protection which is not oily and does not attract dust.
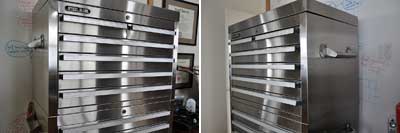

After seeing the results of the Weiman wipes on the tool chest, we went wild and cleaned every stainless steel surface we could find. The results were all equally spectacular: clean, shiny, and gleaming.

Readers know that we like "homebrew" cleaning solutions, but nothing we have tried was as easy or as effective as these Weiman Stainless Steel wipes. If you want to get your stainless steel surfaces shiny and like-new again, give the Weiman wipes a try. We think you will be very impressed. [Permalink] - Weiman Stainless Cleaner FirstUse
|
|
|
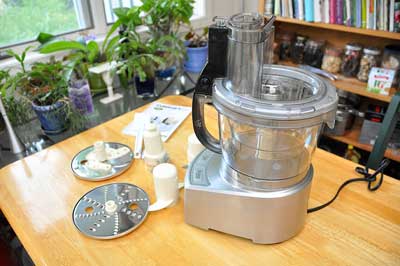
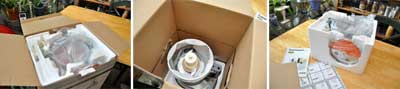
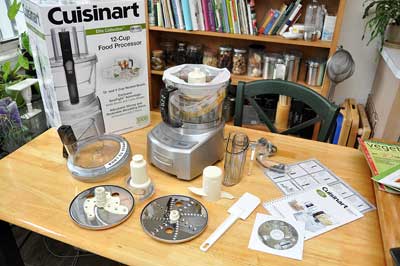
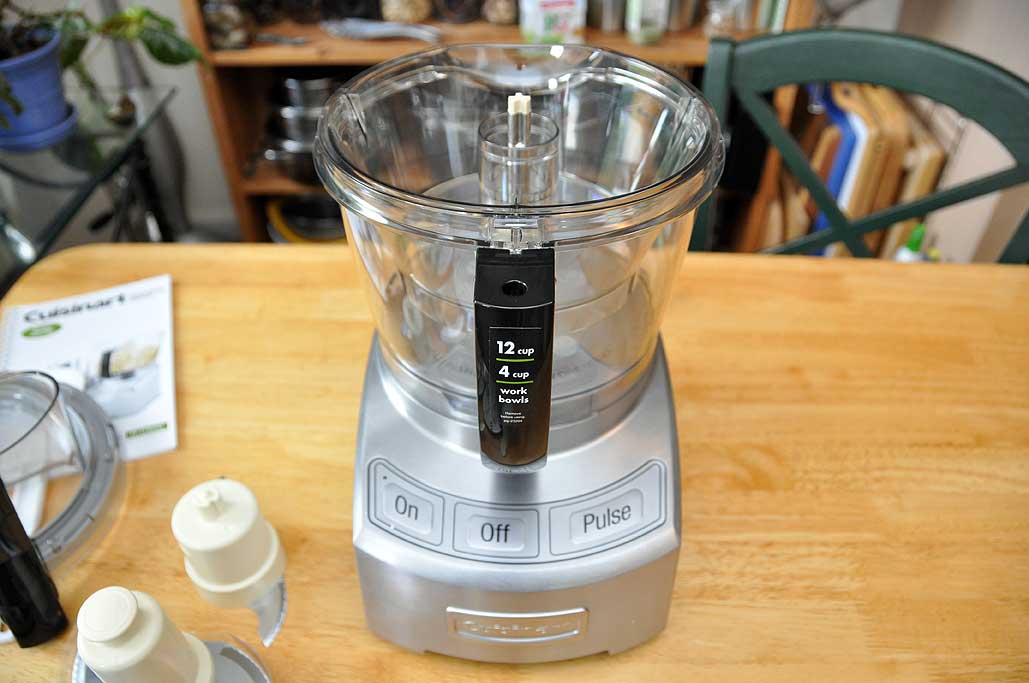
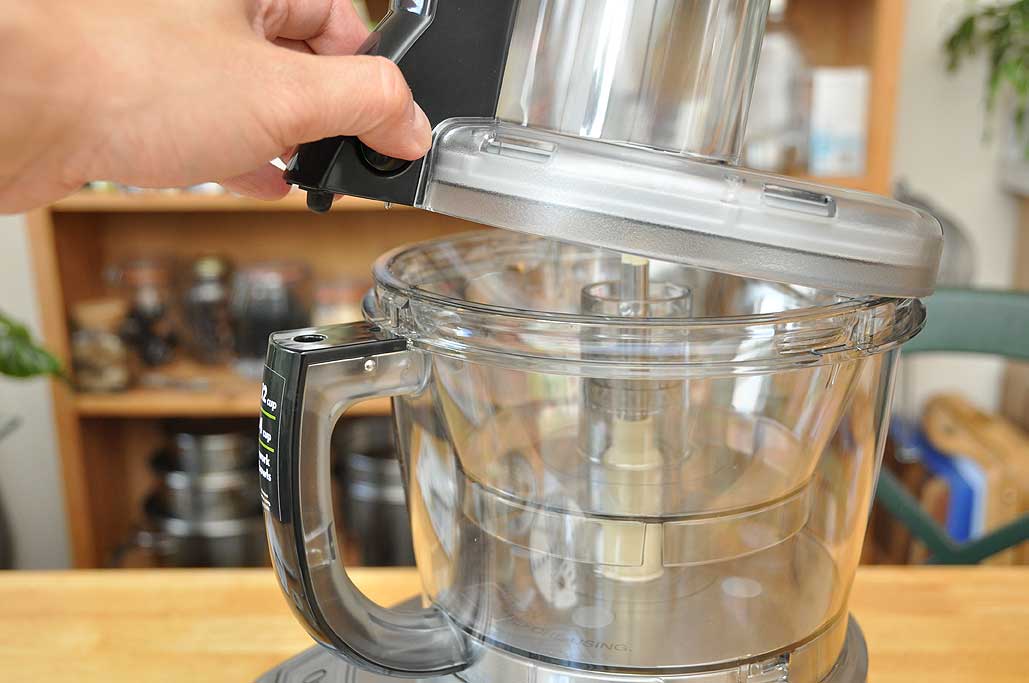
The Cuisinart Elite Collection 12-cup food processor was unpacked as soon as it arrived at the RainyDayKitchen. We had to scramble to get the FirstLook photoshoot finished as folks were eager to give it a try. We haven't see such fuss over a piece of kitchen gear since the UPS guy dropped off the Jura Z5.
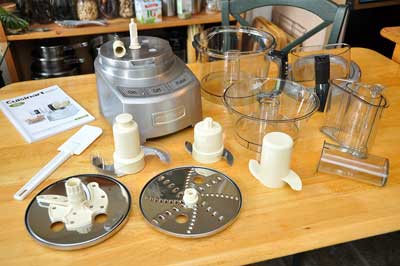
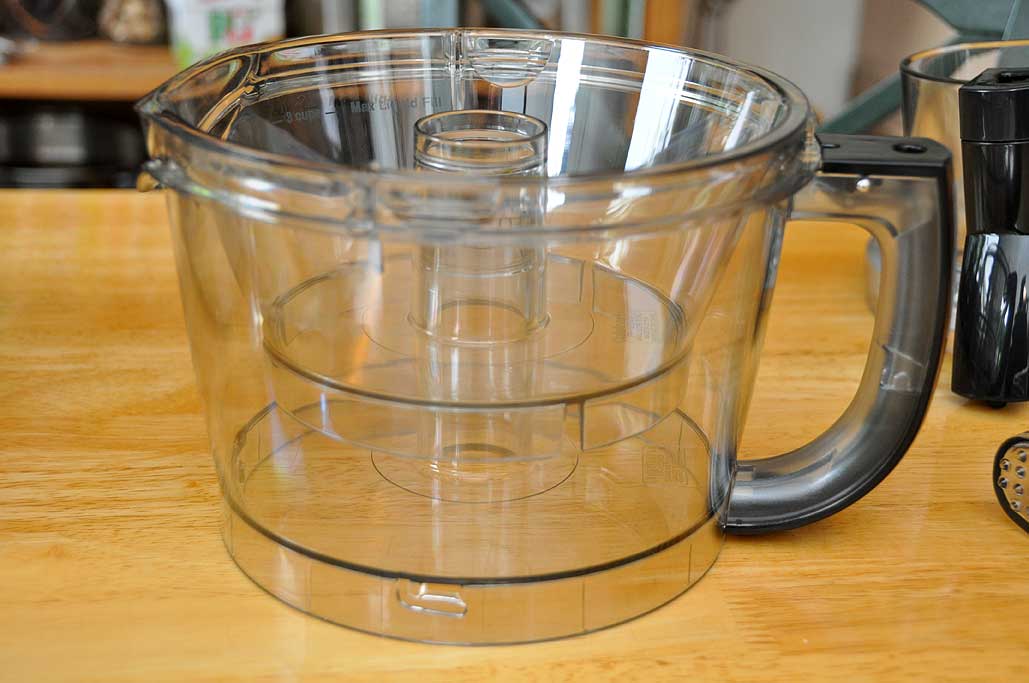
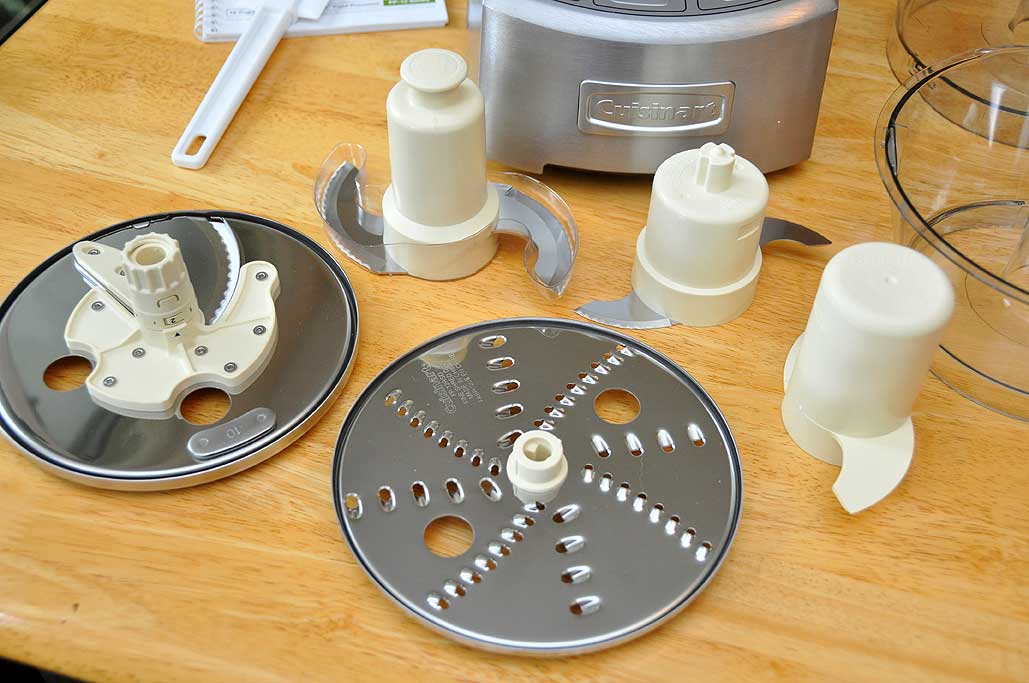
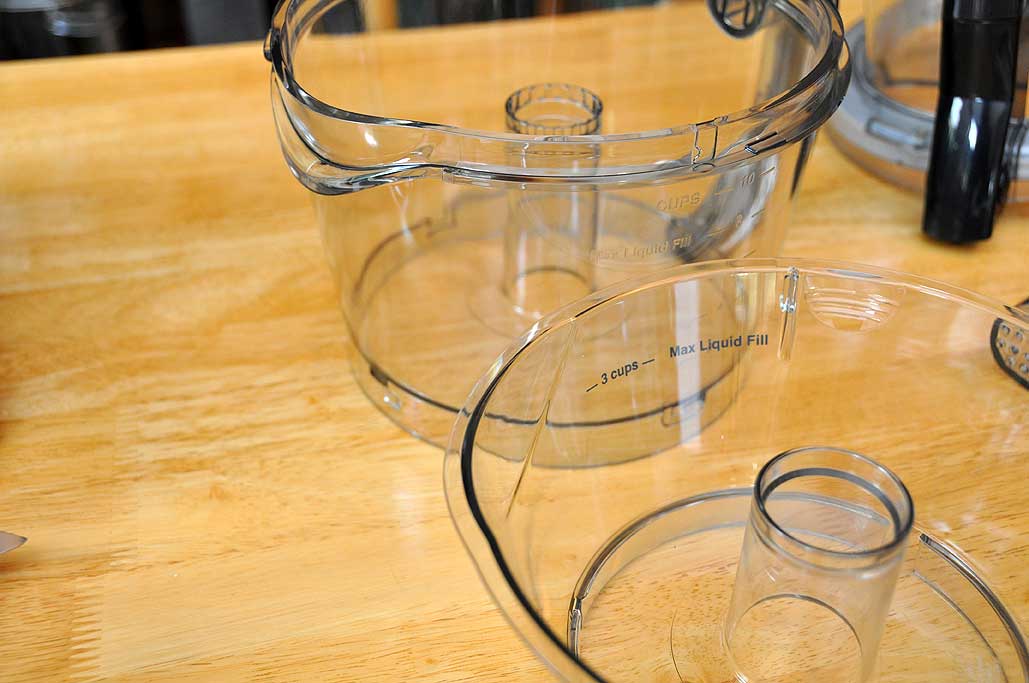
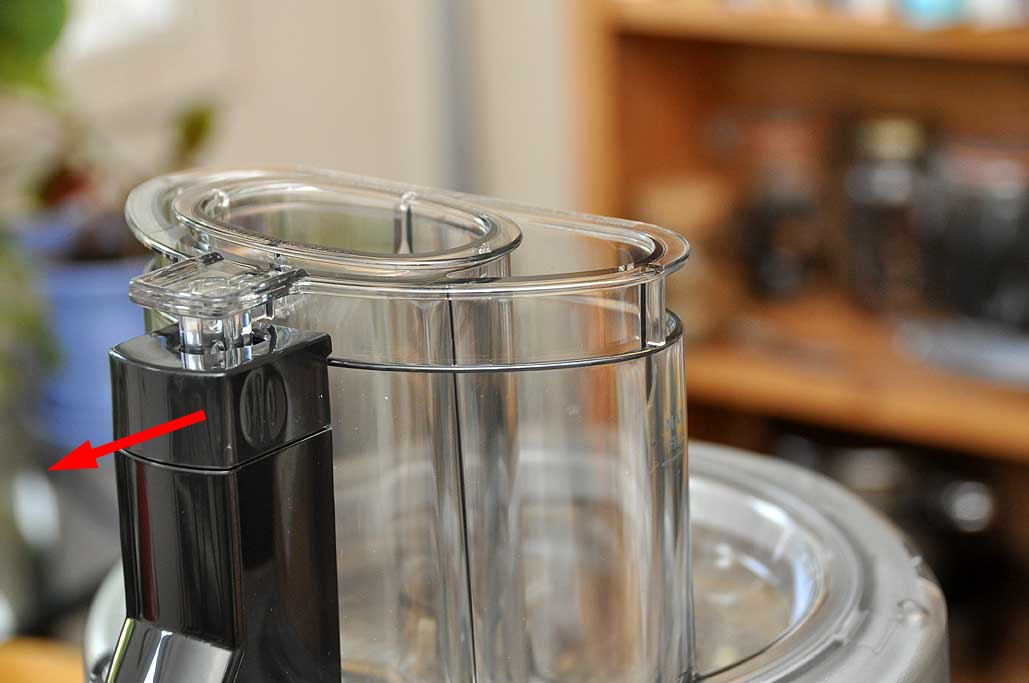
As we noted in the previous article, this Cuisinart food process has a few innovative features. One of them is the bowl-within-a-bowl design. We'll focus on the bowl today and will take a closer look at the other pieces in more detail later.
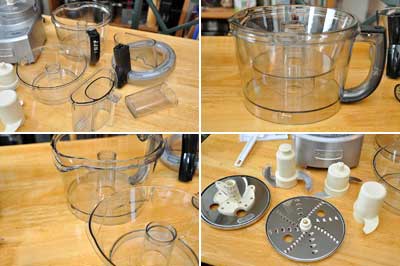
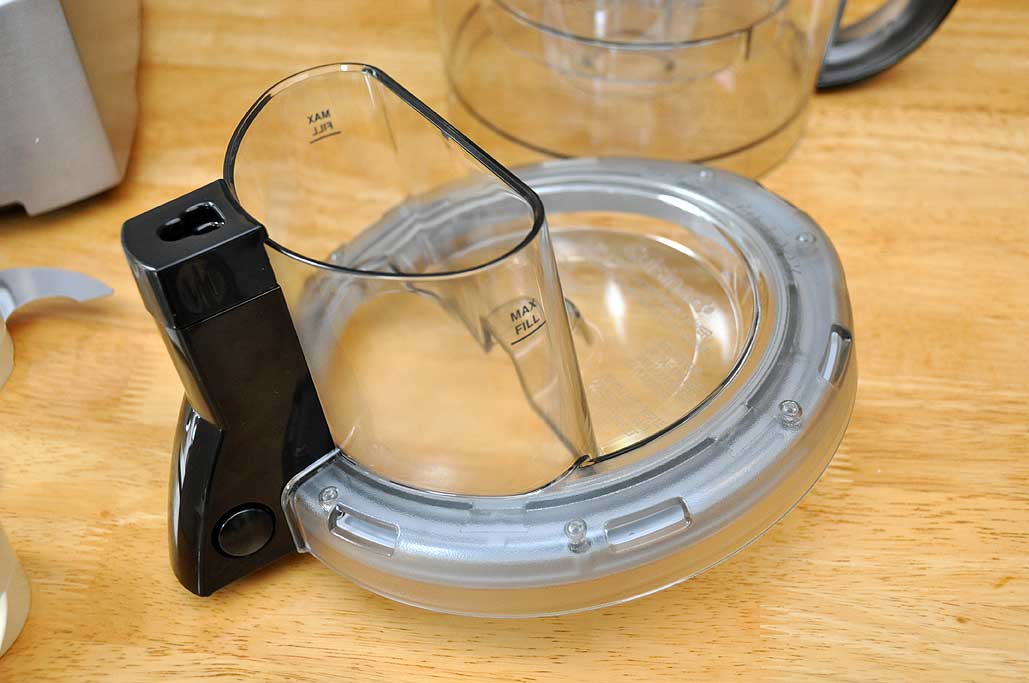
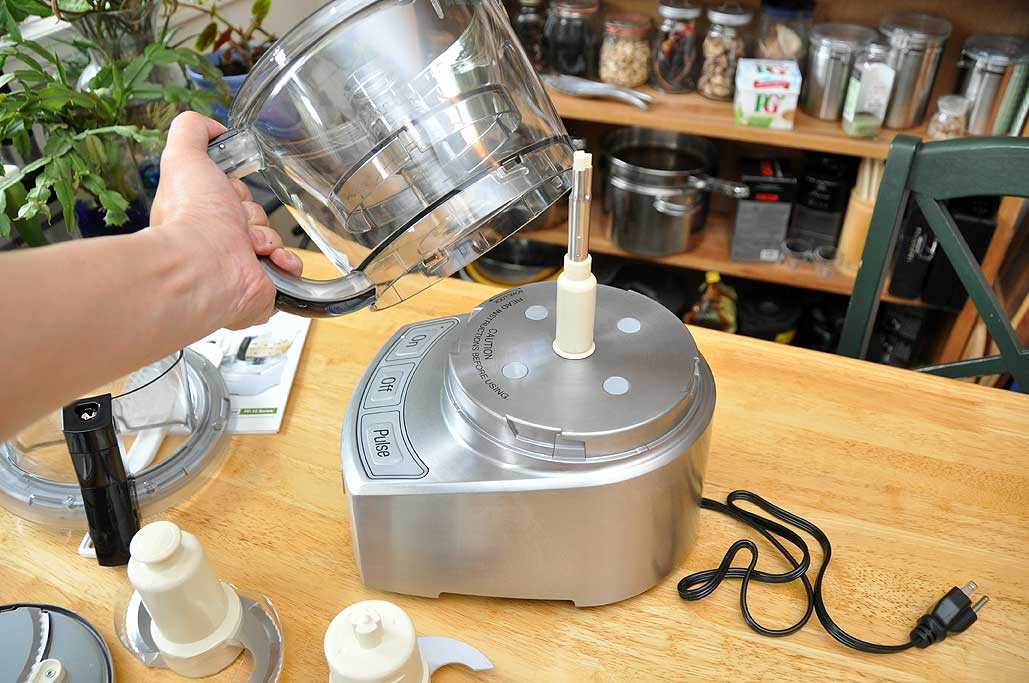
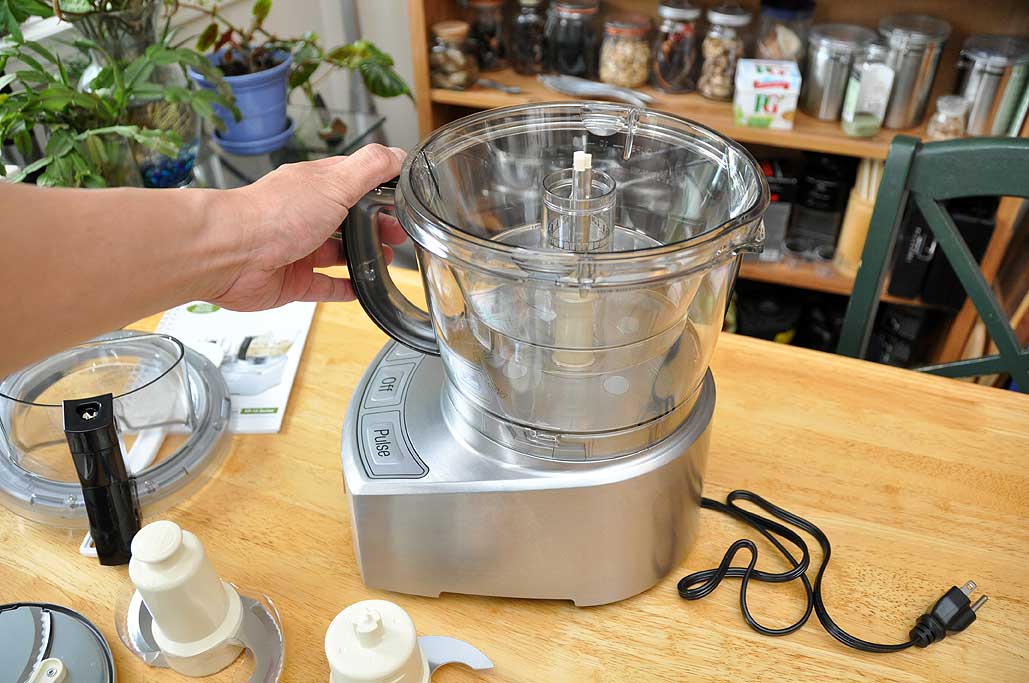
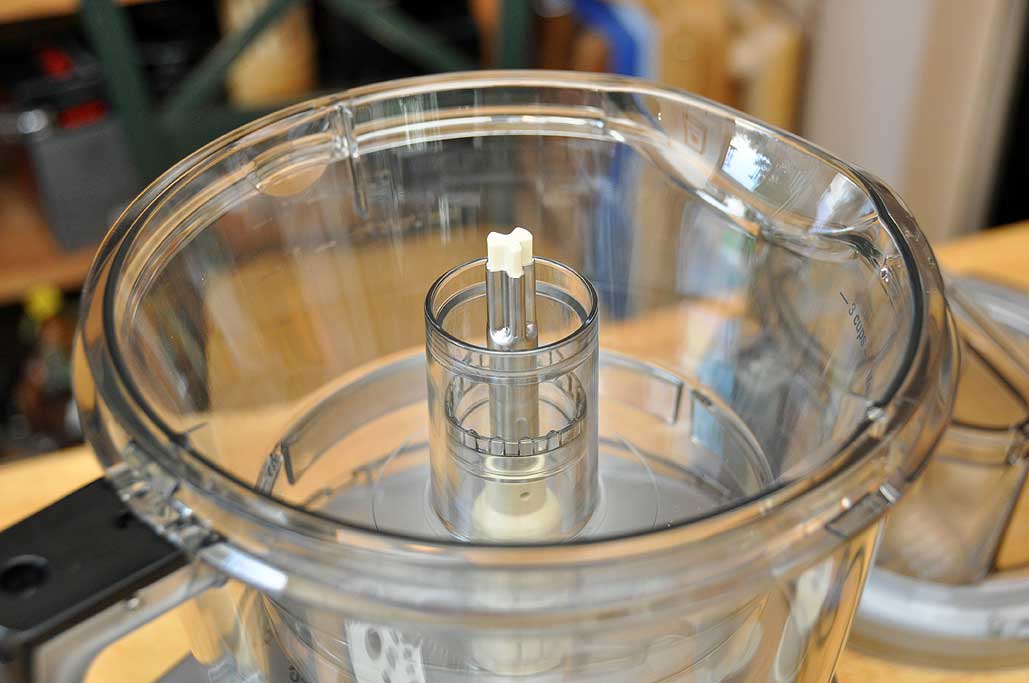
The Elite food processor is really two processors in one. It has a smaller 4-cup chopper as well as a much larger 12-cup unit. The smaller bowl fits inside the larger one and both are covered by the leak-proof lid.
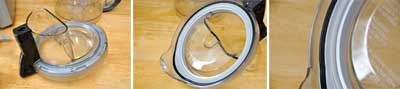
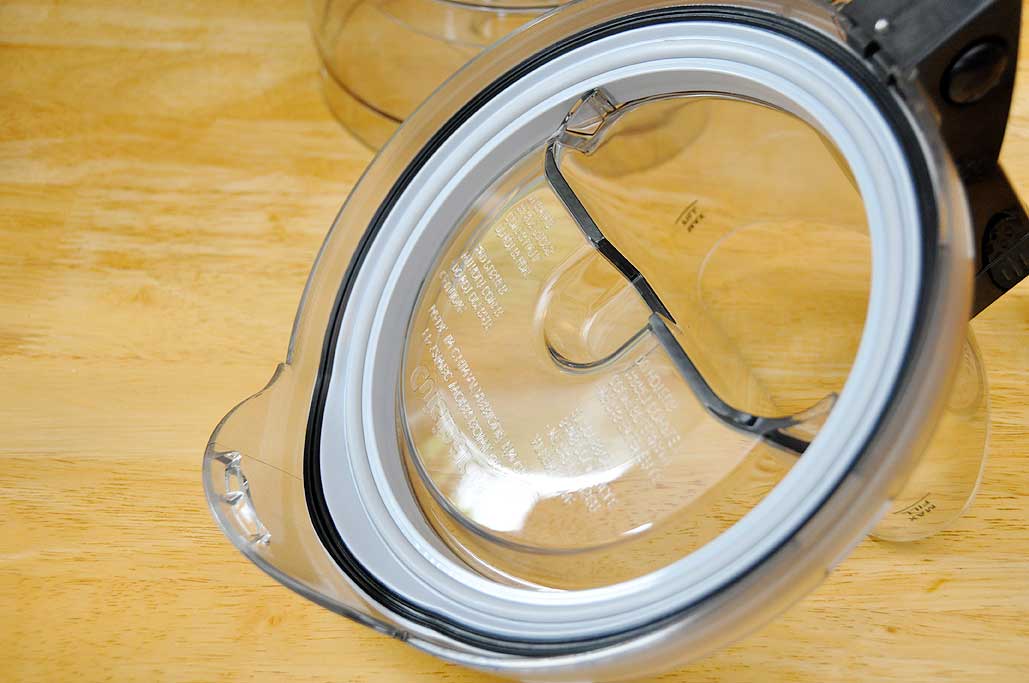
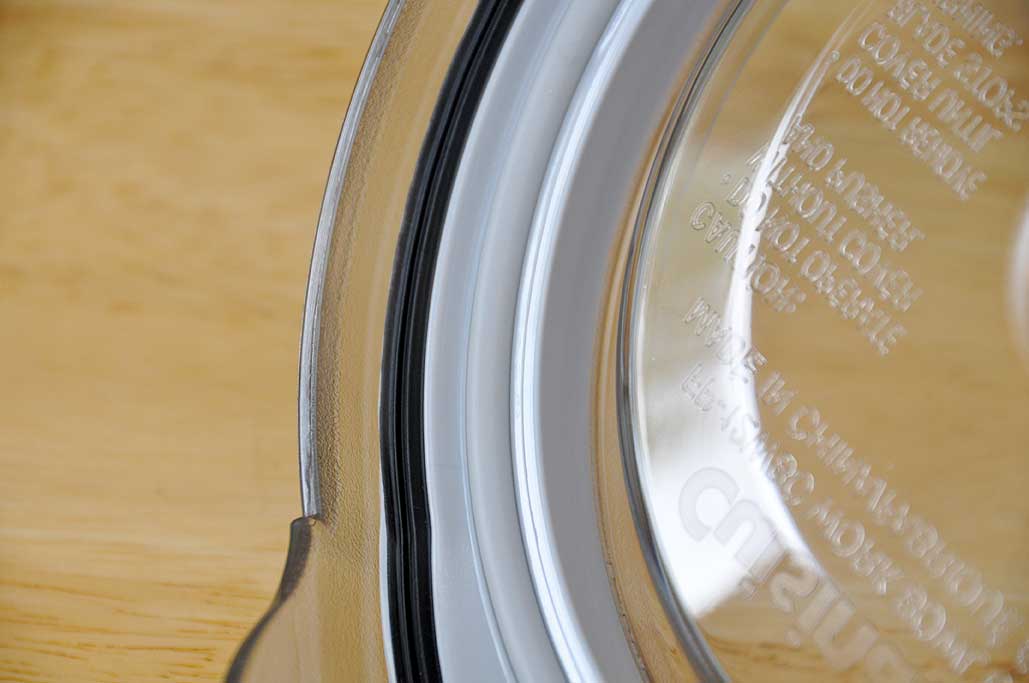
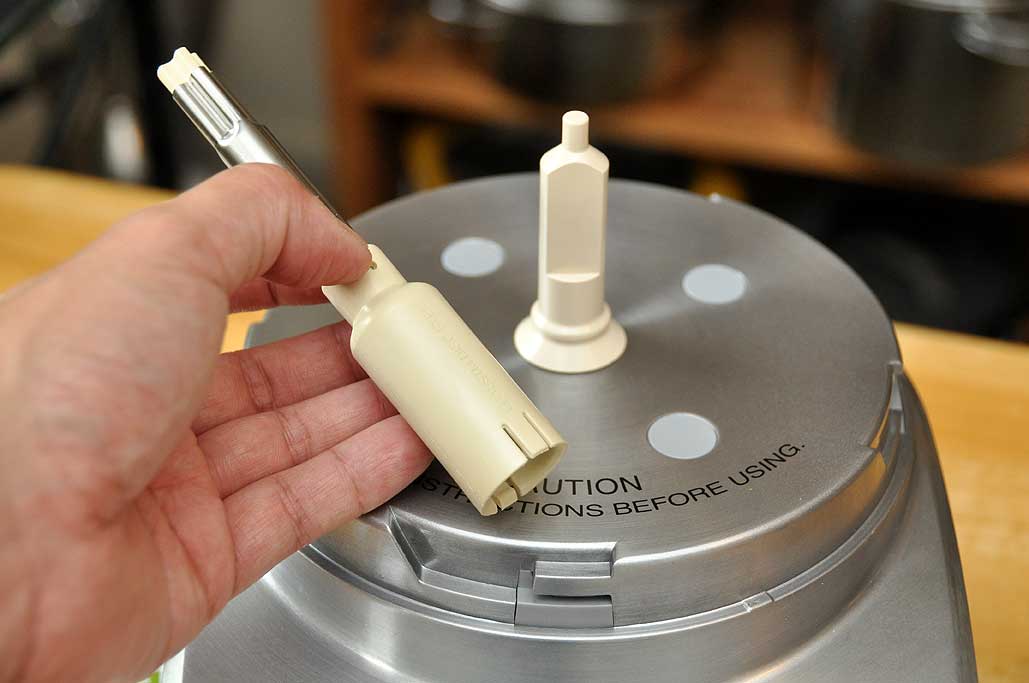
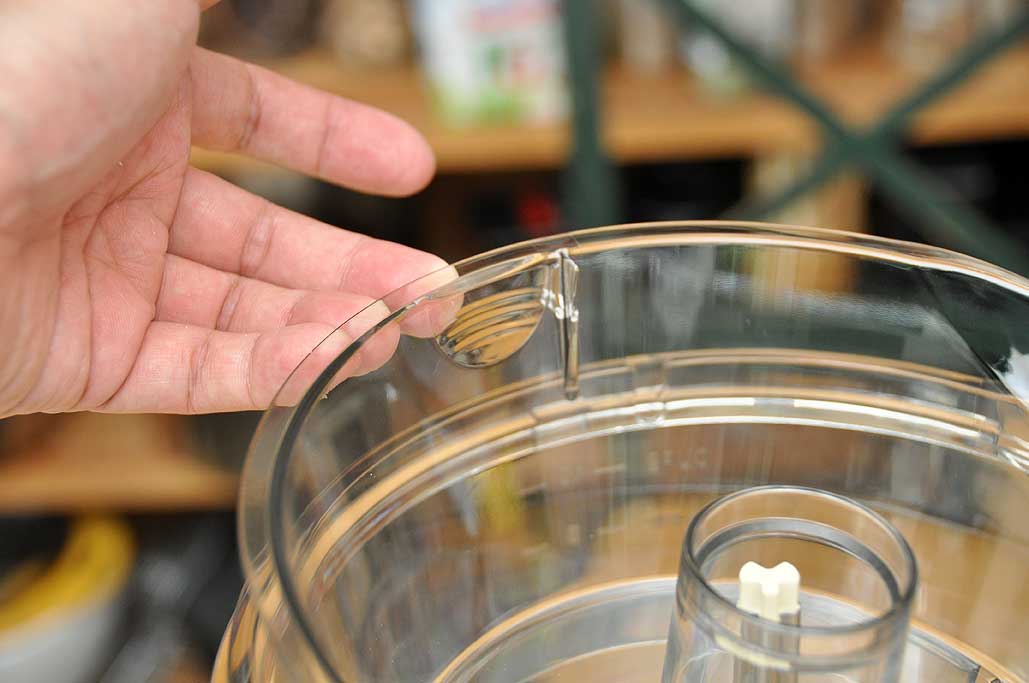
The seal on the underside of the lid is wide and flexible. It is clearly different than the typical flat silicone gasket seal. We took a few close-ups to show some of the details of the membrane. The new multiple-bowl design requires a stem which can change height. Cuisinart solved the problem with an extender which fits over the spindle.
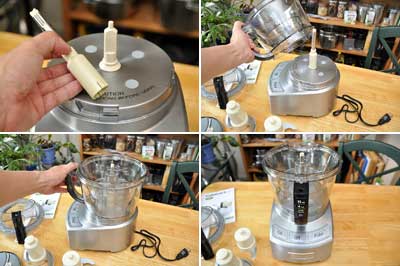
Most food processors are designed to operate only if the both the bowl and the lid are properly positioned. This one is no different. To make things simple, there is only one correct orientation for attaching the working bowl: slide it on, position it slightly left of center, and move it to the center. The working bowl locks with a positive click.
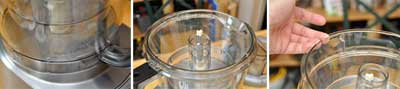
Like the larger working bowl, the smaller bowl can only be positioned one way. There are guides and channels to help properly align the pieces. Lips and strategically molded grips makes lifting easier.

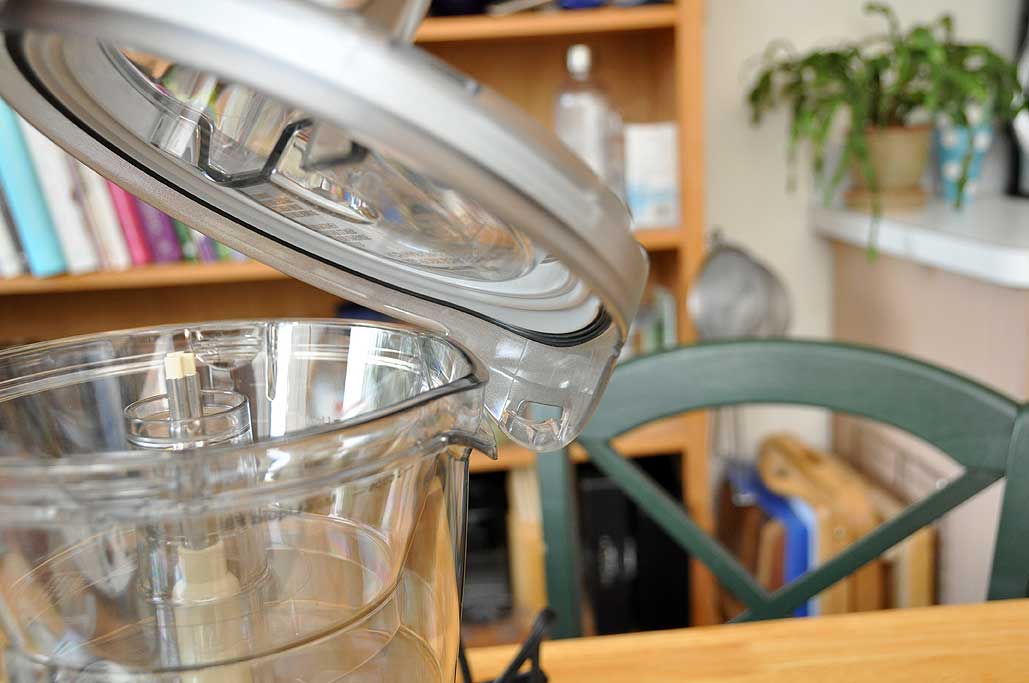
The lid locks into place via two anchor points (back, front). We prefer the hooking the back first and bringing the front down until it clicks into place. However, the front can also be aligned with the bowl's handle and pushed down until it clicks. Squeezing the side of the base will release the catch and free the lid. The feed tube in the lid is extra wide to accommodate large items.
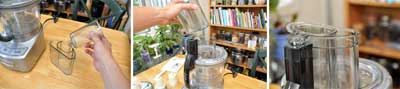
To make working with the smaller bowl easier, the food pusher has a second insert to reduce the size of the opening. A small slide in the back of the pusher locks it in place for use. With all three pieces (bowl, lid, pusher) are properly assembled, the unit is ready for use.
We will take a look at the other parts (blades, base, etc...) in the next installment of this FirstLook series. The closer we examine this Elite Collection Food Processor from Cuisinart, the more impressed we are with the design, attention to details, and quality Cuisinart has put into the product. We can't wait to see it in action! [Permalink] - Cuisinart Elite Food Processor: Bowl FirstLook
|
|
|
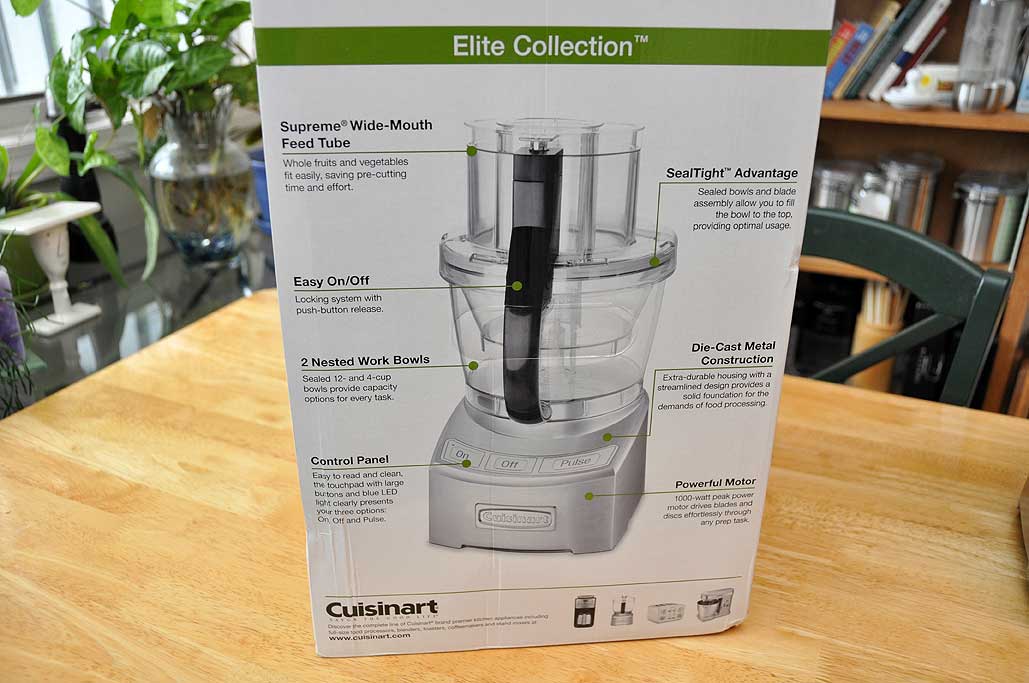
The food processor is an incredible invention. It's a tool which streamlined home cooking by making quick work of slicing, dicing, and shredding. It has the abilities of a blender, mixer, and a slicer. Cuisinart introduced the first food processor to the US in 1973. The design and features has not changed much...until now.
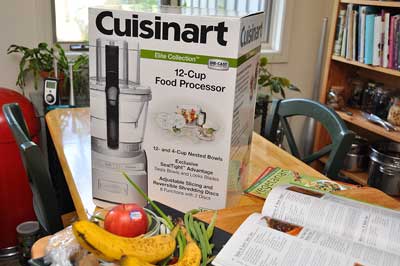
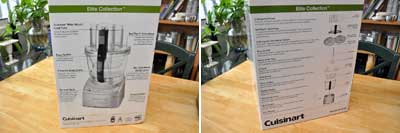
Cuisinart took everything they have learned in the past 35 years, distilled it down to the essentials, and created the Elite Collection. The new units have features such as nested bowls, no-leak design, and super powerful motor. This new line comes in various sizes (12, 14, 16 cups) and colors/materials (white, black, die cast metal).
The 12-cup unit just became available in September. A unit showed up in the RainyDayKitchen soon after. We were eager to take a look so we unpacked it right away. Our first impressions were: lots of accessories, excellent construction, and great looks!
The 12-cup die cast metal food processor came with two integrated bowls. The cover has the new SealTight feature. The blades (dough, chopping/mixing, shredding) have the exclusive BladeLock capability. However, our favorite part is the heavy die-cast brush metal base.
Cuisinart is backing up its confidence in the quality of this new line by offering a full 10-year warranty on the motor and a limited 3-year warranty on everything else. We'll have a detailed FirstLook soon. [Permalink] - Cusinart Elite Collection
|
|
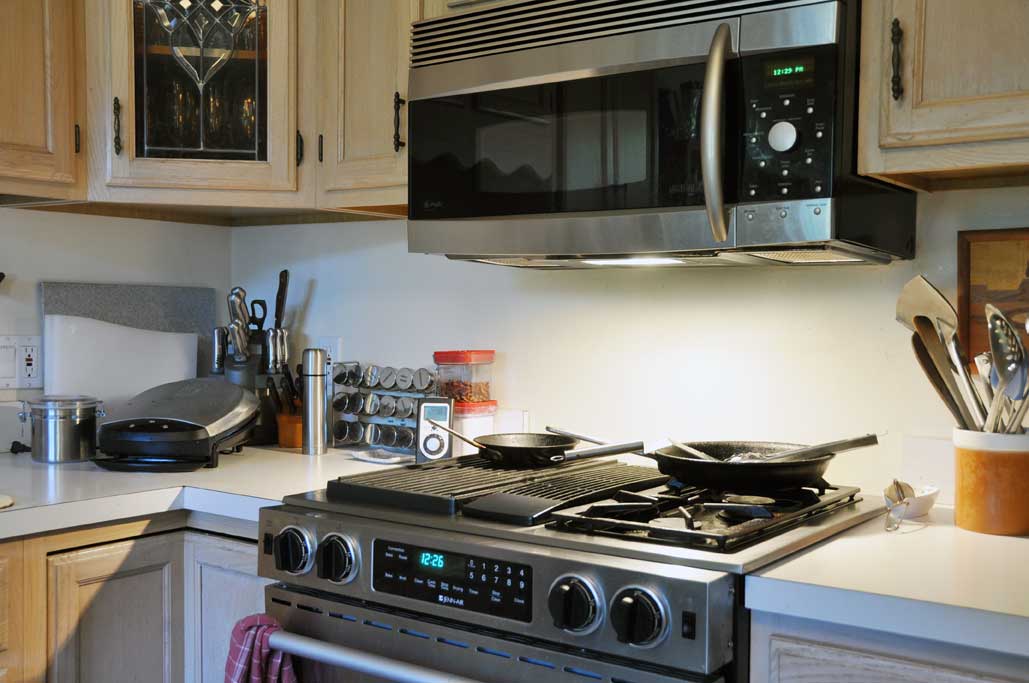
Stainless steel is a fantastic material. Stainless steel is a low-carbon steel containing at least 10% chromium. It is the chromium that gives the steel its unique stain- and corrosion-resisting properties. Stainless steel is 100% recyclable. In fact, over 50% of new stainless steel items come from remelted stainless steel scrap. Most items made with stainless steel have been meant for industrial applications, but many products for home use are now made with this versatile material.
We have slowly been updating the appliances in the RainyDayKitchen. Most of them have a stainless steel finish. They look great and stand up to well to heavy use. The steel may be stain resistant, but they are certainly not fingerprint resistant. Keeping the finish clean is definitely a challenge.

This is where Weiman comes in. They make a line of stainless steel cleaners that take the work out of keeping these surfaces sparkling. The cleaners come in a few different forms: spray, aerosal, and wipes. What they have in common is a formula which will remove fingerprints, smudges, residue and grease from the surface without leaving any streaks.
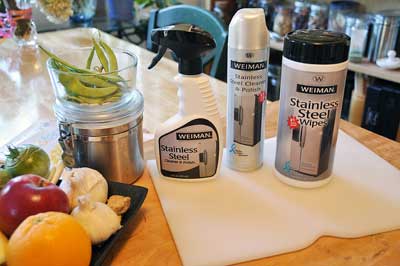
The spray and aerosol are useful for covering large surfaces (oven, stoves, refrigerators, and dishwashers). The wipes are good for smaller appliances (microwaves, toasters and coffeemakers).
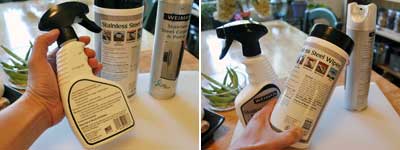

To see if the claim is as good as the product, we are planning on testing these Weiman stainless steel cleaners on all of the surfaces in our kitchen. We'll be looking at the cleaners' ability to cut grease, remove water spots, and leave a shine. [Permalink] - Weiman Stainless Steel Cleaner
|
|
|
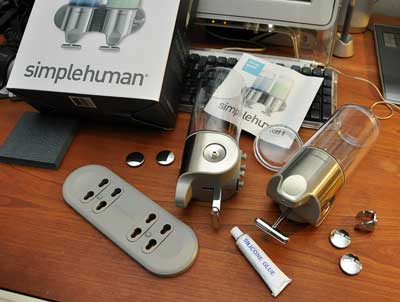
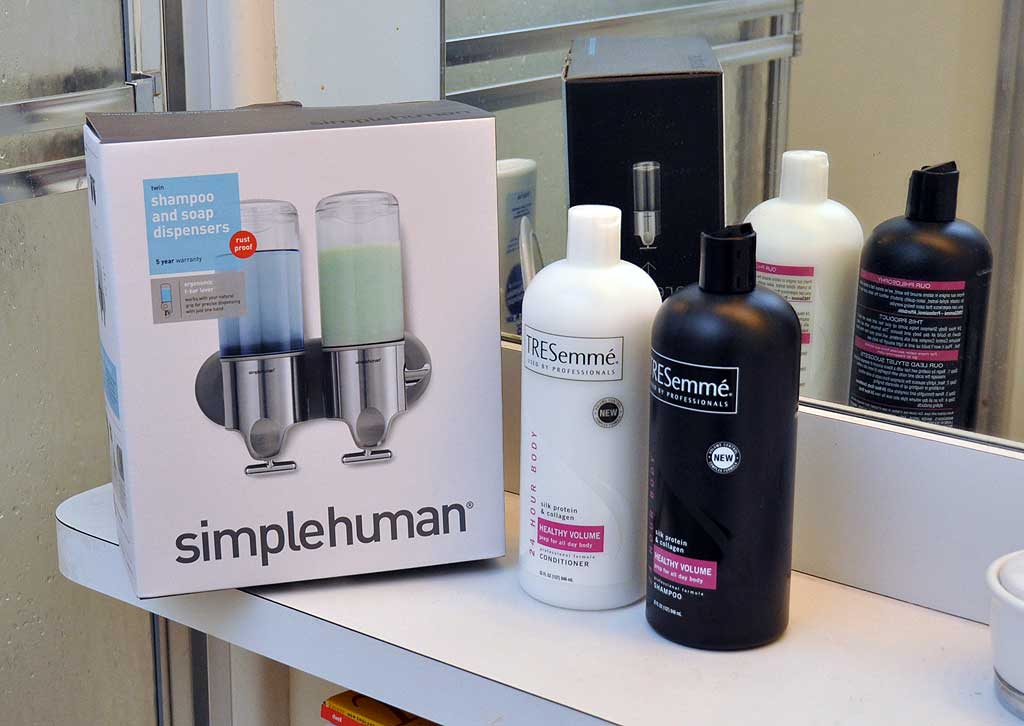
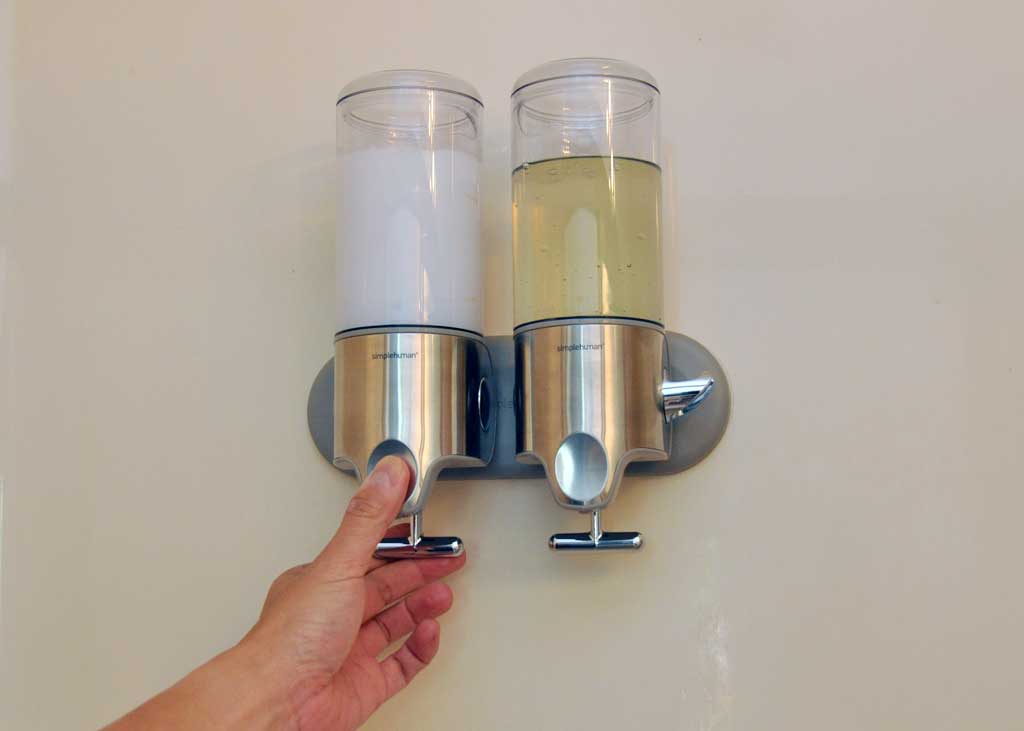
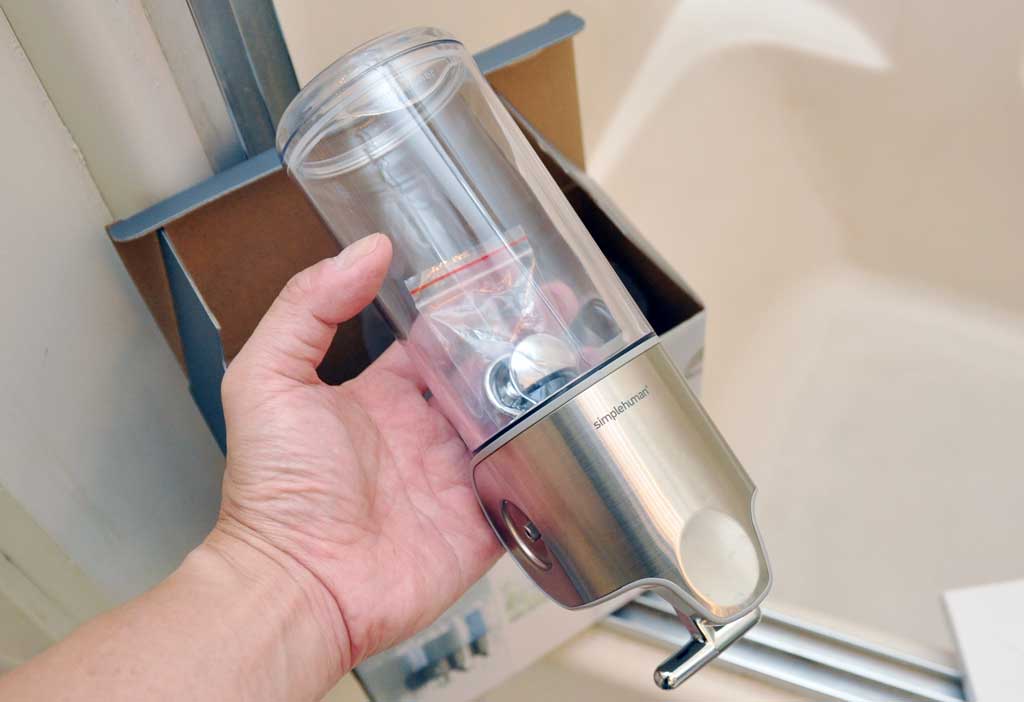
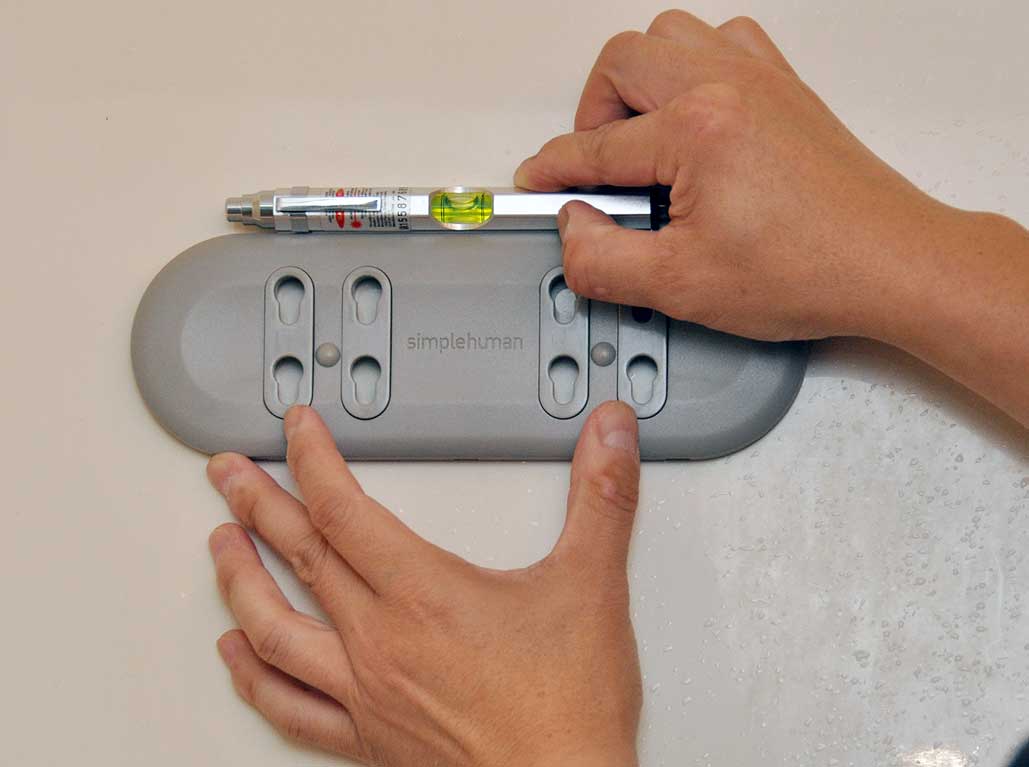
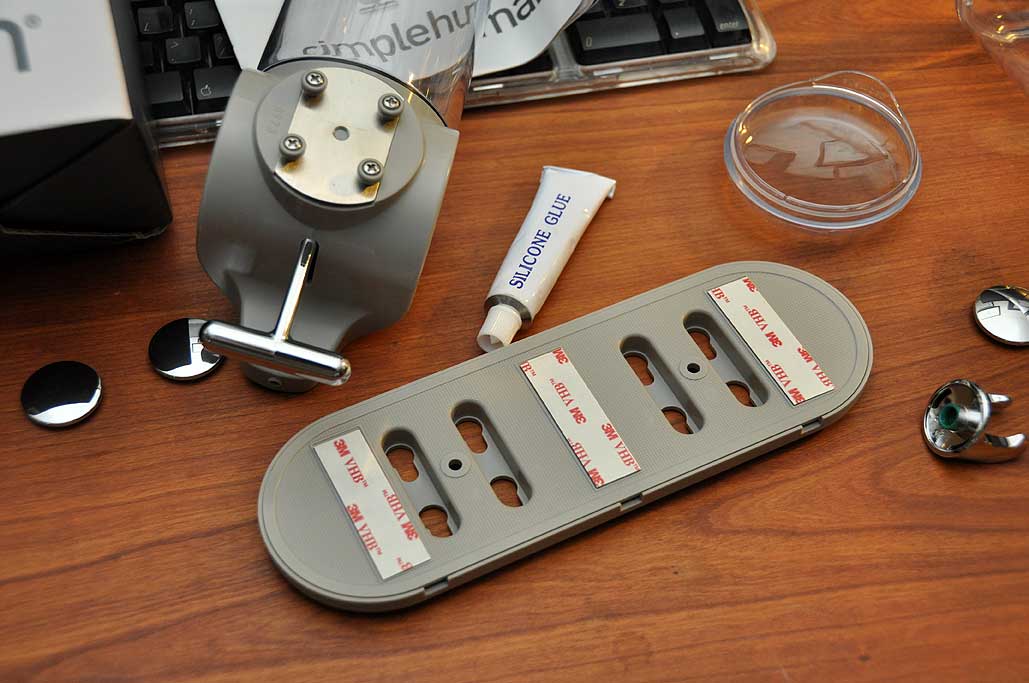
We have been away for the past few weekends, so a few of the smaller projects have been piling up. This included the installation of the SimpleHuman soap dispenser.

The installation steps are very simple: pick a spot, apply the silicone glue to the mount, level on the wall, press and let dry for 24 hours, attach the dispensers.
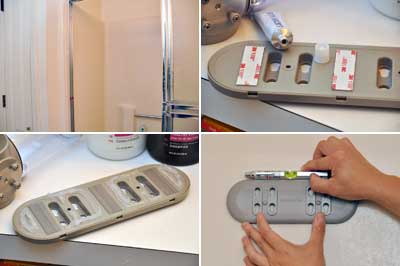
One tip for mounting is to not hold back on the silicone glue. The three strips of adhesive tape will only hold the mount in place until the glue dries. However, do make sure the mount is level before pressing down on the adhesive tape.
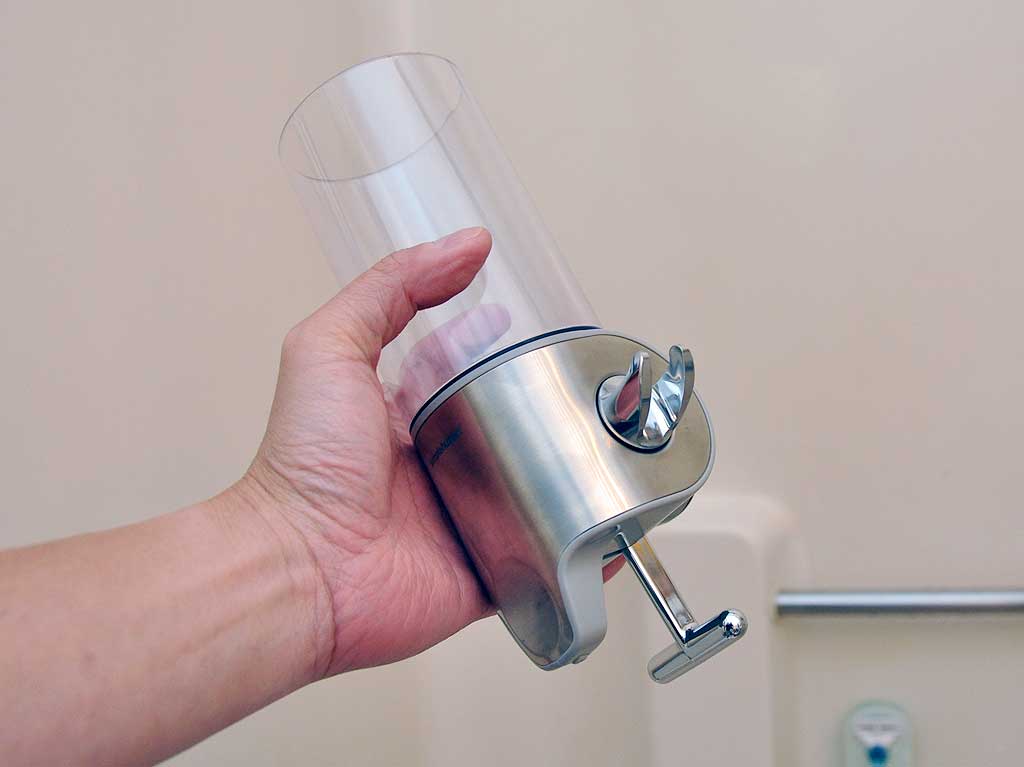
The dispensers just slide into the openings in the mount and lock in place. They are easy to remove for cleaning. There is a choice of end cap or hook for one of the dispensers.

Simple Human designed these dispensers for one-handed operation. This may seem like a small detail, but it is these small touches which make their products such a pleasure to use every time. [Permalink] - Simple Human Soap Dispenser Installation
|
|
|
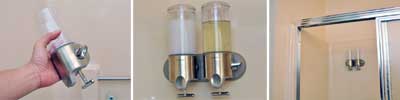
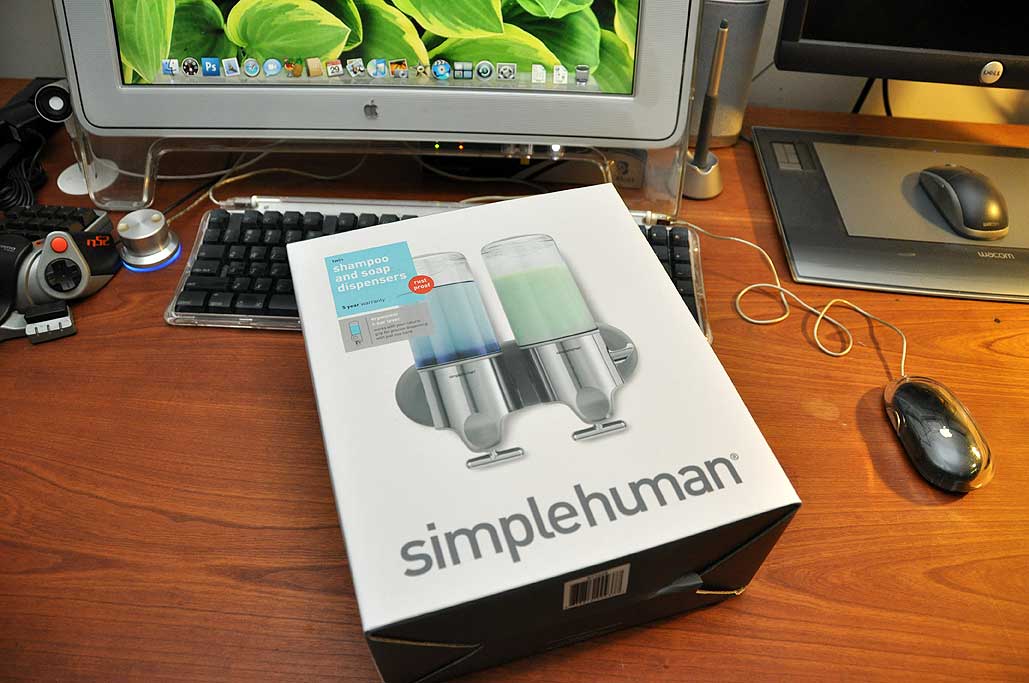
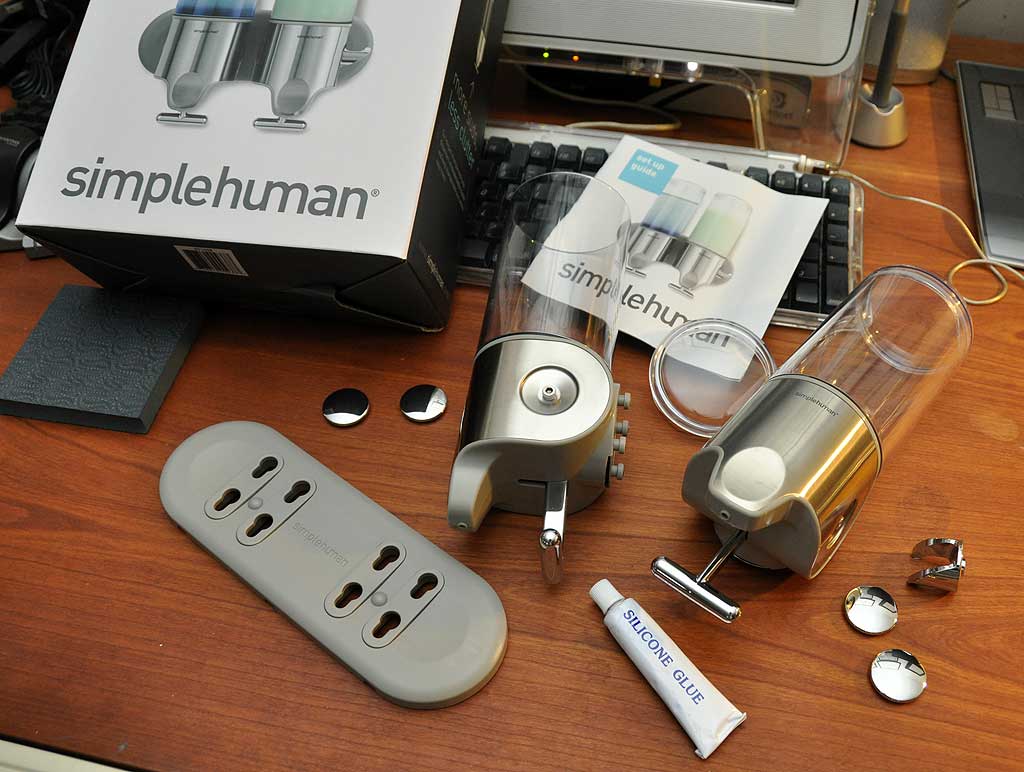
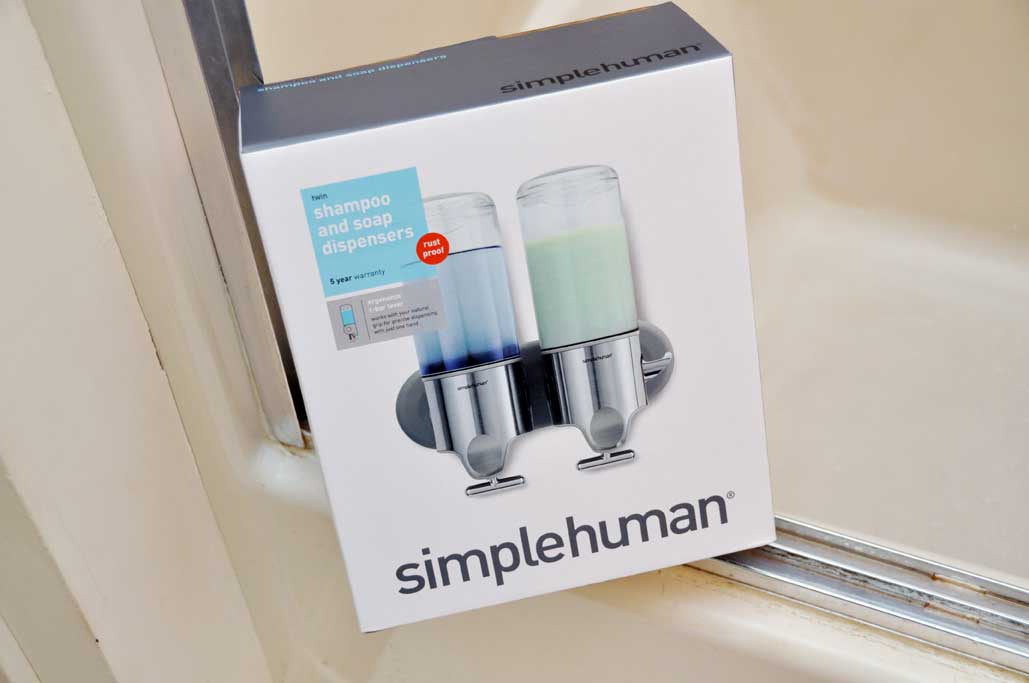
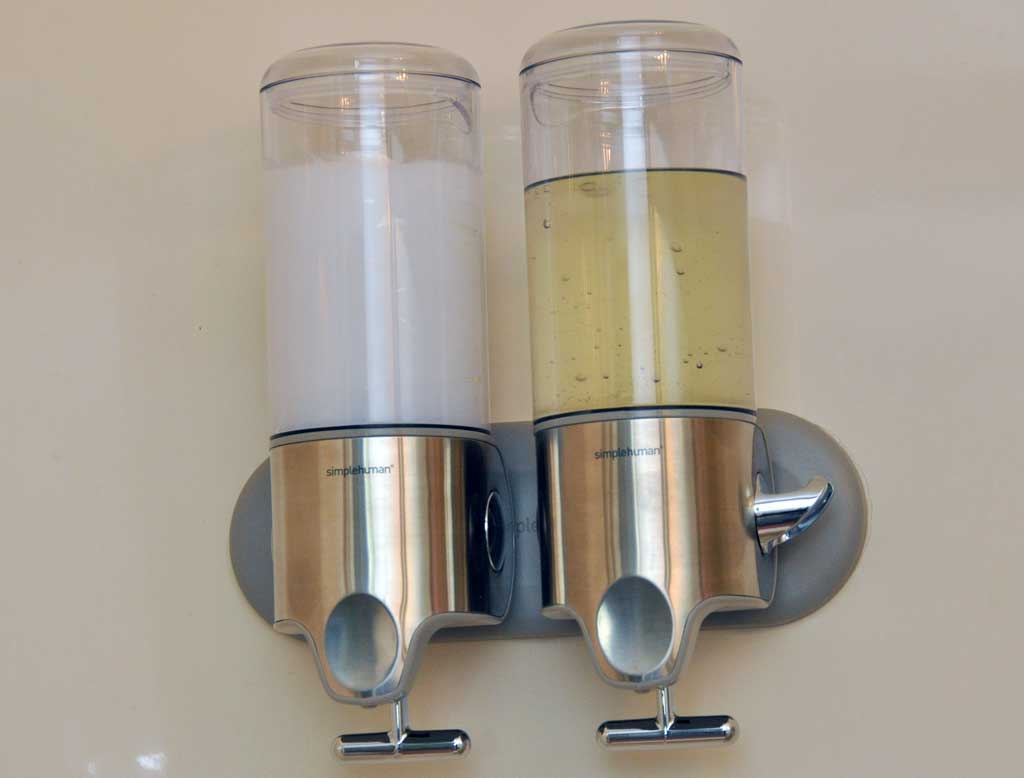
SimpleHuman makes a lot of really well thought out products for the home. We have a few of them around the office (soap dispenser, shower caddy, etc...) and have found them to be well made, functional, and visually appealing. SimpleHuman's latest product is a new line of wall-mounted shampoo and soap dispensers created to bring simplicity and order to the shower.

These shampoo and soap dispensers are designed to hold shampoo, conditioner, body wash or lotion neatly and securely on the wall. The dispensers have a transparent soap chamber and elegant chrome body. A design sure to compliment any décor and make the bathroom feel more like a luxury spa.
Unlike most soap dispensers, which require both hands: one to release the soap and the other to catch it. The simplehuman shampoo and soap dispensers are designed for easy, one-handed use. A wide, twist-off lid makes the dispensers easy to refill and the clear soap chamber shows how much soap or shampoo is left.
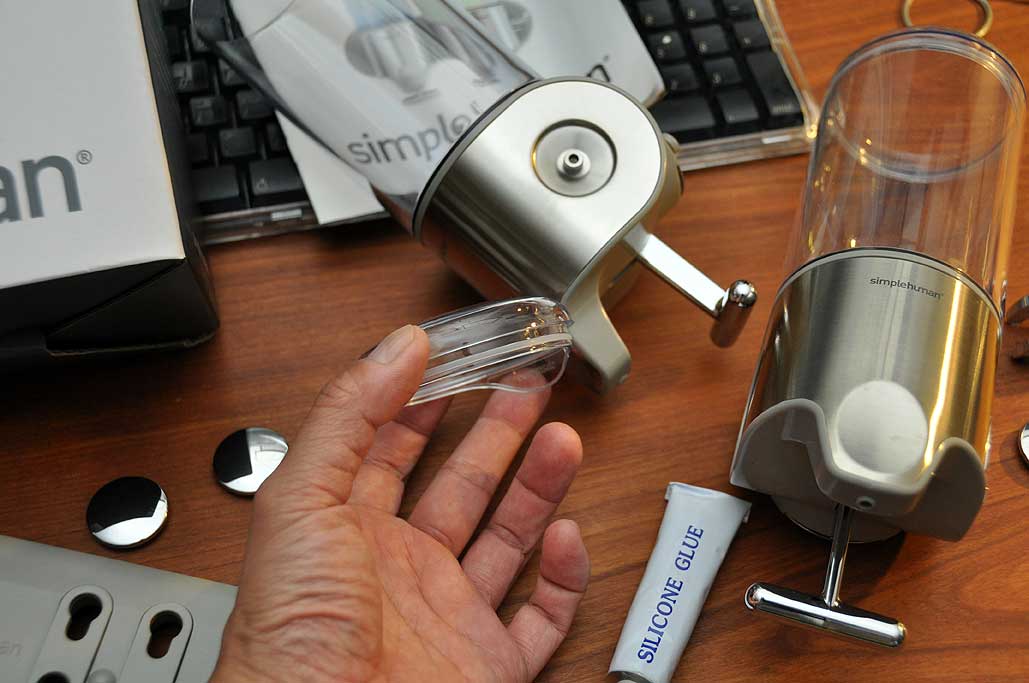
In addition to being easy to use, the dispensers are also easy to install. There’s no need for hardware or tools—they come with specially formulated waterproof silicone glue and double-sided adhesive tape. The tape holds the dispenser in place while the silicon glue is applied. The glue creates a watertight barrier and attaches the unit securely to the wall.
Made from rustproof high-grade stainless steel and durable ABS plastic, the shampoo and soap dispensers won’t rust or discolour over time, and come with a 5 year warranty. We will be installing this soon and should have the installation write-up in a week or two after. The interns will have no more excuses for not following the one shower a week policy...whether they need it or not! [Permalink] - SimpleHuman Soap/Shampoo Dispenser FirstLook
|
|
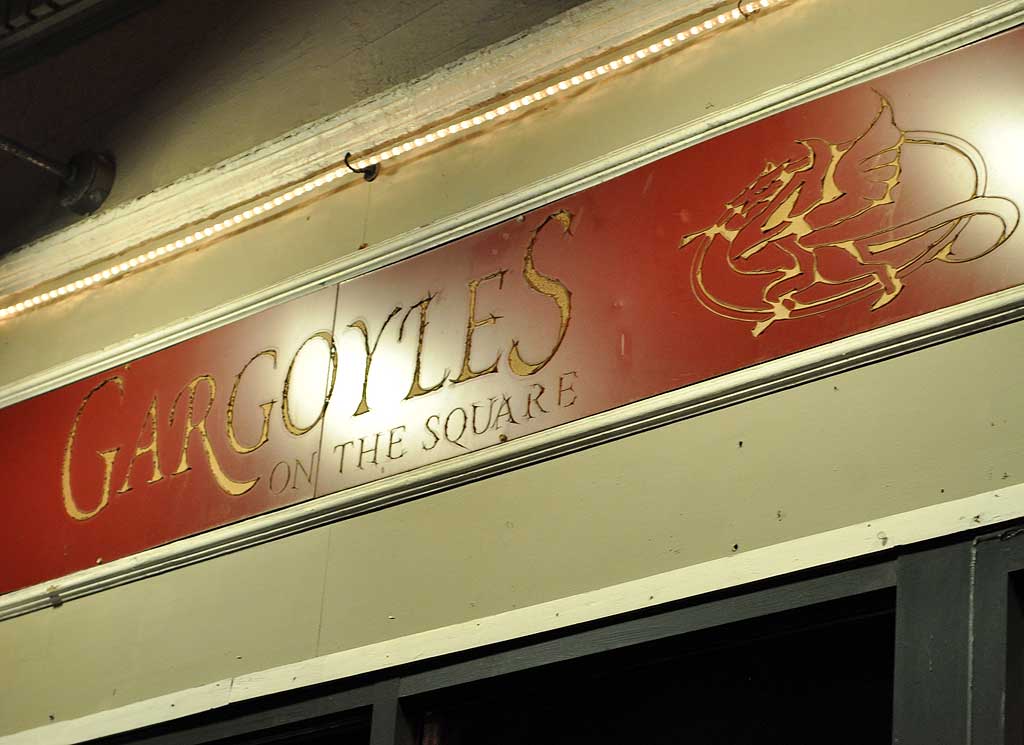
We packed a lot into this Labor Day weekend. On Saturday, we were on the road early and drove down to NYC for a Chinese banquet that evening (check out this video of how to de-bone a whole fish using nothing but spoons). We left early and came back to Boston and met up with Lisa and Jay for the Lobster Feast at Gargoyles in Davis Square.

Lisa and Jay live within walking distance of the restaurant, so instead of fighting for a parking spot in Davis Square, we parked on their street. It gave us a chance to visit with them and see what they have been doing with their house.
Lisa and Jay have been busy renovating a house in Somerville for the past few years. They have a fun and crafty approach to their decorating, have done an amazing job with the space and have documented their efforts for RainyDay Renovations. We've been meaning to writing it up at some point :-)

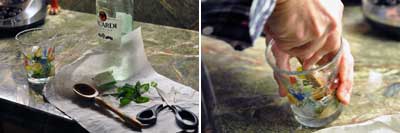
Our dinner reservations were not until 8PM, so we had time to unwrap a b'day present and to enjoy one of Jay's handmade mojitos. A perfect Summer cocktail before the stroll over to Gargoyles.

The LobsterFeast menu was not Gargoyles' standard offering for the evening. It was a Labor Day Weekend special and reservations had to be made ahead of time. The LobsterFeast started with a lobster pizza appetizer, followed by the main course of a 1.5lb boiled lobster and mussels , and ended with strawberry shortcake and a side dish of lobster ice cream. The fixed price of $65/couple also included a bottle of wine. It was an amazing deal and well worth the early drive back from NYC.

If you want advance notice of Gargoyles' dinner specials, get on their emailing list. The restaurant will be closed on Sept 7-9 for renovations, but will reopen with a new menu on Sept 10. We will definitely keep our eye out for their next special and hope to be back soon! [Permalink] - LobsterFest at Gargoyles
|
|
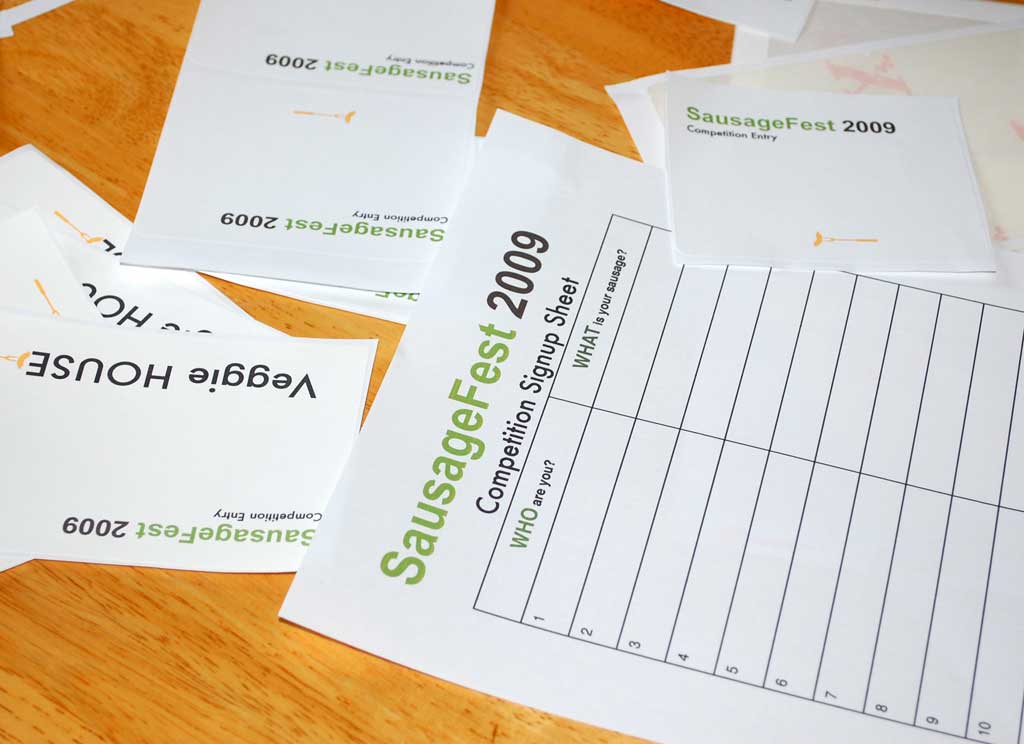
SausageFest 2009 had a large number of competition entries, and a great turnout of guests. We knew this at the start because we used Evite to manage the invitations and RSVPs this year. What a great tool! If you are planning an event with more than a few guests, Evite is a great resource. It really helped the crew prep properly this year...and prep they did!

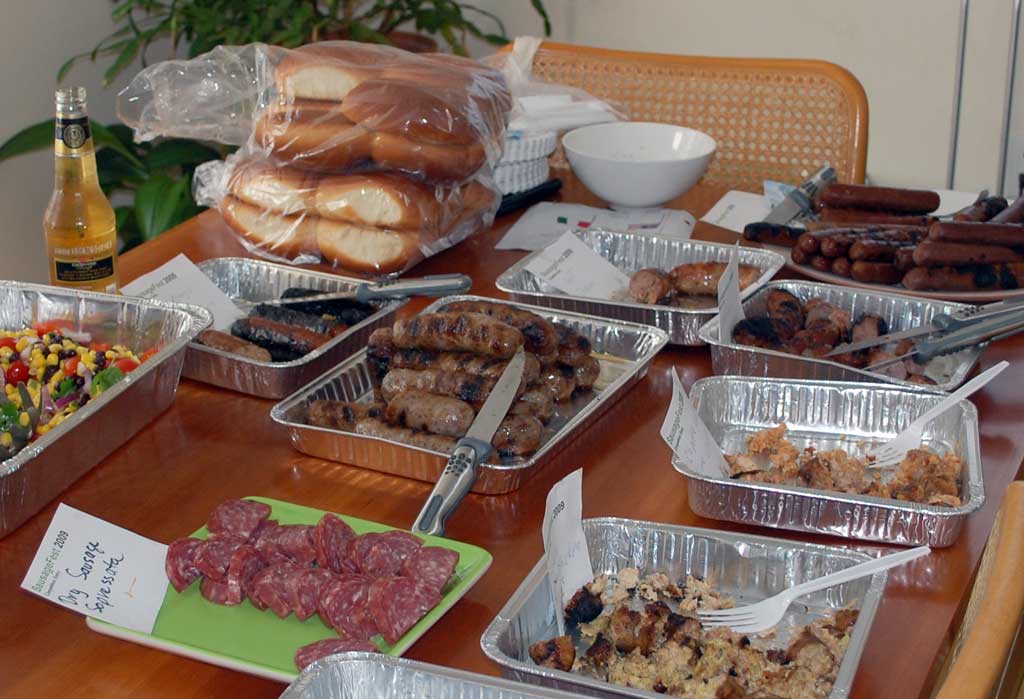
The various grills (gas, charcoal) were cleaned and ready to go by mid-morning. Last minute items (extra gas canisters, ice, entry forms, etc...) were all checked off the to-do list by noon.
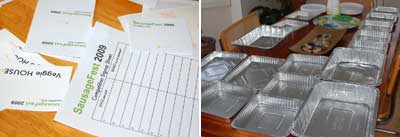
As we all know, folks love to congregate in the kitchen. From past experience, we also knew that everyone loves to help if there are things for them to do. So we laid out the arrangements for the sauage entries early, strategically placed items to help lessen the kitchen congestion, and made sure the "flow" around the food table was not impeded in any way.
The grills were lit and the "house" sausages from the Buffalo Guys were sizzling by 3PM. Guests bearing sausages (and pies, beer, Turkish stuff in containers, etc...) started arriving around 3:30. SausageFest was in full swing by 4PM. All in all, over a dozen different entries for the categories ( Most Exotic, Vegetarian, Homemade--by butcher, Crowd-Pleaser).
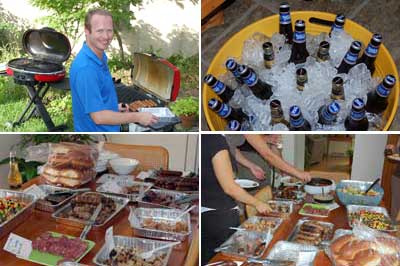
What happened after 4PM was kind of a blur but it appears that we all managed to eat ourselves into a nice meat-coma (unless you were the few who doesn't eat meat). Some of the more exotic entries were: Artichoke & Parmesan Chicken sausage; Chipotle, Honey & Lime Chicken sausage; Spicy Mango & Jalepeno Chicken Sausage; Smoked Apple Chardonnay Chicken Sausages. Apparently chicken is the base meat of choice for exotic sausages.

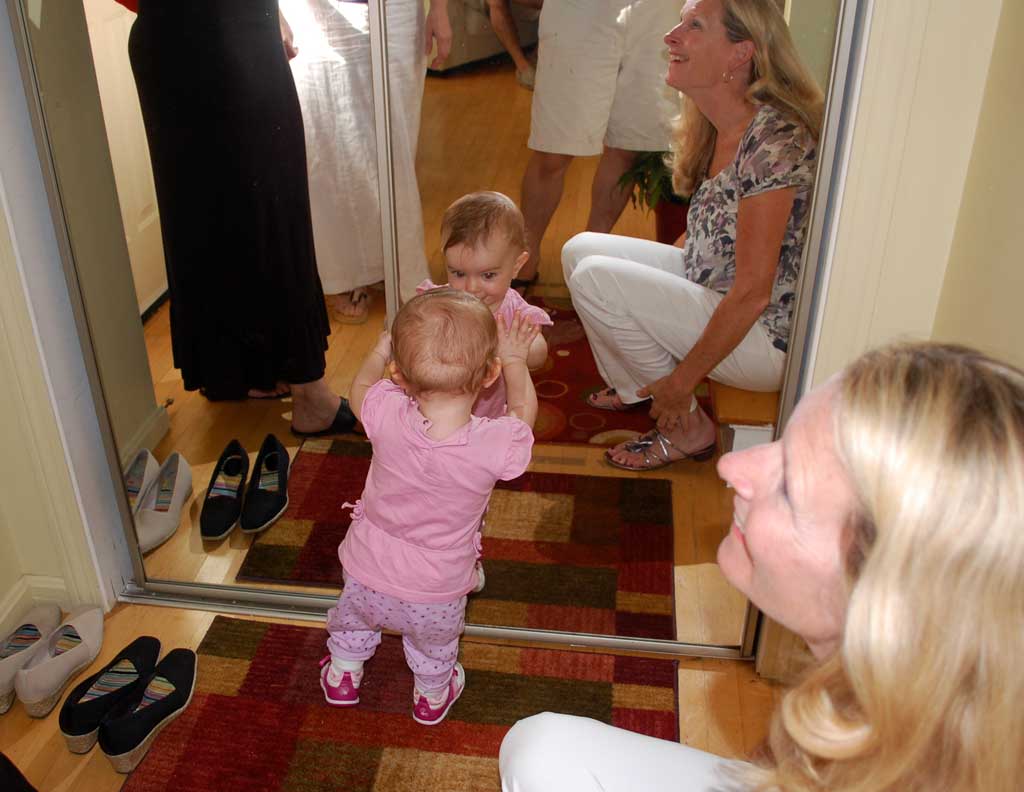
Another "exotic" thing at the party were the babies. We are not sure how, but they presented valid invitations so we had to let them in. The babies (Michael, Ella) were clearly a hit and often over-shadowed the sausages. There were reports of Ella munching on an apple-chicken sausage, but we do not have photo-confirmation of such. However, she did kindly posed for this shot with Yoncha and Franchesca.

The voting got a bit complicated with all the excellent entries, but in the end we were able to sort everything out. We have to give a special mention to one of the participants. Erica (a first time SausageFest participant) brought a spicy homemade dipping sauce which, had it been officially entered with any of her entries, would definitely have taken a categorie. Erica's beer-marinated entries were good, but the sauce was simply amazing.

We would like to thank all of our guests for helping us put together a truly spectacular collection of sausages. The competition was keen this year. We would also like to note that while it was great to sample the tasty chicken entries, it was Adam and Carron's "Hot Italian" which took home the Crowd Pleaser title. What was even cooler was that the sausages were locally-made from Tony's Market in Roslindale! We are going to have to go check out Tony's Market and see what other "winners" they have in the shop. [Permalink] - SausageFest 2009
BTW, here is a link to the requested recipe for the Chickpea, Chilli, and Coriander Salad.
|
|
Hard to believe this is our sixth SausageFest! This year's event is going to the biggest one yet. We will have guests from Italy, some from Bermuda, and a big crowd of RainyDay friends from the New England area. We are looking forward to seeing what sausage entries will be at the event.

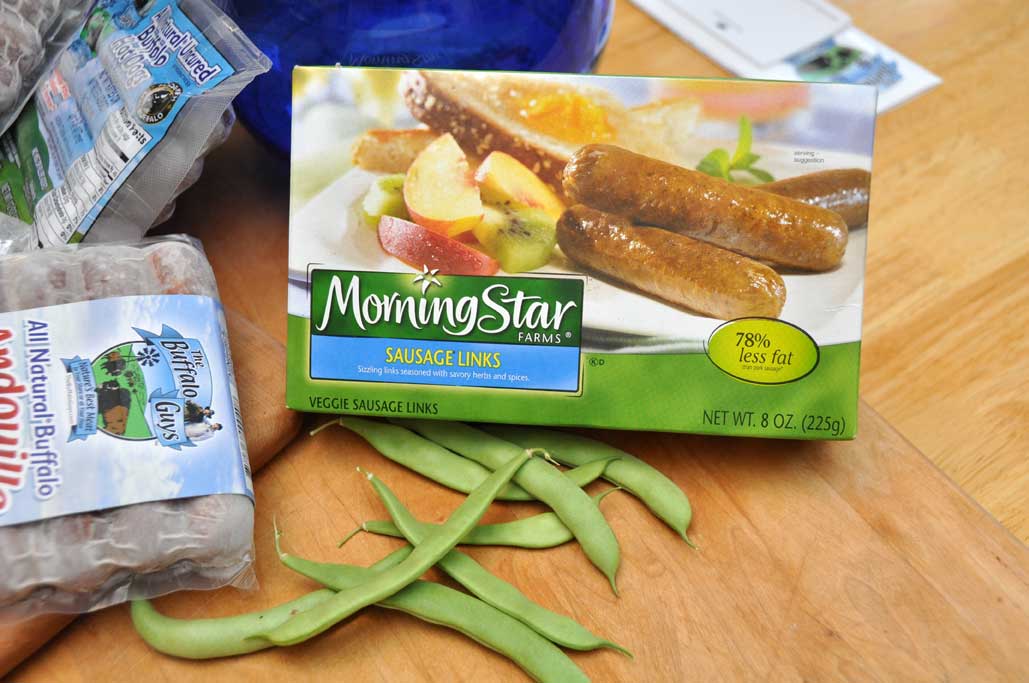
As in past years, our food sponsors have sent some goodies for the event. The Buffalo Guys have sent a nice sampling of their buffalo sausages and hot dogs. Their sausages have always been a crowd-pleaser! The Soda Club folks sent a few of our favorite Summer flavors, extra bottles, and an additional CO2 canister. They also sent a pack of flavors designed just for water. Making our own flavored soda is both a money-saver and a planet-saver. It is also a lot of fun!
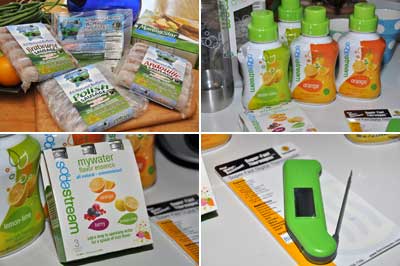
To ensure that all the sausages will be grilled to the proper temperature, we have the latest in temperature probes from ThermoWorks. This new Thermapen is faster, more accurate, and now completely splash-proof.

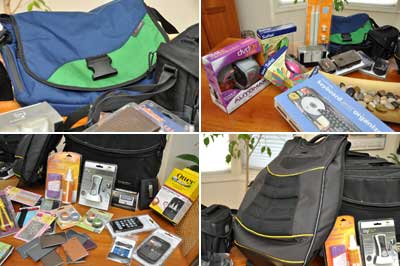
Just like previous SausageFests, there are four different categories: Crowd Pleaser, Most Exotic, Best Non-Meat, and Best Homemade. Since SausageFest IS a competition, there are prizes for winners in each category. This year there will be LOTS of prizes. We have stuff from Tom Bihn, Slappa, Tamrac, American Innovative, OtterBox, and Saitek...just to name a few.
Even though this is quite the event for processed meats, vegetarian options will be available at the sampling table. Past experiences have indicated that approximately 25% of SausageFest guests are vegetarians. This year the numbers may be a high as 30%. We are close to Cambridge after all.

There will be three grills going. We look forward to seeing everyone and their sausage entries. Just remember...nobody leaves until all of the food is gone! The weather is looking good for the event. We'll have a write-up posted by Sunday...after we have recovered from the sausage coma. [Permalink] - SaudageFest 2009 Sponsors
|
|
|
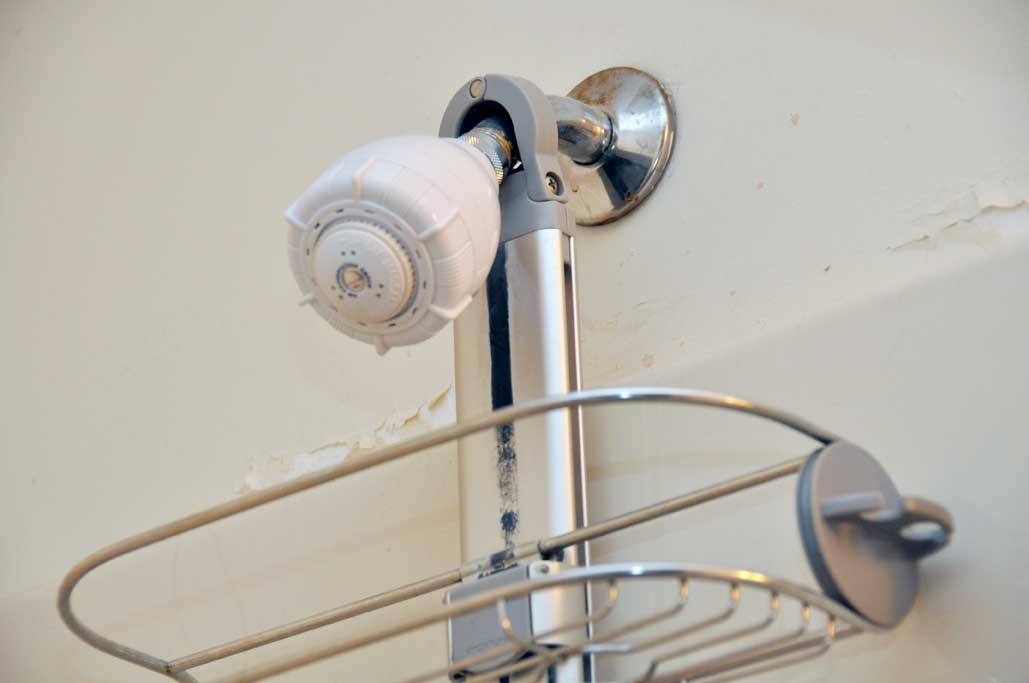
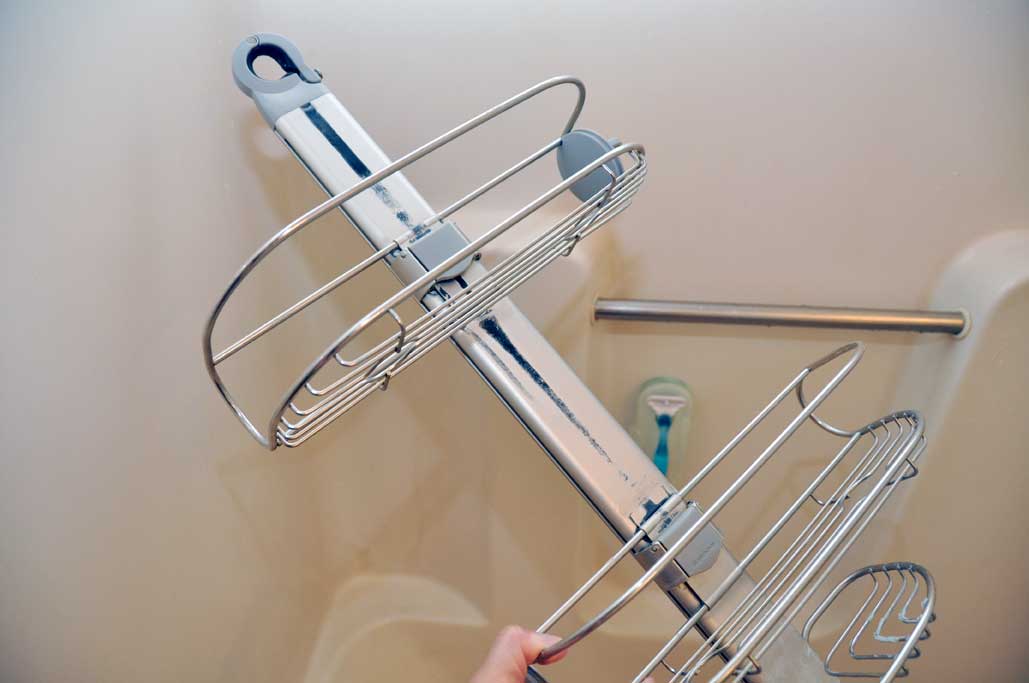
As most readers are aware, we don't just take a quick look at the features for most of the items reviewed on RainyDayMagazine and call it a day. We like to see how they actually perform in the real world over time. This is what makes us different from other "review" sites. Based on the emails we get, you all seem to agree :-) Since we are getting ready to add another SimpleHuman product to the shower in the company bathroom, we thought it would be a good opportunity to take a look at how the last item was faring.
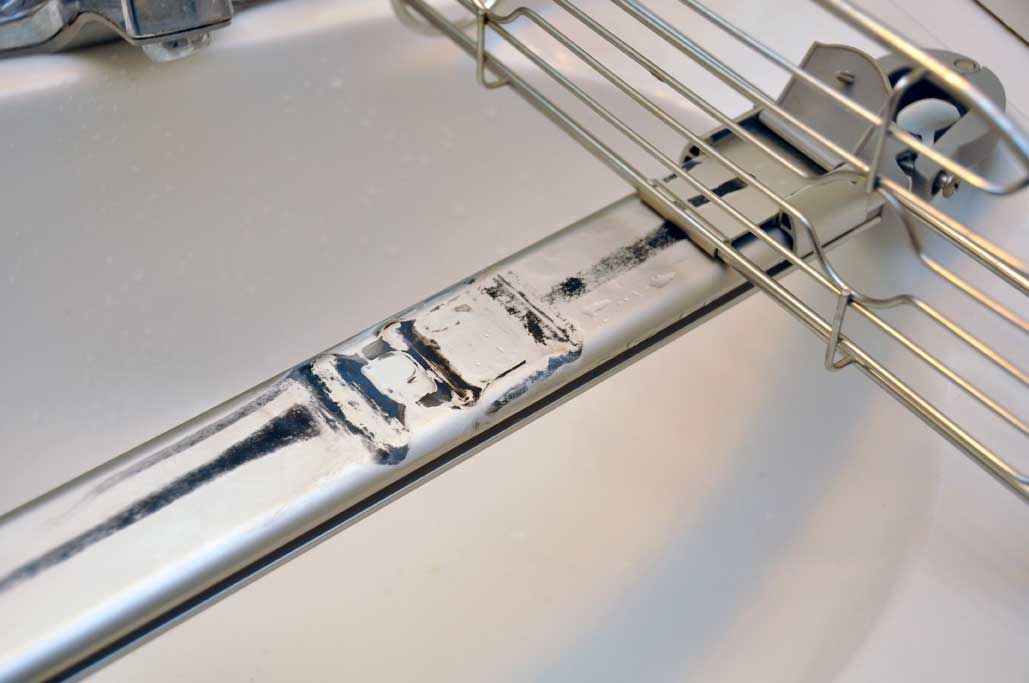
It has been almost two years since we installed the SimpleHuman shower caddy and it has held up amazingly well. Its design is very stable even when heavily loaded. We love the horizontally and vertically adjustable racks. They can be adjusted to accommodate many bottle sizes. After almost two years of daily use, there is no rust on any of chrome parts. The only stain is this odd black streak running down from the shower head. We have been wanting to clean off this gunk for the past 6 months, but like many things we never got around to it...until now.
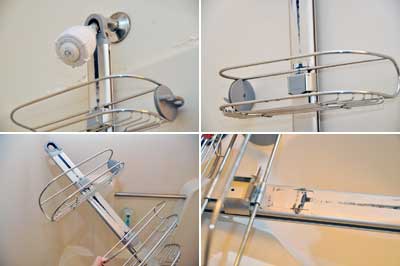
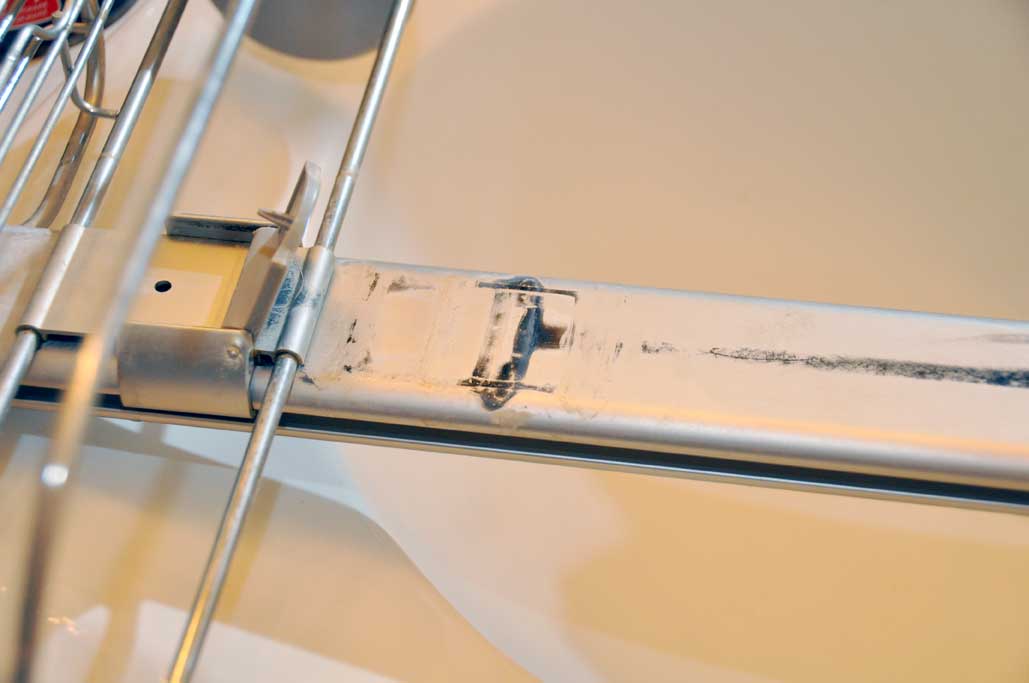
Since it ran from the shower head down, we thought it had to be because of the black rubber ring around the clamp. The stain does not come off when scraped with the fingernail. Whatever it was, it flowed down from the top, around the clamps and was diluted by the time it got to the mid-section. It must have been a bit thick as it left a clean stripe at the start as it moved downward.
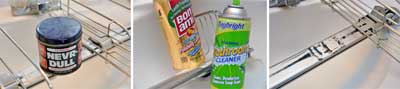
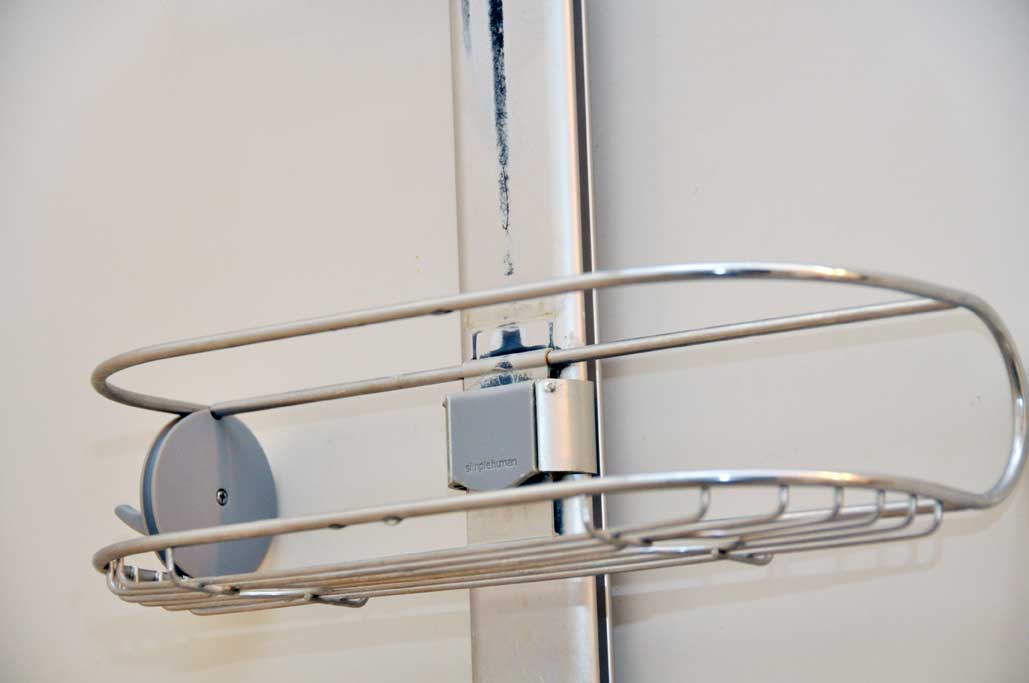
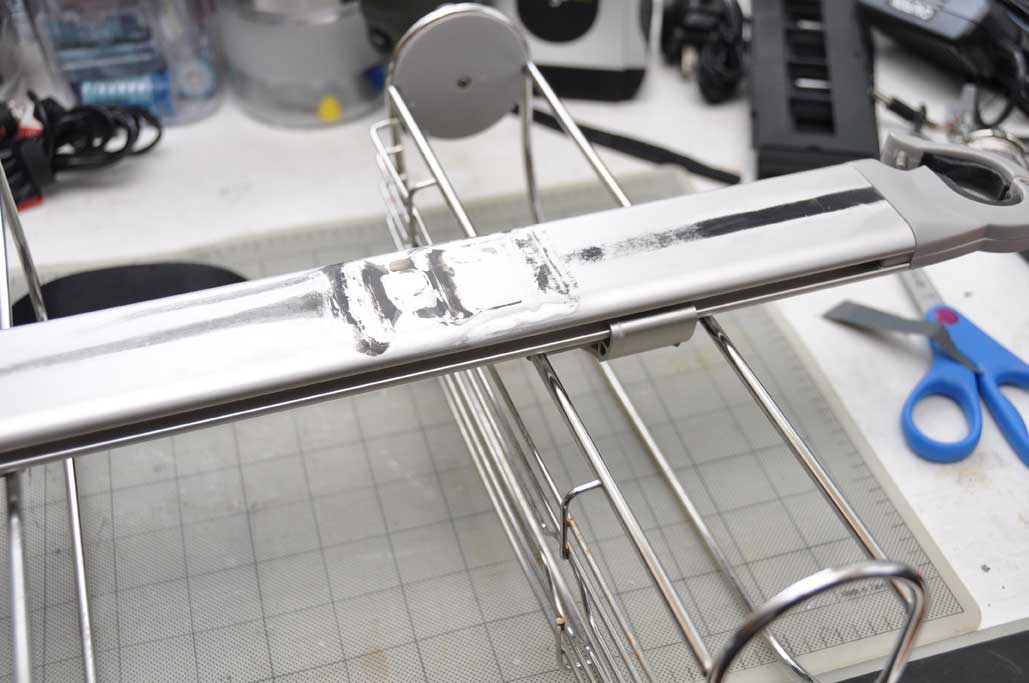
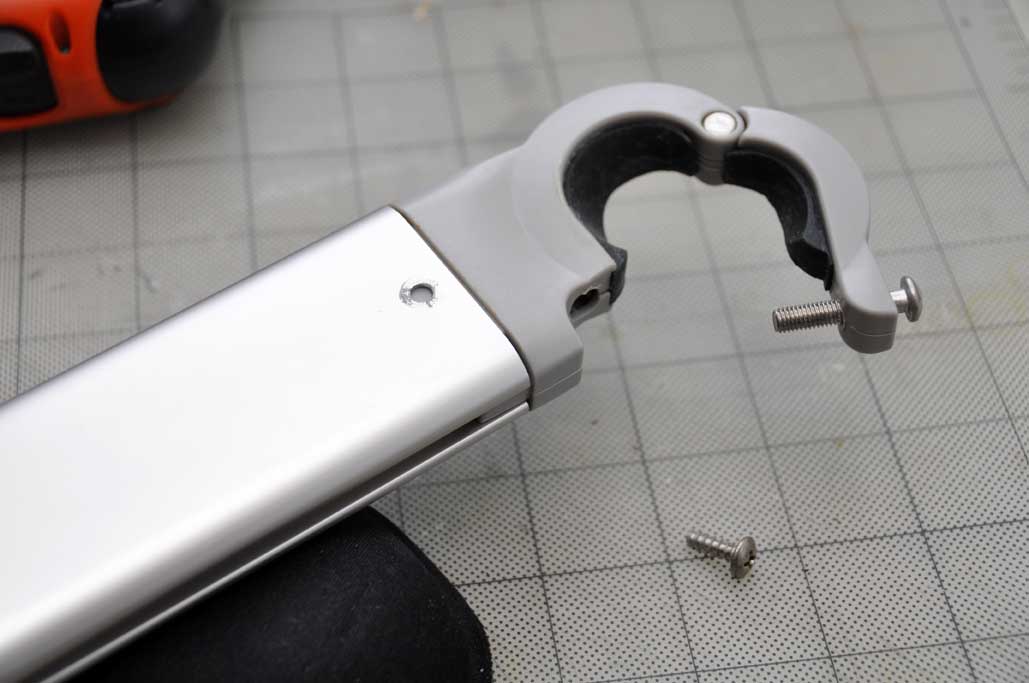
It also did not respond to any of the cleansers we had in house. In fact, the only way we could get it off was to sand it. So, it seems that this stain was the result of a chemical reaction between something and the aluminum spine. We had two options at this point, sand it off or flip the channel. We chose the quicker solution.

The only downside to flipping the channel was that the two screw holes are now visible in the front of the caddy. This is something we are willing to tolerate as the sanding option would have meant that we would be removing the anodized surface and exposing the raw aluminum...which may not be the best thing for the metal.
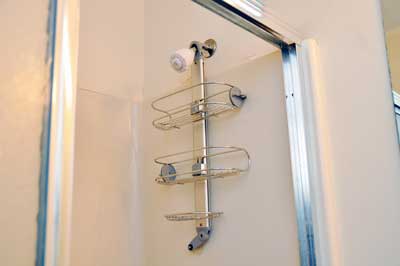
Everything reassembled nicely as the spine is symmetrical. The flipping part of the project took less than 10 minutes and we were happy with the results. Now if we could figure out what actually reacted with the aluminum. Until then, the interns are forbidden to do chemistry experiments while washing their hair in the shower. [Permalink] - SimpleHuman Shower Caddy ITW
|
|
|
Companies that pay special attention to the design of their products (Apple, Sony, etc...) have always enjoyed a loyal following. Their customers are happy to pay extra for products which perform well and look great doing it. We have always tried to do our part in helping to promote companies which have this focus. SimpleHuman is such a company.

We have reviewed many products from SimpleHuman (coffee maker, shower caddy, etc...) over the years. They are great looking products which have stood up to the rigors of daily use around the office. When these shampoo and soap dispenser showed up at the office, we were eager to take a look. Their tagline of "more suds, less clutter" meshed well with the philosophy here at the magazine. God knows we need help in reducing the clutter :-)

As with all SimpleHuman products, this dispenser was designed to help promote a calm and pleasurable living environment. One that is "efficient," not austere.

The FirstLook will be posted in a week or so. The installation write-up will follow shortly. Unfortunately, the "group shower" FirstUse photoshoot proposal did not make it past the review committee (Bostonians...need we say more?). [Permalink] - SimpleHuman Liquid Dispensers
|
|
|
When it gets really hot in Boston, many people head to the Cape. The Cape has become so popular that a two-hour drive can turn into a four-hour crawl. We hate sitting in traffic, which is why when we get the urge to take a mini-vacation, we head to "The Cape Cod of the South Shore"... Wollaston Beach in Quincy.

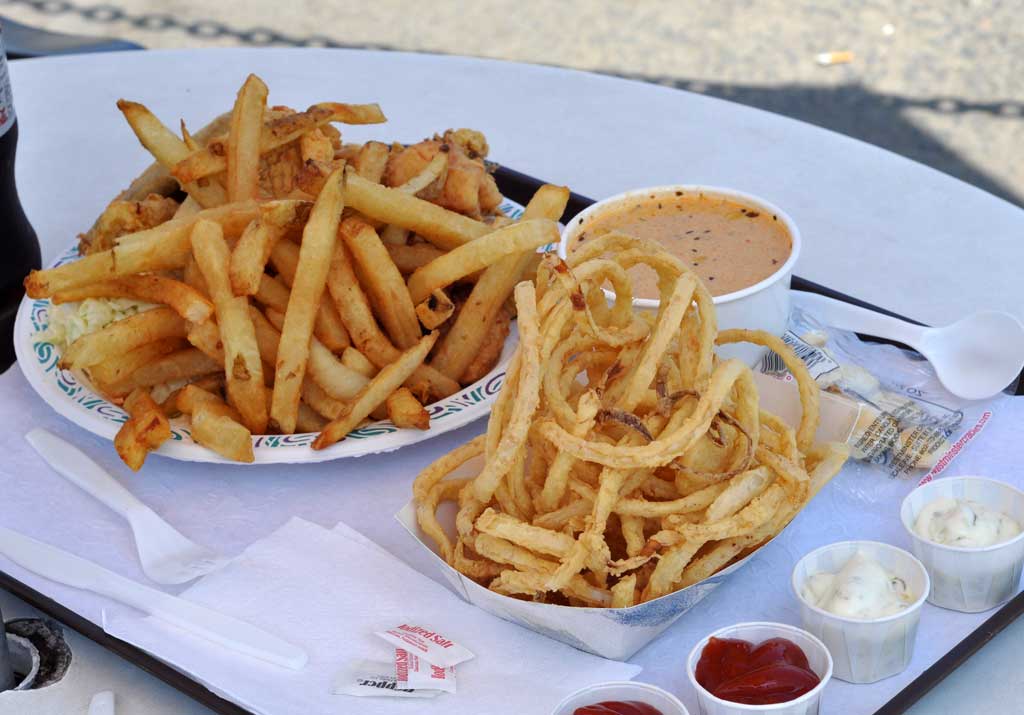
During the week, Wollaston Beach is pretty empty. There is a lifeguard watching over the crowd, such as it is. While we are not big on sitting in the sun in an attempt to alter our DNA, we are all about finding great fried clams.

If we were up in Essex we would find our way to Woodman's. When we are in Quincy, we stop at the Clam Box. Today we went all out for lunch: spicy crab/corn chowder, fried onion rings, and the seafood platter. It was way more food than we needed and all of it was excellent.

For us, this mini-vacation (a half-day in the middle of the week) to Wollaston Beach was a nice alternative to driving all the way to the Cape. We got the same salty ocean breeze, the fried seafood, and the walk along the beach... all without a traffic jam. [Permalink] - Wollaston Beach, Quincy
|
|
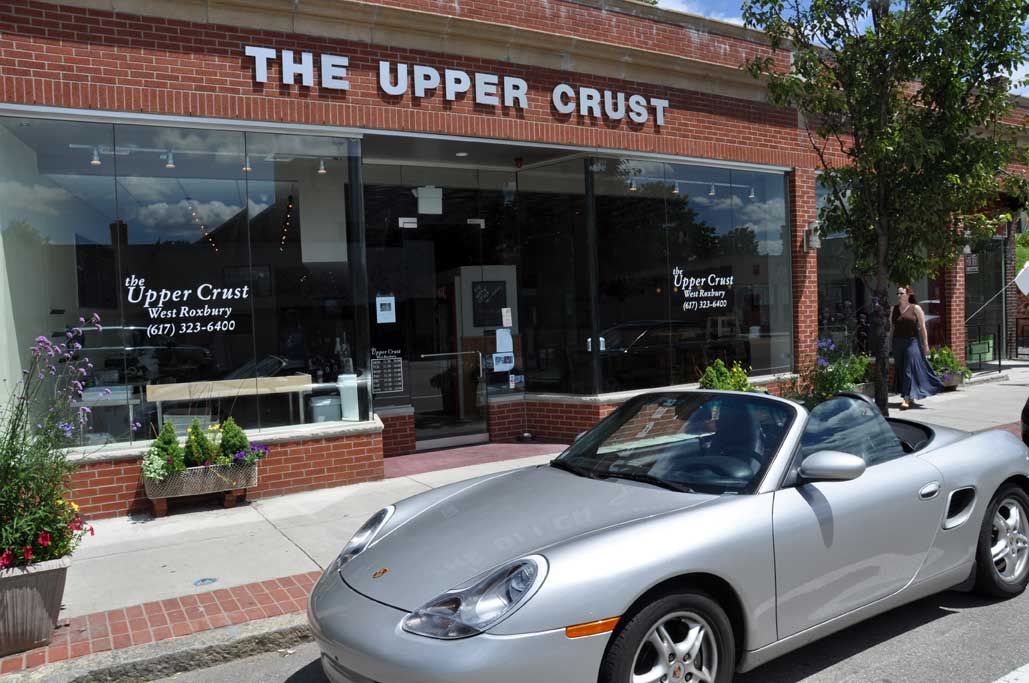
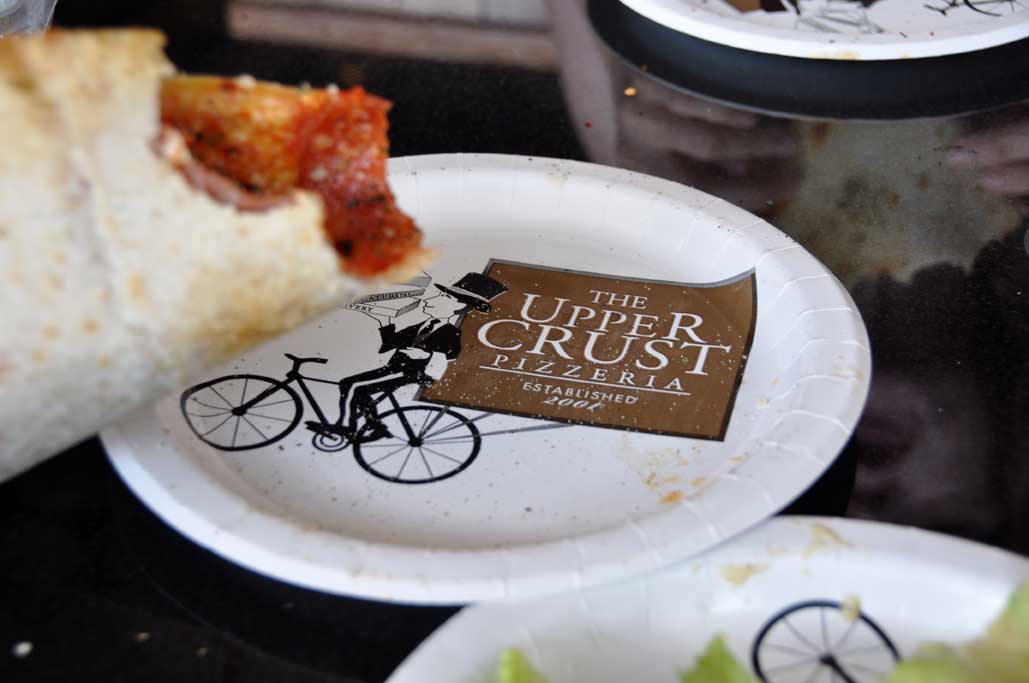
Pizza is something we love. We make it fresh, we buy frozen ones from Trader Joes, and we go out and try any and all pizza restaurants whenever we happen upon them. Our favorite kind of pizza is the thin crust style made with fresh ingredients. A few months ago, our favorite Chinese restaurant burnt down. We got very sad :-( A few weeks ago, we heard that a new pizza restaurant had sprung up in the ashes. We became very excited :-)

Some of the folks here had heard of a local chain called The Upper Crust. None of us had ever been in one. When we had heard that it had opened, we went at the first opportunity.

The old Chinese restaurant (the food was good, but the decor was pretty depressing) had been completely gutted and redone. The first thing we noticed was the bright and airy layout. The large glass front really opened up the space. We loved how they decorated the ceiling with pizza pie pans. Very fun and modern.
The Upper Crust serves traditional Neapolitan-style pizza (thin crust, chunky sauce). They have a lot of interesting topping combinations on the menu. Since this was our first time, we wanted to try something basic: cheese, cheese+pepperoni.

We were not disappointed! The crust was thin but tasty, the sauce had plenty of tomato-y goodness, and the pepperoni had just enough kick to stand out without overpowering anything.

If you like pizza, live in the Boston area, and have not tried The Upper Crust, you really need to get yourselves out to one ASAP. We are happy there is now one less than a mile away from the office. In fact, if they put in WiFi, we may just relocate our office to the restaurant. [Permalink] - The Upper Crust
|
|
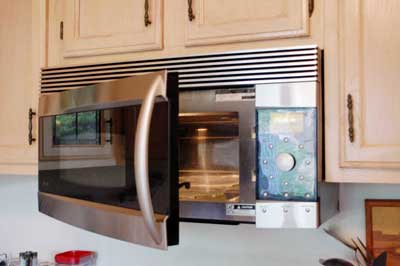
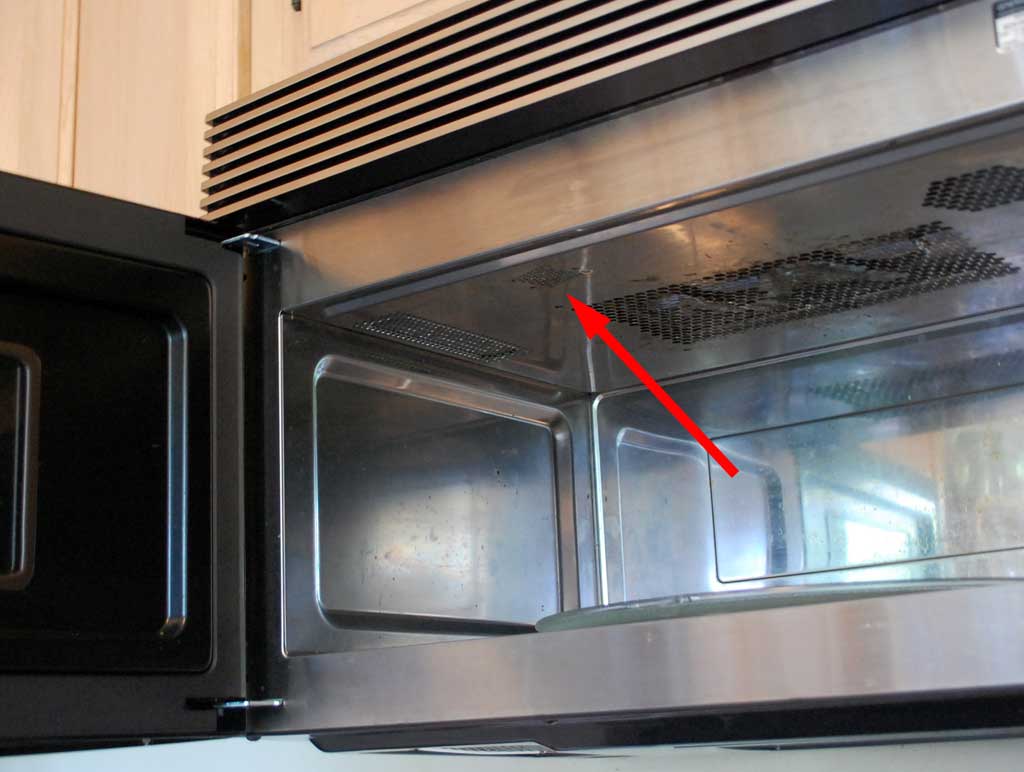
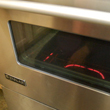
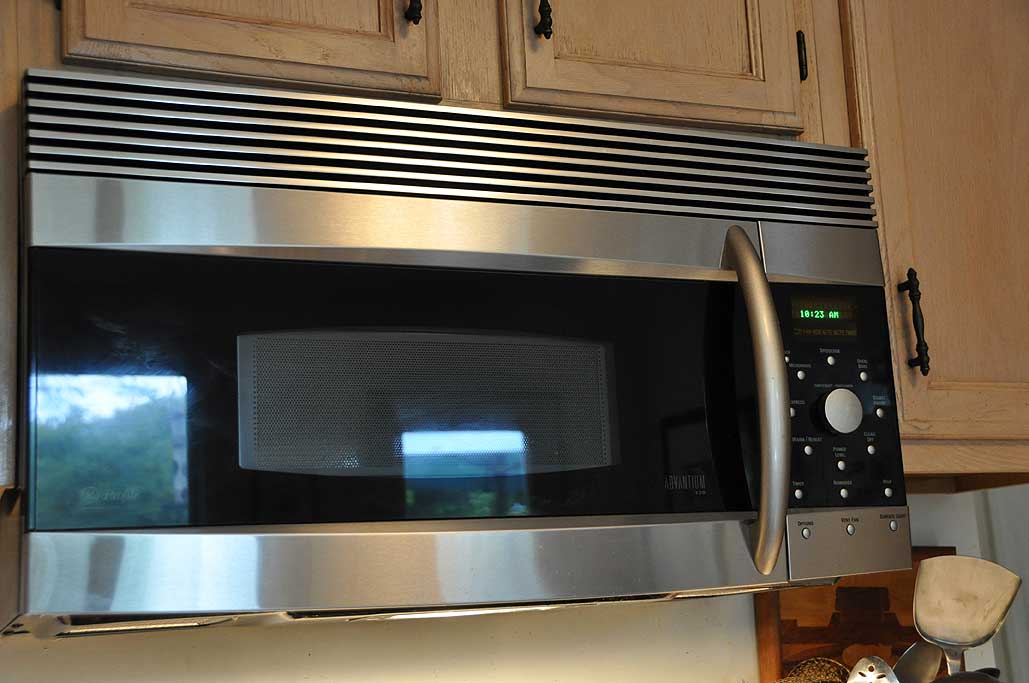
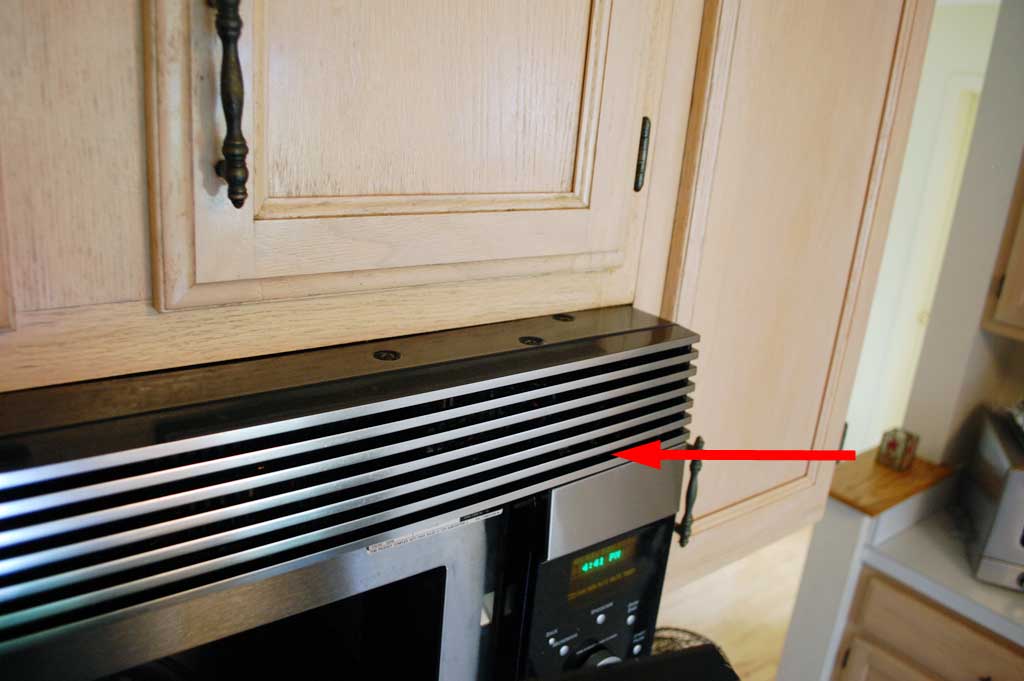
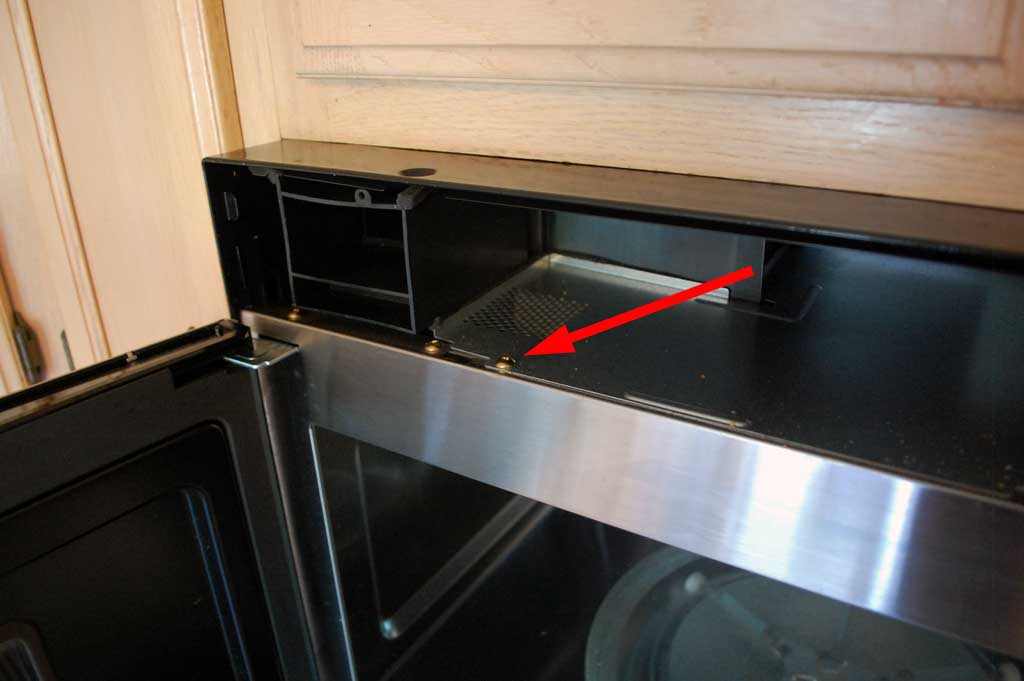
The internal light of our GE Advantium oven went out a few weeks ago. It seem like is should be a simple enough task to replace a bulb. However, upon closer inspection, there did not appeared to be a way to get at the burnt out bulb from the inside of the oven. We figured we would give GE tech support a call to see if we were missing something obvious. The person at the GE service desk was very nice, but they got confused and thought we were asking about the lights under the unit. Once we made it clear that we were inquiring about the light which should come on when the door opens, they "explained" that it was not a "user-serviceable" part. If we would like to schedule an appointment, they would be happy to send a techician out to change the bulb ...for $200.
The obvious question to ask was..."just how many GE technicians does it take to change a light bulb?" They apparently did not see the humor in that question and the conversation soon ended. We thought there was no way we were going to pay someone to come and change a light bulb even if it was free, let alone for $200! If a technician can do it "in the field", then there must be an easy way to get at the bulb.

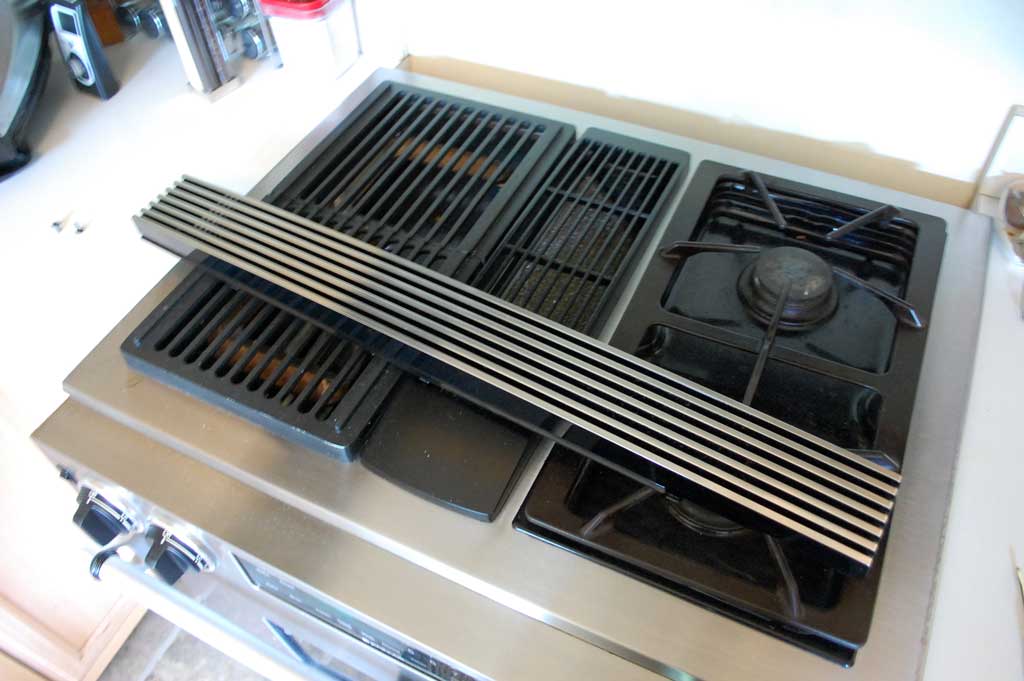
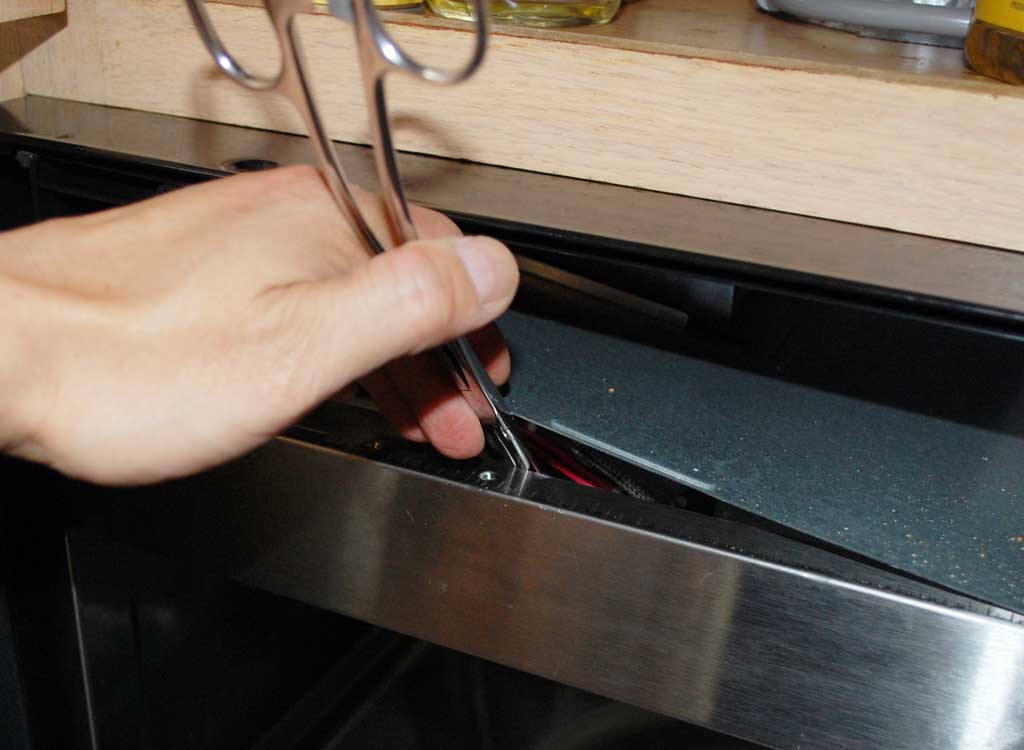
With the AC plug disconnected and the power to the unit verified "off", we went to work. As the bulb was located at the upper part of the inside of the oven, taking the grill off seem to be a sensible first step.
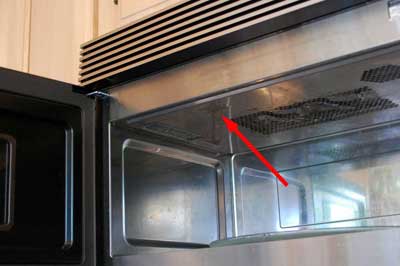
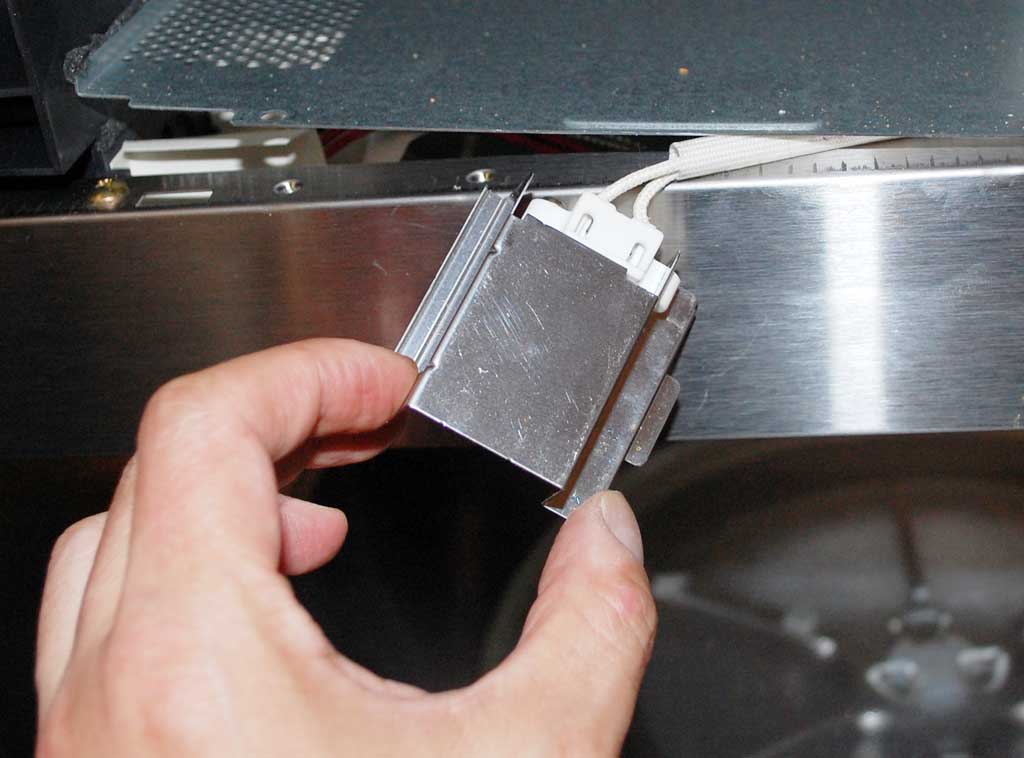
There were a few machine screws accessible from the top of the unit. The two front ones anchored the grill in place. Removing them loosened the grill, but for some reason it would not lift free. There was one more screw in the right front of the grill which was somehow holding on to the grill. When we loosened the screw, we heard a "pop." The screw would not come out, but we were able to free the grill.
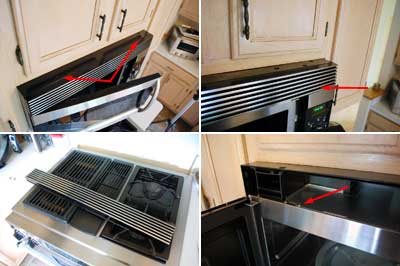
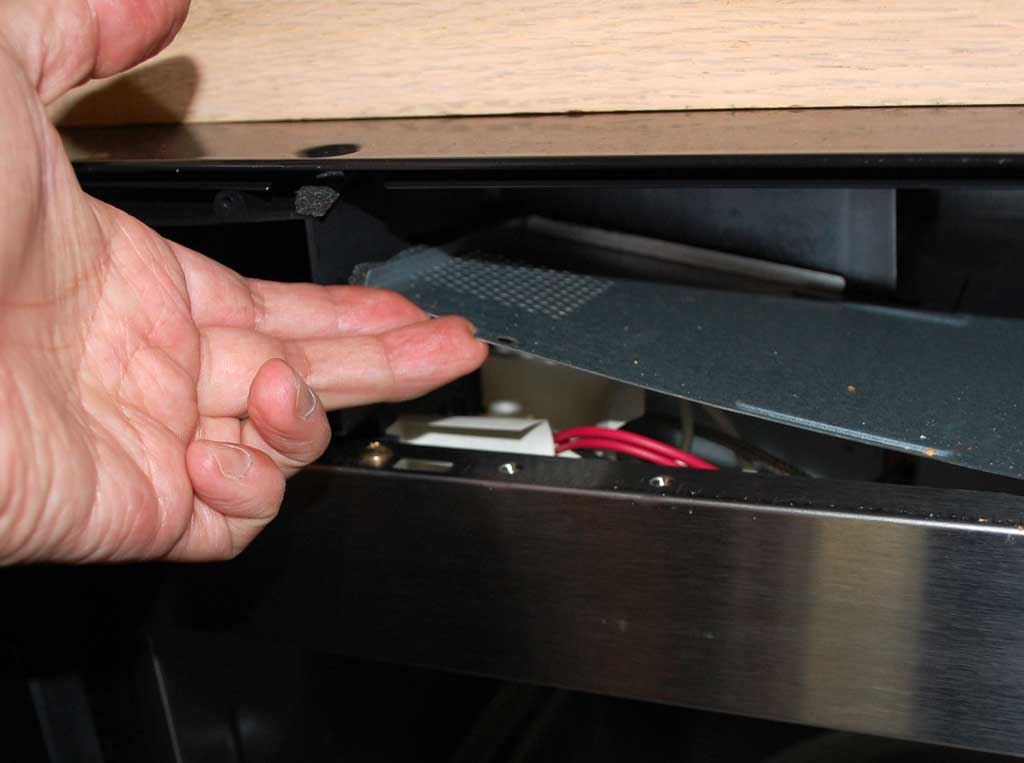
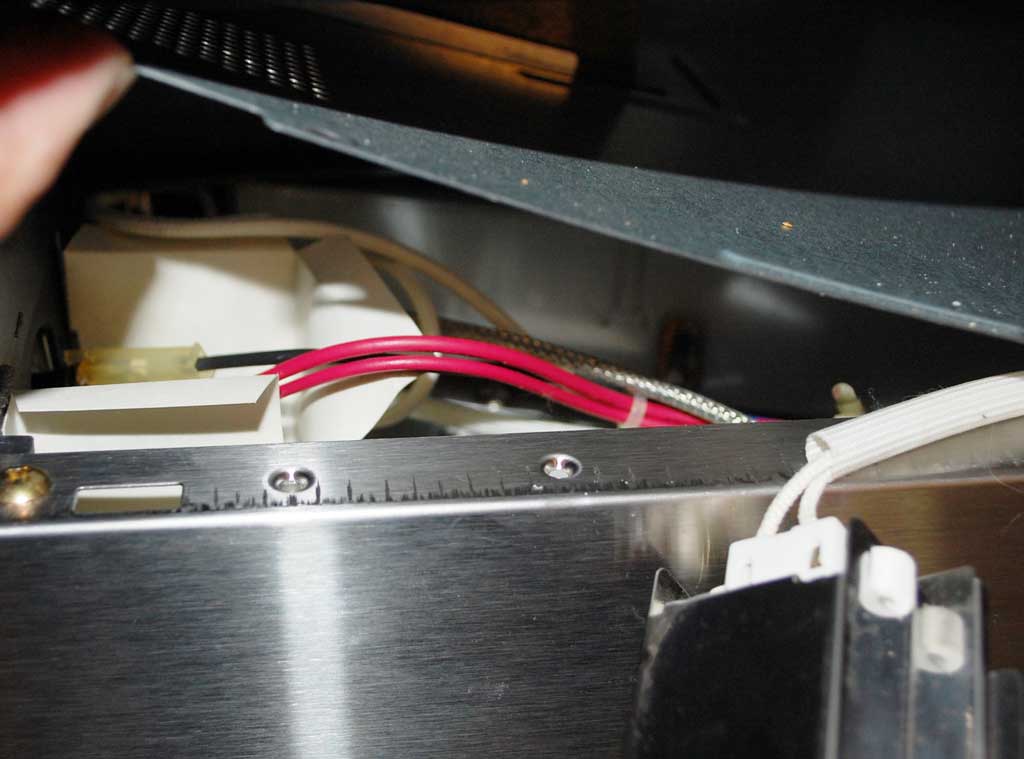
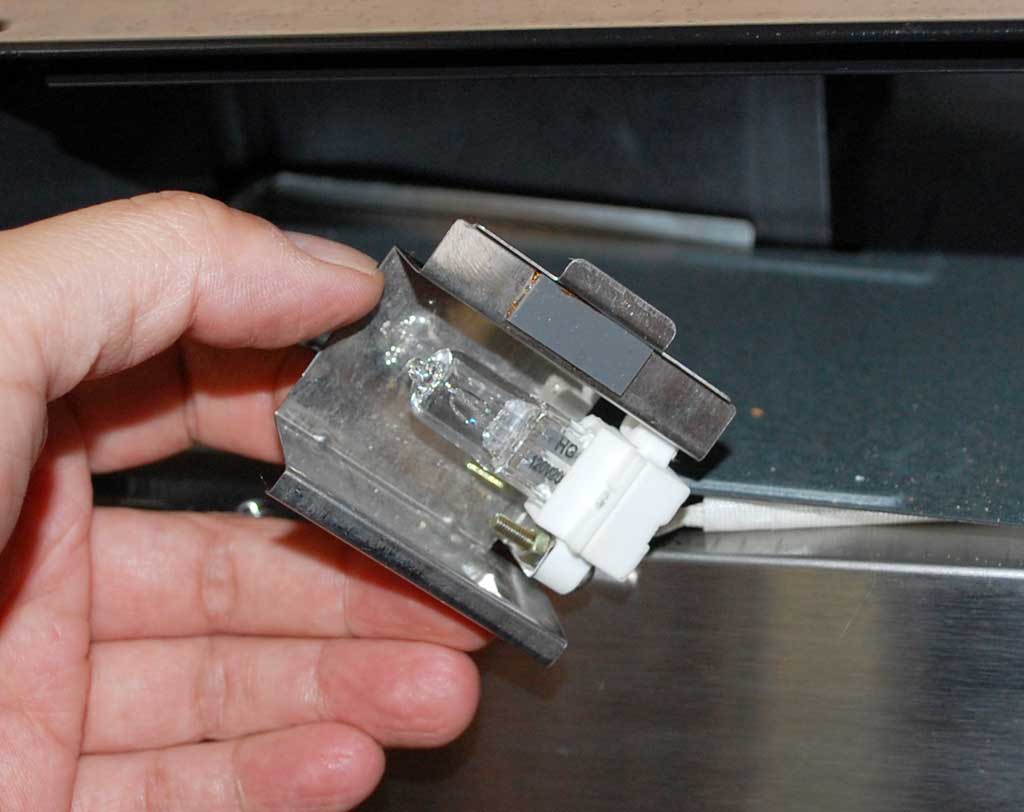
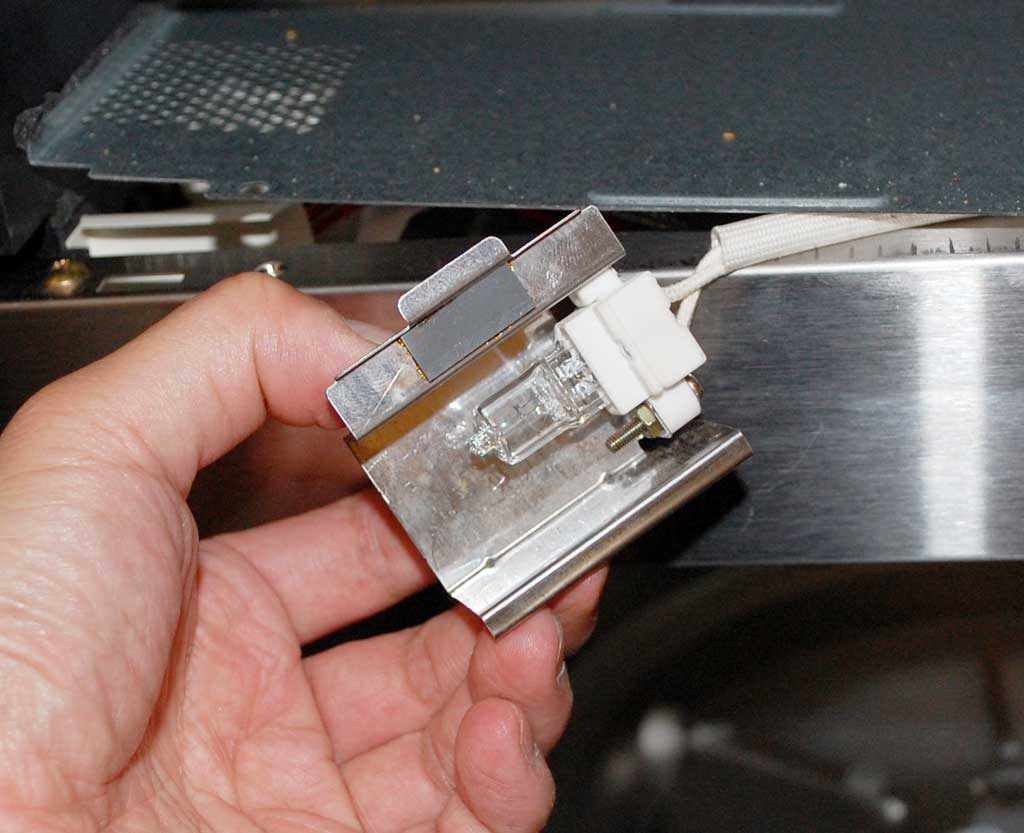
Looking inside the uncovered compartment, we saw a large screw holding a metal panel in place. The panel did not appeared to be removeable, but we were able to lift it sufficiently to see the bulb socket. The assembly did not look like it was screwed down and with a little bit of fiddling we were able to extracted it. Readers with large fingers may have difficulty fishing out the socket assembly, but our interns have small hands so it was not a problem.
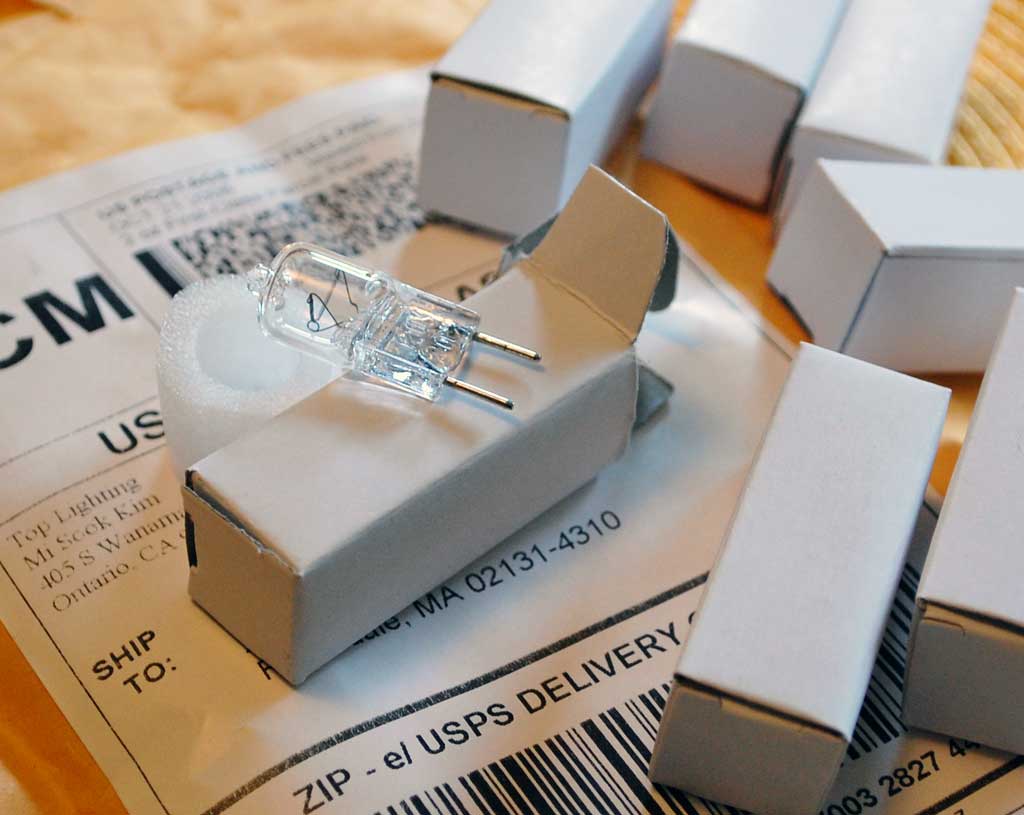
The bulb was a standard 120V/20W G8 JCD-type halogen. Prices of these bulb varies greatly ($20 @GE parts store, $5.99 @Home Depot, $1 @EBay). We had purchased a bunch of them on EBay ($1.15 each + shipping) a while back as they are commonly used in many of the lighting applications around our office.

Upon closer inspection of the light socket, we realized it was held in place by the spring-like cover. This realization made it easier to get the the assembly back into position. All we needed to do was to slide one side in place and use a long thin tool to lightly push the other side until the tab went into the slot.

We did do a quick test of the bulb before putting the assembly back into place. One thing to remember is that halogen bulb get VERY hot very quickly. Definitely let everything cool down before touching any part of the socket. Unlike the removal, the reattachement of the grill went without any problems. We didn't even have to mess with that screw in the front. This project only required simple tools, but as we had stated...small hands will make it easier to fish out the light socket.
We can understand that some readers may be uncertain about sticking their hand into a bunch of wires and fishing around. For the few brave souls who are comfortable doing DIY projects around the house, this is certainly a manageable repair task...especially at a savings of $200! [Permalink] - Advantium Bulb Replacement
|
|
|
Yesterday we were in Chatham to get a glimpse of the damages left by last week's storm. On the way home, we came upon a little bakery called Marion's Pie Shop.

The make all of their baked goods from scratch: breakfast treats, fruit breads, and lots of different kinds pies. They have apple pies. They have bumbleberry pies. They have blackberry, raspberry, blueberry, and strawberry pies. They also have savory pies such as chicken, beefsteak, and seafood. All of them are available in 6" or 9" versions. Just re-heat and serve.
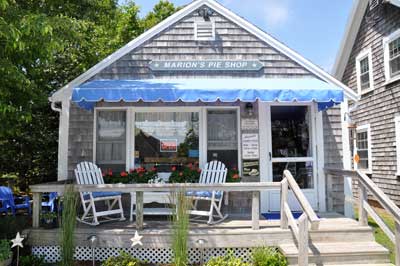
The shop is open year-round, but is closed on Mondays in the the Winter time. If you find youselves out in Chatham, you should definitely stop at Marion's Pie on Rt28. The store is easy to find.

We had some of the blueberry pie for dessert last night...delicious. The chicken pie w/ gravy will be for dinner tonight. While it was curiosity that got us down to Chatham, Marion's Pie Shop may be the thing that will keep us going back. [Permalink] - Marion's Pie Shop
|
|
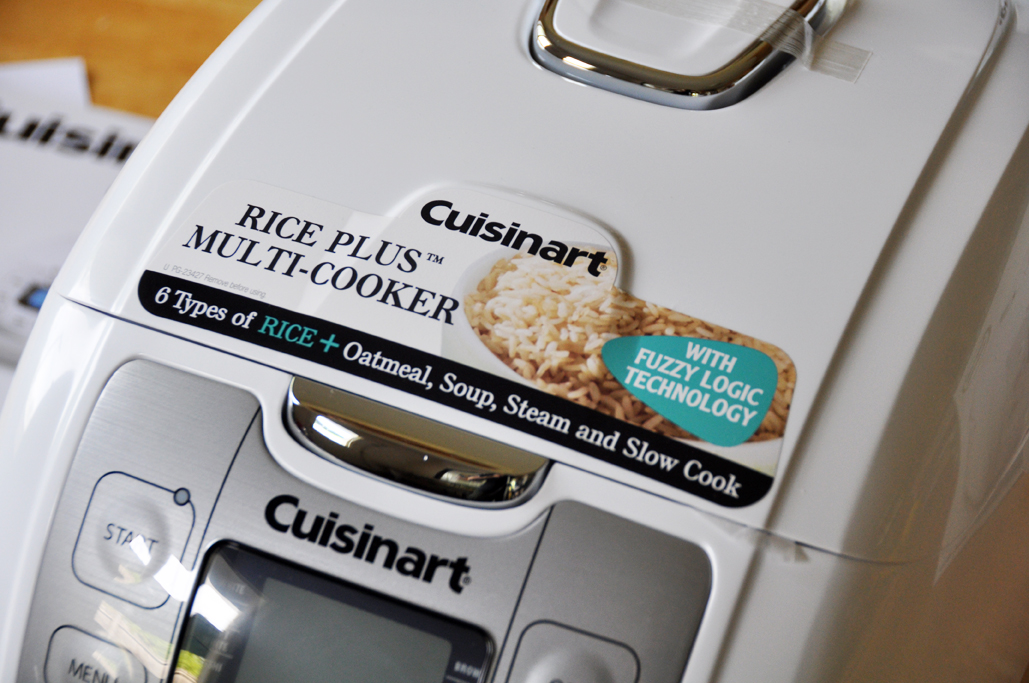
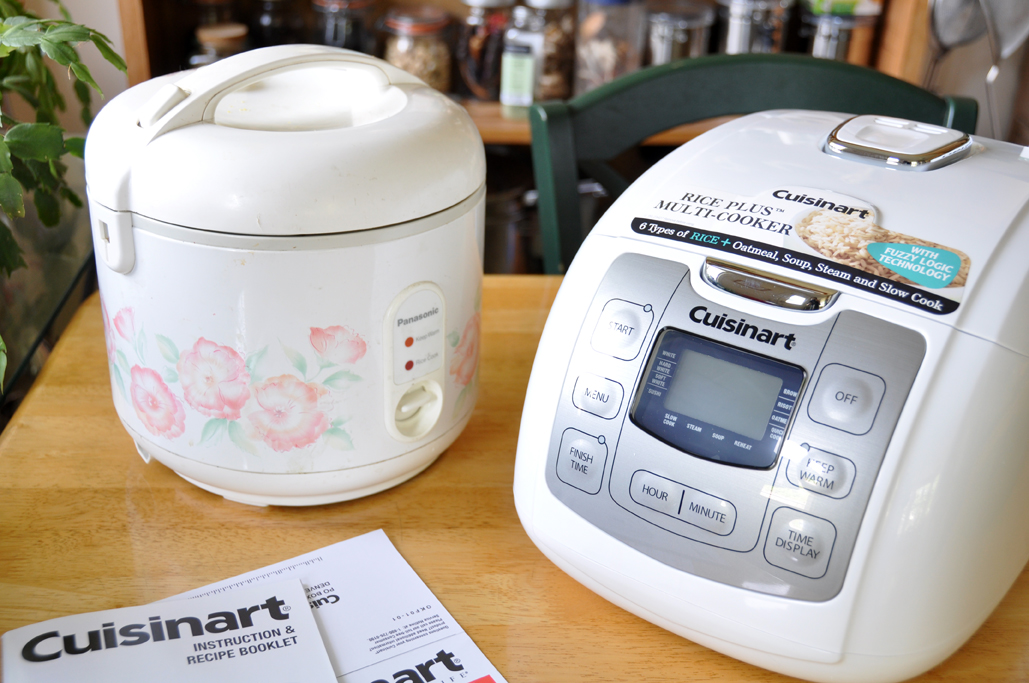
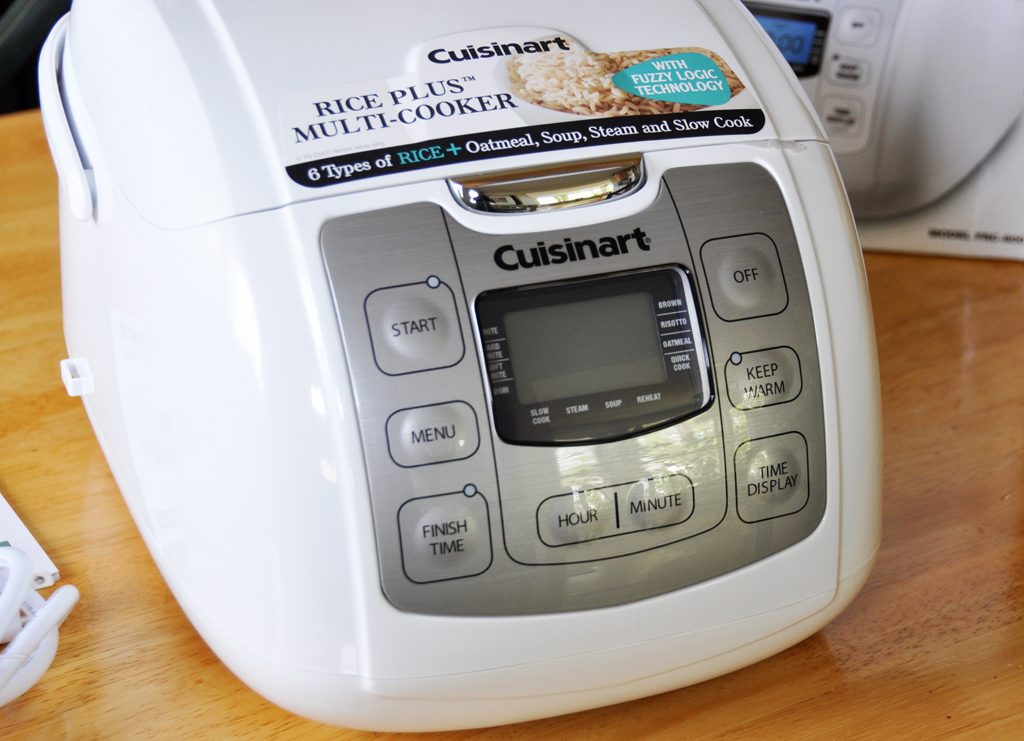
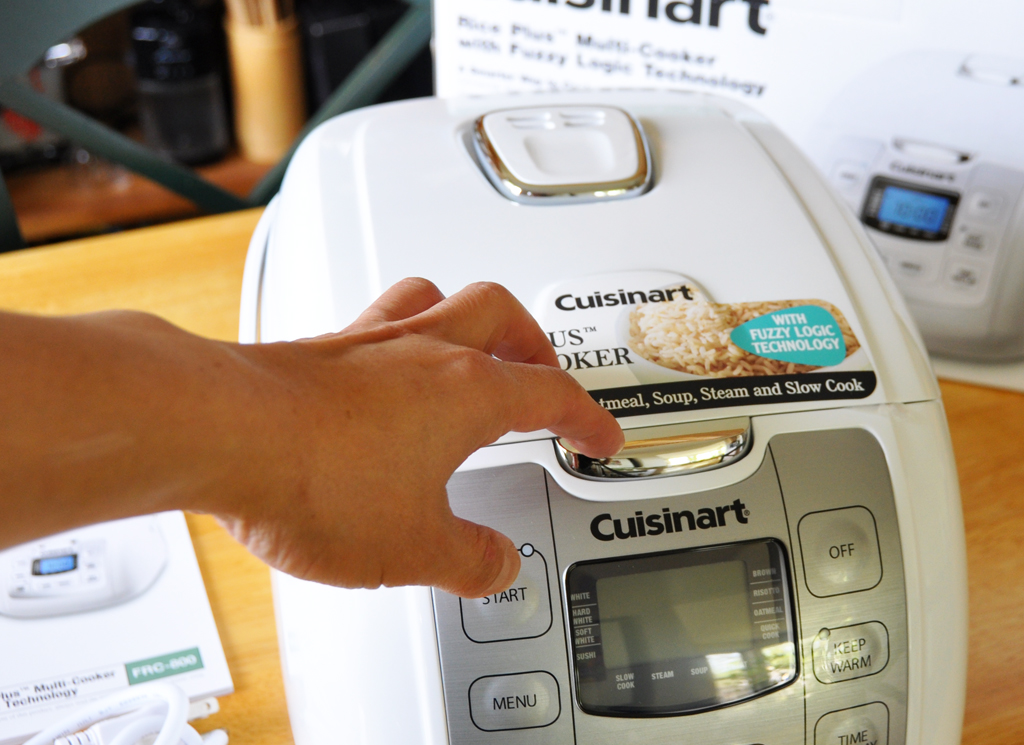
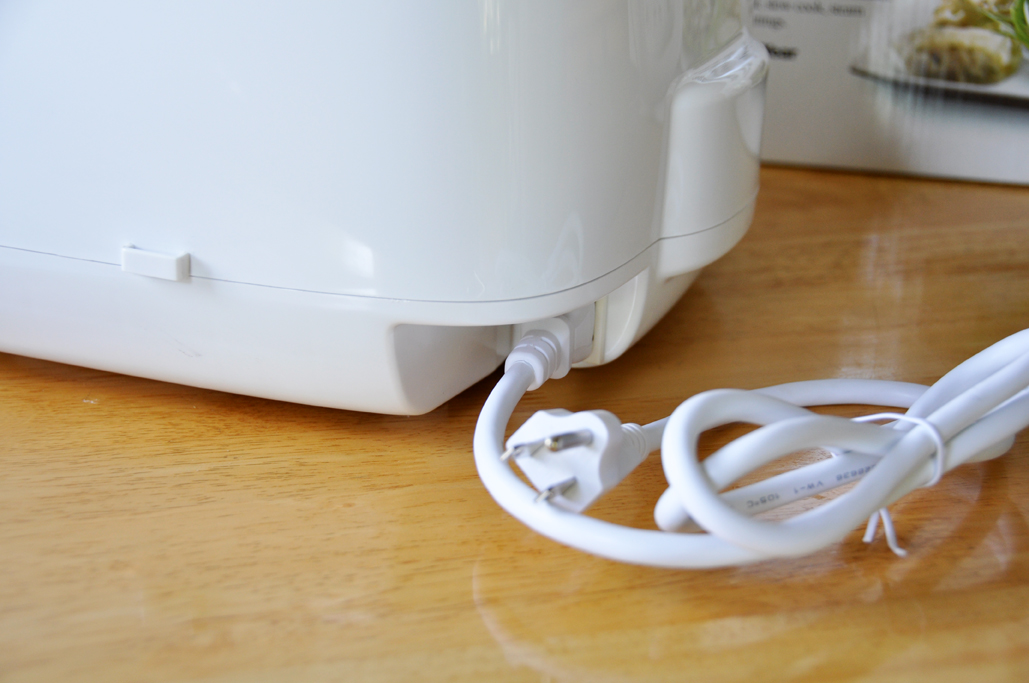
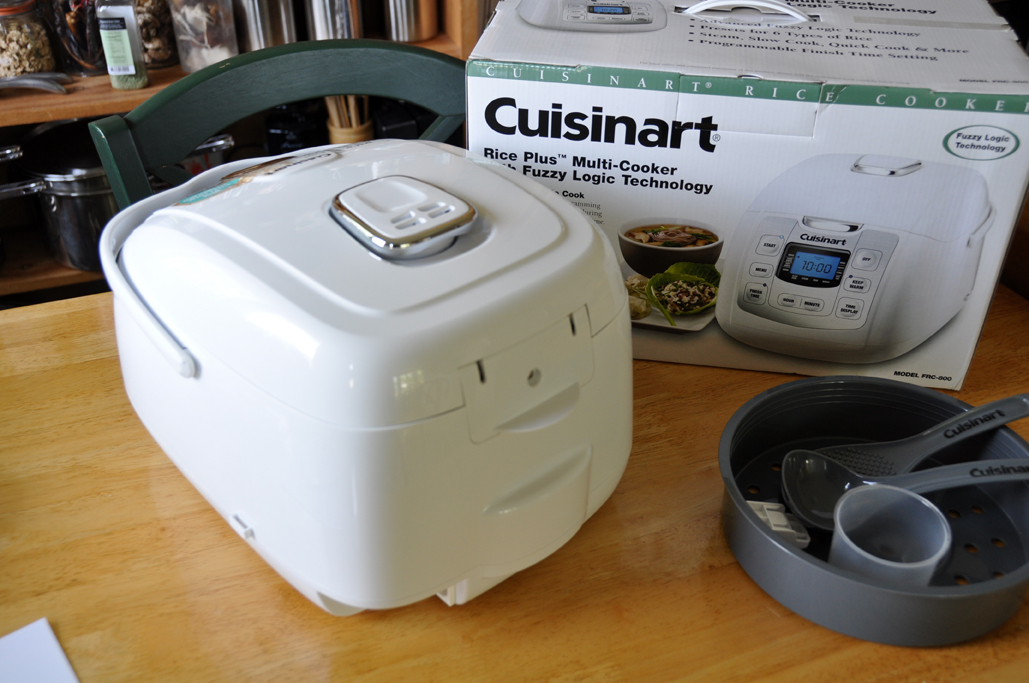
We unpacked the Cuisinart Rice Plus Multi-Cooker this weekend to familiarize ourselves with the device prior to the upcoming FirstGrill event. This Cuisinart cooker is no ordinary rice steamer. It is a new generation of "smart" kitchen devices that "know" how to optimize cooking time and heat depending on the ingredients. This is the kind of gear that you, our RainyDayKitchen readers, have asked us to tell you more about :-)

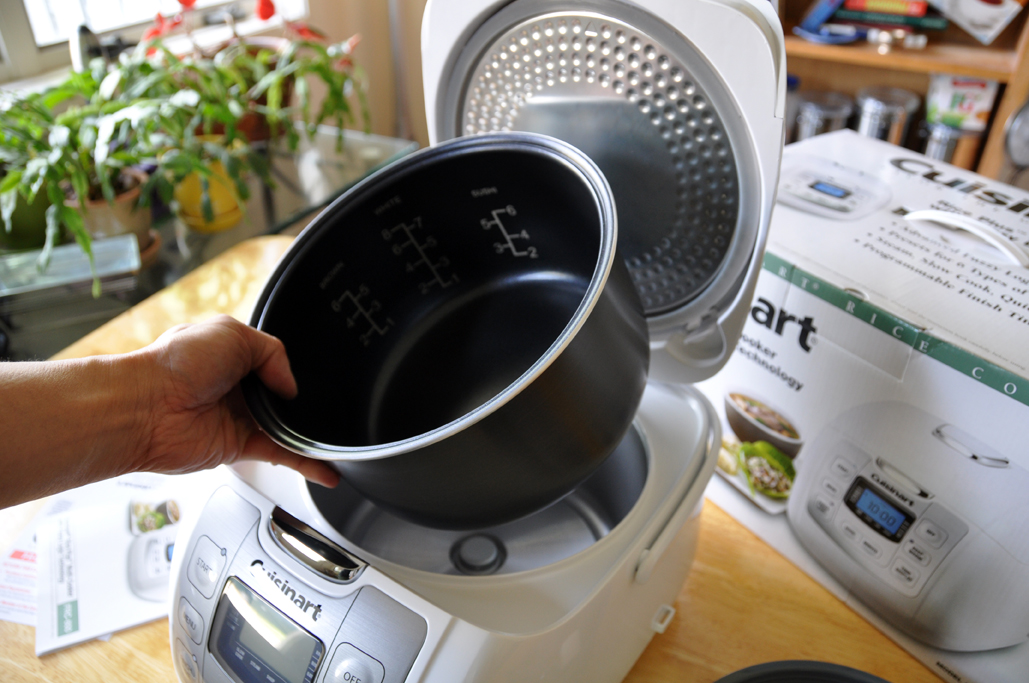
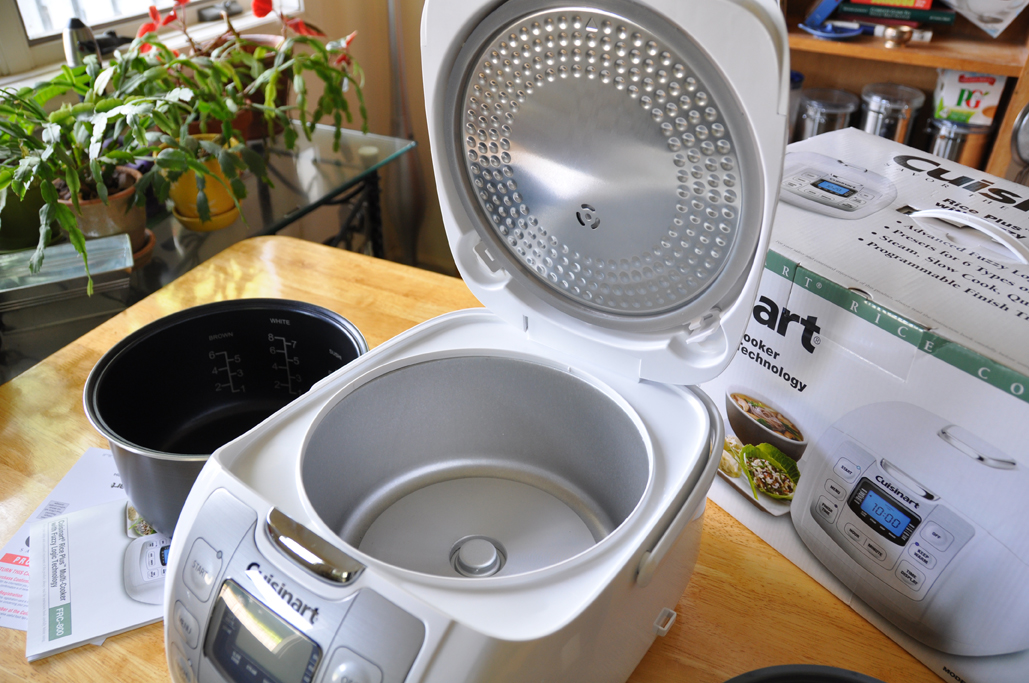
The Cuisinart unit is about the size of large bread box and will fit nicely on most countertops. The top of the unit opens easily with a push of a large centrally located release button. The cooker comes with an integrated steaming tray, measuring cup, and utensils.
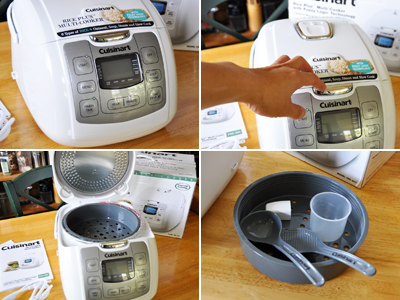
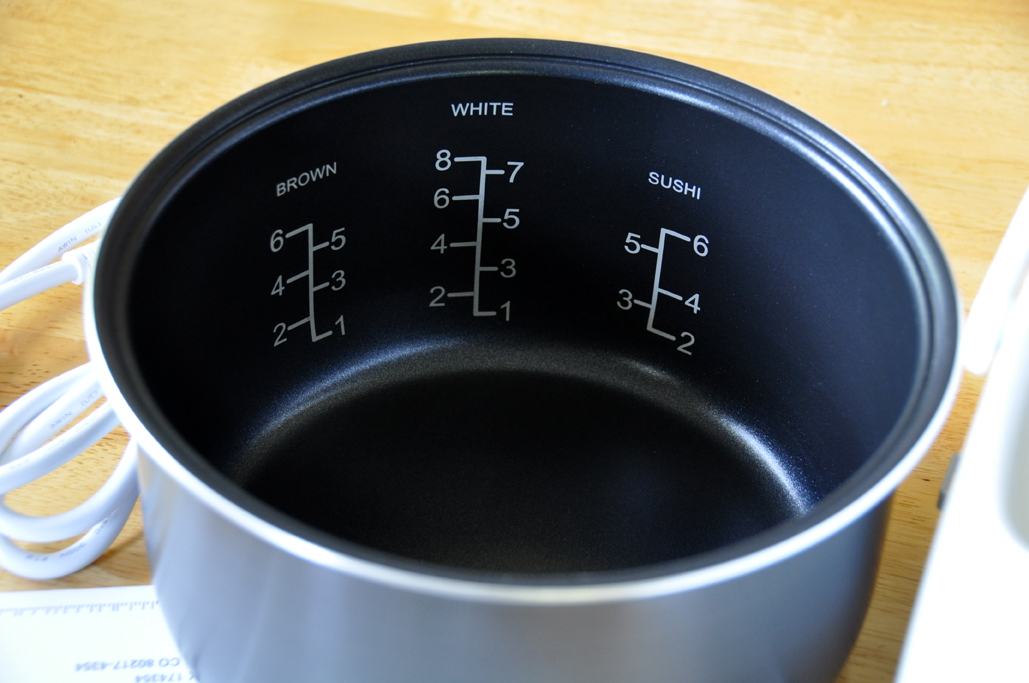
The removable pot is made of light weight aluminium. Its interior is calibrated and coated with a nonstick surface. This is convenient for clean up, but also good for pan-frying ingredients for soups and stew without having to use another pot. The heating element at the bottom of the cooker is sealed so wipe up of any liquid should be easy.

The front panel controls are large sealed push-buttons. There is a LCD panel for time and other info display. The pressure release valve is at the top of the cover and the AC cord plugs into the side of the unit. Note the integrated carrying handle for portability. Nice touch.
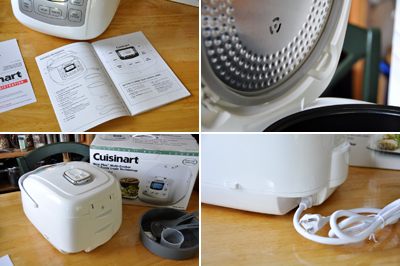
We like the overall look, functional design, and esthetics of this Cuisinart cooker in this FirstLook. The control layouts are logical. Its lines are soft but the feel of the unit is solid.

We will be using the Multi-Cooker and our regular cooker for some of the side dishes. It'll be interesting to see how they compare. There will be a full report in a few weeks. [Permalink]- Cuisinart Fuzzy Logic Cooker FirstLook
|
|
March 28,2009 (WeekendEdition) |
Newport Rhode Island is known for its Cliff Walk, the Tennis Hall of Fame, and blocks and blocks of mansions. These are all great reasons for a day trip from Boston.


However, the BEST reason to drive to Newport maybe for the food at Annie's diner. The menu offers standard fare, but the taste is out of this world. We are not sure what they put in the eggs with sausages, but they were the best we've had in a long time.

If you are within driving range of Newport, it is a great day trip. If you are hungry when you are there, definitely make your way to Annie's. Breakfast is served all day. [Permalink]- Breakfast in Newport
|
|
March 26,2009 (TurnOnTheLightsThursday) |
Some here have been complaining about the flickering light in the RainyDayKitchen. The problem was not serious enough to make it on the RainyDayRenovations Project list, but it was always in the back of our minds.
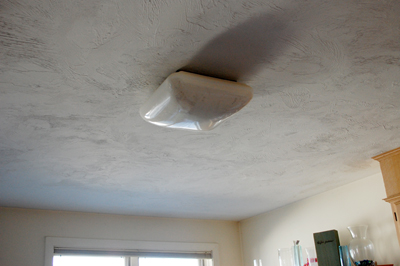
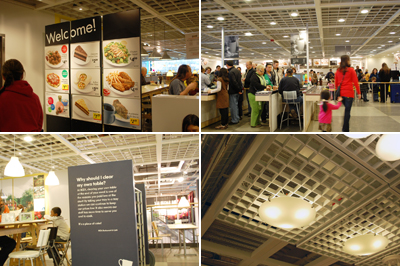
This past weekend, a few folks went to IKEA for lunch (cheapest place to shop AND eat) and saw a perfect replacement for the annoying, and some would say ugly, overhead light in the kitchen.
Since the lamp they saw was under $30, they didn't bother to get approval from the bean counters. The Finance folks approved the expense even thought they had not pre-approved the purchase. It is unbelievable the amount of paper work we have to do around here.
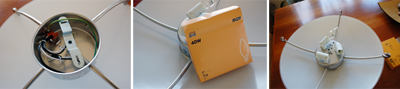
The great thing about IKEA products is they are all designed with DIYers in mind. The construction is simple, their instructions are clear, and the installation usually quick and simple. This overhead lamp was no exception.
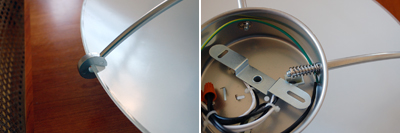
The base holds three 40W bulbs. The glass shade is held in place by four arms. One of the arms is spring-loaded so it can move to secure the shade.
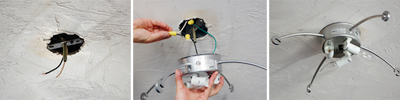
We turned off the main circuit to the kitchen before we started the work...doing the project during the day helps because the lights will be off :-) Attaching the base to the old spot was a simple disconnect/reconnect of the three wires (white, black, ground). The trickiest part was getting the main post to come through the base so we could attach secure it with the nut.
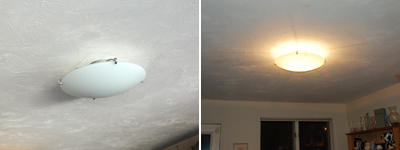
We were done in about 15 minutes. Since we did not have to cut or drill anything, there was nothing to clean up. The light came on when we reset the breaker and hit the power. The flickering has been permanently removed and the kitchen now has a much warmer glow. Thank you IKEA. [Permalink]- Let there be light
|
|
March 25,2009 (WowUsWednesday) |
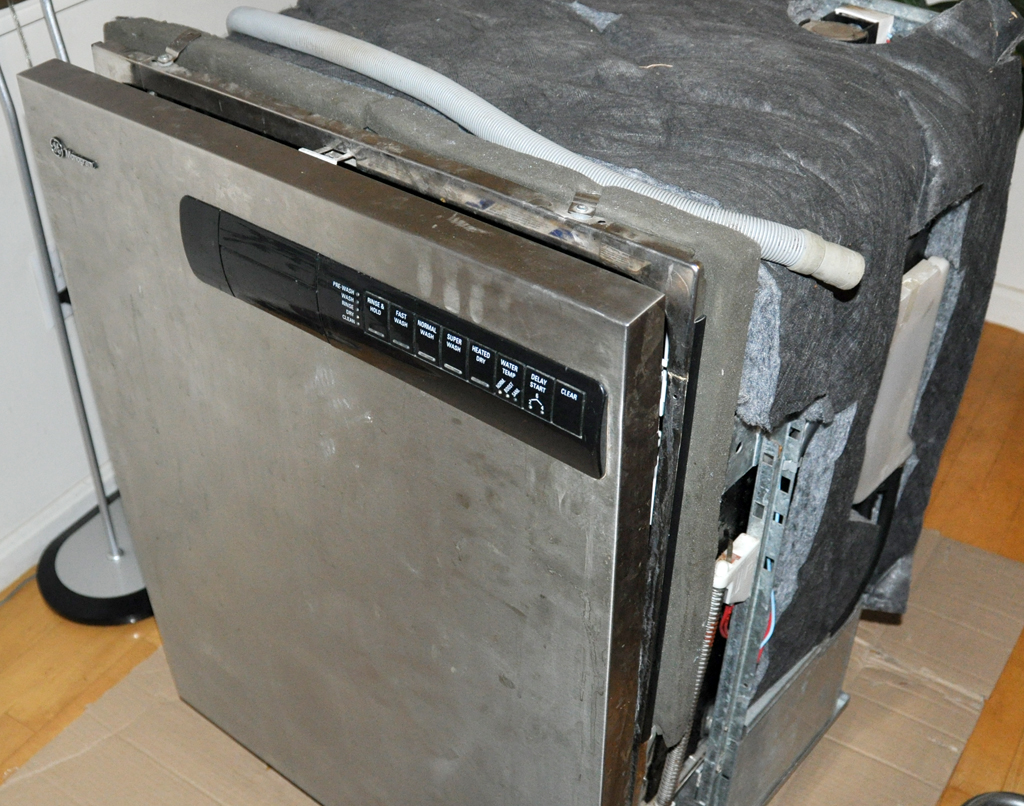
One never knows what gets put out on the sidewalks of Boston on trash day. OK, most of it is trash, but once in a while, you find a $1000 stainless steel dishwasher along with the usual crap.
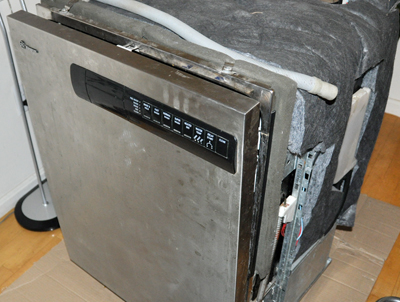
This one was discovered by one of our editors while surfing Craigslist. It was listed as .. "free, first come first served. The only problem is that it leaks...already out on the sidewalk. " Well, nobody here could pass up a deal or challenge such as that!
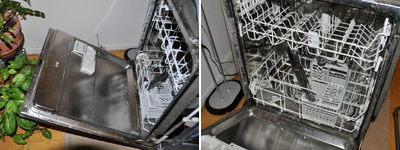
We were on our way to Rhode Island, but Jay (one of our editors) offered to go pick it up. By the time we got back, it was out on the back deck!

The machine looks to be in pretty good shape. No scratches or dents. It was stainless steel both inside and out. There was no rust anywhere, but it could use a cleaning around the edges.

We have no idea of the mechanical state of this machine, but we now have our Spring RainyDayKitchen/RainyDayRenovation project! How hard could it be to fix a leaky dishwasher anyway? We'll let you know. [Permalink]- Free is Good
|
|
March 15,2009 (WeekendEdition) |
Cupcakes are a hit at any family gathering. Often they are served from a tray, but for a special occassion our RainyDayKitchen folks thought it would be fun to go the extra step.

This weekend they are going to a b'day party to help one of the editor's mom celebrate her 80th. It's a big family and there will be LOTS of homemade food. Instead of standard size cupcakes, they thought it would be better to make smaller bite-size ones.


They made about sixty little cupcakes and made the interns decorate some of them. To display the decorated ones, they stacked them on a four-tier stand to create a mini cupcake tree. Some of us didn't know such a thing even existed :-)

The next time you find yourself looking for an alternative for the standard cupcake presentation, consider the Cupcake Tree. It is easy to set up, practical to use, and will make the cupcakes even more inviting! [Permalink]- Cupcake Tree
|
|
Feb 11,2009 (WhatTodoWednesday) |
Looking for a great Boston neighborhood restaurant for Valentine's Day? Sophia's Grotto would be our first choice. Two appetizers, two entrees and a bottle of wine for a fixed price of $59.95. Go here if you want to check out the fabulous Valentine's Day menu!

The special menu is only for Thursday and Friday nights. Reservations are required. [Permalink]- Sophia's Grotto |
January 10-11,2009 (WeekendEdition) |
The forecast for this weekend was snow...about 8 inches of it. The white stuff was scheduled to starting falling around 7PM on Saturday night, and snow emergency parking was already in effect in Boston by the afternoon. This was a major bummer as we had after-holiday-season holiday party plans for Satuday night. When we saw no signs of flurries at 6PM, we decided to chance it and made our way over to the party. We were glad we did!

Two of our contributing editors have been hosting this annual event for many years. The highlight of the evening is always a Yankee Swap that brings out the "competitive" gift-swapping nature in all of the guests. This year was no different.

However, the non-disclosure we signed prevents us from revealing the full extent of the .... needless to say, we can dress up as adults, but they can't expect us behave like grown ups :-)

The storm did finally show up around midnight. The drive home was beautiful. When we checked the amount of snow in the morning, the local weather folks were correct. There were about eight inches of fine power on the ground. [Permalink]- Yankee Swap |
|
|
|
|
|
|


