We are starting a tradition of replacing our Oakley lenses on the Solstices (Summer, Winter). Summer officially started on Monday, but we didn't get around to it until today. We replaced the OEM lenses we had on these Oakleys in November with lenses from ExoVista because they had gotten scratched up pretty badly by our not using the microfiber case when stashing them in the door pocket of the car: the sunglasses bounced around and got nicked up enough to obstruct the view during wearing. We were more careful these past six months and the ExoVista lenses those came through unscathed.

In March, we told you about the Oakley replacement lenses made by Caulfield of New Zealand. They were the least expensive ($35) replacement lenses available on EBay. So we were naturally curious as to how they would measure up. The FirstLook was promising. Now it's time to see how well they fit the frame. After six months of use, we will know how durable they are.

We have detailed the lens removal/installation process a few times (Oakley, ExoVista) so we won't dwell on the obvious steps. Suffice to say, use the right tools (Torx T6 bit) and work on an uncluttered surface because the screw and gasket will fall out and to quote Treebeard, they are "very very small." This time we will try to give a few tips on how to make the procedure easier to do.
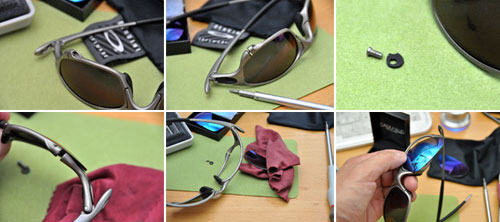
The easiest way to remove the lens is to first pop out the edge closest to the arm because that area has the most give. Once the lens was no longer entirely in the frame, we gripped the lens with a cloth and slid it out. We encountered more resistance with the ExoVista lens than we had with the Oakley one, but was able to remove it without causing the lens or the frame any damage. To put the the new lens in, we reversed the steps and started by anchoring the edge closest to the nose piece first and working our way toward the screw end.

These new lenses fit perfectly. While doing the lens replacement, we did make a new observation which might save folks some headaches: the rubber gasket is not symmetrical. When everything has been reassembled, there should not be any bits sticking out. If it is protruding, it probably means that it was put in reverse and needs to be flipped.

We will be wearing these ice blue lenses from now until the Winter Solstice. We will try to remember to store them in the microfiber pouch when not being used, but they will not be handled any more delicately than they have had in the past. We'll see in six months time how well these lenses stand up to the wear and tear of daily use. If you want to get yourself a set now, head on over to EBay, search for seller "bigdaddyjj" and tell him the folks at RainyDayMagazine sent you :-) [Permalink] -Caulfield Lens Installation
|

